前言
接口自动化测试,是所有测试人员必备的一项技能,建立一套稳定、可用率高的测试用例集,能够帮助测试人员提升测试效率,是日常工作中不可或缺的小技能。本文主要基于业界使用广泛的TestNG框架进行展开,介绍TestNG在实际工程实践中的应用。
众所周知,TestNG之所以能够作为一款优秀的测试框架被广泛应用,主要在于其具备Annotation、依赖性测试、支持并发测试、支持错误重试、用例管理、以及测试报告的自定义等特性,能够帮助测试人员对测试用例进行高效的管理和维护,看看如何基于TestNG框架解决测试过程中的一些痛点。
痛点
- 自动化case多,用例执行顺序混乱。
在测试过程中,常常会遇到场景A依赖于场景B的情况,举个栗子:
当我创建了一个typeA的广告,针对广告A我需要创建一些创意,关于typeA广告的case执行完成后,需要删除typeA广告。再创建typeB的广告,再执行typeB广告的case。但是在使用testng过程中发现,在同一个测试类中,@test默认测试方法的执行顺序是按照方法名的首字母升序排序执行的,这就会导致在执行typeA广告相关case执行了一半后,又去执行typeB广告相关的case。而我们针对case执行的前置条件,是以group维度进行配置的,那么就会出现在执行typeA相关的case时,typeA的广告已经被删除了。 - 自动化不稳定
在自动化用例的实际应用时,经常会出现,单独跑一个case的时候,是成功的,而跑全量case时,经常会出现部分case失败的情况。 - 异步接口多,等待耗时过长
在一些高并发场景中,服务器需要处理的事务较多,很多接口采用的是异步调用的方式,等待时间不确定,常常导致接口的返回结果和预期不符,断言失败。
那么接下来主要针对以上几点,介绍一下以上问题的解决方案。
痛点解决方案及优化
- 自动化case多,用例执行顺序混乱
针对这种现象,TestNg其实提供了很好的解决方案:
- Method1.
在testclass维度,可以通过testng.xml来进行管理
如上,通过presever-order这个属性,来控制case按顺序执行。
- Method2.
testclass中的每一个case的执行顺序是不受preserve-order控制的,而是按case首字母的顺序来执行。这时就需要通过priority来指定执行顺序(默认值为0),数值越小,越靠前执行。
step1.创建监听器
public class RePrioritizingListener implements IAnnotationTransformer {

    HashMap priorityMap = new HashMap();
    Integer class_priorityCounter = 10000;
    Integer max_testpriorityLength = 4;

    @Override
    public void transform(ITestAnnotation annotation, Class testClass, Constructor testConstructor, Method testMethod) {

        Class declaringClass = testMethod.getDeclaringClass();
        Integer test_priority = annotation.getPriority();
        Integer current_ClassPriority = priorityMap.get(declaringClass);
        //修改当前类中的@test的priority值
        if (current_ClassPriority == null) {
            current_ClassPriority = class_priorityCounter++;
            priorityMap.put(declaringClass, current_ClassPriority);
        }

        String concatenatedPriority = test_priority.toString();
        while (concatenatedPriority.length() < max_testpriorityLength) {
            concatenatedPriority = "0" + concatenatedPriority;
        }
        concatenatedPriority = current_ClassPriority.toString() + concatenatedPriority;

        annotation.setPriority(Integer.parseInt(concatenatedPriority));
    }

}
加这个监听的原因是:priority是在testng开始时候一次性加载进去的,不同类中priority相同的case会一起执行,仍然会出现case乱序的情况。所以需要 implement IAnnotationTransformer 对每个class 的method priority 进行重置。
step2. 在testNG的xml中添加监听
step3.在测试类中添加priority值(默认值为0,数值越小,越靠前执行),并设置dependsOnGroups。
public class TestClassA {

    @Test(priority=1,group = "1")
    public testMethod1 (){
    }
    @Test(priority=2,group = "1")
    public testMethod2 (){
    }
    @Test(priority=3,,group = "1")
    public testMethod3 (){
    }
}
public class TestClassB {
    @Test(priority=1,dependsOnGroups= {"1"})
    public void ttestMethod4() {
    }
    @Test(priority=2,dependsOnGroups= {"1"})
    public void testMethod5() {
    }
    @Test(priority=3,dependsOnGroups= {"1"})
    public void testMethod6() {
    }
}
- 自动化不稳定
自动化不稳定的原因有很多,在case并发执行的过程中,很可能由于环境的原因,会造成我们的用例失败。testNg的IRetryAnalyzer接口可以有效地帮助我们解决此类问题。具体实施步骤如下:
step1.添加监听,实现IAnnotationTransformer,重写transform方法。
public class RetryListener implements IAnnotationTransformer {

    @Override
    public void transform(ITestAnnotation iTestAnnotation, Class testClass, Constructor constructor, Method method) {

        IRetryAnalyzer iRetryAnalyzer= iTestAnnotation.getRetryAnalyzer();
        if(iRetryAnalyzer==null){
            iTestAnnotation.setRetryAnalyzer(CustomRetry.class);
        }
    }
}
这里做的工作就是扫描所有的@Test方法是否具有retryAnalyzer属性,没有则为其设置重试属性(即@Test(retryAnalyzer = CustomRetry.class))。而具体的重试机制,可以通过实现IRetryAnalyzer接口,进行自定义实现。
step2.实现IRetryAnalyzer接口
public class CustomRetry implements IRetryAnalyzer {
    private static final Logger logger = LoggerFactory.getLogger(CustomRetry.class);
    private int initRetryCount = 0;
    private int maxRetryCount = 3; //失败重跑次数

    @Override
    public boolean retry(ITestResult iTestResult) {
        if(initRetryCount < maxRetryCount){
            initRetryCount++;
            logger.debug("================ {}.{} 重试第{}次==============",iTestResult.getTestClass().getName(),iTestResult.getName(),initRetryCount);
            try {
                Thread.sleep(2000);
            }catch (InterruptedException e) {
                e.printStackTrace();
            }
            return true;
        }
        return false;
    }
}
这边我设置了失败重跑次数为3,如果重跑失败,则会被ignore。
step3. 应用
1.全局生效
在testng.xml中配置监听
2.单用例
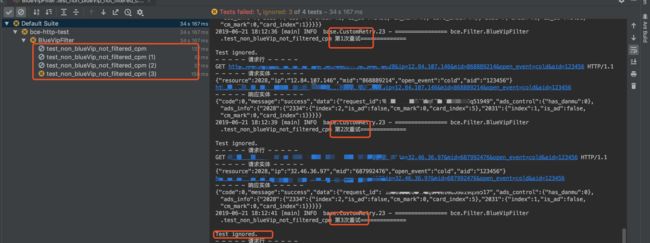
@Test(groups = "filterCpm",retryAnalyzer = CustomRetry.class)
    public void test_non_blueVip_not_filtered_cpm(){
        boolean is_ad = blueVipBaseTest("123456");
        Assert.assertTrue(is_ad);
    }
效果如下图,用例失败后会重试三次
- 异步接口多,等待耗时过长
解决此类问题的方法是轮询。
    public void refreshRtbAdsData(Integer creativeId) throws InterruptedException{
        int count = 10;//轮询限制重试次数
        HttpRequestUtil httpRequestUtil = new HttpRequestUtil();
        httpRequestUtil.addheader("Content-Type", "application/json");
        String refreshData = httpRequestUtil.getResponseBody(Config.rtbRefrshUrl,"get");
        while (!refreshData.contains(String.valueOf(creativeId)) && count > 0){
            httpRequestUtil.addheader("Content-Type", "application/json");
            refreshData = httpRequestUtil.getResponseBody(Config.rtbRefrshUrl,"get");
            count--;
            Thread.sleep(2000);//控制请求频率
        }
    }
上面的方法就是轮询10次,每2000ms轮询一次,直到拿到所需的创意。通过这种方式,我们用例集执行时间减少了一半,同时稳定性也得以提升。
4.自定义测试报告
自定义测试报告主要是方便对测试结果进行整理,同时提升定位问题的效率。具体步骤如下:
step1. 创建监听重写onFinish方法。主要目的是对测试的结果进行整理打包,以邮件的方式发送给相关责任人。
public class TestngListener extends TestListenerAdapter {
    public void onFinish(ISuite iSuite) {
        ReportStaticFactory.copyReportStatic();
        ReplaceHtmlReportStaticLocation.replaceStatic();

        try {
            ZipUtil.doZip("test-output", "test-output/report.zip");
        } catch (IOException var11) {
            var11.printStackTrace();
        }

        String projectName = ISuiteInfo.getSuiteName(iSuite);
        ArrayList> suiteResult = ISuiteInfo.getSuiteResult(iSuite);
        Boolean suiteState = ISuiteInfo.getSuiteState(iSuite);
        String testResultState = suiteState ? "Pass" : "Fail";
        (new StringBuilder()).append(projectName).append(" - 测试结果 - ").append(testResultState).toString();
        String htmlMailContent = null;
        ArrayList failResults = ISuiteInfo.getFailResults(iSuite);

        try {
            HtmlMailContent.getHtmlMailContent(projectName, suiteState, suiteResult, failResults);
        } catch (TemplateException | IOException var10) {
            var10.printStackTrace();
        }
    }
}
step2.配置
总结
以上就是基于TestNG的一些自动化实践的总结,后续如有更好的应用,再做补充啦~