|
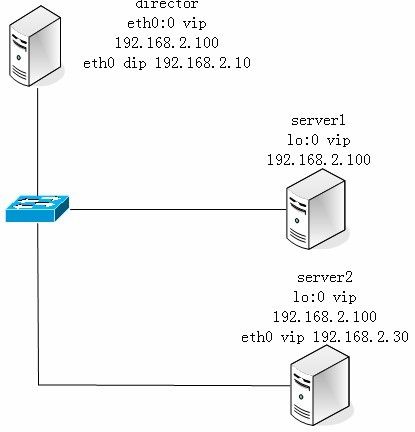
先配置内核参数 再配置vip 1. 配置内核参数 arp_announce :INTEGER 不同取值表示对网络接口上本地IP地址发出的ARP回应作出相应级别的限制:相关代码在 默认为0 8 -不回应所有(本地地址)的arp查询 [root@server ~]# sysctl -a |grep announce |head -1 >>/etc/sysctl.conf [root@server ~]# sysctl -a |grep ignore |head -1 >>/etc/sysctl.conf [root@server ~]# vim /etc/sysctl.conf net.ipv4.conf.all.arp_announce = 2 net.ipv4.conf.lo.arp_announce = 2 net.ipv4.conf.lo.arp_ignore= 1 net.ipv4.conf.all.arp_ignore=1 --必须先配置内核参数才配置vip。 2.配置地址 [root@server ~]# ifconfig lo:0 192.168.2.100 netmask 255.255.255.255 --vip要配置在逻辑端口上 [root@server ~]# route add -host 192.168.2.100 dev lo:0 --针对主机的路由,返回接口是lo:0 [root@server1 ~]# route -n Kernel IP routing table Destination Gateway Genmask Flags Metric Ref Use Iface 192.168.2.100 .0 255.255.255.255 UH 0 0 0 lo 192.168.2.0 .0 255.255.255.0 U 0 0 0 eth0 192.168.2.0 .0 255.255.255.0 U 0 0 0 eth1 [root@server1 ~]# [root@server ~]# 3.安装apache [root@server ~]# [root@server ~]# mount /dev/cdrom /mnt/cdrom [root@server ~]# cd /mnt/cdrom/Server/ [root@server Server]# rpm -ivh httpd--22.el5.i386.rpm [root@server Server]# vim /var/www/html/index.html hello,test lvs-dr page from server1! ~ [root@server Server]# service httpd start Starting httpd: [ OK ] [root@server Server]# 4,。配置server2 [root@server Server]# scp /etc/sysctl.conf 192.168.2.30:/etc The authenticity of host '192.168.101.10 (192.168.101.10)' can't be established. RSA key fingerprint is bd:3f:b7:85:6d:1b:df:82:f8:4f:fc:fe:7f:57:4b:06. Are you sure you want to continue connecting (yes/no)? y Please type 'yes' or 'no': yes Warning: Permanently added '192.168.101.10' (RSA) to the list of known hosts. [email protected]'s password: sysctl.conf 100% 1126 1.1KB/s 00:00 [root@server Server]#
[root@server2 ~]# sysctl –p --定义限制本地的arp请求的级别 0 默认级别,任何本地地址接口有请求的ip都relay 1 在目标子网和接口的地址尽量不回应 2 使用最优的地址回应 net.ipv4.conf.all.arp_announce = 2 net.ipv4.conf.lo.arp_announce = 2 net.ipv4.conf.lo.arp_ignore = 1 net.ipv4.conf.all.arp_ignore = 1 [root@server2 ~]#
[root@server2 ~]# ifconfig lo:0 192.168.2.100 netmask 255.255.255.255 [root@server2 ~]# route add -host 192.168.2.100 dev lo:0
[root@server2 ~]# route -n Kernel IP routing table Destination Gateway Genmask Flags Metric Ref Use Iface 192.168.2.100 .0 255.255.255.255 UH 0 0 0 lo 192.168.2.0 .0 255.255.255.0 U 0 0 0 eth0 [root@server2 ~]# cd /mnt/cdrom/Server/ [root@server2 Server]# rpm -ivh httpd--22.el5.i386.rpm
[root@server2 Server]# vim /var/www/html/index.html hello ,this is test page from server2!
[root@server2 Server]# service httpd start 4.配置director [root@director ~]# ifconfig eth0:0 192.168.2.100 netmask 255.255.255.255 [root@director ~]# mount /dev/cdrom /mnt/cdrom [root@director ~]# cd /mnt/cdrom/Cluster [root@director Cluster]# ll ipvs* -r--r--r-- 93 root root 31359 2007-01-19 ipvsadm-1.24-8.1.i386.rpm [root@director Cluster]# rpm -ivh ipvsadm-1.24-8.1.i386.rpm [root@director Cluster]# ipvsadm -Ln IP Virtual Server version (size=4096) Prot LocalAddress:Port Scheduler Flags -> RemoteAddress:Port Forward Weight ActiveConn InActConn [root@director Cluster]# --定义虚拟服务 [root@director Cluster]# ipvsadm -A -t 192.168.2.100:80 -s rr --指定realserver [root@director Cluster]# ipvsadm -a -t 192.168.2.100:80 -r 192.168.2.20 -g [root@director Cluster]# ipvsadm -a -t 192.168.2.100:80 -r 192.168.2.30 -g [root@director Cluster]# [root@director Cluster]# ipvsadm -Ln IP Virtual Server version (size=4096) Prot LocalAddress:Port Scheduler Flags -> RemoteAddress:Port Forward Weight ActiveConn InActConn TCP 192.168.2.100:80 rr -> 192.168.2.30:80 Route 1 0 0 -> 192.168.2.20:80 Route 1 0 0 [root@director Cluster]# [root@director Cluster]# ipvsadm -Ln IP Virtual Server version (size=4096) Prot LocalAddress:Port Scheduler Flags -> RemoteAddress:Port Forward Weight ActiveConn InActConn TCP 192.168.2.100:80 rr -> 192.168.2.30:80 Route 1 0 4 -> 192.168.2.20:80 Route 1 0 4 [root@director Cluster]#
|

