App Store:https://itunes.apple.com/us/app/bai-ri/id1169827099?l=zh&ls=1&mt=8
项目背景
从事iOS开发已经第二个年头了,不谦虚的说句,虽然伴随着不少坑,自我感觉进步还是不少的。但实际开发基本都投入在公司的项目之中,缺少一些属于自己的产物。恰逢公司项目进入了空闲期,于是萌生了写一个属于自己的App的念头,既学习实操一下App Store的上线流程,也作为这一阶段的自我总结。
App的灵感其实源自微信公众号warfalcon的活动——坚持某个目标100天,看这份坚持能为自己带来什么。我在还没成为一名程序猿之前就曾经号召过小伙伴共同进行一次,但当时记录全凭自己手动(现在公众号已有专属的记录页面),虽然麻烦,一百天下来也是获益匪浅。而群里的小伙伴近来正好又有了新的目标,加上跃跃欲试的我,百日就这样诞生了。
项目架构
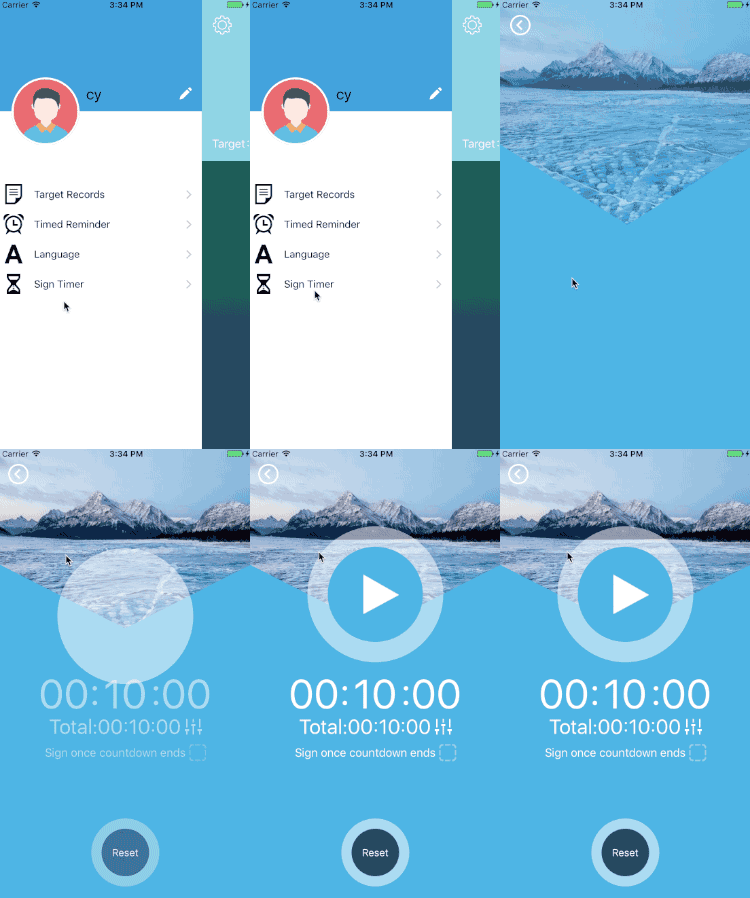
百日功能上主要分为四个模块:主页、设置、记录和分享。
- 主页
主页包含了这个App的核心功能——签到功能。100天的目标转换到App上就是100天的签到。因为技术和资金的原因,未能搭建一个服务器对记录进行远程记录,所以数据使用CoreData进行本地的缓存。 - 设置
包含个人信息设置、国际化、定时提醒(本地通知)和计时器。 - 记录
分为目标列表、目标月度总结以及签到日历。 - 分享
分享主要指的是签到成功和任务完成时的社交分享,借助第三方包ShareSDK进行整合。
问题记录
动态启动页
开始时仅使用LaunchScreen.storyboard作为启动页的设置,后来在实现国际化时(涉及文字和图片资源)发现LaunchScreen.storyboard中页面虽然类别是UIViewController,但并不进入生命周期方法。猜测是直接从配置文件生成相应大小的静态View作为启动页,所以跳过了生命周期方法。后来参考一些主流App的做法,从抽取一些基础页面元素作为LaunchScreen.storyboard的内容,在keyWindow设置完成后在最上层添加一层新的View作为启动页的补充(这里使用了自己造的轮子CYLaunchAnimateViewController),以实现国际化及启动页消失时的动画效果。日期处理
众多的日期处理的问题是我刚构想这个项目时没有意料到的。过期时的补签到,目标的月度统计,日历天数的计算,无处不涉及日期的比较。最后主要归纳为两个Catagory方法:
    //NSDate天数差
    - (NSInteger)dayIntervalSinceDate:(NSDate *)date{
        NSDate *dateOne = [self zeroOfDate];
        NSDate *dateTwo = [date zeroOfDate];
        NSTimeInterval timeInterval = [dateOne timeIntervalSinceDate:dateTwo];
        return timeInterval/(60 * 60 * 24);
    }

    //当天零点
    - (NSDate *)zeroOfDate{
        NSCalendar *calendar = [NSCalendar currentCalendar];
        return [calendar startOfDayForDate:self];
    }
其中获取当天零点的方法在网上有比较繁琐的实现,需要获取NSDateComponents,手动将时分秒毫秒设置为0后再转换为NSDate。估计startOfDayForDate:是后来Apple官方新增的API,但在头文件中未有注明。
这里还遇到了一个坑,当时间转换为当天零点后(时分秒毫秒都为0),在控制台中打印时间,会以零时区显示,即为16:00。打印其他时间点皆为本地时区。当时调试许久,以为是自己设置问题。
- 第三方键盘高度
在资料输入页面很多时候会监听键盘事件,通过获取键盘的高度和输入框的Y值计算偏移量,键盘唤醒时根据偏移量上移View避免键盘遮挡焦点输入框。
    - (void)viewDidLoad {
        [super viewDidLoad];
        [[NSNotificationCenter defaultCenter] addObserver:self selector:@selector(keyboardWillShow:) name:UIKeyboardWillShowNotification object:nil];
        [[NSNotificationCenter defaultCenter] addObserver:self selector:@selector(keyboardWillHide) name:UIKeyboardWillHideNotification object:nil];
    }

    - (void)keyboardWillShow:(NSNotification *)notifi{
        UIControl *textInput = [self firstResponder];
        CGRect parentRect = [textInput.superview convertRect:textInput.frame toView:nil];
        CGFloat maxY = CGRectGetMaxY(parentRect);

        CGRect kbEndFrm = [notifi.userInfo[UIKeyboardFrameEndUserInfoKey] CGRectValue];
        CGFloat kbY = kbEndFrm.origin.y;

        CGFloat delta = kbY - maxY;
        if(delta < 0){
            [UIView animateWithDuration:0.25 animations:^{
                self.view.transform = CGAffineTransformMakeTranslation(0, delta);
            }];
        }
    }

    - (void)keyboardWillHide{
        [UIView animateWithDuration:0.25 animations:^{
            self.view.transform = CGAffineTransformIdentity;
        }];
    }
这方法在使用原生键盘时没有问题,但在使用搜狗舒服法等第三方键盘时候,用原来的方法上推View时总有一定的偏差。这时断点能发现,当唤醒键盘时,原生键盘只调用keyboardWillShow:方法一次,而第三方的键盘会调用三次。对比三次调用时传入的NSNotification对象,其中第一和第三次的键盘高度相近,却明显比第二次小,第二次也更接近真正的键盘高度。而正是第三次调用,使正确的偏移量遭到了覆盖。所以要计算出正确的偏移量,就要在调用keyboardWillShow:方法时,对传入数据进行筛选。
    - (void)keyboardWillShow:(NSNotification *)notifi{

        //通过对比三次获取到的数据,我们可以发现,当键盘高度有偏差时,UIKeyboardFrameBeginUserInfoKey为0,这时候就要把这种情况筛选掉(因为这里我引用了第三方的键盘工具,所以要加上一个工具条的高度44)
        CGRect beginUserInfo = [[notifi.userInfo objectForKey:UIKeyboardFrameBeginUserInfoKey]   CGRectValue];
        if (beginUserInfo.size.height <=44) return;

        UIControl *textInput = [self firstResponder];
        CGRect parentRect = [textInput.superview convertRect:textInput.frame toView:nil];
        CGFloat maxY = CGRectGetMaxY(parentRect);

        CGRect kbEndFrm = [notifi.userInfo[UIKeyboardFrameEndUserInfoKey] CGRectValue];
        CGFloat kbY = kbEndFrm.origin.y;

        CGFloat delta = kbY - maxY;
        if(delta < 0){
            [UIView animateWithDuration:0.25 animations:^{
                self.view.transform = CGAffineTransformMakeTranslation(0, delta);
            }];
        }
    }
- 遮盖层动画
遮盖层动画是这个项目中我学到最有趣的部分。遮盖层动画通过CAShapeLayer和CoreAnimation配合实现。作为CALayer的子类,CAShapeLayer可以配合UIBezierPath实现多层结构。复数重叠部分为保留部分,奇数重叠部分为镂空部分。动画效果就是通过改变复数层的范围实现的。以百日计时器中的进入动画为例:
    CAShapeLayer *maskLayer = [CAShapeLayer layer];
    self.coverView.layer.mask = maskLayer;
    CAKeyframeAnimation *coverAnimation = [CAKeyframeAnimation animation];
    coverAnimation.duration = totalTime;
    coverAnimation.keyPath = @"path";

    //这里把展开的扇形分为左右两个部分进行处理,原因下面解释
    UIBezierPath *pathOne = [UIBezierPath bezierPathWithArcCenter:CGPointMake(ScreenWidth/2, ScreenHeight/2) radius:ScreenHeight startAngle:-M_PI_2 endAngle:-M_PI_2+M_PI_2*0.01 clockwise:YES];
    [pathOne addLineToPoint:CGPointMake(ScreenWidth/2, ScreenHeight/2)];
    [pathOne closePath];
    UIBezierPath *pathOneLeft = [UIBezierPath bezierPathWithArcCenter:CGPointMake(ScreenWidth/2, ScreenHeight/2) radius:ScreenHeight startAngle:-M_PI_2 endAngle:-M_PI_2-M_PI_2*0.01 clockwise:NO];
    [pathOneLeft addLineToPoint:CGPointMake(ScreenWidth/2, ScreenHeight/2)];
    [pathOneLeft closePath];
    [pathOne appendPath:pathOneLeft];

    UIBezierPath *pathTwo = [UIBezierPath bezierPathWithArcCenter:CGPointMake(ScreenWidth/2, ScreenHeight/2) radius:ScreenHeight startAngle:-M_PI_2 endAngle:-M_PI_2*0.3 clockwise:YES];
    [pathTwo addLineToPoint:CGPointMake(ScreenWidth/2, ScreenHeight/2)];
    [pathTwo closePath];
    UIBezierPath *pathTwoLeft = [UIBezierPath bezierPathWithArcCenter:CGPointMake(ScreenWidth/2, ScreenHeight/2) radius:ScreenHeight startAngle:-M_PI_2 endAngle:-M_PI+M_PI_2*0.3 clockwise:NO];
    [pathTwoLeft addLineToPoint:CGPointMake(ScreenWidth/2, ScreenHeight/2)];
    [pathTwoLeft closePath];
    [pathTwo appendPath:pathTwoLeft];

    UIBezierPath *pathThree = [UIBezierPath bezierPathWithArcCenter:CGPointMake(ScreenWidth/2, ScreenHeight/2*0.8) radius:ScreenHeight startAngle:-M_PI_2 endAngle:-M_PI_2*0.3 clockwise:YES];
    [pathThree addLineToPoint:CGPointMake(ScreenWidth/2, ScreenHeight/2*0.8)];
    [pathThree closePath];
    UIBezierPath *pathThreeLeft = [UIBezierPath bezierPathWithArcCenter:CGPointMake(ScreenWidth/2, ScreenHeight/2*0.8) radius:ScreenHeight startAngle:-M_PI_2 endAngle:-M_PI+M_PI_2*0.3 clockwise:NO];
    [pathThreeLeft addLineToPoint:CGPointMake(ScreenWidth/2, ScreenHeight/2*0.8)];
    [pathThreeLeft closePath];
    [pathThree appendPath:pathThreeLeft];

    coverAnimation.values = @[(__bridge id)(pathOne.CGPath),(__bridge id)(pathTwo.CGPath),(__bridge id)(pathThree.CGPath)];
    coverAnimation.keyTimes = @[@(0),@(0.7),@(1)];
    coverAnimation.removedOnCompletion = NO;
    coverAnimation.fillMode = kCAFillModeForwards;
    [maskLayer addAnimation:coverAnimation forKey:nil];
这里也有一个小坑,当初实现扇形动画的时候,并没有把扇形左右分离,而是直接使用CAKeyframeAnimation设定关键帧进行处理了。但发现当设定最后扇形角度超过90°时,过程动画就偏离了原来预期,成为另一种的运动轨迹。感觉是CAKeyframeAnimation把它理解为了另一种形式的形变,没有深究,分为左右两边后就能按预期执行了。
- 国际化
国际化也是一直希望实操的一个要点,但一直没有机会,趁着自己折腾自己作主也就一并学习实现了。实现要点有三:-
1.在Project中添加支持语言
-
2.在需要实现国际化的xib/storyborad中配置勾选支持语言。可以选择文本实现或是xib实现。
- 3.创建通用文本文件
Localizable.strings,按需配置国际化文本,调用方式如下:
-
NSLocalizedString(@"key", nil);
- App内的语言切换
实现参考了作者翻炒吧蛋滚饭 的文章iOS App的国际化,以及App内的语言切换。
    #import "NSBundle+Language.h"
    #import

    static const char _bundle = 0;

    @interface BundleEx : NSBundle

    @end

    @implementation BundleEx

    - (NSString *)localizedStringForKey:(NSString *)key value:(NSString *)value table:(NSString *)tableName {
        NSBundle *bundle = objc_getAssociatedObject(self, &_bundle);
        return bundle ? [bundle localizedStringForKey:key value:value table:tableName] : [super localizedStringForKey:key value:value table:tableName];
    }

    @end

    @implementation NSBundle (Language)

    + (void)setLanguage:(NSString *)language {
        static dispatch_once_t onceToken;
        dispatch_once(&onceToken, ^{
            object_setClass([NSBundle mainBundle], [BundleEx class]);
        });

        objc_setAssociatedObject([NSBundle mainBundle], &_bundle, language ? [NSBundle bundleWithPath:[[NSBundle mainBundle] pathForResource:language ofType:@"lproj"]] : nil, OBJC_ASSOCIATION_RETAIN_NONATOMIC);

        [[NSUserDefaults standardUserDefaults] setObject:language forKey:@"myLanguage"];
        [[NSUserDefaults standardUserDefaults] synchronize];
    }

    @end
因为[NSBundle mainBundle]在App启动时已经生成,所以即使改变NSUserDefaults的AppleLanguages字段也需要重新启动App才会生效。所以作者的以在设置语言时新建一个对应语言的NSBundle对象,通过objc_setAssociatedObject绑定在[NSBundle mainBundle]之上。用利用runtime将[NSBundle mainBundle]类别替换为子类BundleEx,子类复写- (NSString *)localizedStringForKey:(NSString *)key value:(NSString *)value table:(NSString *)tableName方法,不直接从[NSBundle mainBundle]中获取字符,而是从绑定于其上拥有对应语言环境NSBundle中获取。这样更改语言只需更新[NSBundle mainBundle]绑定的NSBundle即可,无需重启App,相当巧妙!
本地通知
在准备实现定时提醒功能时恰逢iOS10更新,官方对本地及远程推送开放了全新的API,需要为iOS10作单独的适配处理。具体参照了ChenYilong/iOS10AdaptationTips-
上传App Store - "Invalid Bundle"
打包上传App Store时报如下错误ERROR ITMS-90682: "Invalid Bundle. The asset catalog at 'Payload/****.app/Assets.car' can't contain 16-bit or P3 assets if the app is targeting iOS releases earlier than iOS 9.3."
Xcode8的新特性(坑),当App兼容iOS 9.3以下版本是,资源里面不能包含16bit或者display P3 颜色的图片。
定位不符合格式图片方法如下:- 1.解压ipa文件(使用解压工具或将后缀改为.zip)
- 2.终端进入解压所得Payload文件夹内.app文件
cd yourPath/Payload/name.app
- 3.使用find命令查询Assets.car路径
find . -name 'Assets.car'
- 4.转换成json图片信息(我的 'Assets.car'路径为
./Assets.car)
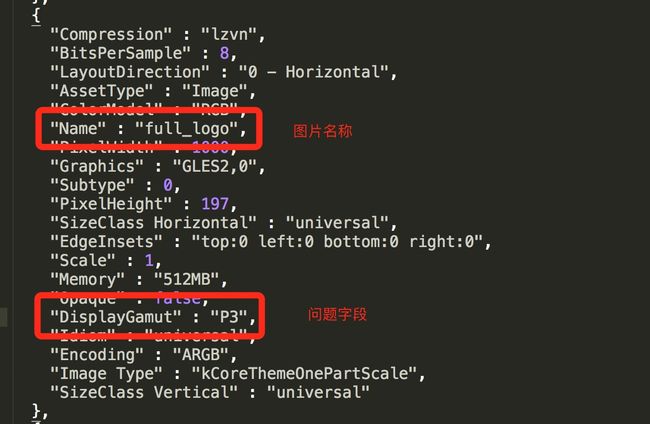
sudo xcrun --sdk iphoneos assetutil --info ./Assets.car > /tmp/Assets.json
- 5.打开Assets.json
open /tmp/Assets.json
-
6.查找"DisplayGamut" : "P3",然后记下图片的名称。
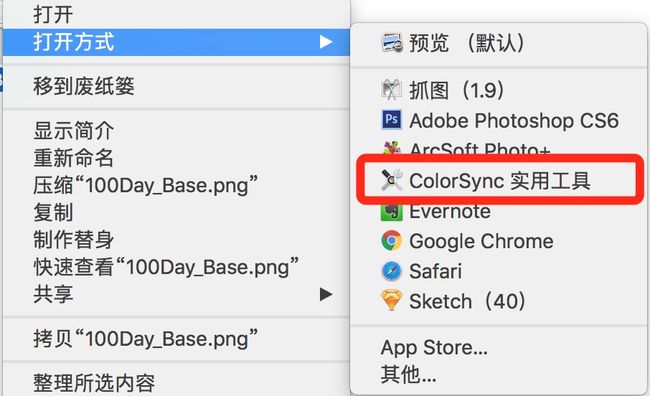
- 7.使用ColorSync使用工具打开编辑问题图片
如果重新打包后上传仍然报错,则重新导入编辑好的图片到项目中,并Clean项目。
参考:Xcode8打包上传错误ERROR ITMS-90682: "Invalid Bundle. The asset catalog at***


