Model 基本操作
-
当我们需要引用外部数据库时,假如我们想改名字,可以这样做:
class User < ActiveRecord::Base self.table_name = "example" end -
什么是
主键(primary key):每個資料表的流水編號欄位(ID).当然这个主键也可以自定义:
class User < ActiveRecord::Base
  self.primary_key = "user_id"
end
-
什么是ORM?
我們如果想要存取資料庫裡的內容,以前必需透過資料庫查詢語言(SQL)向資料庫進行查詢,但透過 ORM 的包裝之後,可以讓我們用操作「物件」的方式來操作資料庫。
-
平均数,求和,最大值,最小值直接让数据库来计算!$ bin/rails console >> Candidate.sum(:age) (0.2ms) SELECT SUM("candidates"."age") FROM "candidates" => 44 >> Candidate.average(:age).to_f (0.1ms) SELECT AVG("candidates"."age") FROM "candidates" => 14.6666666666667$ bin/rails console >> Candidate.maximum(:age) (0.2ms) SELECT MAX("candidates"."age") FROM "candidates" => 22 >> Candidate.minimum(:age) (0.2ms) SELECT MIN("candidates"."age") FROM "candidates" => 2 -
更新数据的方法有
save、update、update_attribute及update_attributes:# 使用 save 方法 candidate.name = "剪彩倫" candidate.save # 使用 update_attribute 方法更新單一欄位的值(注意:方法名字是單數) candidate.update_attribute(:name, "剪彩倫") # 使用 update 更新資料,可一次更新多個欄位,且不需要再呼叫 save 方法 candidate.update(name: "剪彩倫", age: 20) # 使用 update_attributes 方法 candidate.update_attributes(name: "剪彩倫", age: 20)
  單數的 `update_attribute` 方法會跳過驗證(Validation),等於是 `save(validate: false)` 的效果,在使用的時候要稍微注意一下。

- 如果想整个资料表一起修改:
Candidate.update_all(name: "剪彩倫", age: 18) -
scope可以嵌套,利用嵌套,可以方便我们:
- 使代码整洁。
- 方便我们修改。
还可以:预设scope,
  class Product < ActiveRecord::Base
    default_scope { order('id DESC') }
    scope :available, -> { where(is_available: true) }
  end
要取消預設的 scope,必須使用
unscope方法:$ bin/rails console >> Product.unscope(:order) Product Load (0.2ms) SELECT "products".* FROM "products" >> Product.unscope(:order).order(:title) Product Load (0.3ms) SELECT "products".* FROM "products" ORDER BY "products"."title" ASC這樣才能把預設的 scope 的效果移除。
Model Migration
什么是migration: 描述数据表长什么样的档案。
为什么要这样设计:一切为了方便多人协作!
-
刚执行
rake db:migrate发现要改一下栏位,怎么办?- 可以用
rollback:rake db:rollback(这样一次可以退回一个migration文件。) - 新增migration文件来修改。(推荐!)
- 可以用
-
新增migration文件时,原来可以直接上index索引啊,酷!:
$ bin/rails g migration add_candidate_id_to_articles candidate_id:integer:index
Running via Spring preloader in process 7765
  invoke  active_record
  create    db/migrate/20170101081538_add_candidate_id_to_articles.rb
class AddCandidateIdToArticles < ActiveRecord::Migration[5.0] def change add_column :articles, :candidate_id, :integer add_index :articles, :candidate_id end end rake db:setup可以一口氣把資料表建完,順便把預設資料寫入。
model的关联性
什么是外部键:用于对应其他model主键的栏位,例如:
user_idproduct_id可以用
user.create_post(:title => "hello")来新建对应的资料,生成的资料自动对应好user_id。-
之前商店大赛加油站,无法先新建address再对应user_id,现在终于找到原因和解决方法!:
原因:rails5之后,必须先建立
头才能建立尾!-
解法:加多一个
optional: trueclass Store < ApplicationRecord belongs_to :user, optional: true end
-
has_one 跟 belongs_to 方法需要同時設定嗎?
不一定,端看需求,一樣以我們上面 User 跟 Store 的例子來看,如果你不需要「從 Store 反查 User」的功能的話,那
belongs_to是不需要設定的。 -
其实多对多没有我们rails101教材上的那么复杂,其实可以这么简单:
  class WareHouse < ApplicationRecord
    belongs_to :store
    belongs_to :product
  end
class Store < ApplicationRecord belongs_to :user has_many :ware_houses has_many :products, through: :ware_houses endclass Product < ApplicationRecord has_many :ware_houses has_many :stores, through: :ware_houses end看到没有,第二个has_many只要写两个字段就可以啦!之前是这样的:
有点让新手摸不着头脑。。。
-
酷!还有一种叫HABTM(has_and_belongs_to_many)!
  # Store Model
  class Store < ActiveRecord::Base
    has_and_belongs_to_many :products
  end

  # Product Model
  class Product < ActiveRecord::Base
    has_and_belongs_to_many :stores
  end
就這樣,不需要另外新增第三方 Model 即可完成多對多關連。注意,我是說「不需要第三方 Model」,不是「不需要第三方資料表」,畢竟還是要有一個資料表存放雙方的資訊,只是這個資料表因為不重要也不會存取它,所以可以不需要 Model 對應。
這個第三方資料表的名字是有規定的,預設是「兩個資料表依照英文字母先後順序排序,中間以底線分格」,所以以我們這個例子來說,這個資料表的名字就是「products_stores」。
Model 驗證及回呼
-
资料验证:有三个方法:
- 前端驗證:在 HTML 頁面使用 JavaScript 在使用者填寫資料的時候就先檢查。
- 後端驗證:資料傳進來在寫入資料庫之前之後再檢查。
- 資料庫驗證:直接由資料庫本身所提供的功能來做資料驗證。
推荐model层来做这件事!
-
验证是否为空:
class Article < ApplicationRecord
  validates :title, presence: true
end
- ```
    class Article < ActiveRecord::Base
      validates_presence_of :title
    end
这两种效果是一样的。
-
想查看错误的提示信息?
- 检查是否有错误提示:
a1.errors.any? - 检查错误提示是什么:
a1.errors.full_messages
- 检查是否有错误提示:
-
只有这些方法会触发验证:
- create
- create!
- save
- save!
- update
- update!
其它方法不會經過驗證流程喔
有驚嘆號版本的,如果驗證未通過會產生錯誤訊息,而沒有驚嘆號版本則僅會回傳該 Model 的一個空物件。这大概就是惊叹号的好处了!
-
如何跳过验证?
user1 = User.new user1.save(validate: false) -
检查是否能通过验证?
>> user1.valid? => false -
回呼(Callback):
其中,顏色比較深的那幾個流程是有機會可以掛上一些方法,又稱之回呼(Callback)
注意:
before_save跟before_create的差別,在於before_save是每次存檔的時候都會經過,但before_create只有在「新增」的時候才會觸發。除了這樣的寫法,如果內容單純的話,也是可以使用 Block 的方式來寫:
  require 'digest'
  class User < ActiveRecord::Base
    before_create do
      self.email = Digest::MD5.hexdigest(email)
    end
  end
寄發信件
- 之前的奇怪,现在不奇怪了,寄送信件,rails已内置好这个功能了,使用很容易!
背景工作及工作排程(异步任务)
慌然大悟,原来这就是我之前一直想学的异步任务!!!!相见恨晚!
如果我要写一个异步任务,可以这样做:
执行
rails g job user_confirm_email-
设置 app/jobs :
class UserConfirmEmailJob < ApplicationJob queue_as :default def perform(user) # 在這裡寄發確認信... end end -
在controller里作用:
    def create
      @user = User.new(user_params)
      if @user.save
        UserConfirmEmailJob.perform_later(@user)
        redirect_to @user, notice: 'User was successfully created.'
      else
        render :new
      end
    end
搞定!
一些小技巧:
其中,
queue_as方法是指這件工作急不急,預設值是:default,如果這件工作不急,可把:default改成:low_priority,如果是急件則可設定成:urgent。# 這樣是 5 秒之後做 UserConfirmEmailJob.set(wait: 5.seconds).perform_later(@user) # 這樣是「明天下午有空再做」 UserConfirmEmailJob.set(wait_until: Date.tomorrow.noon).perform_later(@user)
- 通常异步任务会被放在缓存中,如果宕机,重开机这些资料会不见。安全起见,可以用第三方gem:(把任务放入资料库)常用:有 `Sidekiq` 跟 `Delayed Job`

  下面以`Delayed Job`为例:

  - 在 *Gemfile.rb* 中增加:
gem 'delayed_job_active_record'
```
$bundle修改:
app/configs/application.rb:
API 模式
-
直接用
render json: @users会输出所有的json数据。如果想过滤一些数据的话,可以这样:-
新增
app/views/users/index.json.jbuilder:json.array! @users, partial: 'users/user', as: :user -
新增
app/views/users/_user.json.jbuilder:json.extract! user, :id, :name, :email, :created_at, :updated_at json.url user_url(user, format: :json)
-
-
有一个叫API-Only 的东西,在新增专案时,选择这种模式,可以帮rails减肥!
$ rails new my_blog --api
寫測試讓你更有信心 Part 1
-
为什么要写测试:
前期看起来有点花功能 ,但却是为后面多次开发的测试节省时间!
不写测试可能还有各种偷懒的理由,但,跟着大神学着写吧~
不要為了測試而測試,你寫的是「規格」(Spec)
开发前写一写“测试“,这里作者说是
规格。
下面以RSpec来实作:
-
安装RSpec:
$ gem install rspec -
把要有哪些项目要测试,先写出来:
  # 檔案:bank_account_spec.rb

  RSpec.describe BankAccount do
    describe "存錢功能" do
      it "原本帳戶有 10 元,存入 5 元之後,帳戶餘額變 15 元" do
      end

      it "原本帳戶有 10 元,存入 -5 元之後,帳戶餘額還是 10 元(不能存入小於等於零的金額)" do
      end
    end

    describe "領錢功能" do
      it "原本帳戶有 10 元,領出 5 元之後,帳戶餘額變 5 元" do
      end

      it "原本帳戶有 10 元,試圖領出 20 元,帳戶餘額還是 10 元,但無法領出(餘額不足)" do
      end

      it "原本帳戶有 10 元,領出 -5 元之後,帳戶餘額還是 10 元(不能領出小於或等於零的金額)" do
      end
    end
  end
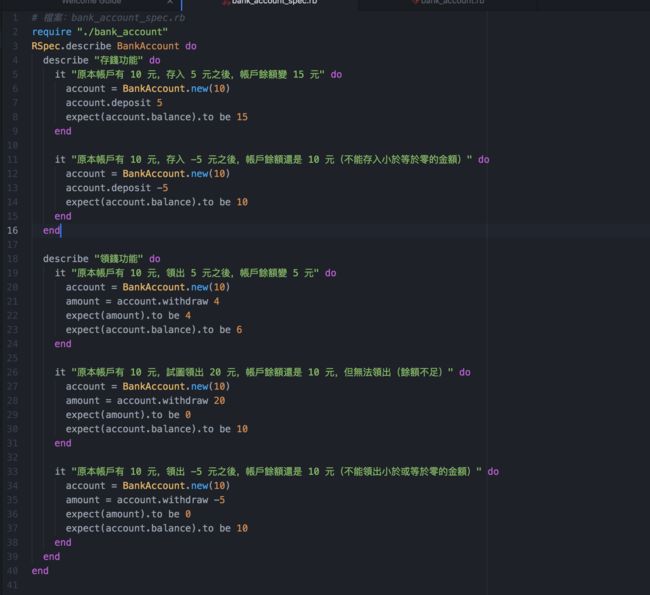
然后开始写内容:
然后,开始
$ rspec bank_account_spec.rb进行测试,自然会出错。根据错误提示,把所有bug都解掉!
-
一些小技巧:
- before(:each)
- before(:all)
-
let(:account){BankAccount.new(10)}这个语句相当于动态地为整个方法提供一个区块变数。
寫測試是算是業界很常見的標準技能,所以:写吧!
代码重构:
- 页面上的逻辑可以这样处理:
- 写进viewhelper
- 在model里写义一个实体方法,然后在页面就只可以直接用啦!
- 善用继承,不能继承的就引入模组功能。
代码重构(进阶版):
-
設計 Service Object 類別,新增纯ruby的类别。
-
使用 Form Object
表示暂时看不太懂。。。先放过。。
后面的内容实操一遍,基本没有什么重要的知识了……。。
当然这个课程还有一些不错的内容在更新中……


