在使用Handler的过程中主要涉及到以下几个类Looper、Handler、Message、还有一个隐藏的Message Queue,它直接与Looper交互,我们不会直接接触。
Handler创建
Handler#Handler
public Handler(Callback callback, boolean async) {
        if (FIND_POTENTIAL_LEAKS) {
            final Class klass = getClass();
            if ((klass.isAnonymousClass() || klass.isMemberClass() || klass.isLocalClass()) &&
                    (klass.getModifiers() & Modifier.STATIC) == 0) {
                Log.w(TAG, "The following Handler class should be static or leaks might occur: " +
                    klass.getCanonicalName());
            }
        }
        //关联Looper
        mLooper = Looper.myLooper();
        if (mLooper == null) {
            throw new RuntimeException(
                "Can't create handler inside thread that has not called Looper.prepare()");
        }
        //关联MessageQueue 同时也说明了MessageQueue 属于Looper
        mQueue = mLooper.mQueue;
       //注意这里的mCallback 它也是消息处理方式的一种,下文会有分析
        mCallback = callback;
        mAsynchronous = async;
    }
上面的代码展示了Handler如何与Looper、MessageQueue关联,下面我们看下Looper是如何被创建得的,以及它的MessageQueue是怎么创建的。
Looper#myLooper
static final ThreadLocal sThreadLocal = new ThreadLocal();

public static @Nullable Looper myLooper() {
        return sThreadLocal.get();
    }
可以看到Looper 是通过ThreadLocal.get得到的,那ThreadLocal又是什么呢?
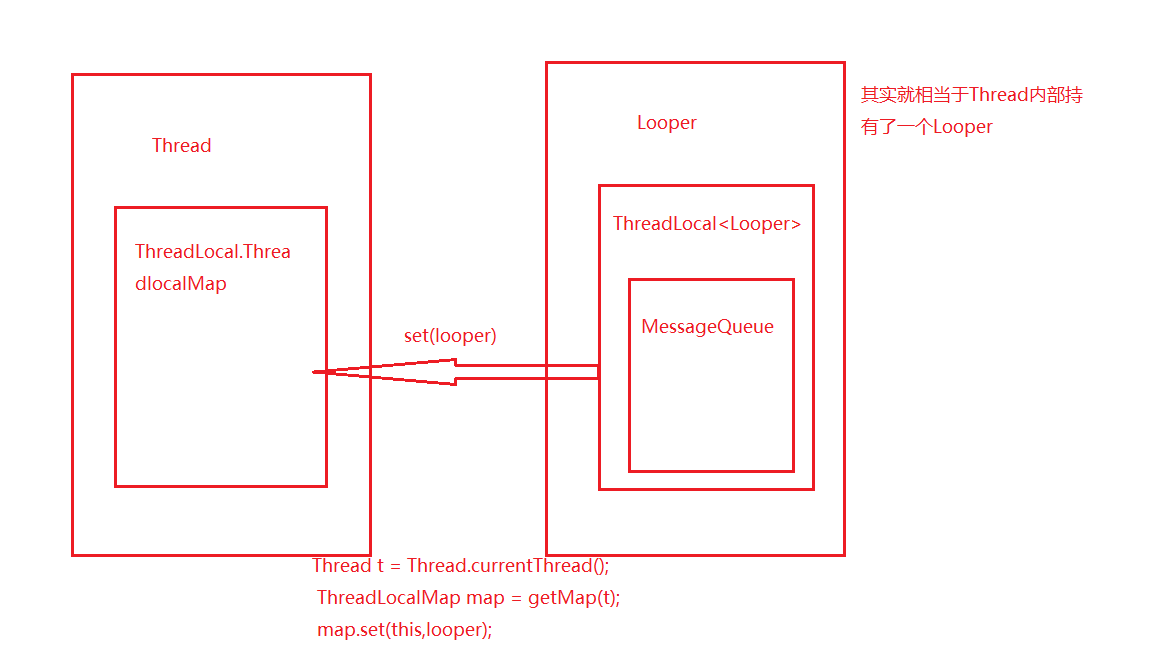
通过注释我们可以发现,ThreadLocal是一个跟线程绑定的数据存储类,它可以在指定的线程中存储数据,同时也只能在指定线程中才能获取数据,对于其他线程来时是无效的,既然是集合肯定有set和get方法。
首先我们来看下线程和Loop之间的关系图:
下面我们来看下
ThreadLocal#set
 public void set(T value) {
        //得到当前正在运行的线程
        Thread t = Thread.currentThread();
        //ThreadLocalMap 是一个自定义的hash map 用来存储数据
        ThreadLocalMap map = getMap(t);
        if (map != null)
            map.set(this, value);
        else
            createMap(t, value);
    }
我们说过ThreadLocal是跟指定线程绑定的,其实从下面代码就能看出来
ThreadLocalMap getMap(Thread t) {
        return t.threadLocals;
    }

void createMap(Thread t, T firstValue) {
        t.threadLocals = new ThreadLocalMap(this, firstValue);
    }
代码很简单,我就不解释了。
好了既然我们知道了ThreadLocal,那接下来我们就看下Looper。既然ThreadLocal.get()得到的是Looper,我们就理由相信这个Looper是跟UI线程绑定的。可是这个Looper又是在哪初始化的呢? 而且初始化肯定是通过ThreadLocal.set方式调用的。
Looper#prepare
public static void prepare() {
        prepare(true);
    }

    private static void prepare(boolean quitAllowed) {
        if (sThreadLocal.get() != null) {
            throw new RuntimeException("Only one Looper may be created per thread");
        }
        sThreadLocal.set(new Looper(quitAllowed));
    }

private Looper(boolean quitAllowed) {
        //创建Looper的同时创建了MessageQueue
        mQueue = new MessageQueue(quitAllowed);
        mThread = Thread.currentThread();
    }
那Looper#prepare又是在哪被调用了呢?最终我们在ActivityThread#main函数中找到了,也就是程序启动时调用的。
ActivityThread#main
public static void main(String[] args) {
    //............. 无关代码...............
     此时跟UI线程绑定的Looper已经创建了
    Looper.prepareMainLooper();
    //开启无线循环来不断的从消息队列中拿消息
    Looper.loop();
    throw new RuntimeException("Main thread loop unexpectedly exited");
}
Looper#loop(省略一部分代码)
public static void loop() {
    //获得一个跟UI线程绑定的 Looper 对象
    final Looper me = myLooper();
    // 拿到 looper 对应的 mQueue 对象
    final MessageQueue queue = me.mQueue;
    //死循环监听(如果没有消息变化,他不会工作的) 不断轮训 queue 中的 Message
    for (;;) {
        // 通过 queue 的 next 方法拿到一个 Message
        Message msg = queue.next(); // might block
        //空判断
        if (msg == null)return;
        //消息分发   此处的target其实就是绑定的Handler
        msg.target.dispatchMessage(msg);
        //回收操作
        msg.recycleUnchecked();
    }
}
到这里的时候我先你的脑子肯定会闪过一个念头进入死循环那程序不就卡死了吗,程序还在吗执行呢?这个问题我们先放放,下面会简答,这里可以先说结论。首先MessageQueue不是传统的阻塞队列,因为它没有继承任何队列,同时内部也没有持有任何阻塞队列的对象,那它是如何实现阻塞队列的效果的呢?其实这里使用了linux的epoll技术,感兴趣的朋友可以深入研究下,下次如果有时间的话我也会写一篇相关的博文来介绍。下面是摘自百度的epoll介绍:
epoll是Linux内核为处理大批量文件描述符而作了改进的poll,是Linux下多路复用IO接口select/poll的增强版本,它能显著提高程序在大量并发连接中只有少量活跃的情况下的系统CPU利用率。另一点原因就是获取事件的时候,它无须遍历整个被侦听的描述符集,只要遍历那些被内核IO事件异步唤醒而加入Ready队列的描述符集合就行了。epoll除了提供select/poll那种IO事件的水平触发(Level Triggered)外,还提供了边缘触发(Edge Triggered),这就使得用户空间程序有可能缓存IO状态,减少epoll_wait/epoll_pwait的调用,提高应用程序效率
Handler创建的另一种姿势
上文我们分析了在UI线程(主线程)中创建的Handler,并会得到一个UI Looper,那假如我们新建一个线程并在其中创建Handler会发生什么?
public class LooperThread extends Thread {
    private Handler handler1;
    private Handler handler2;
    @Override
    public void run() {
        // 将当前线程初始化为Looper线程
        Looper.prepare();
        // 实例化两个handler
        handler1 = new Handler();
        handler2 = new Handler();
        // 开始循环处理消息队列
        Looper.loop();
    }
}
在子线程中我们可以创建多个Handler,但是必须手动调用Looper.prepare();和Looper.loop();而且Looper.prepare()必须在Handler创建之前,这是为什么呢?我们回到上文中的代码。因为在创建Handler的时候会检查mLooper 是否为null,为null会抛出异常,并且此处的Looper是跟当前线程绑定的。
public Handler(Callback callback, boolean async) {
        //关联Looper
        mLooper = Looper.myLooper();
        if (mLooper == null) {
            throw new RuntimeException(
                "Can't create handler inside thread that has not called Looper.prepare()");
        }
    }
要保证mLooper 不为null,必须要先调用Looper.prepare()进行Looper的创建并绑定当前线程。
public static void prepare() {
        prepare(true);
    }

    private static void prepare(boolean quitAllowed) {
        if (sThreadLocal.get() != null) {
            throw new RuntimeException("Only one Looper may be created per thread");
        }
        sThreadLocal.set(new Looper(quitAllowed));
    }
在创建完Handler之后还需要手动调用Looper.loop()开启消息循环队列。
阶段总结
好了到这,我们已经分析完Handler以及Looper和MessageQueue的创建和关联,并且还知道,创建完Looper和MessageQueue之后会进入一个死循环一直等待消息的到来并拿出消息进行分发处理,否则会一直阻塞,其中这里的阻塞队列利用了linux的epoll技术。另外,我们还知道一个线程可以有多个Handler,但是只能有一个Looper!
Handler发送消息
有了handler之后,我们就可以使用 post(Runnable), postAtTime(Runnable, long), postDelayed(Runnable, long), sendEmptyMessage(int), sendMessage(Message), sendMessageAtTime(Message, long)和 sendMessageDelayed(Message, long)这些方法向MQ上发送消息了。从上面这些方法你可能会以为我们可以发送2中消息类型:Message和Runnable,但其实发出的Runnable最终也会被封装成Message,下面我们来看代码:
Handler#xxx
public final boolean post(Runnable r)
    {
       return  sendMessageDelayed(getPostMessage(r), 0);
    }

private static Message getPostMessage(Runnable r) {
        Message m = Message.obtain();
        m.callback = r;
        return m;
    }


public final boolean sendMessage(Message msg)
    {
        return sendMessageDelayed(msg, 0);
    }

 public final boolean sendMessageDelayed(Message msg, long delayMillis)
    {
        if (delayMillis < 0) {
            delayMillis = 0;
        }
        return sendMessageAtTime(msg, SystemClock.uptimeMillis() + delayMillis);
    }

 public boolean sendMessageAtTime(Message msg, long uptimeMillis) {
        //得到消息队列
        MessageQueue queue = mQueue;
        if (queue == null) {
            RuntimeException e = new RuntimeException(
                    this + " sendMessageAtTime() called with no mQueue");
            Log.w("Looper", e.getMessage(), e);
            return false;
        }
        return enqueueMessage(queue, msg, uptimeMillis);
    }
可以看到不管通过哪种方法发送消息,最终都会进入到sendMessageAtTime方法,并执行enqueueMessage入队操作。
Handler#enqueueMessage
private boolean enqueueMessage(MessageQueue queue, Message msg, long uptimeMillis) {
        //注意看这行代码 我们将Handler赋值给Message的target
        msg.target = this;
        if (mAsynchronous) {
            msg.setAsynchronous(true);
        }
        return queue.enqueueMessage(msg, uptimeMillis);
    }
阶段总结
通过上面的代码得到一条原则就是:消息发送和处理遵循『谁发送,谁处理』的原则。过程还是比较简单的,下面有2点要注意的地方:
- 我们发送的2中类型消息最终都会被封装成Message对象进行发送
- 在创建完消息之后我们会将Message和Handler通过msg.target = this进行绑定,方便下面进行处理。
Handler处理消息
Looper#loop
public static void loop() {
    //获得一个 Looper 对象
    final Looper me = myLooper();
    // 拿到 looper 对应的 mQueue 对象
    final MessageQueue queue = me.mQueue;
    //死循环监听(如果没有消息变化,他不会工作的) 不断轮训 queue 中的 Message
    for (;;) {
        // 通过 queue 的 next 方法拿到一个 Message
        Message msg = queue.next(); // might block
        //空判断
        if (msg == null)return;
        //消息分发
        msg.target.dispatchMessage(msg);
        //回收操作
        msg.recycleUnchecked();
    }
}
MessageQueue的工作方式是当有消息被放入的时候MessageQueue.next()会返回Message对象,否则就会阻塞在这,拿到消息以后会调用Message绑定的Handler来出来消息,然后回回收消息。下面让我们看下消息是如何被处理。
Handler#dispatchMessage
public void dispatchMessage(Message msg) {
      //callback对应Runnable对象
        if (msg.callback != null) {
            handleCallback(msg);
        } else {
            if (mCallback != null) {
                if (mCallback.handleMessage(msg)) {
                    return;
                }
            }
            handleMessage(msg);
        }
    }

private static void handleCallback(Message message) {
        message.callback.run();
    }

 public void handleMessage(Message msg) {
    }
可以看到,消息处理分成了2中方式,一种是我们传递的Runnable对象,另一种是普通的Message对象。代码很简单,handleCallback直接调用了Runnable.run,而handleMessage是空实现,需要我们重写并且实现它。还有一种处理方式就是mCallback,是在创建Handler的时候通过都找参数传入的,大家回去最上面通过注释可以看到。
阶段总结
通过上面得到代码,我们了解到在处理消息的时候有三种方式,并且是有顺序的。
- 如果有Runnable消息就直接处理Runnable消息,然后忽略其他消息,所以Runnable的优先级是最高的。
- 没有Runnable消息,查找时候有通过构造函数传入的Callback对象,有就处理并检查时候处理成功,成功就直接returan,否则才调用最普通的Message对象处理。
- 普通Message的优先级是最低的,并且需要我们自己来实现handleMessage方法。
- 从上面的代码中我们也验证了Handler谁发送就谁处理的原则,实现方式是通过将Handler赋值给Message.target来实现的。
epoll的真相
到此关于Handler的创建、消息发送以及消息处理都分析完毕了。现在还剩下那个死循环的问题一直困扰着我们,那就是linux底层epoll到底是如何处理消息的呢。本来这段代码想自己分析的,但在查找资料的时候发现已经有好多人分析过了,并且分析的比较透彻,其中MessageQueue涉及到很多native方法,我这里就不分析,下面放上2篇分析的比较好的博文供大家自己来参考。
深入理解 MessageQueue
Looper 中的 loop() 方法是如何实现阻塞的
