CGAffineTransform是iOS封装的一套用于实现仿射变换效果的API,用于绘制2D图形,可以进行位移、旋转、缩放、叠加等效果,常用方法如下:
/** 位移仿射 */
init(translationX tx: CGFloat, y ty: CGFloat)
translatedBy(x tx: CGFloat, y ty: CGFloat)

/** 缩放仿射 */
init(scaleX sx: CGFloat, y sy: CGFloat)
scaledBy(x sx: CGFloat, y sy: CGFloat)

/** 旋转仿射 */init(rotationAngle angle: CGFloat)
rotated(by angle: CGFloat) -> CGAffineTransform

/** 叠加仿射 */
concatenating(_ t2: CGAffineTransform)
CGAffineTransform原理
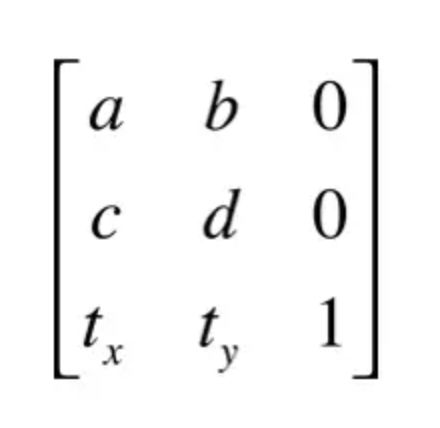
CGAffineTransform --view的2D变换运用得是矩阵乘法,通过最基础的仿射方法init(a: CGFloat, b: CGFloat, c: CGFloat, d: CGFloat, tx: CGFloat, ty: CGFloat),可以发现他有6个参数,可以拼出一下矩阵:
仿射变换的矩阵计算:
根据矩阵计算规则我们可以得到:
x' = ax + cy + tx
y' = bx + dy + ty
实践运用
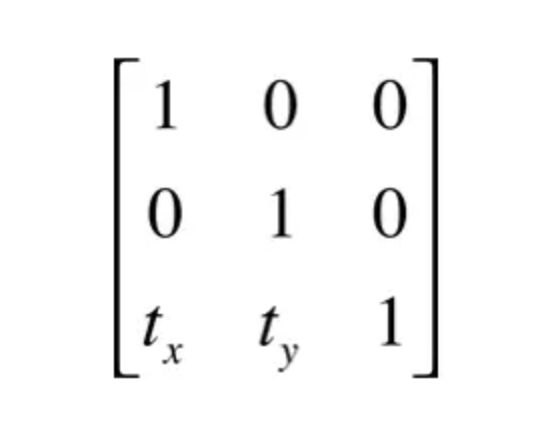
平移
代码如下:
/** t' = [ 1 0 0 1 tx ty ] */
UIView.animate(withDuration: 1) {
  _ = CGAffineTransform(a: 1, b: 0, c: 0, d: 1, tx: 100, ty: 100)
  self.redView?.transform = CGAffineTransform(translationX: 100, y: 100)
  print(NSStringFromCGRect((self.redView?.frame)!))
}
输出结果为:{{200, 200}, {100, 100}}
注: 当tx为正值时,会向x轴正方向平移,反之,则向x轴负方向平移;当ty为正值时,会向y轴正方向平移,反之,则向y轴负方向平移
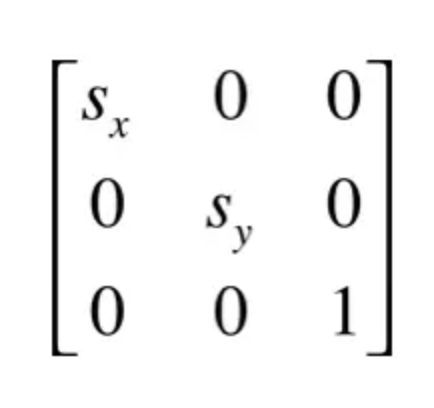
缩放
代码如下:
/** t' = [ sx 0 0 sy 0 0 ] */
UIView.animate(withDuration: 1) {
  self.redView?.transform = CGAffineTransform(scaleX: 2, y: 2)
  print(NSStringFromCGRect((self.redView?.frame)!))
}
注: 当sx为正值时,会在x轴方向上缩放x倍,反之,则在缩放的基础上沿着竖直线翻转;当sy为正值时,会在y轴方向上缩放y倍,反之,则在缩放的基础上沿着水平线翻转
效果图:
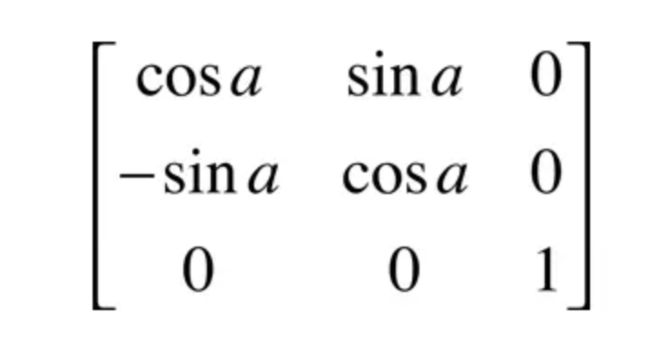
旋转
代码如下:
/** t' = [ cos(angle) sin(angle) -sin(angle) cos(angle) 0 0 ] */
UIView.animate(withDuration: 1) {
self.redView?.transform = CGAffineTransform(rotationAngle: CGFloat(M_PI_2))  print(NSStringFromCGRect((self.redView?.frame)!))
}
效果图:
注1: 当angle为正值时,逆时针旋转坐标系统,反之顺时针旋转坐标系统
CATransform3D仿射变换
3D仿射在iOS中是通过CATransform3D实现的,它有着与CGAffineTrans类似的一组API,但他们有个重要的区别在于CATransform3D的效果只能加在layer的transform属性上,而CGAffineTransform直接加在View上。
3D仿射矩
类似于2D仿射,3D仿射也有一个基础矩阵,并且比2D的多一个维度,计算规则如下:
根据矩阵计算规则我们可以得到:
x' = m11x + m21y + m31*z + m41(tx)
y' = m12x + m22y + m32*z + m42(ty)
z' = m13x + m23y + m33*z + m43(tx)
CATransform3D有16个存储属性,含义如下:
平移因子: m41(x位置) m42(y位置) m43(z位置) 缩放因子: m11(x位置) m22(y位置)
切变因子: m21(x位置) m12(y位置)
旋转因子: m13(x位置) m31(y位置)
透视因子: m34(有旋转才能看出效果
常用方法:
/** 旋转动画 */
CATransform3DMakeRotation(_ angle: CGFloat, _ x: CGFloat, _ y: CGFloat, _ z: CGFloat) -> CATransform3D
/** 缩放动画 */
CATransform3DMakeScale(_ sx: CGFloat, _ sy: CGFloat, _ sz: CGFloat) -> CATransform3D /** 位移动画 */
CATransform3DMakeTranslation(_ tx: CGFloat, _ ty: CGFloat, _ tz: CGFloat) -> CATransform3D
/** 检查2个3D仿射效果是否相同 */
CATransform3DEqualToTransform(_ a: CATransform3D, _ b: CATransform3D) -> Bool
/** 检查是否有做过仿射3D效果 */
CATransform3DIsIdentity(_ t: CATransform3D) -> Bool
/** 3D仿射转换成2D仿射 */
CATransform3DGetAffineTransform(_ t: CATransform3D) -> CGAffineTransform
/** 2D仿射转换成3D仿射 */
CATransform3DMakeAffineTransform(_ m: CGAffineTransform) -> CATransform3D
/** 3D仿射效果反转(反效果,比如原来扩大,就变成缩小) */
CATransform3DInvert(_ t: CATransform3D) -> CATransform3D
/** 叠加3D仿射效果 */
CATransform3DConcat(_ a: CATransform3D, _ b: CATransform3D) -> CATransform3D
/*    这个是一个初始化矩阵,带入矩阵算法计算后的结构会得到    x'=x , y'=y , z'=z    它的作用是清除之前对矩阵设置的仿射效果,或者用来初始化一个原始无效果的仿射矩阵
        [ 1 0 0 0 ]
        [ 0 1 0 0 ]
        [ 0 0 1 0 ]
        [ 0 0 0 1 ]*/
CATransform3DIdentity: CATransform3D
实战:
代码如下:
   static var j = 0
    @objc func touches3DTransform() {
        switch ViewController.j {
        case 0:
            /** 旋转 */
            UIView.animate(withDuration: 1) {
                self.blueBtn?.layer.transform = CATransform3DMakeRotation(CGFloat(M_PI), 0, 0, 1)
            }
        case 1:
            /** 平移 t' =  [1 0 0 0; 0 1 0 0; 0 0 1 0; tx ty tz 1] */
            /**  */
            UIView.animate(withDuration: 1) {
                self.blueBtn?.layer.transform = CATransform3DMakeTranslation(100, 100, 100)
            }
        case 2:
            /** 缩放 t' = [sx 0 0 0; 0 sy 0 0; 0 0 sz 0; 0 0 0 1] */
            UIView.animate(withDuration: 1) {
                self.blueBtn?.layer.transform =  CATransform3DMakeScale(2, 1, 1)
            }
        case 3:
            /** 旋转缩放 t' = rotation(angle, x, y, z) * t */
            UIView.animate(withDuration: 1) {
                self.blueBtn?.layer.transform = CATransform3DRotate(CATransform3DMakeScale(1, 1, 1), CGFloat(M_PI), 0, 1, 0)
            }
            print(NSStringFromCGRect((blueBtn?.frame)!))
        case 4:
            /** 反转 */
            UIView.animate(withDuration: 1) {
                self.blueBtn?.layer.transform = CATransform3DInvert(CATransform3DMakeScale(2, 2, 1))
            }
            print(NSStringFromCGRect((blueBtn?.frame)!))
        default:
            print("other")
        }
        ViewController.j += 1
    }
效果图:
参考资料:http://liuyanwei.jumppo.com/2015/11/24/iOS-affine-transfermation-animation.html
--------------------- 本文来自 蜗牛非牛 的CSDN 博客 ,全文地址请点击:https://blog.csdn.net/qq_34003239/article/details/82852822?utm_source=copy


