前言
由于项目需要,近段时间开发的夜间模式功能。主流的方案如下:
1、通过切换theme实现
2、通过resource id映射实现
3、通过Android Support Library的实现
方案选择
- 切换theme实现夜间模式
采用这种实现方式的代表是和知乎~实现策略如下:
1)在xml中定义两套theme,差别仅仅是颜色不同
自定义颜色:
在layout布局文件中,如 TextView 里的 android:textColor="?attr/clockTextColor" 是让其字体颜色跟随所设置的 Theme。
2)Java代码相关实现:
@Override
  protected void onCreate(Bundle savedInstanceState) {
      super.onCreate(savedInstanceState);
      supportRequestWindowFeature(Window.FEATURE_NO_TITLE);
      initData();
      initTheme();
      setContentView(R.layout.activity_day_night);
      initView();
  }
在每次setContentView之前必须调用initTheme方法,因为当 View 创建成功后 ,再去 setTheme 是无法对 View 的 UI 效果产生影响的。
  /**
     * 刷新UI界面
     */
    private void refreshUI() {
        TypedValue background = new TypedValue();//背景色
        TypedValue textColor = new TypedValue();//字体颜色
        Resources.Theme theme = getTheme();
        theme.resolveAttribute(R.attr.clockBackground, background, true);
        theme.resolveAttribute(R.attr.clockTextColor, textColor, true);

        mHeaderLayout.setBackgroundResource(background.resourceId);
        for (RelativeLayout layout : mLayoutList) {
            layout.setBackgroundResource(background.resourceId);
        }
        for (CheckBox checkBox : mCheckBoxList) {
            checkBox.setBackgroundResource(background.resourceId);
        }
        for (TextView textView : mTextViewList) {
            textView.setBackgroundResource(background.resourceId);
        }

        Resources resources = getResources();
        for (TextView textView : mTextViewList) {
            textView.setTextColor(resources.getColor(textColor.resourceId));
        }

        int childCount = mRecyclerView.getChildCount();
        for (int childIndex = 0; childIndex < childCount; childIndex++) {
            ViewGroup childView = (ViewGroup) mRecyclerView.getChildAt(childIndex);
            childView.setBackgroundResource(background.resourceId);
            View infoLayout = childView.findViewById(R.id.info_layout);
            infoLayout.setBackgroundResource(background.resourceId);
            TextView nickName = (TextView) childView.findViewById(R.id.tv_nickname);
            nickName.setBackgroundResource(background.resourceId);
            nickName.setTextColor(resources.getColor(textColor.resourceId));
            TextView motto = (TextView) childView.findViewById(R.id.tv_motto);
            motto.setBackgroundResource(background.resourceId);
            motto.setTextColor(resources.getColor(textColor.resourceId));
        }

        //让 RecyclerView 缓存在 Pool 中的 Item 失效
        //那么,如果是ListView,要怎么做呢?这里的思路是通过反射拿到 AbsListView 类中的 RecycleBin 对象,然后同样再用反射去调用 clear 方法
        Class recyclerViewClass = RecyclerView.class;
        try {
            Field declaredField = recyclerViewClass.getDeclaredField("mRecycler");
            declaredField.setAccessible(true);
            Method declaredMethod = Class.forName(RecyclerView.Recycler.class.getName()).getDeclaredMethod("clear", (Class[]) new Class[0]);
            declaredMethod.setAccessible(true);
            declaredMethod.invoke(declaredField.get(mRecyclerView), new Object[0]);
            RecyclerView.RecycledViewPool recycledViewPool = mRecyclerView.getRecycledViewPool();
            recycledViewPool.clear();

        } catch (NoSuchFieldException e) {
            e.printStackTrace();
        } catch (ClassNotFoundException e) {
            e.printStackTrace();
        } catch (NoSuchMethodException e) {
            e.printStackTrace();
        } catch (InvocationTargetException e) {
            e.printStackTrace();
        } catch (IllegalAccessException e) {
            e.printStackTrace();
        }

        refreshStatusBar();
    }

    /**
     * 刷新 StatusBar
     */
    private void refreshStatusBar() {
        if (Build.VERSION.SDK_INT >= 21) {
            TypedValue typedValue = new TypedValue();
            Resources.Theme theme = getTheme();
            theme.resolveAttribute(R.attr.colorPrimary, typedValue, true);
            getWindow().setStatusBarColor(getResources().getColor(typedValue.resourceId));
        }
    }
refreshUI函数起到模式切换的作用。通过 TypedValue 和 Theme.resolveAttribute 在代码中获取 Theme 中设置的颜色,来重新设置控件的背景色或者字体颜色等等。refreshStatusBar刷新状态栏。
/**
     * 展示一个切换动画
     */
    private void showAnimation() {
        final View decorView = getWindow().getDecorView();
        Bitmap cacheBitmap = getCacheBitmapFromView(decorView);
        if (decorView instanceof ViewGroup && cacheBitmap != null) {
            final View view = new View(this);
            view.setBackgroundDrawable(new BitmapDrawable(getResources(), cacheBitmap));
            ViewGroup.LayoutParams layoutParam = new ViewGroup.LayoutParams(ViewGroup.LayoutParams.MATCH_PARENT,
                    ViewGroup.LayoutParams.MATCH_PARENT);
            ((ViewGroup) decorView).addView(view, layoutParam);
            ObjectAnimator objectAnimator = ObjectAnimator.ofFloat(view, "alpha", 1f, 0f);
            objectAnimator.setDuration(300);
            objectAnimator.addListener(new AnimatorListenerAdapter() {
                @Override
                public void onAnimationEnd(Animator animation) {
                    super.onAnimationEnd(animation);
                    ((ViewGroup) decorView).removeView(view);
                }
            });
            objectAnimator.start();
        }
    }

    /**
     * 获取一个 View 的缓存视图
     *
     * @param view
     * @return
     */
    private Bitmap getCacheBitmapFromView(View view) {
        final boolean drawingCacheEnabled = true;
        view.setDrawingCacheEnabled(drawingCacheEnabled);
        view.buildDrawingCache(drawingCacheEnabled);
        final Bitmap drawingCache = view.getDrawingCache();
        Bitmap bitmap;
        if (drawingCache != null) {
            bitmap = Bitmap.createBitmap(drawingCache);
            view.setDrawingCacheEnabled(false);
        } else {
            bitmap = null;
        }
        return bitmap;
    }
showAnimation 是用于展示一个渐隐效果的属性动画,这个属性作用在哪个对象上呢?是一个 View ,一个在代码中动态填充到 DecorView 中的 View。
知乎之所以在夜间模式切换过程中会有渐隐效果,是因为在切换前进行了截屏,同时将截屏拿到的 Bitmap 设置到动态填充到 DecorView 中的 View 上,并对这个 View 执行一个渐隐的属性动画,所以使得我们能够看到一个漂亮的渐隐过渡的动画效果。而且在动画结束的时候再把这个动态添加的 View 给 remove 了,避免了 Bitmap 造成内存飙升问题。
- resource id映射实现夜间模式
通过id获取资源时,先将其转换为夜间模式对应id,再通过Resources来获取对应的资源。
public static Drawable getDrawable(Context context, int id) {
    return context.getResources().getDrawable(getResId(id));
}
public static int getResId(int defaultResId) {    if (!isNightMode()) {
        return defaultResId;
    }
    if (sResourceMap == null) {
        buildResourceMap();
    }
    int themedResId = sResourceMap.get(defaultResId);
    return themedResId == 0 ? defaultResId : themedResId;
}
private static void buildResourceMap() {
    sResourceMap = new SparseIntArray();
    sResourceMap.put(R.drawable.common_background, R.drawable.common_background_night);
    // ...
}
这个方案简单粗暴,麻烦的地方和第一种方案一样:每次添加资源都需要建立映射关系,刷新UI的方式也与第一种方案类似,貌似今日头条,网易新闻客户端等主流新闻阅读应用都是通过这种方式实现的夜间模式。
- 通过Android Support Library实现
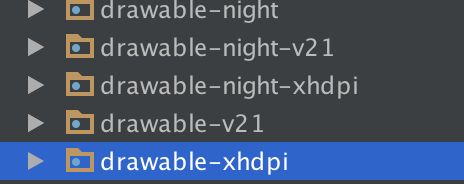
1)在res目录中为夜间模式配置专门的目录,以-night为后缀
2)在Application中设置夜间模式
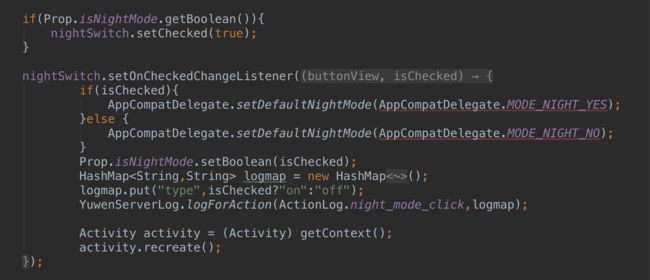
3)夜间模式切换
夜间模式实现
三种方案比较,第二种太暴力,不适合项目后期开发;第一种方法需要做配置的地方比第三种方法多。总体来说,第三种方法最简单,类似整个app内有一个夜间模式的总开关,切换了以后就不用管了。最后采用第三种方案!
通过Android Support Library实现夜间模式虽然简单,但是当中也碰到了一些坑。现做一下记录:
1、 横屏切换的时候,夜间模式混乱
基于Android Support Library的夜间模式,相当于是support库来帮忙关键相关的资源,有时候会出现错误的情况。比如说app横竖屏切换之后!!经测试发现,每次调起一个横屏的Activity,然后退出,整个app的夜间模式就乱了,部分的UI调用的是日间模式的资源~~~
这里认为的加了一个多余的设定:
    /**
     * 刷新UI_MODE模式
     */
    public void refreshResources(Activity activity) {

        if (Prop.isNightMode.getBoolean()) {
            updateConfig(activity, Configuration.UI_MODE_NIGHT_YES);
        } else {
            updateConfig(activity, Configuration.UI_MODE_NIGHT_NO);
        }
    }

    /** * google官方bug,暂时解决方案 * 手机切屏后重新设置UI_MODE
     模式(因为在DayNight主题下,切换横屏后UI_MODE会出错,会导致
     资源获取出错,需要重新设置回来)
     */
    private void updateConfig(Activity activity, int uiNightMode) {
        Configuration newConfig = new
                Configuration(activity.getResources().getConfiguration());
        newConfig.uiMode &= ~Configuration.UI_MODE_NIGHT_MASK;
        newConfig.uiMode |= uiNightMode;
        activity.getResources().updateConfiguration(newConfig, null);
    }
在每次退出横屏的时候,调用这个方法,强制刷新一次config
2、 drawable xml文件中部分颜色值 日间/夜间 弄反了
Android Support Library实现的夜间模式,资源的获取碰到了一些坑。我们经常会在drawable文件夹中定义一些xml来做背景形状、背景颜色。
-
按照Android Support Library的介绍,需要为夜间模式创建一个为night借我的目录,那么这里就可以有两种理解:
1)在values/color.xml 和values-night/color.xml分别为app_textbook_bg_color定义不同的色值
2)在values/color.xml 和values-night/color.xml分别为app_textbook_bg_color定义不同的色值;此外,需要分别定义drawable/bg_textbook.xml和drawable-night/bg_textbook.xml,两个文件的内容可以一样。
这里碰到了一些坑。原先采用的是第一种方法,这样代码改动少,看起来一目了然。但是,,不同厂商的手机会有不一样的表现!!部分手机,在夜间模式的时候还是用的日间的资源;杀了app重进才会好。
我的理解是Android会对资源做缓存~ 缓存的时候会将app_textbook_color解析出来并缓存;假设日间模式app_textbook_color为#FFFFFF,我们设置夜间模式切换,这时候不同手机厂商的策略不一样,有些厂商会把缓存清除,所以切成夜间模式的时候app_textbook_color的色值会改变,夜间模式正常;但是有些厂商应该不会清理缓存,夜间模式切换之后,拿的是日间模式缓存下的色值,也就是#FFFFFF,这样就出问题了~~
以上为个人见解,建议碰到这种情况,多在drawable下写一个xml防止个别手机出错。
3、切换夜间模式需要restartActivity,会闪一下
这也是一个比较坑的地方。夜间模式切换以后,需要重新获取一遍资源,最简单的方法是restart一下。现在我采用的就是这种简单粗暴的方法,用户体验比较不友好,后期需要参考知乎的实现,改进实现。
参考链接
Android夜间模式最佳实践
知乎和的夜间模式实现套路
AppCompat v23.2 - 夜间模式,你所不知道的坑


