接口第一章:
接口业务方向
接口规范:http://open.weibo.com/wiki/2/comments/by_me
接口管理平台工具:
http://yapi.demo.qunar.com/
https://www.eolinker.com/
接口测试框架选择
业务:postman jmeter
业务自动化:python robotframwork(备注:只支持python 2.8 3以上不支持) Python 基于requests(搭建一套数据分离框架)
java httpclient java+maven+testng+rest-assured搭建的一套自动化框架
charles安装配置:
https://blog.csdn.net/longxingzhiwen/article/details/70313773
1.设置端口号
2.安装证书 chls.pro/ssl charlesproxy.com/getssl
抓接口乱码处理
https://www.cnblogs.com/itcqx/p/6529439.html
http://www.paincker.com/charles-charset-incorrect
接口写用例:
查询选车列表:https://selectcar.yiche.com/selectcarforapp?mid=7&s=4&page=1&pagesize=20&cityId=201
mid是品牌6 7 8 9
page多少页
pagesize这一页显示多少条
charles抓包步骤:
第一步: cmd-ipconfig找到IP,手机设置IP和端口8888
第二步:手机打开浏览器浏览器装入装入证书手机浏览器装证书两种方式chls.pro/ssl charlesproxy.com/getssl(注意事项:1.如果你的手机自动浏览器装不上证书,可以下载一个chrome浏览器去安装信任(iOS-通用-信任) 2.如果装后抓不到一定要关闭防火墙)
第三步:charles help->ssl proxying->install下一步下一步安装
Python自动化方向:
了解熟悉requests: https://2.python-requests.org//zh_CN/latest/user/quickstart.html
安装方法:http://www.lfd.uci.edu/~gohlke/pythonlibs pip install requests
公共接口地址:https://blog.csdn.net/c__chao/article/details/78573737
python接口第二章:
1.字典转化JSON(json.dumps() json转化为字典(json.loads())
2.unittest官方文档
https://docs.python.org/2/library/unittest.html
汉化精简版:
http://www.testertechnology.com/posts/detail?id=661
第一个知识点:
#classmethod 修饰符对应的函数不需要实例化,不需要 self 参数,但第一个参数需要是表示自身类的 cls 参数
classmethod.py 中
#@classmethod #方法调用不用去实例化
#① setup(): 每个测试函数运行前运行
#② teardown(): 每个测试函数运行完后执行
#③ setUpClass(): 必须使用 @ classmethod装饰器, 所有test运行前运行一次
#④ tearDownClass(): 必须使用 @ classmethod装饰器, 所有test运行完后运行一次
第二个知识点:
parameterized参数化: 安装 https://pypi.org/project/parameterized/
****************************************************
安装:pip install parameterized
导入:from parameterized import parameterized
*****parameterized参数化运行的方式,必须是普通方式运行,如果用unittest方式运行会报错
安装包的方式:
1.cmd中-pip install parameterized
2.第二种安装方式:pycharm类中先引入对应的包名进入default settings中->添加输入包名安装如果按照过程中失败,那么使用下面方法
Pycharm安装package出现报错:module 'pip' has no attribute 'main'解决方案如下:
https://www.cnblogs.com/Fordestiny/p/8901100.html
如果你们在pycharm中project interpreter中下载包提示erro一直下载失败,那么久需要进入 helpers/packaging_tool.py文件找到do_install修改如下代码:
def do_install(pkgs):
try:
# import pip
try:
from pip._internal import main
except Exception:
from pip import main
except ImportError:
error_no_pip()
return main(['install'] + pkgs)
def do_uninstall(pkgs):
try:
# import pip
try:
from pip._internal import main
except Exception:
from pip import main
except ImportError:
error_no_pip()
return main(['uninstall', '-y'] + pkgs)
**********************************************************************************
安装:pip install parameterized
导入:from parameterized import parameterized
使用方法:parmeterdemo1.py
如果运行控制台出现此类错误,TypeError: don't know how to make test from: None 说明运行方法不能使用unittest方式运行
要使用普通方法运行
3. pycharm类中先引入对应的包名,页面左上角有个小灯泡图标安装选择install xxx包名
第三个知识点:
unittest断言归纳:http://www.testertechnology.com/posts/detail?id=663 tclogin6
代码注释:#ctrl+/ 注释和取消注释
第四个知识点:
logging使用说明:
logging有什么作用:主要打印一些日志信息或者出错信息,方便排查问题(同学们只需要掌握,会使用,不需要会写,这个其实就是公共的方法)
logging.basicConfig(level=logging.DEBUG, format=LOG_FORMAT, datefmt=DATE_FORMAT)--控制台打印日志(basicConfig)方法
http://www.testertechnology.com/posts/detail?id=664
官网:https://docs.python.org/3/library/logging.html https://www.cnblogs.com/liujiacai/p/7804848.html
http://www.testertechnology.com/user/home?id=87
*********************************************************************
第四章 python 参数化结合怎么读取excel数据
xlrd模块:
Python的三方库xlrd用于对excel文件进行读取,可以是“.xls”或“.xlsx”格式(旧版本可能不支持“.xlsx”)。
下载安装:https://pypi.org/project/xlrd/#files,或者使用pip安装 “pip install xlrd”
API文档:https://xlrd.readthedocs.io/en/latest/api.html
xlrd常用的方法:
work_book = xlrd.open_workbook(filename):打开指定路径的excel文件,返回excel处理对象,但无法打开不存在的文件。
work_book.nsheets:返回excel中的sheet个数。
work_book.sheets():加载并返回excel中的所有sheet对象组成的列表。
work_book.sheet_by_index(sheetx):返回对应索引的sheet对象,索引范围为range(work_book.nsheets)。
work_book.sheet_by_name(sheet_name):返回对应sheet名称的sheet对象。
work_book.sheet_names():返回excel中所有sheet名称组成的列表。
sheet.book:sheet所属的work_book。
sheet.name:sheet的名称。
sheet.nrows:sheet中的行数。
sheet.ncols:sheet中的列数。
sheet.row(rowx):返回对应行的cell对象组成的列表。
sheet.row_slice(rowx, start_colx=0, end_colx=None):返回对应行的cell对象组成的列表,也自定义切片获取行的cell对象列表。
sheet.col(colx):返回对应列的cell对象组成的列表。
sheet.col_slice(colx, start_rowx=0, end_rowx=None):返回对应列的cell对象组成的列表,也自定义切片获取行的cell对象列表。
sheet.cell(rowx, colx):返回对应单元格的cell对象。
sheet.cell_value(rowx, colx):返回对应单元格的值。
sheet.row_len(rowx):返回对应行的有效单元格数。
sheet.get_rows():返回一个行的迭代器,每次迭代返回一个cell对象组成的列表,即这一行的cell对象列表。
sheet.row_values(rowx, start_colx=0, end_colx=None):返回对应行的值的列表,也可以自定义切片获取某些值。
sheet.col_values(colx, start_rowx=0, end_rowx=None):返回对应列的值的列表,也可以自定义切片获取某些值。
sheet.cell(rowx, colx).value:返回对应单元格的值文档。
接口第四章:xml和config.ini配置读取
作用:1.xml提高接口灵活度参数可随时配置(xml组装:www.baidu.com/backend/student/unauth/login)
2.config切换线上线下环境方便
xml:
#Python有三种方法解析XML,SAX,DOM,以及ElementTree
sax:解析器主要解析xml
dom对象结构:
#登录接口
#ElementTree 例如:url下面->group->module->action 节点 统称为elementtree节点
#as 修饰定义别名
xml:节点可以随意去配置,主要满足你的业务需求即可
xml必须导入该方法:from xml.etree import ElementTree as ElementTree
# 解析xml文档
tree = ElementTree.parse(url_path)
# Element.iter(tag=None):遍历该Element所有后代,也可以指定tag进行遍历寻找。
# Element.findall(path):查找当前元素下url或path能够匹配的直系节点。
# Element.find(path):查找当前元素下tag或path能够匹配的首个直系节点。
# Element.text: 获取当前元素的text值。
# Element.get(key, default=None):获取元素指定key对应的属性值,如果没有该属性,则返回default值
config.ini 配置
1.创建一个config配置文件,格式如下:
[HTTP]
scheme = http
baseurl =http://xingmengwuhen.test.com
port = 8080
timeout = 10
2.封装一个读取配置文件的公共方法
import configparser
#1.获取配置文件路径
proDir = os.path.split(os.path.realpath(__file__))[0]
configPath = os.path.join(proDir, "config.ini")
#2.打开config.ini读取配置read()
fd = open(configPath)
data = fd.read()
#3.生成conf对象
self.cf = configparser.ConfigParser();
#4.载入配置文件
self.cf.read(configPath)
#5.获取对应配置信息
def get_http(self, name):
self.cf.get 获取 [HTTP],‘name’
#6.from config import readconfig
#调用方法
readcon=readconfig.Read()
7.读取
host=readcon.get_http("port")
baseurl=readcon.get_http("baseurl")
详细信息:http://zixuephp.net/article-431.html
综合练习:
xml+config+json格式接口请求
接口:
config:http://api-shuangshi.tengyue360.com+xml:/backend/student/unauth/login
http://api-shuangshi.tengyue360.com/backend/student/unauth/login
json格式请求:
{
"phone": "14050000000",
"password": "e10adc3949ba59abbe56e057f20f883e",
"messageCode": "",
"loginType": 1,
"timestamp": ""
}
**************
节点获取:
例如:
{
'errno': 200,
'error': '操作成功',
'data': {
'id': '1027',
'name': '测试'
},
'token': None
}
aa=res.json();
print(aa['error'])
print(aa['data']['id'])
**
https://selectcar.yiche.com/selectcarforapp?mid=7&s=4&page=1&pagesize=20&cityId=201
{
"status": 1,
"message": "ok",
"data": {
"count": 26,
"carNumber": 236,
"resList": [
{
"masterId": 7,
"serialID": 1879,
"name": "卡罗拉",
"allSpell": "kaluola",
节点获取:
cc=res.json();(备注:JSON.data.resList[0].name)
print(cc['data']['resList'][0]['name'])
第五章:Python自动化框架搭建
好处:1.采用数据分离,目录结构分层后期好维护
2.线上线下环境随意切换灵活
3.可以实现多接口使用EXCEL操作
4.持续集成比较清晰,简单
5.可以持续集成方便报告查看
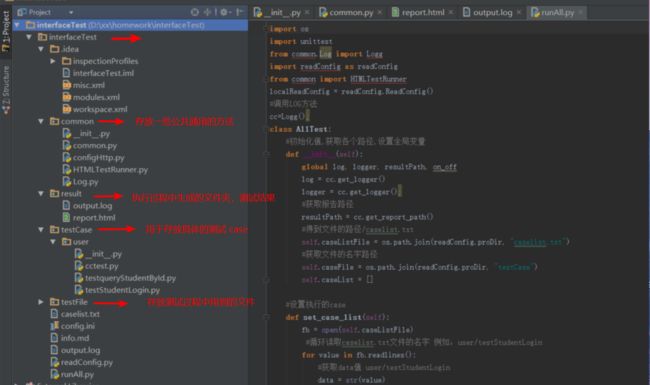
目录 结构:
common:存放一些公共通用的方法
result:执行过程中生成的文件夹,里面存放每次测试的结果
testCase:用于存放具体的测试case
testFile:存放测试过程中用到的文件,包括上传的文件,测试用例
caselist:txt文件,配置每次执行的case名称
config:配置一些常量,例如数据库的相关信息,接口的相关信息参数等
readConfig: 用于读取config配置文件中的内容
runAll:用于执行case
_init_.py 区分文件夹导入的包
token 是什么?是一个令牌,一种身份的验证
############ hTMLTETRUNNER报告结果,加载之后就让显示接口部信息在