编译安装ORB-SLAM2获得三维点云地图(搜遍全网,就这一篇能看懂)
高翔博士对ORBSLAM2修改增加了点云模块,https://github.com/gaoxiang12/ORBSLAM2_with_pointcloud_map 在编译过程中,遇到很多问题,特来记录一下。以便之后的同学可以快速上手。注意环境是ubuntu16.04。
1、下载源码
git clone https://github.com/gaoxiang12/ORBSLAM2_with_pointcloud_map.git
2、解压 orbslam2_modified.zip
解压会得到两个文件夹,分别为 g2o_with_orbslam2 和 ORB_SLAM2_modified,与原orbslam2_modified合并到同一个文件夹
3、进入g2o_with_orbslam2,对cmakelists.txt下的代码进行注释
同时对g2o文件夹下的cmakelists.txt下的代码进行注释
4、回到g2o_with_orbslam2主文件夹,进行编译
cd g2o_with_orbslam2
mkdir build
cmake ..
make -j8
sudo make install
–遇到编译错误时,作如下修改:
(1)修改g2o/types/slam2d/edge_se2_pointxy_bearing.cpp
//t.setRotation(t.rotation().angle()+_measurement);
改为:
t.setRotation((Eigen::Rotation2Dd)(t.rotation().angle()+_measurement));
(2)打开/g2o_with_orbslam2/g2o/solvers/eigen/linear_solver_eigen.h
//typedef Eigen::PermutationMatrix PermutationMatrix;
改为:
typedef Eigen::PermutationMatrix PermutationMatrix;
//typedef Eigen::PermutationMatrix PermutationMatrix;
5、编译DBoW2
cd ORB_SLAM2_modified/Thirdparty/DBoW2
mkdir build
cd build
cmake .. -DCMAKE_BUILD_TYPE=Release
make
#sudo make install
不出意外,应该是已经编译过了的。
6、进入/ORB_SLAM2_modified文件夹
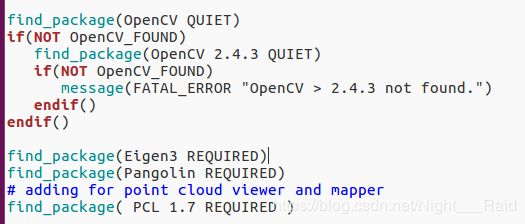
此处可以将CMakeLists.txt进行一定的修改,避免opencv、Eigen等版本引发的错误
然后进行编译:
mkdir build
cd build
cmake ..
make -j8
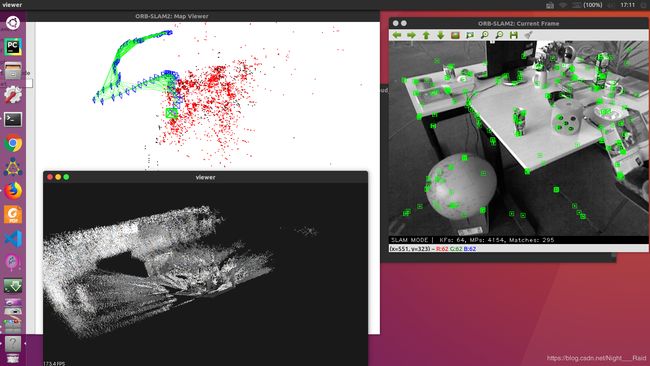
7、用单目/双目/rgbd来做做实验
将数据集以及associate.py,放在 ORB_SLAM2_modified目录下,运行如下命令:
python associate.py rgb.txt depth.txt > associations.txt
执行完毕后可运行示例:
./Example/RGB-D/rgbd_tum Vocabulary/ORBvoc.txt path_to_settings path_to_sequence  path_to_association
例如:
./Examples/RGB-D/rgbd_tum Vocabulary/ORBvoc.txt Examples/RGB-D/TUM1.yaml Data/rgbd_dataset_freiburg1_desk Data/rgbd_dataset_freiburg1_desk/associations.txt
这里大家往往会遇到以下几个问题:
(1)无法显示点云图,只显示三色坐标,这里可以先尝试鼠标缩放一下并移动一些视角,若还未显示点云图,多半是你使用了TUM2.yaml和TUM3.yaml,相对于TUM1.yaml末尾少了一句代码(当年太傻,运行到这一步死活出不来就放弃了,哎):
PointCloudMapping.Resolution: 0.01
(2)点云未显示彩色:这套代码我也试了好多遍,缺失在颜色这一块有点问题我未能解决,先推荐另外一个版本,亲测可以显示彩色点云图。
ORB-SLAM2 rgbd稠密地图 (地图可回环)
https://github.com/tiantiandabaojian/ORB-SLAM2_RGBD_DENSE_MAP.git
编译的时候不推荐 build.sh 的方式,g2o、DBoW2和主文件依次编译即可。
8、ROS+ORB-SLAM2+RealsenseD435i
8.1 编译ORB-SLAM2
chmod +x build_ros.sh
./build_ros.sh
注意: 如果在编译构建的过程中出现关于boost库的错误"Undefined reference to symbol ‘_ZN5boost6system15system_categoryEv’",请参考 https://github.com/raulmur/ORB_SLAM2/issues/494
8.2 修改ros_rgbd.cc
把rgb_topic和depth_topic订阅话题修改为
 "/camera/color/image_raw";
 "/camera/aligned_depth_to_color/image_raw";
#重新编译:
source /home/hong/ROS/orbslam_map_ws/devel/setup.bash
chmod +x build.sh
./build.sh
chmod +x build_ros.sh
./build_ros.sh
8.3 启动RGB-D相机 realsense D435i,获得内参矩阵
打开三个终端
roscore
roslaunch realsense2_camera rs_rgbd.launch
rostopic echo /camera/color/camera_info
运行之后获得:
K就是我们得到的内参矩阵写成了向量模式。
K = [fx 0 cx 0 fy cy 0 0 1 ]
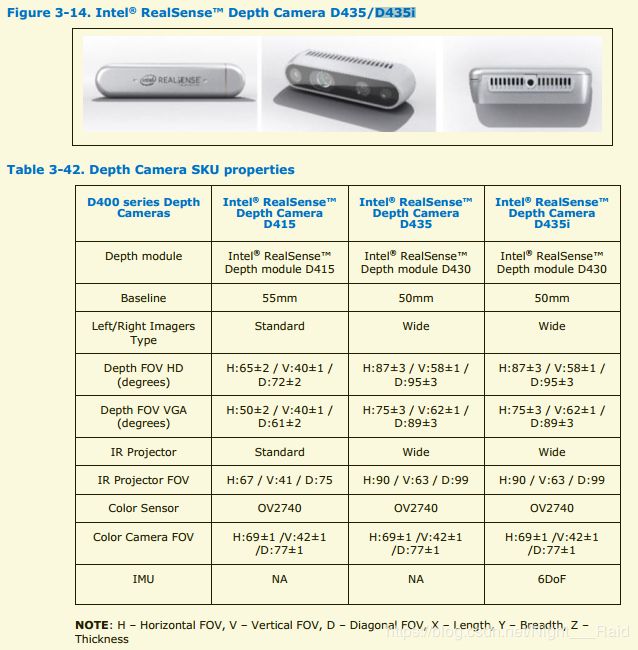
然后就是baseline,根据官方datasheet,
D435i 的baseline为
50mm,bf的值为bf = baseline (in meters) * fx。
根据相机参数得到的D435i.yaml文件
%YAML:1.0

#--------------------------------------------------------------------------------------------
# Camera Parameters. Adjust them!
#--------------------------------------------------------------------------------------------

# Camera calibration and distortion parameters (OpenCV)
Camera.fx: 605.1199340820312
Camera.fy: 603.6488647460938
Camera.cx: 325.7075500488281
Camera.cy: 245.46426391601562

Camera.k1: 0.0
Camera.k2: 0.0
Camera.p1: 0.0
Camera.p2: 0.0
Camera.p3: 0.0

Camera.width: 640
Camera.height: 480

# Camera frames per second
Camera.fps: 30.0

# IR projector baseline times fx (aprox.)
# bf = baseline (in meters) * fx, D435i的 baseline = 50 mm
Camera.bf: 30.

# Color order of the images (0: BGR, 1: RGB. It is ignored if images are grayscale)
Camera.RGB: 1

# Close/Far threshold. Baseline times.
ThDepth: 40.0

# Deptmap values factor
DepthMapFactor: 1000.0

#--------------------------------------------------------------------------------------------
# ORB Parameters
#--------------------------------------------------------------------------------------------

# ORB Extractor: Number of features per image
ORBextractor.nFeatures: 1000

# ORB Extractor: Scale factor between levels in the scale pyramid
ORBextractor.scaleFactor: 1.2

# ORB Extractor: Number of levels in the scale pyramid
ORBextractor.nLevels: 8

# ORB Extractor: Fast threshold
# Image is divided in a grid. At each cell FAST are extracted imposing a minimum response.
# Firstly we impose iniThFAST. If no corners are detected we impose a lower value minThFAST
# You can lower these values if your images have low contrast
ORBextractor.iniThFAST: 20
ORBextractor.minThFAST: 7

#--------------------------------------------------------------------------------------------
# Viewer Parameters
#--------------------------------------------------------------------------------------------
Viewer.KeyFrameSize: 0.05
Viewer.KeyFrameLineWidth: 1
Viewer.GraphLineWidth: 0.9
Viewer.PointSize:2
Viewer.CameraSize: 0.08
Viewer.CameraLineWidth: 3
Viewer.ViewpointX: 0
Viewer.ViewpointY: -0.7
Viewer.ViewpointZ: -1.8
Viewer.ViewpointF: 500

PointCloudMapping.Resolution: 0.01
meank: 50
thresh: 2.0
8.4 运行SLAM
roscore
roslaunch realsense2_camera rs_rgbd.launch
rosrun ORB_SLAM21 RGBD Vocabulary/ORBvoc.txt Examples/ROS/ORB_SLAM21/D435i.yaml
注意:这里有一点小细节值得注意,当本地安装有多个ORB-SLAM版本时,记得把 /Examples/ROS 目录下 ORB-SLAM2文件夹重命名,用于区别各版本,这样rosrun的时候,便于区分。
export ROS_PACKAGE_PATH=${ROS_PACKAGE_PATH}:/home/jinrui/ORB-SLAM2_RGBD_DENSE_MAP/Examples/ROS/ORB_SLAM21
export ROS_PACKAGE_PATH=${ROS_PACKAGE_PATH}:/home/jinrui/ORBSLAM2_with_pointcloud_map/orbslam2_modified/ORB_SLAM2_modified/Examples/ROS/ORB_SLAM20


