ES安装的那些坑
安装ES:
unzip elasticsearch-5.1.1.zip
cp -r elasticsearch-5.1.1 /home/stt/server/
修改配置文件: (注意配置项的冒号后面要有空格)
cluster.name: stt-ELK //修改集群的名字,以免在网络上混乱串门,加入别的集群里面
node.name: ELK-node1 //自定义节点名字
path.data: /home/stt/server/elasticsearch-5.1.1/data //自定义数据存储路径
path.logs: /home/stt/server/elasticsearch-5.1.1/logs //自定义日志存储路径
bootstrap.memory_lock: false
network.host: 0.0.0.0 //修改 ES 的监听地址,这样所有的机器都可以访问这部 ES
http.port: 9200 //注释掉的配置项,但却是默认的,只是我打开了,不用刻意去修改端口
//添加新的配置项,允许跨域访问,这样 head 插件方可对 ES 进行访问
http.cors.enabled: true //开启跨域访问支持,默认为false
http.cors.allow-origin: "*" //跨域访问允许的域名地址,使用正则表达式
启动服务:(前台运行调试)
/home/stt/server/elasticsearch-5.1.1/bin/elasticsearch
报错一:
ERROR: bootstrap checks failed
解决方案:
vim /etc/security/limits.conf //添加, 【注销后并重新登录生效】
* soft nofile 300000
* hard nofile 300000
* soft nproc 102400
* hard nproc 102400
查看是否生效[seven@localhost ~]$ ulimit -Hn
65536
报错二:
[2016-12-30T15:18:09,190][WARN ][o.e.b.JNANatives ] Unable to lock JVM Memory: error=12, reason=无法分配内存
[2016-12-30T15:18:09,190][WARN ][o.e.b.JNANatives ] This can result in part of the JVM being swapped out.
[2016-12-30T15:18:09,191][WARN ][o.e.b.JNANatives ] Increase RLIMIT_MEMLOCK, soft limit: 65536, hard limit: 65536
[2016-12-30T15:18:09,191][WARN ][o.e.b.JNANatives ] These can be adjusted by modifying /etc/security/limits.conf, for example:
# allow user 'stt' mlockall
stt soft memlock unlimited
stt hard memlock unlimited
解决方案:
vim /etc/security/limits.conf //添加
* soft memlock unlimited
* hard memlock unlimited
验证是否生效:
$ ulimit -a
core file size (blocks, -c) 0
data seg size (kbytes, -d) unlimited
scheduling priority (-e) 0
file size (blocks, -f) unlimited
pending signals (-i) 96201
max locked memory (kbytes, -l) unlimited
max memory size (kbytes, -m) unlimited
open files (-n) 300000
pipe size (512 bytes, -p) 8
POSIX message queues (bytes, -q) 819200
real-time priority (-r) 0
stack size (kbytes, -s) 8192
cpu time (seconds, -t) unlimited
max user processes (-u) 102400
virtual memory (kbytes, -v) unlimited
file locks (-x) unlimited
报错三:
max virtual memory areas vm.max_map_count [65530] likely too low, increase to at least [262144]
解决方案:
vim /etc/sysctl.conf //添加
fs.file-max = 1645037
vm.max_map_count=655360
执行:sysctl -p
报错四:(这个问题一但成为第一个阻断服务启动的原因,在终端是不会有输出和任何的日志记录的,文章末请听我讲)
Java HotSpot(TM) 64-Bit Server VM warning: INFO: os::commit_memory(0x0000000094cc0000, 1798569984, 0) failed; error='Cannot allocate memory' (errno=12)
#
# There is insufficient memory for the Java Runtime Environment to continue.
# Native memory allocation (mmap) failed to map 1798569984 bytes for committing reserved memory.
# An error report file with more information is saved as:
# /home/stt/server/elasticsearch-5.1.1/hs_err_pid10221.log
解决方案(最好不要修改默认值,否则引起更多问题):
(内存溢出,思路更改JVM内存大小即可)
vim elasticsearch-5.1.1/config/jvm.options
# Xms represents the initial size of total heap space
# Xmx represents the maximum size of total heap space
-Xms1g (默认为2G)
-Xmx1g (默认为2G)
2017-01-12T16:12:22,404][INFO ][o.e.b.BootstrapCheck     ] [SfD5sIh] bound or publishing to a non-loopback or non-link-local address, enforcing bootstrap checks
ERROR: bootstrap checks failed
initial heap size [536870912] not equal to maximum heap size [1073741824]; this can cause resize pauses and prevents mlockall from locking the entire heap
解决方法:
vi config/jvm.options
###-Xms 和 -Xmx需要配置的相等,不然无法启动成功。
-Xms1024m
-Xmx1024m
启动服务:(后台运行)
/home/stt/server/elasticsearch-5.1.1/bin/elasticsearch -d
##ES 5.1.1 安装 head:
(5.1.1版本的 elasticsearch 没有提供直接插件安装方法,但在该github上该插件作者给出了方法)
下载二进制源码包:
wget https://nodejs.org/dist/v4.2.2/node-v6.2.0-linux-x64.tar.gz
解压:
tar xf node-v6.2.0-linux-x64.tar.gz -C /home/stt/env/
设置环境变量:
vim /etc/profile: //添加
export NODE_HOME=/home/stt/env/node-v6.2.0-linux-x64
export PATH=$PATH:$NODE_HOME/bin
最终的 /etc/profile 成为这样:
执行:source /etc/profile
测试node是否生效:
$ node -v
v6.2.0
$ npm -v
3.8.9
安装grunt:
grunt是一个很方便的构建工具,可以进行打包压缩、测试、执行等等的工作,5.0里的head插件就是通过grunt启动的。因此需要安装一下grunt:
npm config set registry https://registry.npm.taobao.org //设置代理镜像源,加速下载
cd /home/stt/node-v4.2.2-linux-x64/lib/node_modules
npm install grunt //显示的2条warn可以忽略
测试grunt是否生效:
$ grunt -version
grunt-cli v1.2.0
grunt v1.0.1
安装head插件:
下载:
git clone git://github.com/mobz/elasticsearch-head.git
cd /home/stt/elasticsearch-head
npm install (提示:如果遇到网络的瓶颈,将预先下载的源码包放在对应的位置效果一样,目录为/tmp/phantomjs/,确定位置后可自行创建并上传包)
修改 elasticsearch-head/ _site/app.js
// 把localhost改为ip
找到:
this.base_uri = this.config.base_uri || this.prefs.get("app-base_uri") || "http://localhost:9200";
改为:
this.base_uri = this.config.base_uri || this.prefs.get("app-base_uri") || "http://192.168.8.116:9200";
修改 elasticsearch-head/Gruntfile.js
connect: {
server: {
options: {
hostname: "0.0.0.0", //增加这个配置
port: 9100,
base: '.',
keepalive: true
}
}
}
启动服务:(后台运行)
grunt server & //需要在 /home/stt/elasticsearch-head 下执行,因为我的 grunt 没有进行全局的安装
全局执行报错:
grunt-cli: The grunt command line interface (v1.2.0)
Fatal error: Unable to find local grunt.
If you're seeing this message, grunt hasn't been installed locally to
your project. For more information about installing and configuring grunt,
please see the Getting Started guide:
http://gruntjs.com/getting-started
##安装Logstash:
解压源码包:
tar zxf logstash-5.1.1.tar.gz -C /home/stt/server/
mkdir /home/stt/server/logstash-5.1.1/conf /home/stt/server/logstash-5.1.1/logs
vim conf/central.conf (处理基于 FILE 方式输入的日志信息,这里是简单的举个例子,日后继续学习补充)
input {
file {
path => "/tmp/XX-YY-ZZ.log"
}
}
output {
elasticsearch {
hosts => "192.168.8.116:9200"
index => "nginx-access"
}
stdout {
codec => rubydebug
}
}
启动服务:(后台运行,logstash 必须要制定配置文件来启动,告诉服务输入和输出)
/home/stt/server/logstash-5.1.1/bin/logstash -f /home/stt/server/logstash-5.1.1/conf/central.conf &
##安装Kibana:
解压源码包:
tar zxf kibana-5.1.1-linux-x86_64.tar.gz -C /home/stt/server/
vim config/kibana.yml //修改
server.port: 5601 //打开注释而已,不用可以去效果,请使用默认端口
server.host: "0.0.0.0" //打开监听地址,让别的机器也能访问这个 kibana
elasticsearch.url: "http://127.0.0.1:9200"
启动服务: (后台运行)
/home/stt/server/kibana-5.1.1-linux-x86_64/bin/kibana &
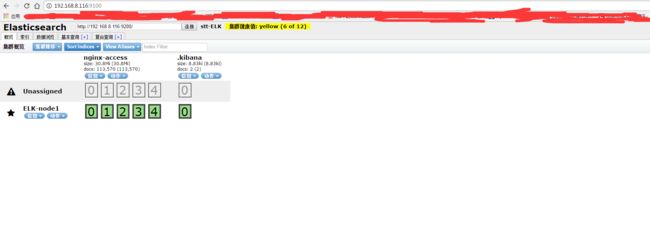
通过 head 插件访问 ES 数据:
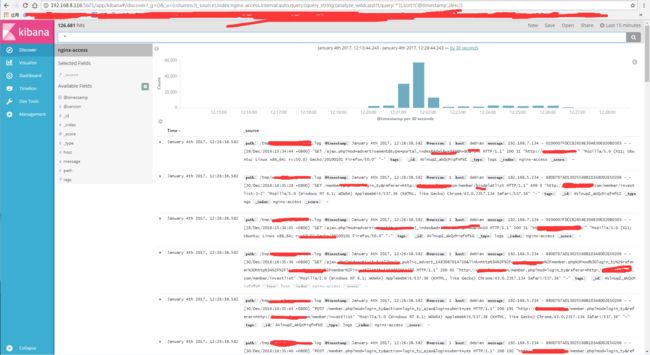
通过 Kibana 访问 ES 数据:
后记:(二次高潮)
在此,我要对5.1.1版本的 elasticsearch 吐槽一下。第一,JVM内存溢出导致的 ES 服务启不来,竟然不会有任何输出和日志生成(不过也可能是因为我在虚拟机上测试的原因,反正换了高配置的实体机后更改了 /etc/sysctl.conf 和 /etc/security/limits.conf 所需用到的配置在启动就完美解决了问题。我的虚拟机上即使更改了比较小的JVM内存也启不来,报错 ERROR: bootstrap checks failed )后来我换了好几个安装包,最后就换了实体机发现了问题,就用最新下载的 zip 包了,不然我还是习惯使用 tar.gz 包,反正都一样;第二,关于 5.0 版本以后的 ES 的 head 插件安装,真是让我步步惊心,因为我是小白,所以不是很懂github 的东西,也感谢有这个机会深入弄一下相关的安装。综上所有,我这个 ELK 前前后后一共弄了差不多3天才完成搭建。
日志分析系统是一个很有用的工具,方便并解放运维人员的劳动力,否则,天天查询 N 台服务器的日志,会很麻烦的。有经验的童鞋就会知道——不是每台服务器都只有一个地方有日志被查询。
安装完 ELK 后,我发现,有点难用。因为我对 Kibana 一点都不熟悉,随便弄了下才有了这个日志内容的显示。等日后继续补充我对 ELK 的各种配置和使用,先做个部署记录并尽快让我们开发人员自己去查日志去,解放我们的双手。而且, Logstash 对日志的处理是很快的,也很精准,一滴不漏。大大的赞。实时分析日志,我相信它。


