自动驾驶毫米波雷达物体检测技术-算法
Radar target generation and detection - Software
本文的代码均在MATLAB上运行, MATLAB在传统辅助驾驶系统的验证和模拟上相对于其他编程语言具有很强的优势.
Github: https://github.com/williamhyin/SFND_Radar_Target_Detection
Email: [email protected]
知乎专栏: 自动驾驶全栈工程师
Range and velocity estimation
在这篇博客中, 首先我们需要学会如何使用多普勒傅里叶变换技术估计距离和速度. 雷达分辨目标的能力对于准确的感知是非常关键的. 在开始之前, 让我们先来看一下有关啁啾和雷达分辨率的三个主要测量维度.
-
啁啾
啁啾(Chirp)是指频率随时间而改变(增加或减少)的信号, 这一术语可以与扫频信号(Sweep signal)互换使用. 它通常用于声纳、雷达和激光.
图片引用自此
-
距离分辨率(Range Resolution)
雷达需要具备区分两个距离非常近的目标的能力. 比如, 当雷达的距离分辨率为4米时, 它就不能区分相距1m的行人和汽车. 距离分辨率完全取决于啁啾的带宽B_sweep.
d r e s = c 2 B s w e e p d_{r e s}=\frac{c}{2 B_{s w e e p}} dres=2Bsweepc -
速度分辨率(Velocity Resolution)
如果两个目标有相同的距离, 但是当它们以不同的速度移动, 它们仍然可以被区分开来. 速度分辨率取决于啁啾的个数. 正如讨论我们的情况下, 我们选择发送128个啁啾. 较高的啁啾数量增加了速度分辨率, 但它也需要更长的时间来处理信号.
-
角度分辨率(Angle Resolution)
雷达能够在空间上分离两个目标. 即使两个目标在相同的距离以相同的速度运动, 它们仍然可以通过雷达坐标系中的角度分辨出来.
Range Estimation
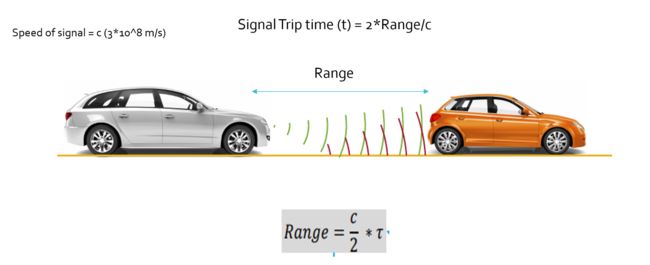
雷达通过测量目标反射的电磁信号的飞行时间来确定目标的飞行距离.
但是如何确定雷达信号的传输时间呢? 我们需要测量频移.
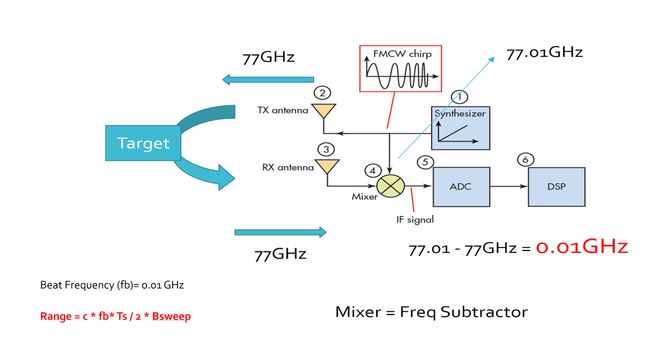
FMCV 波形具有频率随时间线性变化的特点. 如果雷达能够确定接收频率和雷达的斜坡频率之间的差值, 那么它就可以计算雷达信号的时间和距离目标的距离.
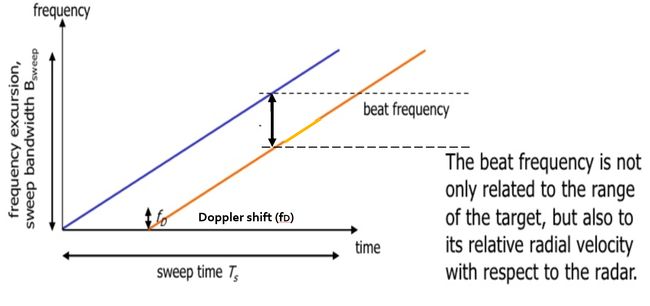
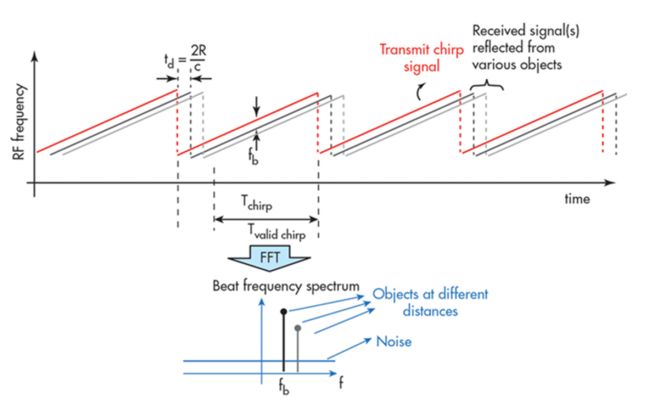
首先我们得理解一点, 如果目标是静止的, 那么发射频率和接收频率是相同的. 但是, 雷达的斜坡频率是随时间不断变化的, 所以, 当我们取得接收频率和斜坡频率之间的差(beat frequency) , 我们就得到了信号传输时间.
如上图所表示, f_b是拍频, 通过雷达的斜坡频率减去接收到的频率来测量.
f b = f ramping − f received f_{b}=f_{\text {ramping}}-f_{\text {received}} fb=framping−freceived
如上图所示, 雷达发射信号的频率是77 GHz, 返回信号的频率是77.01, 它们的差值delta称为拍频, 拍频正比于啁啾时间(td).
t d T s = f b B sweep t d = 2 R c \frac{t_{d}}{T_{s}}=\frac{f_{b}}{B_{\text {sweep}}}\\ t_{d}=\frac{2 R}{c} Tstd=Bsweepfbtd=c2R
基于上述的公式, 我们可以计算目标的距离
R = c T s f b 2 B s w e e p R=\frac{c T_{s} f_{b}}{2 B_{s w e e p}} R=2BsweepcTsfb
距离计算需要啁啾时间T_s 和啁啾带宽B_sweep, 而这些可以依据我们配置时的雷达距离分辨率和最大探测距离计算.
一般来说, 对于 FMCW 雷达系统, 扫描时间*(Ts/Tchirp*)至少应该是雷达最大距离往返时间的5-6倍.
此处我们假设是5.5倍:
T chirp = 5.5 ⋅ 2 ⋅ R max / c T_{\text {chirp}}=5.5 \cdot 2 \cdot R_{\max } / c Tchirp=5.5⋅2⋅Rmax/c
R_max为最大探测距离.
而B_sweep的计算公式为:
B s w e e p = c / 2 ∗ delta − r B_{s w e e p}=c / 2 * \operatorname{delta}_{-}r Bsweep=c/2∗delta−r
delta_r为距离分辨率
Doppler Estimation
Doppler effect
雷达的速度估计是基于一种古老的现象, 叫做多普勒效应. 多普勒效应是波源和观察者有相对运动时, 观察者接受到波的频率与波源发出的频率并不相同的现象. 根据多普勒理论, 波源与目标接近使得接受和反射的频率变高, 而波源远离目标使得接受和反射的频率变低. 同样的原理也用于雷达枪来捕捉超速者, 甚至用于体育运动来测量球的速度.
如上所述, 由于目标速度的多普勒效应, 接收到的信号频率会有一个频移fD. 多普勒频移与目标的速度成正比, 如下图所示.
f D = 2 ν r λ f_{D}=\frac{2 \nu_{r}}{\lambda} fD=λ2νr
- fD: 多普勒效应导致的传输频率频移
- νr: 与目标的相对速度
- λ : 信号的波长
通过测量多普勒引起的频率偏移, 雷达可以确定速度.
综上, 拍频由两个频率分量组成: fr(距离引起的频率增量)和 fd(速度引起的频率偏移). 值得注意的是在汽车雷达的情况下, fd与 fr相比是非常小的. 因此多普勒速度是通过测量多个啁啾之间的相位变化率来计算的.
下面的公式显示了相位变化率与频率之间的关系:
d Φ d t = frequency \frac{d \Phi}{d t}=\text { frequency } dtdΦ= frequency
Doppler phase shift
运动目标在每次啁啾持续时间内的微小位移会引起的相位变化. 由于每次啁啾的持续时间一般是微秒(μs), 因此会导致毫米级(mm)的微小位移. 这可以用来计算相位变化率, 从而确定多普勒频率.
Δ φ = Δ x λ ( λ = 2 π or 36 0 ∘ ) Δ φ = f ∗ Δ x c ( λ = f / c ) Δ f = Δ φ Δ t \begin{array}{c} \Delta \varphi=\frac{\Delta x}{\lambda} \quad\left(\lambda=2 \pi \text { or } 360^{\circ}\right) \\ \Delta \varphi=f * \frac{\Delta x}{c} \quad(\lambda=f / c)\\ \Delta f=\frac{\Delta \varphi}{\Delta t} \end{array} Δφ=λΔx(λ=2π or 360∘)Δφ=f∗cΔx(λ=f/c)Δf=ΔtΔφ
速度测量的执行代码:
% Doppler Velocity Calculation
c = 3*10^8;         %speed of light
frequency = 77e9;   %frequency in Hz

% TODO : Calculate the wavelength

wavelength = c/frequency;

% TODO : Define the doppler shifts in Hz using the information from above

doppler_shift= [3e3 -4.5e3  11e3 -3e3];

% TODO : Calculate the velocity of the targets  fd = 2*vr/lambda

vr=doppler_shift*wavelength/2;

% TODO: Display results

disp(vr)
Fast Fourier Transform (FFT)
在本博客中我们不需要研究快速傅里叶变换的数学实现, 只需要了解FFT如何帮助雷达监测.
到目前为止, 我们讨论了距离多普勒测量的理论以及计算方程. 但是, 为了使雷达有效地对这些测量数字化处理, 需要将信号从模拟域转换到数字域, 并进一步从时域转换到频域.
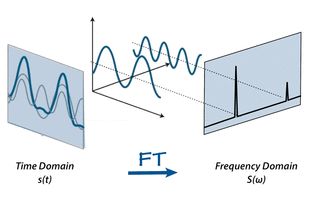
ADC (模拟数字转换器)将模拟信号转换成数字信号. 由于初始的传输信号是时域信号, 快速傅里叶变换被用来将信号从时域转换到频域. 频域转换是进行信号频谱分析和确定由距离多普勒引起的频率偏移的重要手段.
如上图所示,时域信号包含多个频率分量. FFT 技术可以分离所有的频率成分, 给出回波信号的频率响应.
在上图中每个峰值的频谱分别代表不同被检测目标的特性.
1D FFT
在讨论复杂的2D FFT(Range+Doppler)前, 我们先研究下1D FFT(Range).
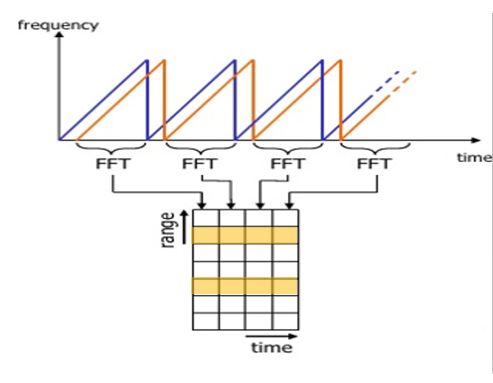
如上图所示, Range FFT 运行在每个样本的每个啁啾上. 每个啁啾(time轴)取样N次(range 轴), 并为每个样本产生一个距离块(range bin). 这个过程对每一次啁啾都会重复,因此它将产生一个 N * (啁啾个数)的Range FFT 块. 这些 FFT bins的集合也称为 FFT block.
block每列中的每一个bin表示新增的范围值, 因此最后一个range bin的末端表示雷达的最大范围.
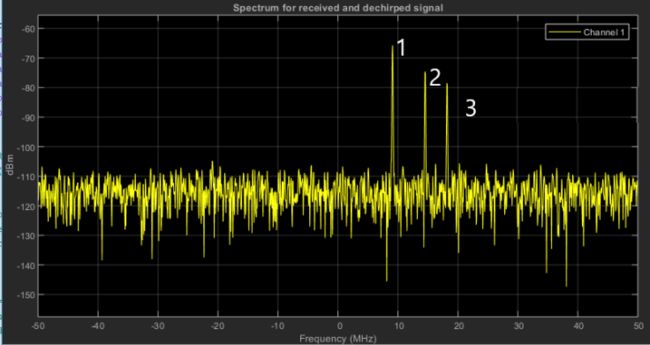
下图是1st FFT (即距离FFT)的输出. 频域中的三个峰值对应于距离自身车辆150、240和300米的三辆不同车辆的拍频.
在MATLAB中我们可以利用FFT 函数对信号样本N维数进行快速傅里叶变换.
以下为最终项目中1st FFT的执行代码:
%% RANGE MEASUREMENT


 % *%TODO* :
%reshape the vector into Nr*Nd array. Nr and Nd here would also define the size of
%Range and Doppler FFT respectively.

Mix_reshape = reshape(Mix,[Nr,Nd]);

 % *%TODO* :
%run the FFT on the beat signal along the range bins dimension (Nr) and
%normalize.

sig_fft1=fft(Mix_reshape,Nr)./Nr;

 % *%TODO* :
% Take the absolute value of FFT output

sig_fft1=abs(sig_fft1);

 % *%TODO* :
% Output of FFT is double sided signal, but we are interested in only one side of the spectrum.
% Hence we throw out half of the samples.
sig_fft1=sig_fft1(1:Nr/2);


%plotting the range
figure ('Name','Range from First FFT')
subplot(2,1,1)

 % *%TODO* :
 % plot FFT output

plot(sig_fft1);
axis ([0 200 0 1]);
2D FFT
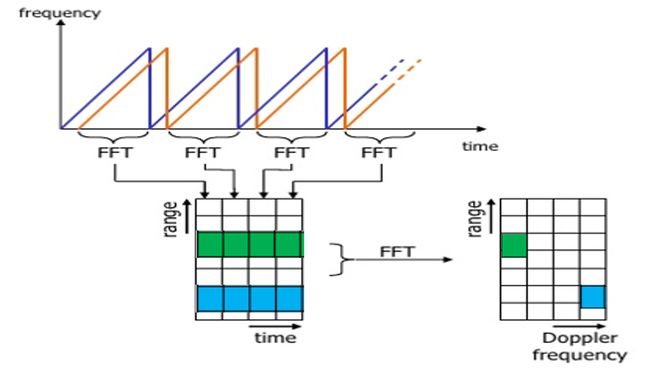
之前我们说过, 多普勒频移可以通过处理多个啁啾之间的相位变化率来实现. 一旦所有的range bins在之前的1st FFT中确定后, 你需要沿着time轴实施2nd FFT, 从而确定多普勒频移.
1st FFT 的输出给出了每个目标的拍频、幅度和相位. 然而当我们从一个啁啾移动到另一个啁啾(每行的一个格到另一个格)时, 由于目标的小位移, 这个相位还是会发生变化. 通过实施2nd FFT , 它能够确定相位的变化率.
如上图所示, 通过对各行 FFT bin进行2nd FFT 运算, 可以得到Doppler FFT. 这被称为二维快速傅里叶变换.
经过二维快速傅里叶变换, 每列中的每个bin代表增加的距离值, 行中的每个bin对应一个速度值.
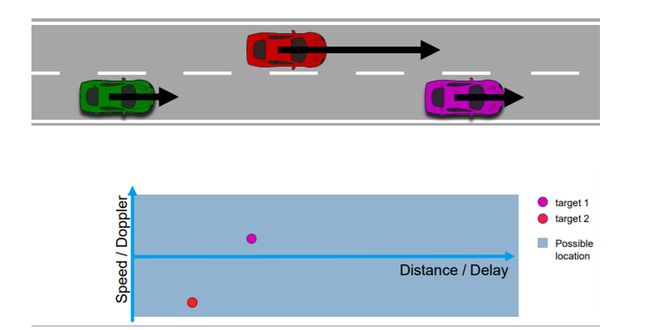
上图是距离多普勒响应图(RDM). 其中一个轴为距离轴, 另一个轴为多普勒速度. RDM通常会被显示在终端中, 以方便了解对目标的感知.
最终项目中的2D FFT的实现代码:
%% RANGE DOPPLER RESPONSE
% The 2D FFT implementation is already provided here. This will run a 2DFFT
% on the mixed signal (beat signal) output and generate a range doppler
% map.You will implement CFAR on the generated RDM


% Range Doppler Map Generation.

% The output of the 2D FFT is an image that has reponse in the range and
% doppler FFT bins. So, it is important to convert the axis from bin sizes
% to range and doppler based on their Max values.

Mix=reshape(Mix,[Nr,Nd]);

% 2D FFT using the FFT size for both dimensions.
sig_fft2 = fft2(Mix,Nr,Nd);

% Taking just one side of signal from Range dimension.
sig_fft2 = sig_fft2(1:Nr/2,1:Nd);
sig_fft2 = fftshift (sig_fft2);
RDM = abs(sig_fft2);
RDM = 10*log10(RDM) ;

%use the surf function to plot the output of 2DFFT and to show axis in both
%dimensions
doppler_axis = linspace(-100,100,Nd);
range_axis = linspace(-200,200,Nr/2)*((Nr/2)/400);
figure,surf(doppler_axis,range_axis,RDM);
值得注意的是, 2D FFT在MATLAB中有内置的函数, 可以一步到位, 无需先单独运行一遍1D FFT.
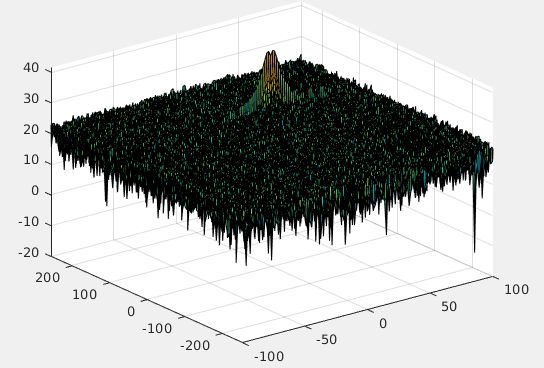
下图是最终项目中2D-FFT的输出结果.
Clutter
在真实环境中, 雷达信号往往伴随着大量的噪声. 雷达不仅接收来自目标的反射信号, 而且还接收来自环境和不需要的目标的反射信号. 来自这些非必要源的散射波被称为杂波.
去除杂波的一种方法是去除具有0多普勒速度的信号. 由于驱动场景中的杂波往往是由静止目标产生的, 0多普勒滤波可以有效地去除这些杂波. 0多普勒滤波的缺点是雷达不能检测到路径中的静止目标, 这将导致检测失败.
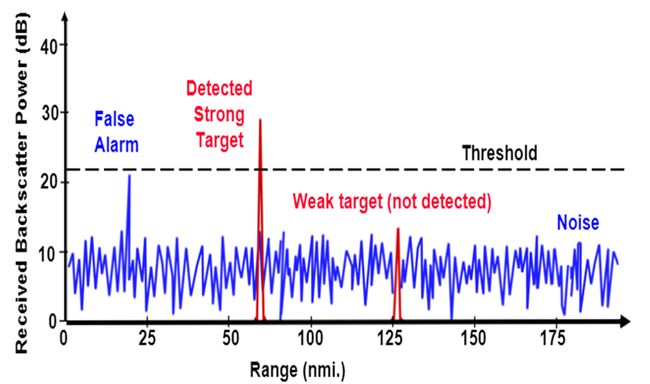
另一种方法是采用固定杂波阈值分割( fixed clutter thresholding). 在固定阈值的情况下, 对阈值以下的信号进行剔除. 该方法在检测阈值设置过高的情况下, 会出现极少的虚警(false alarms), 但同时也会掩盖有效目标. 如果阈值设置得太低, 则会导致过多的错误警报. 如在下图中, 固定阈值导致虚警和漏检弱目标.
虚警率(false alarm rate)是雷达通过噪声或其他干扰信号发现错误信号的速率. 它是在没有有效目标存在的情况下, 检测到雷达目标存在的一种度量.
还有一种方法是使用动态阈值分割(dynamic thresholding). 动态阈值分割通过改变阈值水平来降低误报率. 利用这种名为 CFAR(Constant False Alarm Rate)的技术, 可以监测每一个或每一组距离多普勒bin的噪声, 并将信号与本地的噪声水平进行比较. 此比较用于创建一个阈值, 该阈值为CFAR.
CFAR
CFAR 根据车辆周围环境变化检测阈值. 通过实现恒定的虚警率, 可以解决虚警问题.
目前有四种CFAR:
- Cell Averaging CFAR (CA-CFAR)
- Ordered Statistics CFAR (OS CFAR)
- Maximum Minimum Statistic (MAMIS CFAR)
- And, multiple variants of CA-CFAR
本文中讨论的主要是CA-CFAR.
CA-CFAR
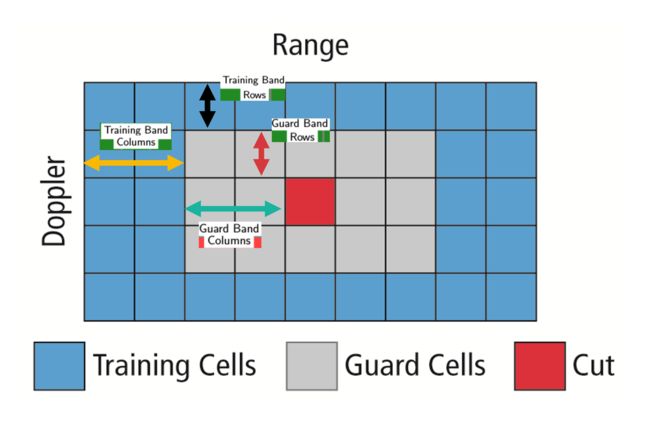
CA-CFAR 是最常用的恒虚警检测技术. CA-CFAR测量被测单元(CUT)两侧的训练单元的干扰程度. 然后用这个测量来决定目标是否在被测单元(CUT)中. 该过程遍历所有的距离多普勒单元, 并根据噪声估计确定目标的存在. 这一过程的基础是, 当噪声存在时, 感兴趣的单元周围的单元包括对噪声的良好估计, 即假定噪音或干扰在空间上暂时是均匀的. 从理论上讲, 它将产生一个不受噪声和杂波影响的恒虚警率.
FFT bins是在通过多个啁啾的Range Doppler FFT生成的. CA-CFAR使用滑动窗口遍历整个FFT bins . 每个窗口由以下单元格组成:
- Cell Under Test:通过比较信号电平和噪声估计值(阈值)来检测目标是否存在的单元.
- Training Cells:在训练单元上测量噪声水平. 训练单元可以分为两个区域, 滞后于CUT的单元称为滞后训练单元, 而领先于CUT的单元称为前导训练单元. 通过对训练单元下的噪声进行平均来估计噪声. 在某些情况下, 采用前导或滞后的噪声平均值, 而在其他情况下, 则合并前导和滞后的噪声平均值, 并考虑两者中较高的一个用于噪声水平估计. 训练单元的数量应根据环境确定. 如果交通场景繁忙, 则应使用较少的训练单元, 因为间隔较近的目标会影响噪声估计.
- Guard Cells :紧邻CUT的单元被指定为保护单元. 保护单元的目的是避免目标信号泄漏到训练单元中, 这可能会对噪声估计产生不利影响. 保护单元的数量应根据目标信号从被测单元中泄漏出来的情况来确定. 如果目标反射很强, 它们通常会进入周围的单元.
- Threshold Factor (Offset):使用偏移值来缩放噪声阈值. 如果信号强度以对数形式定义, 则将此偏移值添加到平均噪声估计中, 否则相乘.
接下来, 我们来实现1维的CA-CFAR.
T : Number of Training Cells
G : Number of Guard Cells
N : Total number of Cells
- 确定训练单元和保卫单元的数量
- 开始在整个FFT 1D阵列上一次滑动一个单元格的窗口. 总窗口大小应为:2(T + G)+ CUT
- 对于每一步, 将所有前导或滞后训练单元内的信号(噪声)相加
- 对总和求平均值以确定噪声阈值
- 使用适当的偏移量值缩放阈值
- 在CUT中的被测信号从窗口起点T + G + 1开始的
- 将5中测量的信号与4中测量的阈值进行比较
- 如果在CUT中测量的信号电平小于所测量的阈值, 则将0值分配给CUT中的信号, 否则分配1.
1D CA-CFAR的代码实现:
% Implement 1D CFAR using lagging cells on the given noise and target scenario.

% Close and delete all currently open figures
close all;

% Data_points
Ns = 1000;

% Generate random noise
s=abs(randn(Ns,1));

%Targets location. Assigning bin 100, 200, 300 and 700 as Targets with the amplitudes of 8, 9, 4, 11.
s([100 ,200, 350, 700])=[8 15 7 13];

%plot the output
plot(s);

% TODO: Apply CFAR to detect the targets by filtering the noise.

% 1. Define the following:
% 1a. Training Cells
T = 12;
% 1b. Guard Cells
G = 4;

% Offset : Adding room above noise threshold for desired SNR
offset=5;

% Vector to hold threshold values
threshold_cfar = [];

%Vector to hold final signal after thresholding
signal_cfar = [];

% 2. Slide window across the signal length
for i = 1:(Ns-(G+T+1))

    % 2. - 5. Determine the noise threshold by measuring it within the training cells

    noise_level =sum(s(i:i+T-1));

    % 6. Measuring the signal within the CUT

    threshold = (noise_level/T)*offset;
    threshold_cfar=[threshold_cfar,{threshold}];

    signal=s(i+T+G);

    % 8. Filter the signal above the threshold
    if (signal
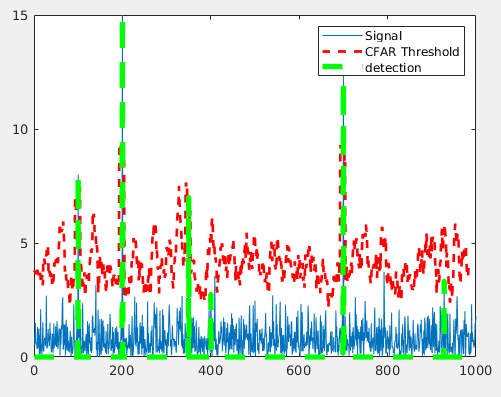
下图为一维CA-CFAR的结果:
2D CA-CFAR
二维恒虚警类似于一维恒虚警, 但在距离多普勒块的两个维度上都实现了. 2D CA-CFAR包括训练单元,被测单元以及保护单元, 以防止目标信号对噪声估计的影响.
接下来, 我们来实现2维的CFAR:
- 确定每个维度Tr和Td的训练单元数. 同样, 选择保护单元格Gr和Gd的数量.
- 在整个单元矩阵上滑动待测单元(CUT).
- 选择总的包含训练, 保护和测试单元的网格. Grid Size = (2Tr+2Gr+1)(2Td+2Gd+1).
- 保护区域和被测单元的总数:(2Gr+1)(2Gd+1).
- 训练单元的总数为:(2Tr+2Gr+1)(2Td+2Gd+1) - (2Gr+1)(2Gd+1)
- 测量并平均所有训练单元的噪声, 并获得阈值.
- 将偏移量(如果以dB为单位的信号强度)添加到阈值, 以将错误警报保持在最低水平.
- 确定被测单元的信号电平.
- 如果CUT信号电平大于阈值, 则将值分配为1, 否则将其等于零.
- 由于被测单元不位于边缘, 而训练单元占据了边缘, 我们将边缘抑制为零. 任何既不是1也不是0的单元格值, 为其分配一个0.
以下是最终2D-CFAR项目的核心代码实现:
% *%TODO* :
%Select the number of Training Cells in both the dimensions.

Tr=10;
Td=8;

% *%TODO* :
%Select the number of Guard Cells in both dimensions around the Cell under
%test (CUT) for accurate estimation

Gr=4;
Gd=4;

% *%TODO* :
% offset the threshold by SNR value in dB

off_set=1.4;
% *%TODO* :
%design a loop such that it slides the CUT across range doppler map by
%giving margins at the edges for Training and Guard Cells.
%For every iteration sum the signal level within all the training
%cells. To sum convert the value from logarithmic to linear using db2pow
%function. Average the summed values for all of the training
%cells used. After averaging convert it back to logarithimic using pow2db.
%Further add the offset to it to determine the threshold. Next, compare the
%signal under CUT with this threshold. If the CUT level > threshold assign
%it a value of 1, else equate it to 0.

% Use RDM[x,y] as the matrix from the output of 2D FFT for implementing
% CFAR

RDM = RDM/max(max(RDM)); % Normalizing

% *%TODO* :
% The process above will generate a thresholded block, which is smaller
%than the Range Doppler Map as the CUT cannot be located at the edges of
%matrix. Hence,few cells will not be thresholded. To keep the map size same
% set those values to 0.

%Slide the cell under test across the complete martix,to note: start point
%Tr+Td+1 and Td+Gd+1
for i = Tr+Gr+1:(Nr/2)-(Tr+Gr)
    for j = Td+Gd+1:(Nd)-(Td+Gd)
        %Create a vector to store noise_level for each iteration on training cells
        noise_level = zeros(1,1);
        %Step through each of bins and the surroundings of the CUT
        for p = i-(Tr+Gr) : i+(Tr+Gr)
            for q = j-(Td+Gd) : j+(Td+Gd)
                %Exclude the Guard cells and CUT cells
                if (abs(i-p) > Gr || abs(j-q) > Gd)
                    %Convert db to power
                    noise_level = noise_level + db2pow(RDM(p,q));
                end
            end
        end

        %Calculate threshould from noise average then add the offset
        threshold = pow2db(noise_level/(2*(Td+Gd+1)*2*(Tr+Gr+1)-(Gr*Gd)-1));
        %Add the SNR to the threshold
        threshold = threshold + off_set;
        %Measure the signal in Cell Under Test(CUT) and compare against
        CUT = RDM(i,j);

        if (CUT < threshold)
            RDM(i,j) = 0;
        else
            RDM(i,j) = 1;
        end

    end
end

RDM(RDM~=0 & RDM~=1) = 0;
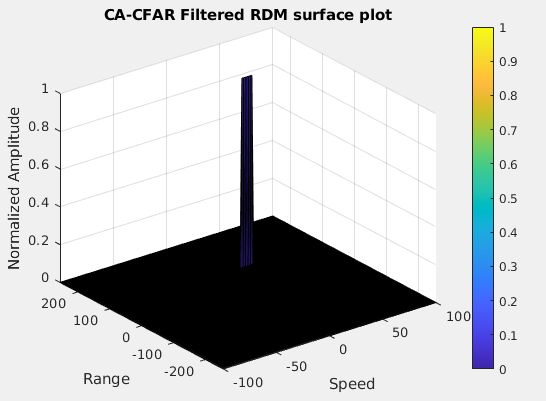
上图是2D-CFAR的结果, 可以看到峰值在100m的位置, 对应的速度约为30m/s.
Angle of Arrival(AOA)
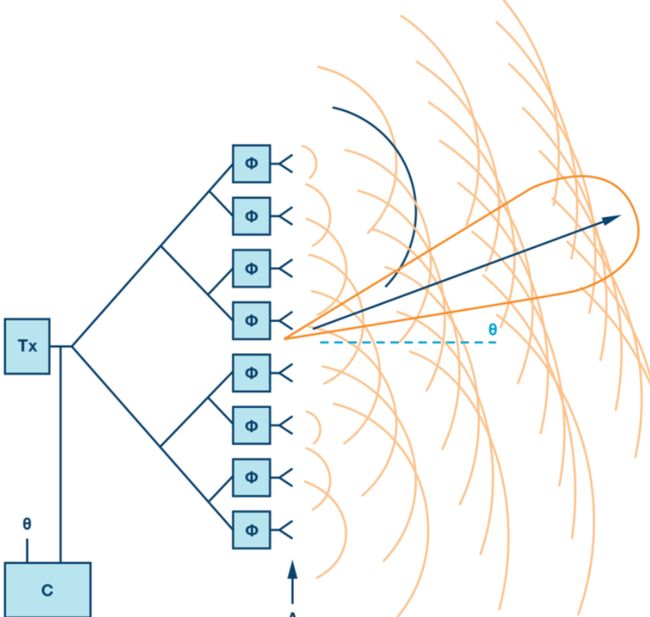
相控阵天线是一种天线阵列, 可沿所需方向电子控制波束. 如果阵列中的每个天线元件都被具有特定相位值的信号激发, 则阵列将控制波束. 这种现象称为光束扫描.
在上图中, Φ代表移相器. 移相器是改变相位以使光束转向所需方向的电子组件.
为了使天线波束转向所需的方向, 移相器被编程为具有恒定的相位增量. 如果一个天线由六个辐射单元组成, 并且将波束引导到一个给定方向所需的相位差为15度, 那么以下是每个单元上的相位值[0,15,30,45,60,75]度. 增量相移随天线单元之间的间距(d)增加. 使用以下方程确定天线的导向角
Φ = 360 ⋅ d ⋅ sin ( theta ) / λ \Phi=360 \cdot d \cdot \sin (\text {theta}) / \lambda Φ=360⋅d⋅sin(theta)/λ
- Φ= incremental phase shift
- d= spacing between antenna elements
- θ= steering direction from the normal of the antenna surface
- λ= wavelength of the signal
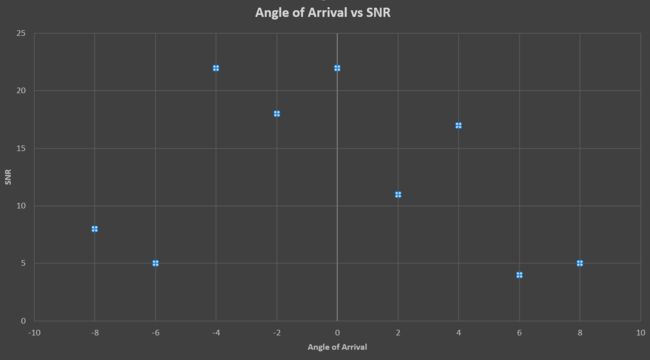
当雷达以程序控制的角度扫描周围环境时, 它可以感知回波信号的角度. 这有助于雷达创建一个空间感知的环境.
它可以测量空间不同角度目标反射信号的信噪比. 这有助于为雷达的空间感知创建一个到达角/信噪比网格.
Clustering
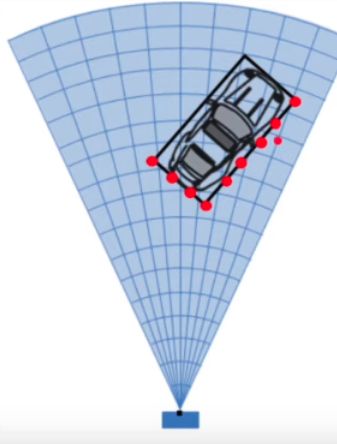
为了提高自动驾驶的感知能力, 需要分别跟踪多个目标. 目标跟踪是计算代价高昂的, 同时跟踪多个目标需要大量的处理能力和内存. 随着雷达技术的进步和传感分辨率的提高, 雷达可以根据目标上散射点的点数生成检测结果. 因此, 重要的是将来自单个目标的所有检测结果聚类, 并为每个目标分配一条航迹.
在这里, 我们将讨论基于欧几里得度量的基本聚类算法. 欧几里得聚类根据检测点之间距离的测量值对检测点进行分组.
聚类算法将目标大小内的所有检测点视为一个簇, 合并为一个质心位置, 并且为每个聚类分配一个新的距离和速度. 这是聚类的所有检测点的测量距离和速度的平均值, 从而方便对每个目标进行有效跟踪.
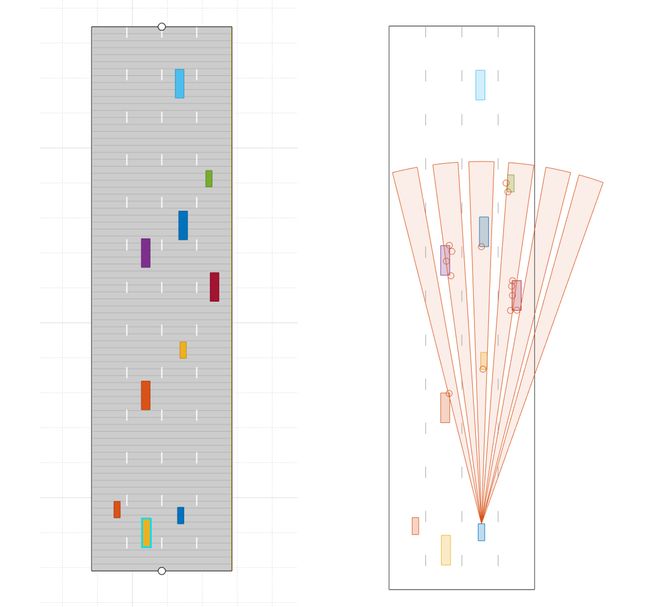
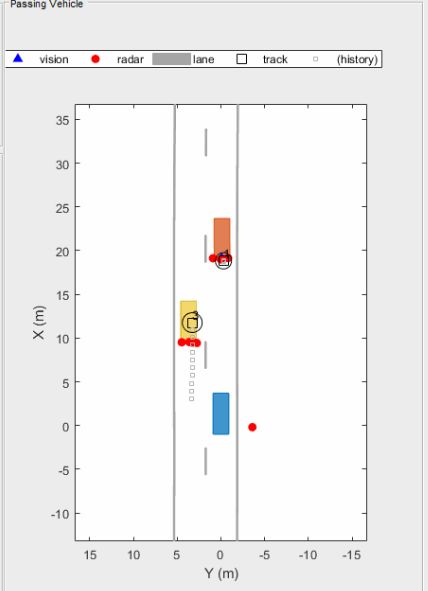
上面是集群场景的一个示例. 在图像中, 蓝色的汽车是一辆自我车(带传感器的汽车) , 探测器是由橙色和黄色的汽车产生的. 利用聚类算法将单个目标相关的所有检测点合并成一个点. 这有助于检测并将航迹分配给目标.
聚类的代码实现:
%%%
% *|clusterDetections|*
%
% This function merges multiple detections suspected to be of the same
% vehicle to a single detection. The function looks for detections that are
% closer than the size of a vehicle. Detections that fit this criterion are
% considered a cluster and are merged to a single detection at the centroid
% of the cluster. The measurement noises are modified to represent the
% possibility that each detection can be anywhere on the vehicle.
% Therefore, the noise should have the same size as the vehicle size.
%
% In addition, this function removes the third dimension of the measurement
% (the height) and reduces the measurement vector to [x;y;vx;vy].
function detectionClusters = clusterDetections(detections, vehicleSize)
N = numel(detections);
distances = zeros(N);
for i = 1:N
    for j = i+1:N
        if detections{i}.SensorIndex == detections{j}.SensorIndex
            distances(i,j) = norm(detections{i}.Measurement(1:2) - detections{j}.Measurement(1:2));
        else
            distances(i,j) = inf;
        end
    end
end
leftToCheck = 1:N;
i = 0;
detectionClusters = cell(N,1);
while ~isempty(leftToCheck)
    % Remove the detections that are in the same cluster as the one under
    % consideration

    %TODO : Complete the clustering loop based on the implementation
    %discussed in the lesson
    underConsideration = leftToCheck(1);
    clusterInds = (distances(underConsideration,leftToCheck) < vehicleSize);
    detInds = leftToCheck(clusterInds);
    clusterDets = [detections{detInds}];
    clusterMeas = [clusterDets.Measurement];
    meas = mean(clusterMeas,2);
    meas2D = [meas(1:2);meas(4:5)];
    i = i+1;
    detectionClusters{i} = detections{detInds(1)};
    detectionClusters{i}.Measurement = meas2D;
    leftToCheck(clusterInds) = [];

end
detectionClusters(i+1:end) = [];
值得注意的是这里使用了MATLAB的自动驾驶工具箱.
上面的聚类实现使用以下步骤:
- 如果探测结果是来自同一个传感器, 那么循环每一个单一的探测点, 并测量它们之间的欧几里得度量.
- 继续运行循环, 直到检测列表为空
在While循环中实现以下内容:
-
选择检查列表中的第一个检测, 并检查其聚类邻居.
- 如果第一个探测点和剩余探测点之间的距离小于车辆大小, 那么将这些探测点和它们各自的参数(距离和速度)分组.
- 对于该组, 采取的距离和速度测量的平均值. (雷达测量向量有6个值, 其中 x 和 y 坐标的距离和速度位于指数1,2,4和5: [ x, y,-, Vx, Vy,-])
- 创建一个新的集群 ID, 然后将所有组检测分配给相同的 ID.
- 接下来, 分配聚类, 平均距离和速度.
- 最后, 从列表中删除已经分配给一个集群的探测点.
- 继续重复这个过程, 直到检测列表为空
Kalman Filter
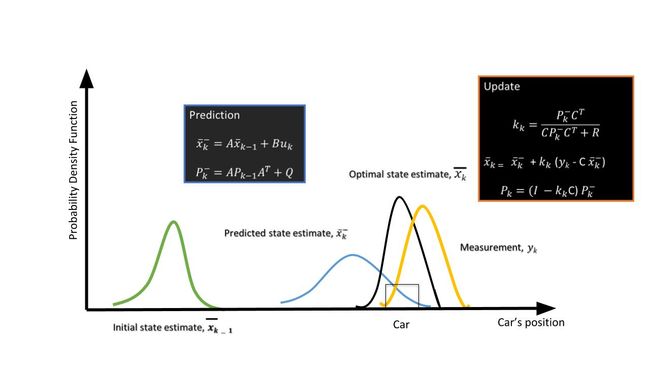
卡尔曼滤波器的目的是估计履带车辆的状态. 在这里, “状态”可以包括位置, 速度, 加速度或其他性能的车辆被跟踪. 卡尔曼滤波器使用长时间观测到的含有噪声或随机变化和其他不准确性的测量值, 产生的数值往往更接近测量值的真实值及其相关的计算值. 它是大多数现代雷达跟踪系统的核心算法.
x^k, the state of the vehicle at the kth step.
A, the state-transition model
Pk, the state covariance matrix - state estimation covariance error
B, control matrix - external influence
C, the observation/measurement model
Q, the covariance of the process noise
R, the covariance of the observation noise
在这里, 我们将简单介绍卡尔曼滤波器, 之后我会详细的在一篇博客中介绍卡尔曼滤波.
-
预测步骤
利用目标车辆的运动模型, 根据当前状态预测目标车辆的未来状态. 由于我们从上一个时间戳知道目标的当前位置和速度, 我们可以预测下一个时间戳的目标位置.
例如, 使用恒速模型, 目标车辆的新位置可以计算为:
x n e w = x p r e v + v ∗ t x_{n e w}=x_{p r e v}+v * t xnew=xprev+v∗t -
更新步骤
在这里, 卡尔曼滤波器使用来自传感器的嘈杂的测量数据, 并将该数据与上一步的预测相结合, 以生成状态的最佳估计.
在MATLAB自动驾驶工具箱中已经内置了卡曼滤波函数.
% This function initializes a constant velocity filter based on a detection.
function filter = initSimDemoFilter(detection)
% Use a 2-D constant velocity model to initialize a trackingKF filter.
% The state vector is [x;vx;y;vy]
% The detection measurement vector is [x;y;vx;vy]
% As a result, the measurement model is H = [1 0 0 0; 0 0 1 0; 0 1 0 0; 0 0 0 1]

%TODO: Implement the Kalman filter using trackingKF function. If stuck
%review the implementation discussed in the project walkthrough
H = [1 0 0 0; 0 0 1 0; 0 1 0 0; 0 0 0 1];
filter = trackingKF('MotionModel', '2D Constant Velocity', ...
 'State', H' * detection.Measurement, ...
 'MeasurementModel', H, ...
 'StateCovariance', H' * detection.MeasurementNoise * H, ...
 'MeasurementNoise', detection.MeasurementNoise);
end
聚类和卡曼滤波在最终项目中并没有使用, 请参考我的GITHUB库中radar simulator代码.
以下是最终结果:
Linkedin: https://linkedin.com/in/williamhyin


