Python--Day6
学习要有定位,明确目标地去学习。希望自己能坚持下去,并有所收获---leaves
python05 -- python函数、文件小讲以及模块和初识flask Web框架
一、文件处理及相关函数
open(文件路径,打开模式) 或者with open() as f:
读写、追加文件
数据库
#configparse 配置文件写成一个字典
read readline readlines
write writelines
文件指针函数
tell() 文件指针的位置
seek() 移动指针
flush() 将内存写入到硬盘上
二、函数
**python核心思想: 函数化编程 ==>重点
2.1 函数概念
函数:python编程中基本的单元
def 函数名(参数可忽略):
函数体
return 返回值
2.2 函数的主要理解:函数式编程 FP
一、注意理解hello 和 hello()的区别,前者是抽象的函数,后者是具体的返回值
二、函数可以是参数,进行传递
##代码示例
In [1]: def fishing():
   ...:     print "diaoyu is good "
   ...:     return 'fish'
In [3]: fishing()
diaoyu is good
Out[3]: 'fish'
In [5]: def doSth(fn):
   ...:     print fn() + 'is got '
   ...:     return 'ok'

In [6]: doSth(fishing)
diaoyu is good
fishis got
Out[6]: 'ok'


###sorted()函数配合lambda匿名函数实现排序
In [7]: arr = [('age',1),('age',19),('age',51),('age',13),('age',31),('age',41),('age',12)]
In [8]: print sorted(arr,key=lambda x:x[1])
[('age', 1), ('age', 12), ('age', 13), ('age', 19), ('age', 31), ('age', 41), ('age', 51)]
三、模块
3.1 模块定义
模块:简单的理解,模块就是文件,我们可以把一个功能存在一个文件中,通过import调用.
3.2 模块的分类
模块整体上分为三类:
1.python自带的模块,如sys,os,math,random,time模块等
2.第三方开发者开发的模块,可以通过pip install 安装,然后import调用导入使用,如flask,requests,pyquery,psutil等
3.自己开发的模块
引申:python中文件夹默认不能导入的,如果需要导入文件夹的话需要添加__init__.py文件,__init__.py文件可以为空,其主要目的是使文件夹变成包以达到可以导入的目的.
调用格式:from "文件目录名" import "导入的函数"
##自己开发的模块示例:
##自己编写的模块

[root@xiaowei code]# pwd
/usr/local/src/newbie/05/code
##文件编写的模块内容
[root@xiaowei code]# cat hello.py
def hello_world():
	print "hello world"


##ipython中导入模块及使用
In [1]: import hello
In [3]: print hello.hello_world()
hello world
None
In [4]: pwd
Out[4]: u'/usr/local/src/newbie/05/code'
3.3 模块调用的方式
模块的使用主要有三种方式:
1.import 模块名
调用:模块名.函数名()
2. from 模块名 import 函数名
调用:函数名()
3. from 模块名 import *
调用:函数名() #导入模块中所有函数,不推荐使用
3.3.1 import的查找路径顺序:
当前路径---> systempath(系统路径)
1.当前路径:当前目录
2.systempath
3. 文件名不要和模块名重复以免调用异常
##systempath 的查看方法:
import sys
sys.path
In [7]: sys.path
Out[7]:
['',
'/usr/local/python27/bin',
'/usr/local/python27/lib/python27.zip',
'/usr/local/python27/lib/python2.7',
'/usr/local/python27/lib/python2.7/plat-linux2',
'/usr/local/python27/lib/python2.7/lib-tk',
'/usr/local/python27/lib/python2.7/lib-old',
'/usr/local/python27/lib/python2.7/lib-dynload',
'/usr/local/python27/lib/python2.7/site-packages',
'/usr/local/python27/lib/python2.7/site-packages/IPython/extensions',
'/root/.ipython']
3.3.2 **注意import 会把模块里的代码执行一遍
#示例代码
[root@xiaowei code]# python run.py
Welcome Module Hello
hello world
None
[root@xiaowei code]# cat hello.py
def hello_world():
	print "hello world"
print "Welcome Module Hello"
[root@xiaowei code]# cat run.py
import hello
print hello.hello_world()
[root@xiaowei code]#
[root@xiaowei code]# python run.py
Welcome Module Hello
hello world
None
3.3.3 import模块出现的矛盾
问题,如3.3.2中的代码,如果引入的时候我不希望执行hello_world()函数外边的print语句,该怎么解决呢。
为了解决引入模块时执行该引入模块中不需要的东西,所以Python中添加判断来解决
if __name__ == "__main__":
代码块
将所引入模块其本身才需要执行的代码放到if判断内,以防止调用被随意的执行。
#示例代码如下:
##run.py 的内容
[root@xiaowei code]# cat run.py
import hello
print hello.hello_world()

##hello.py的内容
[root@xiaowei code]# cat hello.py
def hello_world():
	print "hello world"
if __name__ == '__main__':  #<====练习__name__变量
	print "Welcome Module Hello"

	[root@xiaowei code]# python run.py
hello world
None
[root@xiaowei code]#
3.3.4 python自带变量__name__
__name__:该变量主要是为了识别执行的.py文件是否为函数的文件本身执行的,如果__name__ == "__main__"则证明是其本身执行的,否则,该函数被调用执行的。这时候__name__等于被调用的文件名。
####__name__ == "__main__"的情况

##主文件的内容
[root@xiaowei code]# cat hello.py
def hello_world():
	print "hello world"
	print" __name__  == '%s' " %(__name__)

if __name__ == '__main__':
	hello_world()
	print "Welcome Module Hello"

[root@xiaowei code]#

###执行主文件的结果
[root@xiaowei code]# python hello.py
hello world
 __name__  == '__main__'
Welcome Module Hello


###被调用的执行情况:


###被引用的hello.py文件
[root@xiaowei code]# cat hello.py
def hello_world():
	print "hello world"

print" __name__  == '%s' " %(__name__)

if __name__ == '__main__':
	hello_world()
	print "Welcome Module Hello"
[root@xiaowei code]#

###主程序文件run.py的内容
[root@xiaowei code]# cat run.py
import hello

print hello.hello_world()

##程序的执行结果,非主程序执行的话,__name__等于被调用的文件名。

[root@xiaowei code]# python run.py
 __name__  == 'hello'
hello world
None
四、 Web开发之flask模块
4.1 安装flask
pip install -y flask
##安装flask
[root@xiaowei code]#pip install -y flask

##查看flask是否安装
[root@xiaowei code]# pip list |grep Flask
Flask (0.11.1)
Flask-JSONRPC (0.3.1)
[root@xiaowei code]#
4.2 Web开发介绍
随着php、python、javascript等脚本语言大爆发,导致web开发也进入新的时代.
URL:统一资源标识符
协议://域名:端口/资源地址?携带的参数1=2&参数2=3#页面锚点
URI:统一资源定位符
网络协议五元组(网络协议、用户ip、用户端口、服务ip、服务端口)
Web开发框架之flask与djiago对比
flask :
简洁 、上手迅速 。第三方定制容易
django :
大而全,用第三方的定制比较难,不过django 已经很全了。文档很全面
4.3 第一个flask程序
4.3.1 flask的调用格式:
[root@xiaowei code]# cat flask_web.py

#引入flask的启动模块,写死的
from flask import Flask

##new app(新建一个flask的app也是写死的)
app = Flask(__name__)


##监听路由,就是url在域名和端口后面的
##当域名和端口后面,只有一个/的时候,这个路由触发
@app.route('/')
##路由对应的处理函数,触发路由的时候执行
#处理函数的返回值,显示在浏览器
def  index():
	return  "hello index"

@app.route('/test')
def  test():
	return  "hello test"

if __name__ == "__main__":
        ##启动app,监听端口port
	app.run(host='0.0.0.0',port=888,debug=True)
4.3.2 结果如下:注意是监听路由出发后的处理函数返回值,在浏览器端显示
4.3.3 flask格式与web贯通
URL:统一资源标识符
协议://域名:端口/资源地址?携带的参数1=2&参数2=3#页面锚点
资源就是我们要监听的
资源地址就是@app.route()要写的东西
常说的路由、接口,都是基于url的
?后边的全部参数,格式是key=value的形式。
4.4 flask中如何获取前端参数
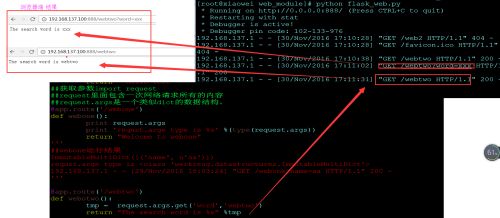
获取参数需要from flask import request操作。request里面包含一次网络请求所有的内容,所有url的参数(GET方法获取得) 都在request.args这个变量里,request.args是一个类似dict的数据结构。
flask通过request.arge.get()获取前端url给出的参数。
具体代码如下:见函数webone、webtwo
###注意一定要import  request函数后才能获取前端传递的参数

[root@xiaowei web_module]# cat flask_web.py
#/usr/bin/python
#coding:utf-8

from flask import Flask ,request,render_template,redirect

##new app
app = Flask(__name__)
@app.route('/')
def  index():
	return  "hello index"
@app.route('/test')
def  test():
	return  "hello test"
##获取参数import request
##request里面包含一次网络请求所有的内容
##request.args是一个类似dict的数据结构。
@app.route('/webone')
def webone():
	print request.args
	print 'requst.arge type is %s' %(type(request.args))
	return "Welcome to webone"
'''
##webone运行结果
ImmutableMultiDict([('name', u'aa')])
requst.arge type is
192.168.137.1 - - [29/Nov/2016 16:03:24] "GET /webone?name=aa HTTP/1.1" 200 -
'''

@app.route('/webtwo')
def webotwo():
	tmp =  request.args.get('word','webtwo')
	return "The search word is %s" %tmp

if __name__ == "__main__":
	app.run(host='0.0.0.0',port=888,debug=True)
实验截图如下:
4.5 前端渲染html文件
需要导入import render_template,默认渲染当前目录下templates目录中的html文件。
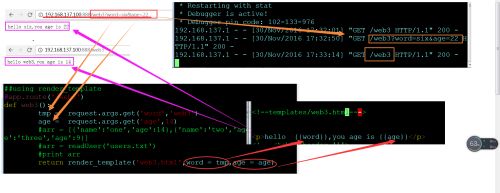
4.5.1 初识render_template渲染。
from flask import Flask ,request,render_template,redirect

##new app
app = Flask(__name__)
@app.route('/')
def  index():
	return  "hello index"
@app.route('/test')
def  test():
	return  "hello test"

##using render_template
@app.route('/web3')
def web3():
        tmp =  request.args.get('word','web3')
        age =  request.args.get('age',14)
        #arr = [{'name':'one','age':14},{'name':'two','age':32},{'name':'three','age':9}]
        #arr = readUser('users.txt')
        #print arr
        return render_template('web3.html',word = tmp,age = age)

if __name__ == "__main__":
app.run(host='0.0.0.0',port=888,debug=True)渲染后的结果如下:
4.5.2 渲染的模板
python中的渲染模板可以使用jinjia2,所谓的模板就是渲染html文件时可以传递变量,注意传递变量时使用关键字形式传递。
渲染模板的形式:
一、单个变量: {{ 变量 }} 包裹的是变量
二、个数不确定 {% 变量 %} 包裹python的循环变量
判断的语法:{% if 判断语句 %}
中间的执行语句
{% endif %}
循环的语法:{% for x in 变量 % }
中间的执行语句
{% endfor %}
循环的变量如果为字典的话,则可以使用tmp.name和tmp[name]两种方式调用
##循环变量的渲染
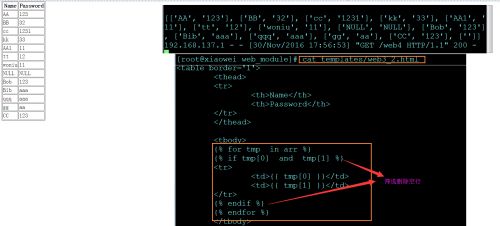
小练习:在前端显示uers.txt的内容(web4函数)
[root@xiaowei web_module]# cat flask_web.py
#/usr/bin/python
#coding:utf-8

from flask import Flask ,request,render_template,redirect
from getUser import readUser
##new app
app = Flask(__name__)
@app.route('/')
def  index():
	return  "hello index"
##using render_template

'''
##注意web4中f.read()的结果为字符串
In [21]: f = open('users.txt')

In [22]: f.read()
Out[22]: 'AA:123\nBB:32\ncc:1231\nkk:33\nAA1:11\ntt:12\nwoniu:11\n'
'''
@app.route('/web4')
def web4():
	tmp =  request.args.get('word','web3')
	age =  request.args.get('age',14)
	#arr = [{'name':'one','age':14},{'name':'two','age':32},{'name':'three','age':9}]
	f = open('users.txt')
	arr = [ line.split(":")  for line in f.read().split('\n') ]
	print arr
	return render_template('web3_2.html',word = tmp,age = age ,arr = arr)

if __name__ == "__main__":
	app.run(host='0.0.0.0',port=888,debug=True)


###渲染文件templates/web3_2.html内容
[root@xiaowei web_module]# cat templates/web3_2.html


		Name
		Password


	{% for tmp  in arr %}
	{% if tmp[0]  and  tmp[1] %}

		{{ tmp[0] }}
		{{ tmp[1] }}

	{% endif %}
	{% endfor %}


[root@xiaowei web_module]#
循环变量渲染后的执行结果图:
遇到问题:前端显示是由于users.txt文件中存在空行情况,出现空表格现象。
空行问题解决:
1.python处理的时候判断(基本已经熟悉了)
2. 前端显示做判断
此处主要将jinjia2处理
##此处两种方式判断都可以
##小练习代码:
t = arr = [['AA', '123'], ['BB', '32'], ['cc', '1231'], ['kk', '33'], ['AA1', '11'],\
 ['tt', '12'], ['woniu', '11'], ['NULL', 'NULL'], ['Bob', '123'], ['Bib', 'aaa'], \
 ['qqq', 'aaa'], ['gg', 'aa'], ['']]

In [36]: for i in t:
    ...:     if len(i) ==  2  :
    ...:         print i
    ...:     else :
    ...:         print "空行"
    ...:
    ...:
['AA', '123']
['BB', '32']
['cc', '1231']
['kk', '33']
['AA1', '11']
['tt', '12']
['woniu', '11']
空行
In [37]: for i in t:
    ...:     if i[0] and i[1]  :
    ...:         print i
    ...:     else :
    ...:         print "空行"
    ...:
    ...:
['AA', '123']
['BB', '32']
['cc', '1231']
['kk', '33']
['AA1', '11']
['tt', '12']
['woniu', '11']
空行
In [38]:
注意:使用渲染时的目录层级结构
[root@xiaowei web_module]# tree
.
├── flask_web.py
├── getUser.py
├── getUser.pyc
├── Readme.md
├── templates
│   ├── form.html
│   ├── web3_1.html
│   ├── web3_2.html
│   └── web3.html
├── users.txt
└── web2.py

1 directory, 10 files
[root@xiaowei web_module]#
4.6 flask的跳转
web中有时候会出现需要跳转的需求,这个时候需要import redirect来实现跳转功能。
跳转完整代码如下:
#/usr/bin/python
#coding:utf-8

from flask import Flask ,request,render_template,redirect
from getUser import readUser
##new app
app = Flask(__name__)
@app.route('/')
def  index():
        return  "hello index"
@app.route('/test')
def  test():
        return  "hello test"
##实现跳转功能,import redirect 函数
@app.route('/web5')
def web5():
        role = request.args.get('role','')
        if role == 'admin':
                return redirect('/test')
        else :
                return "please login"
if __name__ == "__main__":
app.run(host='0.0.0.0',port=888,debug=True)跳转结果截图:
4.7 返回值扩展
小tips return语句后边所有语句都不会执行
In [38]: def test():
    ...:     print '111'
    ...:     print '222'
    ...:     return "Done"
    ...:     print '33333'
    ...:
In [39]: test()
111
222
Out[39]: 'Done'
五、HTML的常用标签
HTML中解决乱码的方法:前端解决乱码==>
注意w3c的代码测试网址:(可以在此网页上测试标签效果)
http://www.w3school.com.cn/tiy/t.asp?f=html5
5.1 常用的table标签
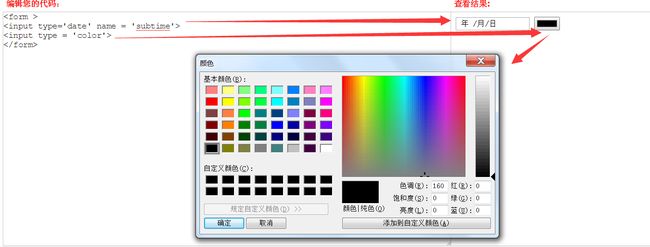
定义HTML 表格中的行。 5.2 常用的form标签 form 有一个action属性,提交的地址(URL) 表单内容,有很多输入框,(input没有闭合标签,跟其他标签不一样的地方需要注意) type = "text" 输入框 type = 'submit' 提交按钮 type = "password" 密码框,输入为小圆点 type = 'checkbox' 多选框 type = 'radio' 单选框 type = 'date' 选日期 type = 'color' 选颜色 value = 'XX' 提交按钮上边的字 form标签练习: 执行的结果图: 1.form结果图 2.单选多选框结果图 3. 时间颜色结果图 5.3 其他常用标签 一段话 按钮 默认的行内模式 HTML代码练习: tes图 p 标签 5.4 form标签结合flask实现前端提交注册用户名密码 实现注册的代码:要求,通过/的index主页访问,在name和password框中输入用户名密码,点击add提交按钮直接写入到users.txt文件中,而后跳转到/web4页面列举出所有的用户名密码。 执行流程及结果:
转载于:https://blog.51cto.com/top99/1878104后端向前端展示数据
标签
标签定义
用法
定义html的网页
定义HTML 表格
tr元素包含一个或多个th或td元素。
定义HTML 表头。
定义HTML 表格单元。
换行 ,也没有闭合标签
一个横线 图片标签,src属性是图片的地址
执行结果图如下:[root@xiaowei web_module]# cat web2.py
#/usr/bin/python
#coding:utf-8
###第二个web程序,练习form标签,熟悉前端向后端提交数据的流程
from flask import Flask,render_template,redirect,request
app = Flask(__name__)
@app.route('/')
def index():
return render_template('form.html')
@app.route('/adduser')
def adduser():
name = request.args.get('name','')
passw = request.args.get('password','')
with open('users.txt','a+') as files:
files.write('%s:%s\n' %(name,passw))
return redirect("/web4")
@app.route('/web4')
def web4():
# tmp = request.args.get('word','web3')
# age = request.args.get('age',14)
#arr = [{'name':'one','age':14},{'name':'two','age':32},{'name':'three','age':9}]
f = open('users.txt')
arr = [ line.split(":") for line in f.read().split('\n') ]
print arr
# return render_template('web3_2.html',word = tmp,age = age ,arr = arr)
return render_template('web3_2.html',arr = arr)
if __name__ == "__main__":
app.run(host='0.0.0.0',port=888,debug=True)你可能感兴趣的:(从零开始学Python-day6)


