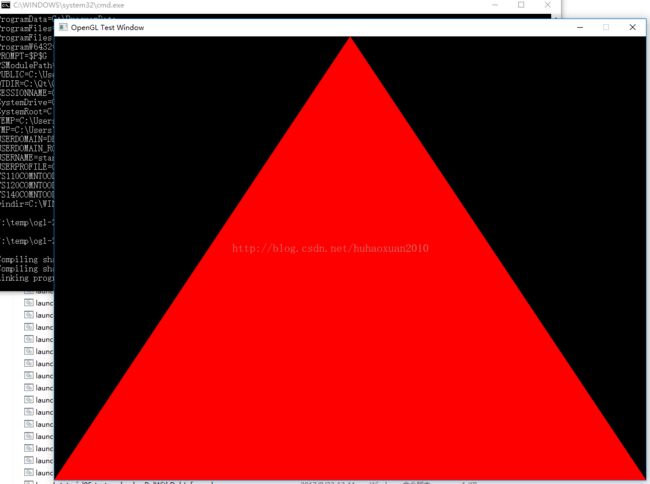
OpenGL绘制三角形
github上下载源码。
使用CMake编译该工程后,以playground目录下的playground.cpp作为模板进行编写验证。
首先playground.cpp中添加代码如下:
#include
#include


#include


#include
GLFWwindow* window;


#include "shader.hpp"


#include
using namespace glm;


int main( void )
{
	// Initialise GLFW
	if( !glfwInit() )
	{
		fprintf( stderr, "Failed to initialize GLFW\n" );
		getchar();
		return -1;
	}


    glfwWindowHint(GLFW_SAMPLES, 4); //4倍抗锯齿,因此每个像素有4个采样点,片段着色器会作用于每一个采样点
	glfwWindowHint(GLFW_RESIZABLE,GL_FALSE);
	glfwWindowHint(GLFW_CONTEXT_VERSION_MAJOR, 2); //OpenGL版本号2.1
	glfwWindowHint(GLFW_CONTEXT_VERSION_MINOR, 1);


    // Open a window and create its OpenGL context
	window = glfwCreateWindow( 1024, 768, "OpenGL Test Window", NULL, NULL);
	if( window == NULL ){
		fprintf( stderr, "Failed to open GLFW window. If you have an Intel GPU, they are not 3.3 compatible. Try the 2.1 version of the tutorials.\n" );
		getchar();
		glfwTerminate();
		return -1;
	}
	glfwMakeContextCurrent(window);


	// Initialize GLEW
	if (glewInit() != GLEW_OK) {
		fprintf(stderr, "Failed to initialize GLEW\n");
		getchar();
		glfwTerminate();
		return -1;
	}


	// Ensure we can capture the escape key being pressed below
	glfwSetInputMode(window, GLFW_STICKY_KEYS, GL_TRUE);


	//create one VAO(顶点数组对象)
	GLuint VertexArrayID;
	glGenVertexArrays(1, &VertexArrayID);
	glBindVertexArray(VertexArrayID);


	static const GLfloat g_vertex_buffer_data[] = {
	-1.0f, -1.0f, 0.0f,
	1.0f, -1.0f, 0.0f,
	0.0f, 1.0f, 0.0f,
	};


	// 通过缓冲把三角形传给OpenGL
	GLuint vertexbuffer;
	glGenBuffers(1, &vertexbuffer);
	glBindBuffer(GL_ARRAY_BUFFER, vertexbuffer);
	glBufferData(GL_ARRAY_BUFFER, sizeof(g_vertex_buffer_data), g_vertex_buffer_data, GL_STATIC_DRAW);
	GLuint programID = LoadShaders("SimpleVertexShader.vertexshader", "SimpleFragmentShader.fragmentshader");
	// Dark blue background
	glClearColor(0.0f, 0.0f, 0.4f, 0.0f);


    do{
		//使用着色器
		glUseProgram(programID);
		// Draw nothing, see you in tutorial 2 !
		glEnableVertexAttribArray(0);
		glBindBuffer(GL_ARRAY_BUFFER, vertexbuffer);
		glVertexAttribPointer(
			0,
			3,
			GL_FLOAT,
			GL_FALSE,
			0,
			(void*)0
			);


		glDrawArrays(GL_TRIANGLES, 0, 3);
		glDisableVertexAttribArray(0);


        // Swap buffers
		glfwSwapBuffers(window);
		glfwPollEvents();


    } // Check if the ESC key was pressed or the window was closed
	while( glfwGetKey(window, GLFW_KEY_ESCAPE ) != GLFW_PRESS &&
		   glfwWindowShouldClose(window) == 0 );


    // Close OpenGL window and terminate GLFW
    glfwTerminate();


    return 0;
}
其中着色器的处理,另外需要独立的着色器文件,因此,在该目录下创建2个文件:
//文件SimpleVertexShader.vertexshader,代码如下:
#version 330
// Input vertex data, different for all executions of this shader.
layout(location = 0) in vec3 vertexPosition_modelspace;


void main(){
	gl_Position.xyz = vertexPosition_modelspace;
	gl_Position.w = 1.0;
}
//文件SimpleFragmentShader.fragmentshader代码如下:
#version 330 core
out vec3 color;


void main()
{
	color = vec3(1, 0, 0);
}
输出:
运行build目录下的:launch-playground-Release.cmd后可看到效果:
参考地址
