Python_文件操作_深入
Python_文件操作_深入
- 按文件中数据的组织形式把文件分为文本文件和二进制文件两大类
- 文本文件:存储常规字符串,由若干文本行组成,通常每行以换行符‘\n’结尾
- 二进制文件:存储字节串(bytes)形式的对象内容,通常是在bin目录下的可执行文件
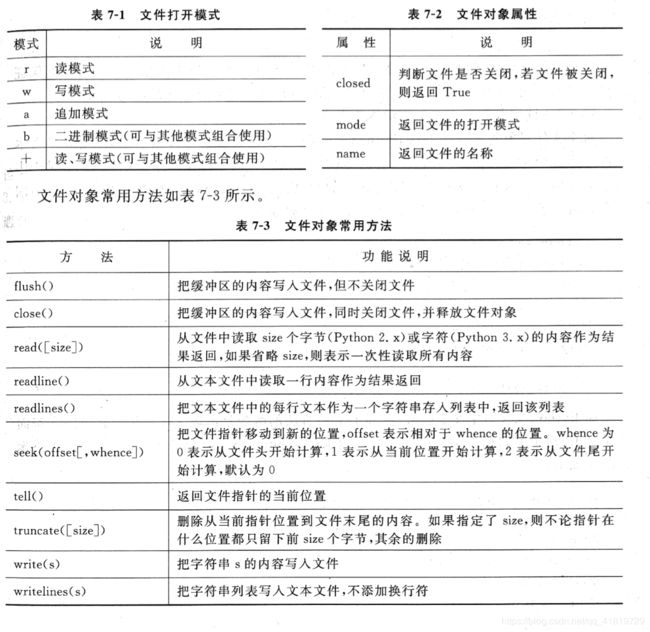
1. 文件对象
2.文本文件操作案例
- 通过几个实例来演示文本文件的读写操作。
- 对于read,write以及其他读写方法,当读写完成后,都会自动移动文件指针。如果需要对文件指针进行定位,可以使用seek方法,如果需要获知文件指针当前位置可以用tell方法
2.1 向文本文件中写入内容
f = open(r'C:\Users\ASUS\Desktop\sample.txt','a+')
s = '文本文件的读取方法\n文本文件的写入方法\n'
f.write(s)
f.close() # 每次io过程都要记得最后释放io流资源
- 使用上下文关键字with可以自动管理资源,无论何种原因跳出with块,总能保证文件被正确关闭,并且可以在代码块执行完毕后自动还原进入该代码块时的现场
## 对于上面的代码,建议写成如下形式:
s = '文本文件的读取方法\n文本文件的写入方法\n'
with open(r'C:\Users\ASUS\Desktop\sample.txt','a+') as f:
    f.write(s)
2.2 读取并显示文本文件的前5个字节
fp=open(r'C:\Users\ASUS\Desktop\sample.txt','r')
print(fp.read(5))
fp.close()
文本文件的
2.3 读取并显示文本文件所有行
fp=open(r'C:\Users\ASUS\Desktop\sample.txt','r')
while True:
    line = fp.readline()
    if line == '': #读到最后一行停止while
        break
    print(line)
fp.close()
文本文件的读取方法

文本文件的写入方法

文本文件的读取方法

文本文件的写入方法
## 也可以写成这样:
f=open(r'C:\Users\ASUS\Desktop\sample.txt','r')
li = f.readlines()
for line in li:
    print(line)
f.close()
文本文件的读取方法

文本文件的写入方法

文本文件的读取方法

文本文件的写入方法
2.4移动文件指针
- 铜鼓哟
s = '大漠孤烟直DMGYZ'
fp = open(r'C:\Users\ASUS\Desktop\sample.txt','w+')
fp.write(s)
fp.flush()
fp.close()
fp = open(r'C:\Users\ASUS\Desktop\sample.txt','r+')
fp.read(3)
'大漠孤'
fp.seek(2)
2
fp.read(1)
'漠'
fp.seek(10)
fp.read(1)
'D'
2.5读取文本文件data.txt中的所有整数,并将其按升序排序后再写入文本文件data_asc.txt中
import re
pattern = re.compile(r'\d+')
fp = open(r'C:\Users\ASUS\Desktop\data.txt','r')
lines = fp.readlines()
data = []
for line in lines:
    matchResult = pattern.findall(line) # 得到的是存放了多个数字的数组
    for i in matchResult:
        data.append(int(i))


data.sort()
print(data)
fp.close()

fw = open(r'C:\Users\ASUS\Desktop\data_asc.txt','w')
fw.writelines(str(data))
[12, 41, 51, 123, 456]
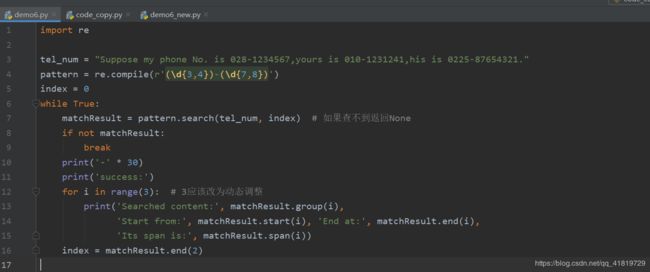
2.6 编写程序,保存为demo6.py,运行后生成文件 demo6_new.py,其中的内容与demo6.py一致,但是在每行的行尾加上了行号
filename = 'demo6.py'
with open(filename, 'r', encoding='UTF-8') as fp:
    lines = fp.readlines()
lines = [line.rstrip() + ' ' * (100 - len(line)) + '#' + str(index) + '\n' for index, line in enumerate(lines)]
with open(filename[:-3] + '_new.py', 'w') as fp:
    fp.writelines(lines)
---------------------------------------------------------------------------

FileNotFoundError                         Traceback (most recent call last)

 in
      1 filename = 'demo6.py'
----> 2 with open(filename, 'r', encoding='UTF-8') as fp:
      3     lines = fp.readlines()
      4 lines = [line.rstrip() + ' ' * (100 - len(line)) + '#' + str(index) + '\n' for index, line in enumerate(lines)]
      5 with open(filename[:-3] + '_new.py', 'w') as fp:


FileNotFoundError: [Errno 2] No such file or directory: 'demo6.py'
3.二进制文件操作案例
在操作二进制文件时需要对其进行序列化和反序列化
- Python中常用的序列化模块由struct,pickle,json,marshal和shelve,其中oikle由C语言实现的cPickle,速度相比较其他模块块将近1000倍!优先考虑使用
3.1 使用pickle模块
- dump(arg,file_object):向目标文件写入二进制数据
- load(file_object):从目标文件中读二进制数据加载到当前程序内存
- 在程序中第一次使用得到数据个数,然后文件指针后移到文件content区域
- 使用while 或 for +load依次从上向下读取文件内容
使用pickle模块写入二进制文件
import pickle

f = open('sample_pickle.dat','wb') # 注意打开方式要加上'b'
n = 7
i = 13000000
a = 99.056
s='万里长城永不倒123abc'
lst = [[1,2,3],[4,5,6],[7,8,9]]
tu = (-5,6,7)
coll = {4,5,6}
dic={'a':'apple','b':'banana','o':'orange'}
try:
    pickle.dump(n,f) # 参数1 为要dump到目标文件的变量/函数名称
    pickle.dump(i,f) # 参数2 为文件对象,在文件对象中指定了操作方式和文件读写路径
    pickle.dump(a,f)
    pickle.dump(s,f)
    pickle.dump(lst,f)
    pickle.dump(tu,f)
    pickle.dump(coll,f)
    pickle.dump(dic,f)
except:
    print('二进制文件写入异常')
finally:
    f.close()
读取刚刚写入的二进制文件中的内容
import pickle

f = open('sample_pickle.dat','rb')
n=pickle.load(f) #第一次使用load函数得到的是文件的数据个数
i =0
while i<n:
    x = pickle.load(f) # 在之后的load都是读取的具体的文件数据
    print(x)
    i=i+1
f.close()
13000000
99.056
万里长城永不倒123abc
[[1, 2, 3], [4, 5, 6], [7, 8, 9]]
(-5, 6, 7)
{4, 5, 6}
{'a': 'apple', 'b': 'banana', 'o': 'orange'}
3.2 使用struct模块
- struct也是常用的对象序列化和二进制文件读写模块
使用struct模块写入二进制文件
import struct

f = open('sample_struct.dat','wb') # 注意打开方式要加上'b'
x = 96.45
n = 13000000
b = True
s='千里黄河水滔滔123abc'
sn = struct.pack('if?',n,x,b) # 将n,x,b三个变量通过pack序列化

f.write(sn) # 序列化后的内容可以直接写入文件
f.write(s.encode()) # string内置函数encode也可以将自身序列化
f.close()
使用struct模块读取上面写入二进制文件的内容
import struct

f= open('sample_struct.dat','rb')
sn = f.read(9)
tu = struct.unpack('if?',sn) # unpack反序列化得到一个元组tuple
print(tu)
n,x,b = tu
print('n=',n,'x=',x,'b=',b)
s = f.read(27)
s=s.decode()
print('s=',s)
(13000000, 96.44999694824219, True)
n= 13000000 x= 96.44999694824219 b= True
s= 千里黄河水滔滔123abc
4. 文件级操作
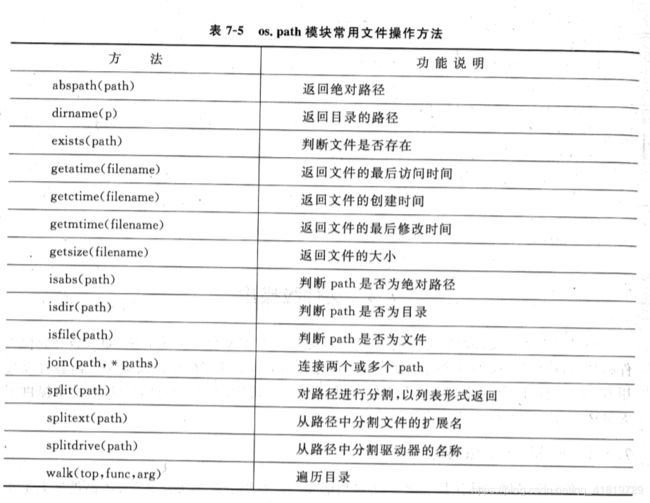
- 如果需要处理文件路径,可以使用os.path模块中的对象和方法
- 如果需要使用命令行读取文件内容可以使用fileinput模块
- 创建临时文件和文件夹可以使用tempfile模块
- 另外,pathlib模块提供了大量用于表示和处理文件系统路径的类
os和os.path 模块
## 实例
import os
import os.path
os.path.exists('text1.txt')
False
os.rename(r'C:\Users\ASUS\Desktop\sample.txt',r'C:\Users\ASUS\Desktop\sample_2.txt') #os.rename可以同时实现文件的重命名和移动
---------------------------------------------------------------------------

FileNotFoundError                         Traceback (most recent call last)

 in
----> 1 os.rename(r'C:\Users\ASUS\Desktop\sample.txt',r'C:\Users\ASUS\Desktop\sample_2.txt') #os.rename可以同时实现文件的重命名和移动


FileNotFoundError: [WinError 2] 系统找不到指定的文件。: 'C:\\Users\\ASUS\\Desktop\\sample.txt' -> 'C:\\Users\\ASUS\\Desktop\\sample_2.txt'
os.path.exists(r'C:\Users\ASUS\Desktop')
True
path = r'C:\Users\ASUS\Desktop\new_text.txt'
os.path.dirname(path) # 返回目录名
'C:\\Users\\ASUS\\Desktop'
os.path.split(path) # 切割目录与文件
('C:\\Users\\ASUS\\Desktop', 'new_text.txt')
os.path.splitdrive(path) # 从路径中分割驱动器的名称
('C:', '\\Users\\ASUS\\Desktop\\new_text.txt')
os.path.splitext(path) # 从路径中分割文件的扩展名
('C:\\Users\\ASUS\\Desktop\\new_text', '.txt')
- 列出当前目录下所有扩展名为dat的文件,使用列表推导式
import os
print([fname for fname in os.listdir(os.getcwd()) if os.path.isfile(fname) and fname.endswith('.dat')])
['sample_pickle.dat', 'sample_struct.dat']
- 下面的代码用来将当前目录所有扩展名为html的文件重命名为扩展名为htm的文件
import os

file_list = os.listdir(".")
for filename in file_list:
    pos = filename.rindex(".")
    if filename[pos+1:]=="html":
        newname=filename[:pos]+"htm"
        os.rename(filename,newname)
        print(filename+"更名为"+newname)
untitled.html更名为untitledhtm
## 使用简洁的列表推导式来替换上面的代码
import os
file_list = [filename for filename in os.listdir(".") if filename.endswith(".html")] # 直接得到html文件名的列表
for filename in file_list:
    newname = filename[:-4]+"htm"
    os.rename(filename,newname)
    print(filename+"更名为"+newname)
a.html更名为a.htm
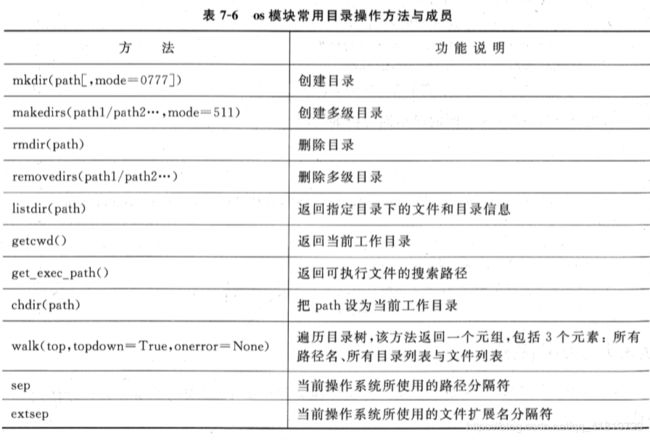
5. 目录操作
- 下面的代码演示了如何使用os模块的方法来查看、改变当前的工作目录、以及CURD目录
import os
os.getcwd() #返回当前工作目录,相当于linux的pwd
'C:\\Users\\ASUS\\python_Learning'
os.mkdir(os.getcwd()+'\\temp') #创建目录
os.chdir(os.getcwd()+'\\temp') # 改变当前工作目录
os.getcwd()
'C:\\Users\\ASUS\\python_Learning\\temp'
os.chdir(os.getcwd()[:-5])
os.listdir(".") # .表示当前目录
['.ipynb_checkpoints',
 'a.htm',
 'Python_函数深入.ipynb',
 'Python_文件操作_深入.ipynb',
 'Python_面向对象_深入_下篇.ipynb',
 'Python面向对象_深入_上篇.ipynb',
 'sample.txt',
 'sample_pickle.dat',
 'sample_struct.dat',
 'String字符串.ipynb',
 'temp',
 'untitledhtm',
 '复杂数据结构.ipynb',
 '字典_集合.ipynb',
 '字符串应用.ipynb',
 '条件循环.ipynb',
 '正则表达式.ipynb']
os.mkdir(os.getcwd()+"\\test")
os.listdir()
['.ipynb_checkpoints',
 'a.htm',
 'Python_函数深入.ipynb',
 'Python_文件操作_深入.ipynb',
 'Python_面向对象_深入_下篇.ipynb',
 'Python面向对象_深入_上篇.ipynb',
 'sample.txt',
 'sample_pickle.dat',
 'sample_struct.dat',
 'String字符串.ipynb',
 'temp',
 'test',
 'untitledhtm',
 '复杂数据结构.ipynb',
 '字典_集合.ipynb',
 '字符串应用.ipynb',
 '条件循环.ipynb',
 '正则表达式.ipynb']
os.rmdir("test") # 删除当前目录下的test目录
os.listdir()
['.ipynb_checkpoints',
 'a.htm',
 'Python_函数深入.ipynb',
 'Python_文件操作_深入.ipynb',
 'Python_面向对象_深入_下篇.ipynb',
 'Python面向对象_深入_上篇.ipynb',
 'sample.txt',
 'sample_pickle.dat',
 'sample_struct.dat',
 'String字符串.ipynb',
 'temp',
 'untitledhtm',
 '复杂数据结构.ipynb',
 '字典_集合.ipynb',
 '字符串应用.ipynb',
 '条件循环.ipynb',
 '正则表达式.ipynb']
- 如果需要遍历指定目录下所有子目录和文件,可以使用递归
import os

def visitDir(path):
    if not os.path.isdir(path):
        print('Error:',path,'is not a directory or does not exist.')
        return
    for lists in os.listdir(path):
        sub_path = os.path.join(path,lists) #获得子路径
        print(sub_path)
        if os.path.isdir(sub_path): # 如果子路径名还是目录,则递归操作
            visitDir(sub_path)
visitDir(r'C:\Users\ASUS\Desktop\寒假论文')
C:\Users\ASUS\Desktop\寒假论文\blockchain
C:\Users\ASUS\Desktop\寒假论文\blockchain\Blockchain and Deep Reinforcement Learning Empowered Intelligent 5G Beyond.pdf
C:\Users\ASUS\Desktop\寒假论文\blockchain\Toward Secure Blockchain-Enabled Internet of.pdf
C:\Users\ASUS\Desktop\寒假论文\中文论文
C:\Users\ASUS\Desktop\寒假论文\中文论文\基于深度强化学习的MEC计算卸载和资源分配研究_程百川.pdf
C:\Users\ASUS\Desktop\寒假论文\中文论文\基于移动边缘计算的物联网资源管理策略研究_乔冠华.pdf
C:\Users\ASUS\Desktop\寒假论文\中文论文\移动边缘计算场景下的网络资源联合优化技术研究_程康.pdf
C:\Users\ASUS\Desktop\寒假论文\联邦学习
C:\Users\ASUS\Desktop\寒假论文\联邦学习\Adaptive Federated Learning in Resource.pdf
C:\Users\ASUS\Desktop\寒假论文\联邦学习\Client Selection for Federated Learning.pdf
C:\Users\ASUS\Desktop\寒假论文\联邦学习\Federated Learning over Wireless Networks.pdf
C:\Users\ASUS\Desktop\寒假论文\联邦学习\Incentive Design for Efficient Federated Learning in.pdf
C:\Users\ASUS\Desktop\寒假论文\联邦学习\Secure and Verifiable Federated Learning.pdf
C:\Users\ASUS\Desktop\寒假论文\边缘网络ML优化
C:\Users\ASUS\Desktop\寒假论文\边缘网络ML优化\Adaptive Federated Learning in Resource.pdf
C:\Users\ASUS\Desktop\寒假论文\边缘网络ML优化\AI赋能车联网边缘计算和缓存.pdf
C:\Users\ASUS\Desktop\寒假论文\边缘网络ML优化\Deep Reinforcement Learning based Resource.pdf
C:\Users\ASUS\Desktop\寒假论文\边缘网络ML优化\Deep Reinforcement Learning for Cooperative Edge Caching in Future Mobile Networks.pdf
C:\Users\ASUS\Desktop\寒假论文\边缘网络ML优化\Q-Learning Based Edge Caching Optimization for D2D Enabled Hierarchical Wireless Networks.pdf
C:\Users\ASUS\Desktop\寒假论文\边缘网络ML优化\分布式DQL.pdf
C:\Users\ASUS\Desktop\寒假论文\边缘网络ML优化\流行度缓存.pdf
实用案例
计算文件的CRC32值。—数据安全–循环冗余校验。
import zlib
print(zlib.crc32('1234'.encode()))
2615402659
import binascii
binascii.crc32('CQUPT'.encode())
369793441
计算文本文件中最长行的长度
def count_longgest(path):
    f = open(path,'r')
    allLineLens=[len(line.strip()) for line in f.readlines()]
    f.close()
    longgest = max(allLineLens)
    print(longgest)
count_longgest(r'C:\Users\ASUS\Desktop\test.txt')
14
计算字符串MD5值。MD5值可以用来判断文件发布之后是否被篡改,对文件完整性保护具有重要意义
import hashlib

md5value=hashlib.md5()
md5value.update('12345'.encode())
md5value=md5value.hexdigest()
print(md5value)
827ccb0eea8a706c4c34a16891f84e7b
# 对上面的代码稍加调整就可以实现自己的MD5计算器
import hashlib
import os
import sys

filename = sys.argv[1]
if os.path.isfile(filename):
    with open(filename, 'r') as fp:
        lines = fp.readlines()
    data = ''.join(lines)
    print(hashlib.md5(data.encode()).hexdigest())
-
将上面的代码保存为文件CheckMD5OfFile.py 然后计算指定文件的MD5值
-
使用xlwt模块写入Excel文件
from xlwt import *

book = Workbook()
sheet1 = book.add_sheet("First")
al = Alignment()
al.horz = Alignment.HORZ_CENTER  # 水平对齐
al.vert = Alignment.VERT_CENTER  # 垂直对齐
borders = Borders()
borders.bottom = Borders.THICK  # 细边框
style = XFStyle()
style.alignment = al
style.borders = borders
row0 = sheet1.row(0)
row0.write(0, 'test', style=style)
book.save(r'D:\test.xls')
-
编写程序,进行文件夹增量备份—系统自动运维,git/svn
- 程序功能与用法:
指定源文件与目标文件夹,自动检测自上次备份以来源文件中内容的改变,包括修改的文件,新建的文件、新建的文件夹等等
,自动复制新增或修改过的文件到目标文件夹,自上次备份以来没有修改过的文件将被忽略而不复制,从而实现增量备份
import os
import filecmp
import shutil
import sys


def autoBackup(scrDir, dstDir):
    """
    备份方法
    :param scrDir:源文件夹地址
    :param dstDir:目标文件夹地址
    :return:
    """
    if (not os.path.isdir(scrDir)) or (not os.path.isdir(dstDir)) or \
            (os.path.abspath(scrDir) != scrDir) or (os.path.abspath(dstDir) != dstDir):
        usage()
    for item in os.listdir(scrDir):
        scrItem = os.path.join(scrDir, item)
        dstItem = scrItem.replace(scrDir, dstDir)
        if os.path.isdir(scrItem):
            # 创建新增的文件夹,保证目标文件夹结构与源文件夹一致
            if not os.path.exists(dstItem):
                os.makedirs(dstItem)
                print('make directory' + dstItem)
            autoBackup(scrItem, dstItem)  # 检查到是目录,递归渗透下一级目录
        elif os.path.isfile(scrItem):
            # 只复制新增或修改过的文件
            if (not os.path.exists(dstItem)) or (not filecmp.cmp(scrItem, dstItem, shallow=False)):
                shutil.copyfile(scrItem, dstItem)
                print('file:' + scrItem + '==>' + dstItem)


def usage():
    """使用说明"""
    print('srcDir and dstDir must be existing absolute path of certain directory')
    print('For example:{0} c:\\olddir c:\\newdir'.format(sys.argv[0]))
    sys.exit(0)


if __name__ == '__main__':
    if len(sys.argv) != 3:
        usage()
        scrDir, dstDir = sys.argv[1], sys.argv[2]
        autoBackup(scrDir, dstDir)
- 编写程序,统计指定文件夹大小以及文件和子文件夹数量—系统运维,可用于磁盘配额的计算
import os

total_size = 0
file_num = 0
dir_num = 0


def visitDir(path):
    global total_size
    global file_num
    global dir_num
    for lists in os.listdir(path):
        sub_path = os.path.join(path, lists)
        if os.path.isfile(sub_path):
            file_num += 1  # 统计文件数量
            total_size += os.path.getsize(sub_path)  # 统计文件总大小
        elif os.path.isdir(sub_path):  # 如果遍历到文件夹,进行递归
            dir_num += 1
            visitDir(sub_path)  # 递归遍历子文件夹


def main(path):
    if not os.path.isdir(path):
        print('Error:', path, 'is not a directory or does not exists.')
        return
    visitDir(path)


def size_convert(size):
    """文件大小单位转换"""
    K, M, G = 1024, 1024 ** 2, 1024 ** 3
    if size >= G:
        return str(size / G) + 'G Bytes'
    elif size >= M:
        return str(size / M) + 'M Bytes'
    elif size >= K:
        return str(size / K) + 'K Bytes'
    else:
        return str(size) + 'Bytes'


def output(path):
    print('The total size of ' + path + ' is:' + size_convert(total_size) + '(' + str(total_size) + 'Bytes)')
    print('The total number of files in ' + path + 'is:', file_num)
    print('The total number of directories in ' + path + 'is', dir_num)


if __name__ == '__main__':
    path = r'D:\sys'
    main(path)
    output(path)
The total size of D:\sys is:348.3839349746704M Bytes(365307033Bytes)
The total number of files in D:\sysis: 6598
The total number of directories in D:\sysis 837
- 假设某学校所有课程每学期允许多次考试,学生可随时参加考试,系统自动将每次成绩添加到Excel文件(包含3列:姓名、课程、成绩)中,现期末要求统计所有学生每门课程的最高成绩。
- 下面的代码首先模拟生成随机成绩数据,然后进行统计分析
import openpyxl
from openpyxl import Workbook
import random


# 生成随机数据到文件
def generateRandomInformation(filename):
    workbook = Workbook()
    worksheet = workbook.worksheets[0]  # 设置工作表
    worksheet.append(['姓名', '课程', '成绩'])
    # 中文名字中的第一第二第三个字
    first = tuple('赵陈孙李')
    middle = tuple('伟志子东')
    last = tuple('坤楠恙')
    # 课程名字
    subjects = ('语文', '数学', '英语')
    # 随机生成200个数据
    for i in range(200):
        line = []
        r = random.randint(1, 100)
        name = random.choice(first)
        if r > 50:  # 按一定概率生成只有两个字的名字
            name = name + random.choice(middle)
        name = name + random.choice(last)  # 生成3个字的名字
        # 依次生成姓名、课程名称和成绩
        line.append(name)
        line.append(random.choice(subjects))
        line.append(random.randint(0, 100))
        worksheet.append(line)
    # 保存数据,生成Excel2007格式的文件
    workbook.save(filename)


def get_result(oldfile, newfile):
    """获取旧文件的数据,添加新增数据并把数据打包到新的文件下"""
    result = dict()  # 用于存放结果数据的字典
    # 打开原始数据
    workbook = openpyxl.load_workbook(oldfile)
    worksheet = workbook.worksheets[0]
    # 遍历原始数据
    for row in list(worksheet.rows)[1:]:  # 第一行是标题行,后面的行才是数据行
        # 姓名,课程名称,本次成绩
        name, subject, grade = row[0].value, row[1].value, row[2].value
        # 获取当前姓名对应的课程名称和成绩信息
        # 如果result字典中不包含,则返回空字典
        t = result.get(name, {})
        # 获取当前学生当前课程的成绩,若不存在返回0
        f = t.get(subject, 0)
        # 只保留该学生该课程的最高成绩
        if grade > f:
            t[subject] = grade
            result[name] = t

    # 创建Excel文件
    workbook1 = Workbook()
    worksheet1 = workbook1.worksheets[0]
    worksheet1.append(['姓名', '课程', '成绩'])
    # 将result字典中的结果数据写入Excel文件
    for name, t in result.items():
        for subject, grade in t.items():
            worksheet1.append([name, subject, grade])
    workbook1.save(newfile)


if __name__ == '__main__':
    oldfile = r'D:\test.xlsx'
    newfile = r'D:\result.xlsx'
    generateRandomInformation(oldfile)
    get_result(oldfile, newfile)


