SpringBootWEB开发
SpringBootWEB开发
- 一: HelloWorld的研究
- 1-1:pom文件
- 1-1-1:父项目
- 1-1-2:启动器
- 1-2:主程序类;主入口类的分析
- 二:配置文件
- 2-1:配置文件
- 2-2:YAML语法
- 2-2-1基本语法
- 2-1-2值的写法
- 2-2-3配置文件值的注入
- 三 springboot加载普通配置文件 @PropertySource
- 四、 springboot给容器添加组件
- 五、 springboot配置文件占位符
- 5-1、随机数
- 六、Profile
- 6-1、多Profile文件
- 6-2、yml支持多文档块方式
- 6-3激动制定profile
- 七、配置文件的加载顺序
- 八、Springboot与日志关系
- 九、SpringbootWEB开发
- 9-1 :SpringBoot对静态资源的映射规则
- 十、Springboot-模板引擎
- 10-1、导入thymeleaf的名称空间
- 10-2、使用thymeleaf语法;
- 10-3、语法规则;
课程学习目标:
1:Springboot-HelloWorld的研究(springboot启动运行原理)
2:Springboot-全局配置文件(2个)
3:SpringBoot给容器添加组件(spring如何添加组件-装配bean)
4:Springboot配置文件占位符(了解)
5:Profile文件
6 : SpringbootWeb开发
7: Springboot整合Thymeleaf(网页静态化)
一: HelloWorld的研究
1-1:pom文件
1-1-1:父项目
<parent>
   <groupId>org.springframework.boot</groupId>
   <artifactId>spring-boot-starter-parent</artifactId>
   <version>1.5.9.RELEASE</version>
   <relativePath/> <!-- lookup parent from repository -->
</parent>
它的父项目
<parent>
   <groupId>org.springframework.boot</groupId>
   <artifactId>spring-boot-dependencies</artifactId>
   <version>1.5.9.RELEASE</version>
   <relativePath>../../spring-boot-dependencies</relativePath>
</parent>
它才是真正管理Springboot应用里面所有的依赖版本
父项目被称之为Spring Boot的版本仲裁中心;
以后我们导入依赖默认是不需要写版本;(没有在dependencies里面管理的依赖自然需要声明版本号)
1-1-2:启动器
<dependency>
   <groupId>org.springframework.boot</groupId>
   <artifactId>spring-boot-starter-web</artifactId>
</dependency>
spring-boot-starter-web:
spring-boot-starter:spring-boot场景启动器;帮我们导入了web模块正常运行所依赖的组件;
Spring Boot将所有的功能场景都抽取出来,做成一个个的starters(启动器),只需要在项目里面引入这些starter相关场景的所有依赖都会导入进来。要用什么功能就导入什么场景的启动器
1-2:主程序类;主入口类的分析
/**
 * @SpringBootApplication 来标注一个主程序类,说明这是一个Spring Boot应用
 */
@SpringBootApplication
public class DemoApplication {
   public static void main(String[] args) {
      // Spring应用启动起来
      SpringApplication.run(DemoApplication.class, args);
   }
}
@SpringBootApplication: Spring Boot应用标注在某个类上说明这个类是SpringBoot的主配置类,SpringBoot就应该运行这个类的main方法来启动SpringBoot应用;
@Target({ElementType.TYPE}) // 注解的适用范围,其中TYPE用于描述类、接口(包括包注解类型)或enum声明
@Retention(RetentionPolicy.RUNTIME) // 注解的生命周期,保留到class文件中(三个生命周期)
@Documented // 表明这个注解应该被javadoc记录
@Inherited// 子类可以继承该注解
@SpringBootConfiguration  // 继承了Configuration,表示当前是注解类
@EnableAutoConfiguration // 开启springboot的注解功能,springboot的四大神器之一,其借助@import的帮助
@ComponentScan(// 扫描路径设置(具体使用待确认)
    excludeFilters = {@Filter(
    type = FilterType.CUSTOM,
    classes = {TypeExcludeFilter.class}
), @Filter(
    type = FilterType.CUSTOM,
    classes = {AutoConfigurationExcludeFilter.class}
)}
)
public @interface SpringBootApplication {
@SpringBootConfiguration:Spring Boot的配置类;
标注在某个类上,表示这是一个Spring Boot的配置类;
@Configuration:配置类上来标注这个注解;
配置类 ----- 配置文件;配置类也是容器中的一个组件;@Component
(备注:该类被@Configuration标注后 那么该类就是一个配置类
@Component
)
@EnableAutoConfiguration:开启自动配置功能;
以前我们需要配置的东西,Spring Boot帮我们自动配置;@EnableAutoConfiguration告诉SpringBoot开启自配置功能;这样自动配置才能生效;
@AutoConfigurationPackage
@Import(EnableAutoConfigurationImportSelector.
public @interface EnableAutoConfiguration {
@AutoConfigurationPackage:自动配置包
@Import(AutoConfigurationPackages.Registrar.class):
Spring的底层注解@Import,给容器中导入一个组件;导入的组件由
AutoConfigurationPackages.Registrar.class;
将主配置类(@SpringBootApplication标注的类)的所在包及下面所有子包里面的所有组件扫描到Spring容器;
@ComponentScan
@ComponentScan这个注解在Spring中很重要,它对应XML配置中的元素,@ComponentScan的功能其实就是自动扫描并加载符合条件的组件(比如@Component和@Repository等)或者bean定义,最终将这些bean定义加载到IoC容器中。
备注:Spring Boot Starter的运行工作原理如下:
1. Spring Boot 在启动时扫描项目所依赖的JAR包,寻找包含spring.factories文件的JAR
2. 根据spring.factories配置加载AutoConfigure类
3. 根据 @Conditional注解的条件,进行自动配置并将Bean注入Spring Context
1-3、IDEA:使用 Spring Initializer快速创建项目
IDE都支持使用Spring的项目创建向导快速创建一个Spring Boot项目;
选择我们需要的模块;向导会联网创建Spring Boot项目;
默认生成的Spring Boot项目;
主程序已经生成好了,我们只需要我们自己的逻辑
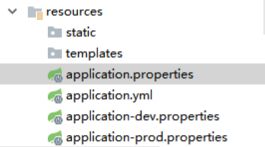
resources文件夹中目录结构
static:保存所有的静态资源; js css images;
templates:保存所有的模板页面;(Spring Boot默认jar包使用嵌入式的Tomcat, 默认不支持JSP页
面);可以使用模板引擎(freemarker、thymeleaf);
application.properties:Spring Boot应用的配置文件;可以修改一些默认设置;
二:配置文件
2-1:配置文件
SpringBoot使用一个全局的配置文件,配置文件名是固定的;
•application.properties
•application.yml
配置文件的作用:修改SpringBoot自动配置的默认值;SpringBoot在底层都给我们自动配置好;
YAML(YAML Ain’t Markup Language)
YAML A Markup Language:是一个标记语言
标记语言:
以前的配置文件;大多都使用的是 xxxx.xml文件;
YAML:以数据为中心,比json、xml等更适合做配置文件;
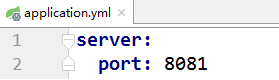
YAML:配置例子

XML:
<server>
<port>8081
</server>
2-2:YAML语法
2-2-1基本语法
k:(空格)v:表示一对键值对(空格必须有);
以空格的缩进来控制层级关系;只要是左对齐的一列数据,都是同一个层级的
属性和值也是大小写敏感;
2-1-2值的写法
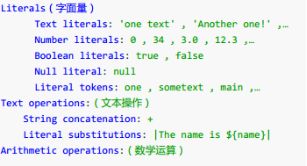
字面量:普通的值(数字,字符串,布尔)
k: v:字面直接来写;
字符串默认不用加上单引号或者双引号;
“”:双引号;不会转义字符串里面的特殊字符;特殊字符会作为本身想表示的意思
name: “zhangsan \n lisi”:输出;zhangsan 换行 lisi
‘’:单引号;会转义特殊字符,特殊字符最终只是一个普通的字符串数据
name: ‘zhangsan \n lisi’:输出;zhangsan \n lisi
对象、Map(属性和值)(键值对):
k: v:在下一行来写对象的属性和值的关系;注意缩进
对象还是k: v的方式

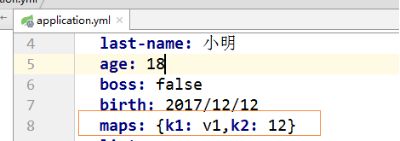
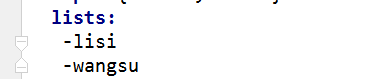
数组(List、Set):
用- 值表示数组中的一个元素
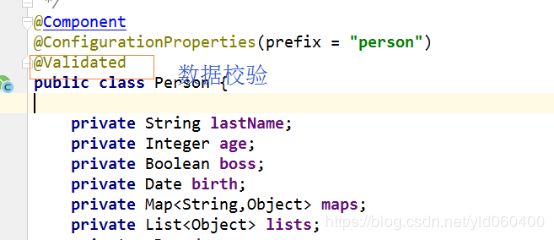
2-2-3配置文件值的注入
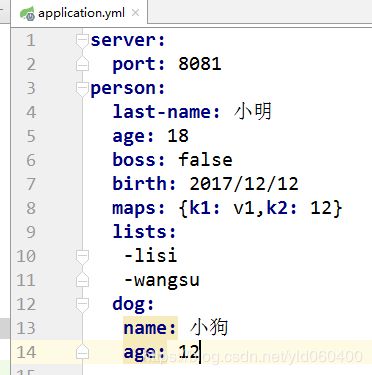
/**
* 将配置文件中配置的每一个属性值 映射到这个组件中
* @ConfigurationProperties 告诉springboot将本类中所有属性和配置文件相关的的配置进行绑定
*
*/
@Component
@ConfigurationProperties(prefix = "person")
public class Person {
private String lastName;
private Integer age;
private Boolean boss;
private Date birth;
private Map maps;
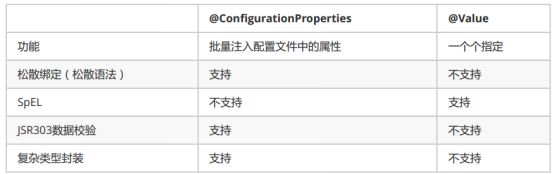
private List @Value获取值和@ConfigurationProperties获取值比较
三 springboot加载普通配置文件 @PropertySource
@ConfigurationProperties
  ---与@Bean结合为属性赋值
  ---与@PropertySource(只能用于properties文件)结合读取制定文件
@PropertySource:加载指定的配置文件;
在Person.java
@PropertySource(value={"classpath:person.properties"})
@Component
@ConfigurationProperties(prefix = "person")
public class Person {
private String lastName;
private Integer age;
private Boolean boss;
private Date birth;
private Map maps;
private List 在person.properties
person.last-name=小明
person.age=18
person.boss=false
person.birth=2017/12/12
person.maps.k1=v1
person.maps.k2=20
person.lists=lisi,wangsu
person.dog.name=小狗
person.dog.age=12
@ImportResource:导入Spring的配置文件,让配置文件里面的内容生效;
第一步:编写HelloService
package com.example.demo.service;

public class HelloService {
}
第二步:创建beans.xml
<?xml version="1.0" encoding="UTF-8"?>
<beans xmlns="http://www.springframework.org/schema/beans"
       xmlns:xsi="http://www.w3.org/2001/XMLSchema-instance"
       xsi:schemaLocation="http://www.springframework.org/schema/beans http://www.springframework.org/schema/beans/spring-beans.xsd">
 <bean id="helloService" class="com.example.demo.service.HelloService"></bean>
</beans>
第三步:编写测试类
@RunWith(SpringRunner.class)
@SpringBootTest
public class DemoApplicationTests {
   @Autowired
   Person person;

   @Autowired
   ApplicationContext ioc;

   @Test
   public void testIoc(){
      boolean b = ioc.containsBean("helloService");
      System.out.println(b);

   }
第四步:在主配置类中加入@ImportResource
@ImportResource(locations = {"classpath:beans.xml"})
@SpringBootApplication
public class DemoApplication {
   public static void main(String[] args) {
      // Spring应用启动起来
      SpringApplication.run(DemoApplication.class, args);
   }
}
四、 springboot给容器添加组件
SpringBoot推荐给容器中添加组件的方式;推荐使用全注解的方式
1、配置类@Configuration------>Spring配置文件
2、使用@Bean给容器中添加组件
配置类-----Spring的配置文件
/**
 * 指明当前类是一个配置类 就是用来替代之前的spring配置文件
 * 之前使用bean标签来添加组件
 * 在这里我们使用@Bean注解来添加组件
 */
@Configuration
public class MyConfig {
    //将方法的返回值添加到容器中:容器中组件默认的id就是方法名
    @Bean
    public HelloService helloService(){
       return  new HelloService();
    }
}
五、 springboot配置文件占位符
5-1、随机数
${random.value}、${random.int}、${random.long}
${random.int(10)}、${random.int[1024,65536]}
5-2占位符获取之前配置的值,如果没有可以是用:指定默认值
person.last‐name=张三${random.uuid}
person.age=${random.int}
person.birth=2017/12/15
person.boss=false
person.maps.k1=v1
person.maps.k2=14
person.lists=a,b,c
person.dog.name=${person.hello:hello}_dog
person.dog.age=15
六、Profile
6-1、多Profile文件
我们在主配置文件编写的时候,文件名可以是 application-{profile}.properties/yml
默认使用application.properties的配置;
6-2、yml支持多文档块方式
server:
  port: 8081
spring:
  profiles:
    active: dev
---
server:
  port: 8082
spring:
  profiles: dev
---
server:
  port: 8083
spring:
  profiles: prof
6-3激动制定profile
1:在主配置(application.properties)文件中指定 spring.profiles.active=dev

2:命令行:
java -jar spring-boot-02-config-0.0.1-SNAPSHOT.jar --spring.profiles.active=dev
七、配置文件的加载顺序
springboot 启动会扫描以下位置的application.properties或者application.yml文件作为Spring boot的默认配置文件
–file:./config/
–file:./
–classpath:/config/
–classpath:/
优先级由高到底,高优先级的配置会覆盖低优先级的配置;
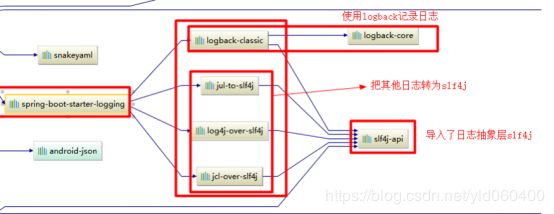
八、Springboot与日志关系
SpringBoot:底层是Spring框架,Spring框架默认是用JCL;
SpringBoot选用 SLF4j和logback;
<dependency>
   <groupId>org.springframework.boot</groupId>
   <artifactId>spring‐boot‐starter‐logging</artifactId>
</dependency>
九、SpringbootWEB开发
9-1 :SpringBoot对静态资源的映射规则
第一种:所有 /webjars/** ,都去 classpath:/META-INF/resources/webjars/ 找资源;
webjars:以jar包的方式引入静态资源;
http://www.webjars.org/
在访问的时候只需要写webjars下面资源的名称即可
<dependency>
<groupId>org.webjars</groupId>
<artifactId>jquery</artifactId>
<version>3.3.1</version>
</dependency>
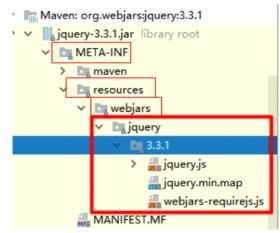
测试:localhost:8081/webjars/jquery/3.3.1/jquery.js

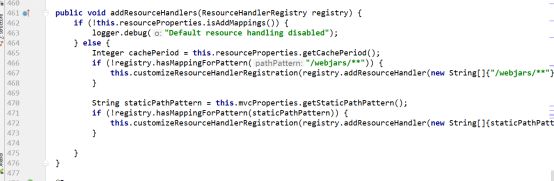
第二种:"/" 访问当前项目的任何资源,都去(静态资源的文件夹)找映射
“classpath:/META‐INF/resources/”,
“classpath:/resources/”,
“classpath:/static/”,
“classpath:/public/”
“/”:当前项目的根路径


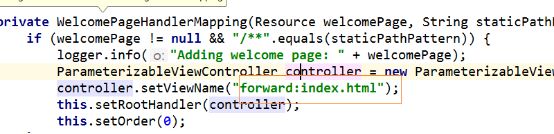
第三种:欢迎页; 静态资源文件夹下的所有index.html页面;被"/"映射;

在public下新建index.html
第四种:所有的 **/favicon.ico 都是在静态资源文件下找;
十、Springboot-模板引擎
JSP、Velocity、Freemarker、Thymeleaf
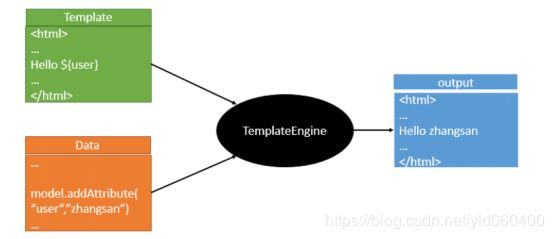
SpringBoot推荐使用的是thymeleaf模板引擎
1引入thymeleaf;
<dependency>
<groupId>org.springframework.boot</groupId>
<artifactId>spring-boot-starter-thymeleaf</artifactId>
</dependency>
2、Thymeleaf使用
@ConfigurationProperties(prefix = "spring.thymeleaf")
public class ThymeleafProperties {
private static final Charset DEFAULT_ENCODING = Charset.forName("UTF‐8");
private static final MimeType DEFAULT_CONTENT_TYPE = MimeType.valueOf("text/html");
public static final String DEFAULT_PREFIX = "classpath:/templates/";
public static final String DEFAULT_SUFFIX = ".html";
//只要我们把HTML页面放在classpath:/templates/,thymeleaf就能自动渲染;
10-1、导入thymeleaf的名称空间
<html lang="en" xmlns:th="http://www.thymeleaf.org">
10-2、使用thymeleaf语法;
<!DOCTYPE html>
<html lang="en" xmlns:th="http://www.thymeleaf.org">
<head>
<meta charset="UTF-8">
<title>Title</title>
</head>
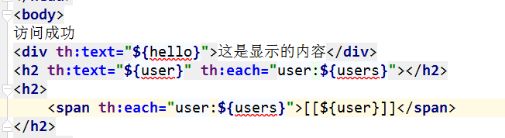
<body>
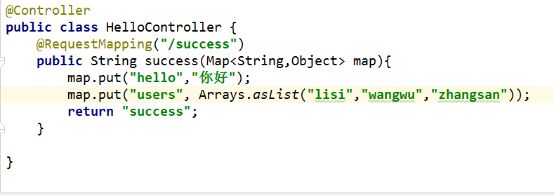
访问成功
<div th:text="${hello}">这是显示的内容</div>
</body>
</html>
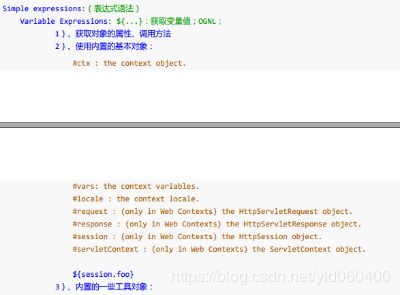
10-3、语法规则;
1)、th:text;改变当前元素里面的文本内容;
th:任意html属性;来替换原生属性的值

2)、表达式?

例如:
3、SpringMVC自动配置
https://docs.spring.io/spring-boot/docs/2.0.6.RELEASE/reference/htmlsingle/#boot-features-spring-mvc-auto-configuration
如何扩展springmvc
编写一个配置类(@Configuration),是WebMvcConfigurerAdapter类型;不能标注@EnableWebMvc;
@Configuration
public class MyMVCConfig extends WebMvcConfigurerAdapter {
    @Override
    public void addViewControllers(ViewControllerRegistry registry) {
        super.addViewControllers(registry);
        registry.addViewController("/hello").setViewName("success");
    }
}