ROS使用过程所学记录及C入门基础(一)
目录
- 1.Int main(void):
- (1)
- (2)
- 2.vim常用基本操作:
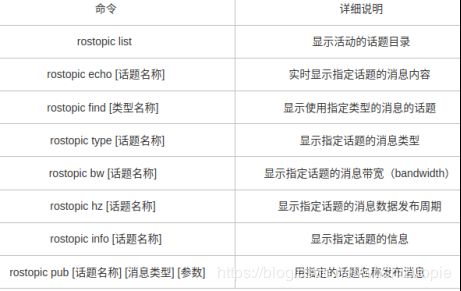
- 3.重温一下ros_topic常用的命令,如下表所示
- (1)rostopic list(列出活动话题)
- (2)加上-v
- (3)rosnode list(查看ROS中正在运行的节点)
- (4)rostopic echo +话题名称(实时显示指定话题的消息内容)
- (5)rostopic info +话题名称(显示指定话题的信息)
- (6不常用)rostopic type +话题名称(显示指定话题的消息类型)
- (7不常用)rostopic find +消息类型(显示使用指定消息类型的话题,与rostopic type相反)
- (8不常用)rosmsg show +话题的消息类型(查看话题类型的具体内容)
- (9不常用)rostopic pub +话题名称 +类型名称 +参数(使用指定话题名称发布消息)
- 4.rosbag相关
- (1)将所有发布的topic数据都记录下来
- (2)录制特定话题
- (3)查看bag文件的内容
- (4)回放bag
- (5)回放特定的bag
- (6)以二倍速回放bag
- (7)循环播放bag
- (8)bag的压缩和解压缩
- 5.设置ROS_MASTER_URI和ROS_IP等环境变量
- (1)查看本机IP
- (2)修改.bashrc文件
- 6.在ROS的rviz下播放雷达点云的bag前提
- 7.使用rostopic命令查看bag数据
- (1)可以先查看bag的信息:
- (2)打印bag数据,eg:
- (3)将打印的数据另存为csv格式的文件,可以用wps打开:
- 8.ubuntu快捷操作
- (1)
- (2)在ubuntu终端编译c程序:
学习C语言主要参考C primer plus和翁恺老师的C语言程序设计视频课程。
1.Int main(void):
(1)
一个C程序总是从main()函数开始执行的,int指明了main()函数的返回类型是整数。函数名后边的圆括号一般包含传递给函数的信息,若没有传递任何信息,则是void。
Eg:某个程序例子如下,
// two_func.c --在一个文件中使用两个函数
#include
void butler(void);    //ISO/ANSI C函数原型
int main(void)
{
    printf("I will summon the butler function.\n");
    bulter();
    printf("Yes. Bring me some tea and writeable CD-ROMS.\n");
    return 0;
}

void bulter(void)    //函数定义的开始
{
    printf("You rang,sir?\n");
}
输出如下:
I will summon the butler function.
You rang,sir?
Yes. Bring me some tea and writeable CD-ROMS.
butler()函数出现了3次。第一次出现在原型中,通知编译器要用到该函数。第二次是在main()函数中以函数调用的形式出现的。最后,程序给出了butler()函数的定义,即函数本身的源代码。
其中,butler()函数原型的第一个void说明butler()不返回值,第二个void,也就是butler(void)中的void,意思是butler()函数没有参数。因此,当编译器到达main()函数中butler()的调用处时会检查butler()的使用是否正确。注意void的意思是空的,而不是无效的。
(2)
printf表示把一些东西输出,
printf("找您的%d元\n",change);
scanf表示把一些东西输入,
scanf("%d",&price);
2.vim常用基本操作:
vim有四种模式
(1)Normal-mode:
在这个模式下,可以通过键盘在文本中移动光标,光标范围从小到大是字符、单词、行、句子、段落和屏幕。启动 VIM 后默认位于正常模式。不论是什么模式,按一下esc键即可切换到正常模式。
(2)Insert-mode:按 i 键进入插入模式,即进入编辑状态,可通过键盘输入内容。
(3)Command-mode:按:或 / 键进入命令模式,可执行一些指令包括指令包括设置环境、文件操作、调用某个功能等等。
(4)Visual-mode:在正常模式下按 v 键进入可视模式。
在终端进入vim后,输入vim +filename即可打开文件;
按vim +filename1 +filename2 +filename3可打开多个文件;
vim -On +filename1 +filename2实现左右分屏(n表示打开文件数);
vim -on +filename1 +filename2实现上下分屏(n表示打开文件数);
按ctrl+w可以切换分屏;
按 i 开始进行编辑;
按 esc 退出编辑;
按 :wq 保存退出;
按 :q! 不保存退出;
按 :e! 放弃对文件的所有修改,恢复文件到上次保存状态。
3.重温一下ros_topic常用的命令,如下表所示
roscore
rosrun turtlesim turtlesim_node
rosrun turtlesim turtle_teleop_key
(1)rostopic list(列出活动话题)
sunyuhang@666:~$ rostopic list
/rosout
/rosout_agg
/turtle1/cmd_vel
/turtle1/color_sensor
/turtle1/pose
(2)加上-v
sunyuhang@666:~$ rostopic list -v

Published topics:
 * /rosout_agg [rosgraph_msgs/Log] 1 publisher
 * /rosout [rosgraph_msgs/Log] 2 publishers
 * /turtle1/pose [turtlesim/Pose] 1 publisher
 * /turtle1/color_sensor [turtlesim/Color] 1 publisher
 * /turtle1/cmd_vel [geometry_msgs/Twist] 1 publisher

Subscribed topics:
 * /rosout [rosgraph_msgs/Log] 1 subscriber
 * /turtle1/cmd_vel [geometry_msgs/Twist] 1 subscriber
(3)rosnode list(查看ROS中正在运行的节点)
sunyuhang@666:~$ rosnode list
/rosout
/teleop_turtle
/turtlesim
(4)rostopic echo +话题名称(实时显示指定话题的消息内容)
sunyuhang@666:~$ rostopic echo /turtle1/pose
x: 6.083539009094238
y: 7.370144367218018
theta: 0.04318530112504959
linear_velocity: 0.0
angular_velocity: 0.0
(5)rostopic info +话题名称(显示指定话题的信息)
sunyuhang@666:~$ rostopic info /turtle1/pose
Type: turtlesim/Pose

Publishers:
 * /turtlesim (http://localhost:41399/)

Subscribers: None
(6不常用)rostopic type +话题名称(显示指定话题的消息类型)
sunyuhang@666:~$ rostopic type /turtle1/pose
turtlesim/Pose
(7不常用)rostopic find +消息类型(显示使用指定消息类型的话题,与rostopic type相反)
sunyuhang@666:~$ rostopic find turtlesim/Pose
/turtle1/pose
(8不常用)rosmsg show +话题的消息类型(查看话题类型的具体内容)
sunyuhang@666:~$ rosmsg show turtlesim/Pose
float32 x
float32 y
float32 theta
float32 linear_velocity
float32 angular_velocity
(9不常用)rostopic pub +话题名称 +类型名称 +参数(使用指定话题名称发布消息)
sunyuhang@666:~$ rostopic pub -1 /turtle1/cmd_vel geometry_msgs/Twist -- '[1.5,0.0,0.0]' '[0.0,0.0,2.0]'
publishing and latching message for 3.0 seconds
(注释:-1表示只发布一次消息,即实际只运行一次,但会像以前的结果一样运行3s;后边依次为话题名称和类型名称;-- ‘[1.5,0.0,0.0]’ '[0.0,0.0,2.0]'表示在x轴上以每秒1.0 m的速度移动,以z轴为中心,每秒旋转2.0rad。)
4.rosbag相关
先创建一个文件夹放置记录的数据,我是在home下新建了一个bagfile文件夹,在该文件夹下打开终端。
(1)将所有发布的topic数据都记录下来
rosbag record -a
(2)录制特定话题
rosbag record /topic1 /topic2
(3)查看bag文件的内容
rosbag info xxx.bag
(4)回放bag
rosbag play xxx.bag
(5)回放特定的bag
rosbag play --topic /topic1
(6)以二倍速回放bag
rosbag play -r 2 xxx.bag
(7)循环播放bag
rosbag play -l xxx.bag
(8)bag的压缩和解压缩
rosbag compress xxx.bag
rosbag decompress xxx.bag
5.设置ROS_MASTER_URI和ROS_IP等环境变量
参考了ROS环境变量解析,删减修改了一些重要的写下来。
URI(Uniform Resource Identifier,统一资源标识符)就是在IMS网络中IMS用户的“名字”,也就是IMS用户的身份标识。
如果需要远程链接,需要在远程服务器将ROS_MASTER_URI变为启动roscore的地址,即master地址。比如export ROS_MASTER_URI=http://192.168.1.101:11311。
设定master地址之后,启动服务的时候,发现在master服务器上执行rosnode list可见这个服务,但是调用其服务,不能链接。
所以在远程机器上的环境变量还需要添加远程服务器自己的IP(否则默认是主机名,但master根据主机名找不到远程服务器)
所以说,当用电脑A用ROS操作系统控制机器人(B,C,D)时,此时的ROS_MASTER_URI是主机地址,也就是电脑A,不是机器人B,机器人C,机器人D。
那么为什么有了IP地址还需要主机名呢?
ip地址等于身份证号,主机名等于姓名。其他电脑通过IP地址来识别你。
下边介绍一下具体的配置过程:
(1)查看本机IP
$ifconfig
(2)修改.bashrc文件
vim ~/.bashrc
在最后添加
    export ROS_HOSTNAME=你的hostname
    export ROS_MASTER_URI=http://(你想要设置为主机的IP):11311
    export ROS_IP=192.168.1.233 (本机的IP)
并将原来存在的这几行内容给注释掉。
我还是习惯用gedit修改…
(解释:
1)export的作用是导入全局变量,例如ROS_HOSTNAME是ROS的全局环境变量,在脚本文件.bashrc中不能直接使用它们,必须使用export将全局变量导入后才能使用。
2)在这里的ROS_MASTER_URI要设置为你想要当作主机的IP,主机从机这里要设置为一致的IP,另外最好加上ROS_IP。
那么对于主机的.bashrc上面应该设置为:
export    ROS_HOSTNAME=主机的hostname
export    ROS_MASTER_URI=主机的IP:11311(也就是说11311是固定的)
export    ROS_IP=主机的IP地址
那么对于从机的.bashrc上面应该设置为:
export   ROS_HOSTNAME=从机的hostname
export   ROS_MASTER_URI=主机的IP:11311
export   ROS_IP=从机的IP地址
***以我的情况而言,是把自动驾驶控制器当作主机,我的电脑当作从机。所以,好像只设置了从机的.bashrc文件,主机的不用改。***嗯,应该是这样…)
6.在ROS的rviz下播放雷达点云的bag前提
在运行了rosbag play xxx.bag后,打开rviz,需要设置Fixed Frame(固定坐标系),问题是topic自己所在的坐标系名字是怎么设置的,又是在哪里查看的呢?
输入指令:
rostopic echo /topic_name | grep frame_id
例如在我使用的/xxx/xxx/lslidar_point_cloud这个话题中,frame_id对应雷达点云数据采集的参考系,运行上述指令后出现frame_id是lidar_mid,所以把Fixed Frame改为lidar_mid。然后,rviz界面左下角的Add-By topic,加上所需显示的topic即可。
综上,整体的步骤就是:修改ip;修改环境变量;rostopic相关操作;rosbag相关操作;rviz相关操作。
7.使用rostopic命令查看bag数据
(1)可以先查看bag的信息:
rosbag info ./test_shitang.bag
(2)打印bag数据,eg:
rostopic echo -b ./test.bag /minibus/topicname1
rostopic echo -b ./test.bag /minibus/topicname2
(3)将打印的数据另存为csv格式的文件,可以用wps打开:
rostopic echo -b ./test_shitang.bag /minibus/gpsposition -p > 1.csv
8.ubuntu快捷操作
(1)
在终端中按ctrl+shift+t可以在同一个窗口打开终端,按alt+数字键可以来回切换。
(2)在ubuntu终端编译c程序:
gcc hello.c -o hello
./hello
先到这里。
