基于阿里云ECS如何在CentOS 7上安装带RTMP模块的Nginx
前言:
百度查了很多nginx配置,可能是因为自己理解有问题,一直配置不成功,发现国外一个帖子写的很详细,按照步骤配置下来没有任何问题,特此翻译留存一下
Nginx RTMP是一种基于Nginx的流媒体播放器,具有RTMP、HLS和MPEG-DASH直播流。Nginx RTMP模块具有很多功能,包括H264/AAC支持、HTTP回调支持、HTTP音视频录制控制模块等。
在本教程中,我将向您展示如何使用RTMP模块安装和配置Nginx web服务器。我们将使用最新的CentOS 7服务器,本指南将包括nginx和rtmp模块的配置以及创建rtmp实时流和视频点播。
前提要求:
- CentOS 7 Server
- Root 权限
- ps:本人配置为阿里云ECS
下面我们将要做的内容:
- 安装依赖库
- 下载Nginx附加包和RTMP模块
- 编译Nginx并从源代码安装
- 将Nginx配置为服务
- 配置Nginx RTMP模块
- 开启第一个RTMP实时流
- 测试
第一步:安装依赖库
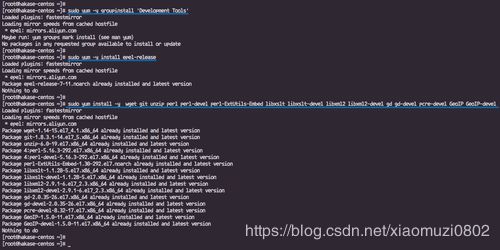
在本教程中,我们将从源代码构建Nginx web服务器。我们需要安装所需的所有包依赖项,包括开发工具、EPEL存储库和其他包。
安装CentOS“开发包”
sudo yum -y groupinstall 'Development Tools'
添加EPEL库
sudo yum -y install epel-release
安装Nginx依赖
sudo yum install -y wget git unzip perl perl-devel perl-ExtUtils-Embed libxslt libxslt-devel libxml2 libxml2-devel gd gd-devel pcre-devel GeoIP GeoIP-devel
第二步:下载Nginx附加包和RTMP模块
在这一步中,我们将下载nginx源代码以及其他依赖项,包括pcre、zlib和OpenSSL。
进入“/usr/local/src”目录
cd /usr/local/src
下载 Nginx 1.14.0 并解压
wget https://nginx.org/download/nginx-1.14.0.tar.gz
tar -xzvf nginx-1.14.0.tar.gz
下载pcre包并解压
wget https://ftp.pcre.org/pub/pcre/pcre-8.42.zip
unzip pcre-8.42.zip
下载 zlib包并解压
wget https://www.zlib.net/zlib-1.2.11.tar.gz
tar -xzvf zlib-1.2.11.tar.gz
下载OpenSSL 包并解压
wget https://www.openssl.org/source/openssl-1.1.0h.tar.gz
tar -xzvf openssl-1.1.0h.tar.gz
克隆rtmp模块
git clone https://github.com/sergey-dryabzhinsky/nginx-rtmp-module.git
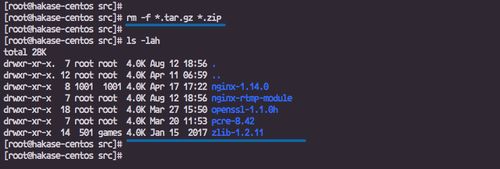
删除所有无用 tar.gz 和.zip 文件
rm -f *.tar.gz *.zip
查看当前目录详细内容
ls -lah
第三步:编译Nginx并从源代码安装
进入到 nginx-1.14.0文件夹
cd nginx-1.14.0/
实用下面参数配置 nginx 1.14.0
./configure --prefix=/etc/nginx \
            --sbin-path=/usr/sbin/nginx \
            --modules-path=/usr/lib64/nginx/modules \
            --conf-path=/etc/nginx/nginx.conf \
            --error-log-path=/var/log/nginx/error.log \
            --pid-path=/var/run/nginx.pid \
            --lock-path=/var/run/nginx.lock \
            --user=nginx \
            --group=nginx \
            --build=CentOS \
            --builddir=nginx-1.14.0 \
            --with-select_module \
            --with-poll_module \
            --with-threads \
            --with-file-aio \
            --with-http_ssl_module \
            --with-http_v2_module \
            --with-http_realip_module \
            --with-http_addition_module \
            --with-http_xslt_module=dynamic \
            --with-http_image_filter_module=dynamic \
            --with-http_geoip_module=dynamic \
            --with-http_sub_module \
            --with-http_dav_module \
            --with-http_flv_module \
            --with-http_mp4_module \
            --with-http_gunzip_module \
            --with-http_gzip_static_module \
            --with-http_auth_request_module \
            --with-http_random_index_module \
            --with-http_secure_link_module \
            --with-http_degradation_module \
            --with-http_slice_module \
            --with-http_stub_status_module \
            --http-log-path=/var/log/nginx/access.log \
            --http-client-body-temp-path=/var/cache/nginx/client_temp \
            --http-proxy-temp-path=/var/cache/nginx/proxy_temp \
            --http-fastcgi-temp-path=/var/cache/nginx/fastcgi_temp \
            --http-uwsgi-temp-path=/var/cache/nginx/uwsgi_temp \
            --http-scgi-temp-path=/var/cache/nginx/scgi_temp \
            --with-mail=dynamic \
            --with-mail_ssl_module \
            --with-stream=dynamic \
            --with-stream_ssl_module \
            --with-stream_realip_module \
            --with-stream_geoip_module=dynamic \
            --with-stream_ssl_preread_module \
            --with-compat \
            --with-pcre=../pcre-8.42 \
            --with-pcre-jit \
            --with-zlib=../zlib-1.2.11 \
            --with-openssl=../openssl-1.1.0h \
            --with-openssl-opt=no-nextprotoneg \
            --add-module=../nginx-rtmp-module \
            --with-debug
sudo make
sudo make install
安装完成后,我们需要创建一个新的symlink模块目录,创建一个新的nginx用户和组,并创建一个新的nginx cache 目录。
创建nginx symlink模块到 ‘/etc/nginx’ 目录
sudo ln -s /usr/lib64/nginx/modules /etc/nginx/modules
创建新的 ‘nginx’ 用户组和用户
sudo useradd -r -d /var/cache/nginx/ -s /sbin/nologin -U nginx
在 ‘/var/cache/nginx’ 创建一个新的Nginx cache 目录并把所有权赋予 ‘nginx’ 用户组
mkdir -p /var/cache/nginx/
chown -R nginx:nginx /var/cache/nginx/
测试 nginx 配置,查看nginx版本
nginx -t
nginx -V
显示如下结果,说明正常

至此,Nginx服务器以及RTMP模块已经被成功的安装到CentOS 7 中。
第四步:将Nginx配置为服务
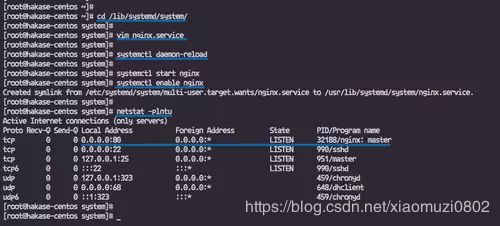
在这一小节中,我们将把Nginx设置为服务,需要在系统服务文件夹中创建nginx服务文件
进入到 ‘/lib/systemd/system’ 文件夹,用vim 命令创建 ‘nginx.service’
cd /lib/systemd/system/
vim nginx.service
将下面内容填充进去(Tips:贴完注意查看一遍,有时候最开始部分会少一些字符,不容易被检查出来)
[Unit]
Description=nginx - high performance web server
Documentation=https://nginx.org/en/docs/
After=network-online.target remote-fs.target nss-lookup.target
Wants=network-online.target

[Service]
Type=forking
PIDFile=/var/run/nginx.pid
ExecStartPre=/usr/sbin/nginx -t -c /etc/nginx/nginx.conf
ExecStart=/usr/sbin/nginx -c /etc/nginx/nginx.conf
ExecReload=/bin/kill -s HUP $MAINPID
ExecStop=/bin/kill -s TERM $MAINPID

[Install]
WantedBy=multi-user.target
保存并退出
重新加载系统文件(Tips:我在这一步出现了问题,该命令无效果,我这边开启不了服务,后来重启之后才有用)
systemctl daemon-reload
开启服务,并设置开机启动
systemctl start nginx
systemctl enable nginx
第五步:配置Nginx RTMP模块
这一步我们将为RTMP模块创建一个额外的Nginx配置文件
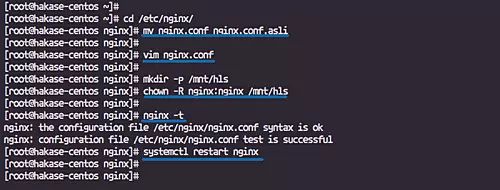
进入’/etc/nginx’ 文件夹,备份该文件夹中的’nginx.conf’ 文件
cd /etc/nginx/
mv nginx.conf nginx.conf.asli
现在创建新的 ‘nginx.conf’
vim nginx.conf
将下面文字填充进去
worker_processes  auto;
events {
    worker_connections  1024;
}

# RTMP configuration
rtmp {
    server {
        listen 1935; # Listen on standard RTMP port
        chunk_size 4000;

# Define the Application
        application show {
            live on;
            # Turn on HLS
            hls on;
            hls_path /mnt/hls/;
            hls_fragment 3;
            hls_playlist_length 60;
            # disable consuming the stream from nginx as rtmp
            deny play all;
        }

    }
}

http {
    sendfile off;
    tcp_nopush on;
    aio on;
    directio 512;
    default_type application/octet-stream;

    server {
        listen 8080;

        location / {
            # Disable cache
            add_header 'Cache-Control' 'no-cache';

            # CORS setup
            add_header 'Access-Control-Allow-Origin' '*' always;
            add_header 'Access-Control-Expose-Headers' 'Content-Length';

            # allow CORS preflight requests
            if ($request_method = 'OPTIONS') {
                add_header 'Access-Control-Allow-Origin' '*';
                add_header 'Access-Control-Max-Age' 1728000;
                add_header 'Content-Type' 'text/plain charset=UTF-8';
                add_header 'Content-Length' 0;
                return 204;
            }

            types {
                application/dash+xml mpd;
                application/vnd.apple.mpegurl m3u8;
                video/mp2t ts;
            }

            root /mnt/;
        }
    }
}
保存并退出
接下来,我们需要为HLS配置创建一个新目录,在上面的配置中我们已经定义了web根目录下的’/mnt’文件夹。
在“/mnt”目录下创建“hls”目录,并将该目录的所有者更改为nginx用户和组。
mkdir -p /mnt/hls
chown -R nginx:nginx /mnt/hls
测试配置并重启nginx服务
nginx -t
systemctl restart nginx
第六步:开启第一个RTMP实时流
在这一步,我们将使用服务器上的mp4视频创建新的RTMP流视频点播,并创建一个新的实时RTMP流,之后使用OBS软件从本地计算机播放。
进入 '/etc/nginx’文件夹并编辑配置文件 ‘nginx.conf’
cd /etc/nginx/
vim nginx.conf
在’rtmp { … }'范围内,编辑如下文字
 # RTMP video on demand for mp4 files
        application vod {
            play /mnt/mp4s;
        }

        # RTMP stream using OBS
        application stream {
            live on;
        }
保存并退出
创建 'mp4s’文件夹并修改所有权限
mkdir -p /mnt/mp4s
chown -R nginx:nginx /mnt/mp4s
测试nginx服务,确保没有任何错误,之后重启nginx 服务
nginx -t
systemctl restart nginx
至此,完成Nginx服务器对于RTMP实时流和vod流的配置

重要:至此基本配置已经完成,需要注意的是,本人使用的是阿里云ECS服务器,在端口控制方面有特殊要求
1、配置本机端口(上面配置中用到了8080端口和1935端口)
#开启端口
firewall-cmd --zone=public --add-port=8080/tcp --permanent
firewall-cmd --zone=public --add-port=1935/tcp --permanent
#重启服务
firewall-cmd --reload
#查看开放的端口
firewall-cmd --list-ports
第七步:测试
1、安装vlc软件
2、打开“媒体”,选择“打开网络串流”,输入RTMP流媒体地址
Tips:xxx.xxx.xxx.xxx为你的服务器地址
media1.mp4需要预先上传到你服务器/mnt/mp4s文件夹
rtmp://xxx.xxx.xxx.xxx:1935/vod/media1.mp4
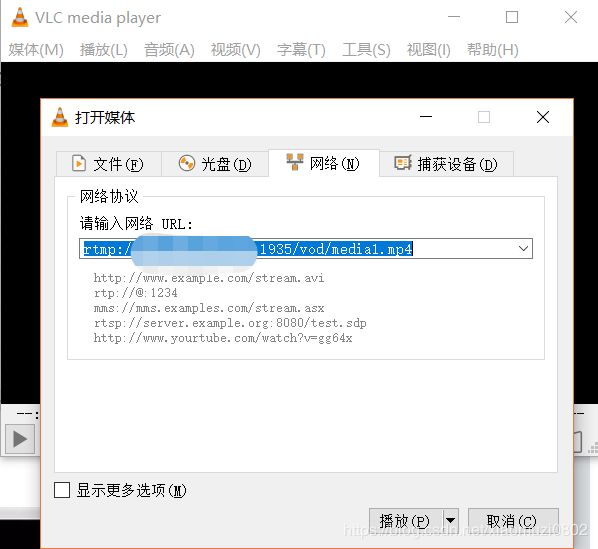
如果没什么问题,你应该就可以看到视频流内容了

后记:
翻译网址:(https://www.howtoforge.com/tutorial/how-to-install-nginx-with-rtmp-module-on-centos/)
参考网址:(https://github.com/sergey-dryabzhinsky/nginx-rtmp-module)
