浅谈 Flutter 构建 | 开发者说·DTalk
本文原作者: Leo,原文发布于掘金: https://juejin.im/post/5d68fb1af265da03d063b69e
不同版本构建产物的差异
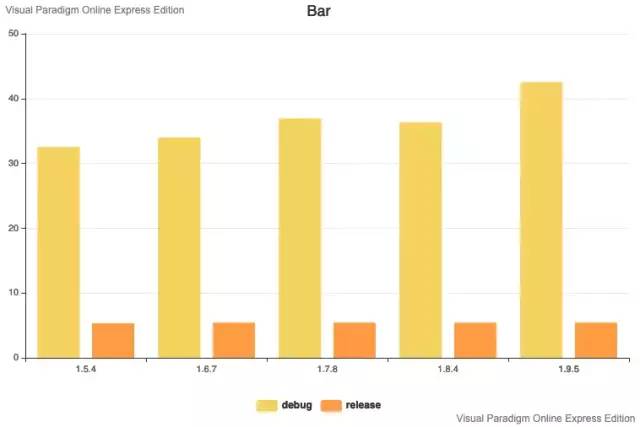
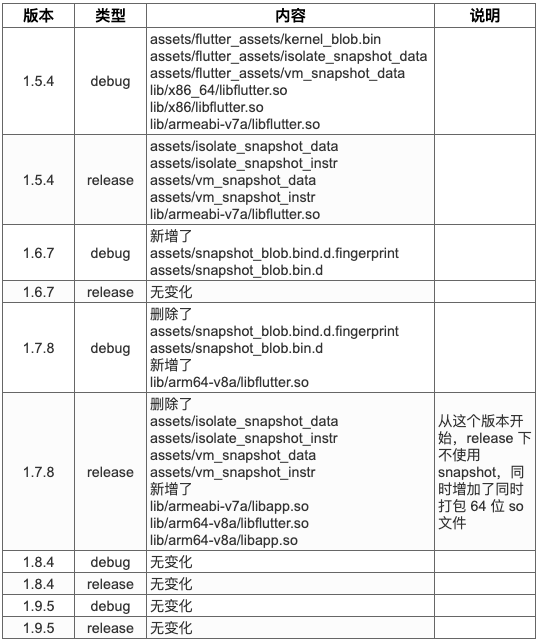
每个版本生成的 Flutter 产物如下所示,这里不列出 fonts、LICENSE 这些文件:
从上面的表格来看,1.5.x 版本和 1.7.x 版本的变化是比较明显的,主要的变化有两点:
第一,1.7.x 版本增加了支持同时编译 32 位和 64 位两种架构,这个在之前一直被诟病,现在官方支持了。
第二,release 模式下,不使用 snapshot 文件,而使用 libapp.so。snapshot 是 Dart VM 所支持的一种文件格式,类似 JVM 的 jar 一样,可以运行在虚拟机环境的文件。
除了变化以外,我们还注意到一些不变的文件,比如 debug 模式下,一直存在的 kernel_blob.bin 文件;lib 目录下 libflutter.so 文件;这些文件各自的作用又是什么呢。带着疑问,我们一起看看 Flutter 的构建过程。
Flutter 支持的编译模式
关于编译模式这块主要参考的:
Flutter 是基于 Dart 开发的,所以 Flutter 的构建跟 Dart 是分不开的。所以,我们先讲 Dart。
在讲 Dart 之前,我们先了解两种编译模式,JIT 和 AOT:
JIT
JIT (Just In Time) 翻译为即时编译,指的是在程序运行中,将热点代码编译成机器码,提高运行效率。常见例子有 V8 引擎和 JVM,JIT 可以充分利用解释型语言的优点,动态执行源码,而不用考虑平台差异性。这里需要注意的是,对于 JVM 来说,源码指字节码,而不是 Java 源码。
这里需要区分,JIT 和解释型语言的区别,JIT 是一种编译模式,比如,Java 是编译型语言,但它也可以使用 JIT。
AOT
AOT (Ahead Of Time) 称为运行前编译,指的是在程序运行之前,已经编译成对应平台的机器码,不需要在运行中解释编译,就可以直接运行。常见例子有 C 和 C++。
虽然,我们会区别 JIT 和 AOT 两种编译模式,但实际上,有很多语言并不是完全使用 JIT 或者 AOT 的,通常它们会混用这两种模式,来达到最大的性能优化。
Dart 支持的编译模式
Dart VM 支持四种编译模式:
1, Script: 最常见的 JIT 模式,可以直接在虚拟机中执行 Dart 源码,像解释型语言一样使用。通过执行 dart xxx.dart 就可以运行,写一些临时脚本,非常方便。
2, Kernel Snapshots: JIT 模式,和 Script 模式不同的是,这种模式执行的是 Kernel AST 的二进制数据,这里不包含解析后的类和函数,编译后的代码,所以它们可以在不同的平台之间移植。
Dart Kernel 是 Dart 程序中的一种中间语言,更多的资料可阅读 Kernel Documentation (https://github.com/dart-lang/sdk/wiki/Kernel-Documentation)。
通过执行 dart --snapshot-kind=kernel --snapshot=xx.snapshot xx.dart 生成。
3, JIT Application Snapshots: JIT 模式,这里执行的是已经解析过的类和函数,所以它会运行起来会更快。但是这不是平台无关,它只能针对 32 位或者 64 位架构运行。
通过执行 dart --snapshot-kind=app-jit --snapshot=xx.snapshot xx.dart 生成。
4, AOT Application Snapshots: AOT 模式,在这种模式下,Dart 源码会被提前编译成特定平台的二进制文件。
要使用 AOT 模式,需要使用 dart2aot 命令, 具体使用为: dart2aot xx.dart xx.dart.aot,然后使用 dartaotruntime 命令执行。
Dart JIT 模式需要配合 Dart VM (虚拟机) ,AOT 则会使用 runtime 来执行,引用官网中的图片来说明:
可以用下面这张图来总结上面的四种模式:
图片来源于 flutters-compilation-patterns
四种模式下的产物大小和启动速度比较:
图片来源于 exploring-flutter-in-android
Flutter 构建过程
下面的分析都是基于 v1.5.4-hotfix.2
执行 flutter build apk 时,默认会生成 release APK,实际是执行的 sdk/bin/flutter 命令,参数为 build apk:
DART_SDK_PATH="$FLUTTER_ROOT/bin/cache/dart-sdk"
DART="$DART_SDK_PATH/bin/dart"
SNAPSHOT_PATH="$FLUTTER_ROOT/bin/cache/flutter_tools.snapshot"
"$DART" $FLUTTER_TOOL_ARGS "$SNAPSHOT_PATH" "$@"
上面的命令完整应该为: dart flutter_tools.snapshot args,snapshot 文件我们上面提过,是 Dart 的一种代码集合,类似 Java 中 Jar 包。
flutter_tools 的源码位于 sdk/packages/flutter_tools/bin 下的 flutter_tools.dart,跟 Java 一样,这里也有个 main() 函数,其中调用的是 executable.main() 函数。
在 main 函数中,会注册多个命令处理器,比如:
DoctorCommand 对应 flutter doctor 命令
CleanCommand 对应 flutter clean 命令
等等
我们这次要研究的目标是 BuildCommand,它里面又包含了以下子命令处理器:
BuildApkCommand 对应 flutter build apk 命令
BuildAppBundleCommand 对应 flutter build bundle 命令
BuildAotCommand 对应 flutter build aot 命令
等等
Build APK
首先我们要理清 build apk 或者 build ios,和 build bundle、build aot 之间的关系。这里我们以 build apk 为例:
当执行 flutter build apk 时,最终会调用到 gradle.dart 中的 _buildGradleProjectV2() 方法,在这里最后也是调用 gradle 执行 assemble task。而在项目中的 android/app/build.gradle 中可以看到:
也就是说,会在 flutter.gradle 这里去插入一些编译 Flutter 产物的脚本。
flutter.gradle 是通过插件的形式去实现的,这个插件命名为 FlutterPlugin。这个插件的主要作用有一些几点:
除了默认的 debug 和 release 之外,新增了 profile、dynamicProfile、dynamicRelease 这三种 buildTypes:
project.android.buildTypes {
    profile {
        initWith debug
        if (it.hasProperty('matchingFallbacks')) {
            matchingFallbacks = ['debug', 'release']
        }
    }
    dynamicProfile {
        initWith debug
        if (it.hasProperty('matchingFallbacks')) {
            matchingFallbacks = ['debug', 'release']
        }
    }
    dynamicRelease {
        initWith debug
        if (it.hasProperty('matchingFallbacks')) {
            matchingFallbacks = ['debug', 'release']
        }
    }
}
动态添加 flutter.jar 依赖:
private void addFlutterJarApiDependency(Project project, buildType, Task flutterX86JarTask) {
    project.dependencies {
        String configuration;
        if (project.getConfigurations().findByName("api")) {
            configuration = buildType.name + "Api";
        } else {
            configuration = buildType.name + "Compile";
        }
        add(configuration, project.files {
            String buildMode = buildModeFor(buildType)
            if (buildMode == "debug") {
                [flutterX86JarTask, debugFlutterJar]
            } else if (buildMode == "profile") {
                profileFlutterJar
            } else if (buildMode == "dynamicProfile") {
                dynamicProfileFlutterJar
            } else if (buildMode == "dynamicRelease") {
                dynamicReleaseFlutterJar
            } else {
                releaseFlutterJar
            }
        })
    }
}
动态添加第三方插件依赖:
project.dependencies {
    if (project.getConfigurations().findByName("implementation")) {
        implementation pluginProject
    } else {
        compile pluginProject
    }
在 assemble task 中添加一个 FlutterTask,这个 task 非常重要,这里会去生成 Flutter 所需要的产物:
首先,当 buildType 是 profile 或 release 时,会执行 flutter build aot:
if (buildMode == "profile" || buildMode == "release") {
    project.exec {
        executable flutterExecutable.absolutePath
        workingDir sourceDir
        if (localEngine != null) {
            args "--local-engine", localEngine
            args "--local-engine-src-path", localEngineSrcPath
        }
        args "build", "aot"
        args "--suppress-analytics"
        args "--quiet"
        args "--target", targetPath
        args "--target-platform", "android-arm"
        args "--output-dir", "${intermediateDir}"
        if (trackWidgetCreation) {
            args "--track-widget-creation"
        }
        if (extraFrontEndOptions != null) {
            args "--extra-front-end-options", "${extraFrontEndOptions}"
        }
        if (extraGenSnapshotOptions != null) {
            args "--extra-gen-snapshot-options", "${extraGenSnapshotOptions}"
        }
        if (buildSharedLibrary) {
            args "--build-shared-library"
        }
        if (targetPlatform != null) {
            args "--target-platform", "${targetPlatform}"
        }
        args "--${buildMode}"
    }
}
flutter build bundle
project.exec {
    executable flutterExecutable.absolutePath
    workingDir sourceDir
    if (localEngine != null) {
        args "--local-engine", localEngine
        args "--local-engine-src-path", localEngineSrcPath
    }
    args "build", "bundle"
    args "--suppress-analytics"
    args "--target", targetPath
    if (verbose) {
        args "--verbose"
    }
    if (fileSystemRoots != null) {
        for (root in fileSystemRoots) {
            args "--filesystem-root", root
        }
    }
    if (fileSystemScheme != null) {
        args "--filesystem-scheme", fileSystemScheme
    }
    if (trackWidgetCreation) {
        args "--track-widget-creation"
    }
    if (compilationTraceFilePath != null) {
        args "--compilation-trace-file", compilationTraceFilePath
    }
    if (createPatch) {
        args "--patch"
        args "--build-number", project.android.defaultConfig.versionCode
        if (buildNumber != null) {
            assert buildNumber == project.android.defaultConfig.versionCode
        }
    }
    if (baselineDir != null) {
        args "--baseline-dir", baselineDir
    }
    if (extraFrontEndOptions != null) {
        args "--extra-front-end-options", "${extraFrontEndOptions}"
    }
    if (extraGenSnapshotOptions != null) {
        args "--extra-gen-snapshot-options", "${extraGenSnapshotOptions}"
    }
    if (targetPlatform != null) {
        args "--target-platform", "${targetPlatform}"
    }
    if (buildMode == "release" || buildMode == "profile") {
        args "--precompiled"
    } else {
        args "--depfile", "${intermediateDir}/snapshot_blob.bin.d"
    }
    args "--asset-dir", "${intermediateDir}/flutter_assets"
    if (buildMode == "debug") {
        args "--debug"
    }
    if (buildMode == "profile" || buildMode == "dynamicProfile") {
        args "--profile"
    }
    if (buildMode == "release" || buildMode == "dynamicRelease") {
        args "--release"
    }
    if (buildMode == "dynamicProfile" || buildMode == "dynamicRelease") {
        args "--dynamic"
    }
}
flutter build bundle
flutter build aot
flutter build bundle --precompiled
当执行 flutter build aot 时,相关的逻辑在 BuildAotCommand 中,它主要分成两个步骤:
1, 编译 kernel
kernel 指 Dart 的一种中间语言,更多资料可以阅读 Kernel-Documentation。最终会调用到 compile.dart 中的 KernelCompiler.compile() 方法:
final List command = [
  engineDartPath,
  frontendServer,
  '--sdk-root',
  sdkRoot,
  '--strong',
  '--target=$targetModel',
];
if (trackWidgetCreation)
  command.add('--track-widget-creation');
if (!linkPlatformKernelIn)
  command.add('--no-link-platform');
if (aot) {
  command.add('--aot');
  command.add('--tfa');
}
if (targetProductVm) {
  command.add('-Ddart.vm.product=true');
}
if (incrementalCompilerByteStorePath != null) {
  command.add('--incremental');
}
Uri mainUri;
if (packagesPath != null) {
  command.addAll(['--packages', packagesPath]);
  mainUri = PackageUriMapper.findUri(mainPath, packagesPath, fileSystemScheme, fileSystemRoots);
}
if (outputFilePath != null) {
  command.addAll(['--output-dill', outputFilePath]);
}
if (depFilePath != null && (fileSystemRoots == null || fileSystemRoots.isEmpty)) {
  command.addAll(['--depfile', depFilePath]);
}
if (fileSystemRoots != null) {
  for (String root in fileSystemRoots) {
    command.addAll(['--filesystem-root', root]);
  }
}
if (fileSystemScheme != null) {
  command.addAll(['--filesystem-scheme', fileSystemScheme]);
}
if (initializeFromDill != null) {
  command.addAll(['--initialize-from-dill', initializeFromDill]);
}

if (extraFrontEndOptions != null)
  command.addAll(extraFrontEndOptions);

command.add(mainUri?.toString() ?? mainPath);

printTrace(command.join(' '));
final Process server = await processManager
  .start(command)
  .catchError((dynamic error, StackTrace stack) {
    printError('Failed to start frontend server $error, $stack');
  });
engineDart 指向 Dart SDK 目录,上面代码执行的最终命令可以简化为:
app.dill 这里面其实就包含了我们的业务代码了,可以使用 strings app.dill 查看:
2, 生成 snpshot
相关的代码位于 base/build.dart 中的 AOTSnapshotter.build() 函数中,有两种模式: app-aot-assemble 和 app-aot-blobs。
app-aot-assemble
在执行 aot 命令时,增加 --build-shared-library 选项,完整命令如下:
flutter build aot --build-shared-library
iOS 只能使用这种模式,在 Flutter SDK 1.7.x 之后,这个也是 Android 的默认选项。
// buildSharedLibrary is ignored for iOS builds.
if (platform == TargetPlatform.ios)
  buildSharedLibrary = false;

if (buildSharedLibrary && androidSdk.ndk == null) {
  // 需要有 NDK 环境
  final String explanation = AndroidNdk.explainMissingNdk(androidSdk.directory);
  printError(
    'Could not find NDK in Android SDK at ${androidSdk.directory}:\n'
    '\n'
    '  $explanation\n'
    '\n'
    'Unable to build with --build-shared-library\n'
    'To install the NDK, see instructions at https://developer.android.com/ndk/guides/'
  );
  return 1;
}
这种模式下,会将产物编译为二进制文件,在 iOS 上为 App.framework,Android 上则为 app.so。
// Assembly AOT snapshot.
outputPaths.add(assembly);
genSnapshotArgs.add('--snapshot_kind=app-aot-assembly');
genSnapshotArgs.add('--assembly=$assembly');
app-aot-blobs
当使用这种模式时,会生成四个产物,分别是:
instr 全称是 Instructions
了解更多: Flutter-engine-operation-in-AOT-Mode (https://github.com/flutter/flutter/wiki/Flutter-engine-operation-in-AOT-Mode)
-
isolate_snapshot_data:表示 isolate 堆存储区的初始状态和特定的信息。和 vm_snapshot_data 配合,更快的启动 Dart VM。
-
isolate_snapshot_instr:包含由 Dart isolate 执行的 AOT 代码。
-
vm_snapshot_data:表示 isolates 之间的共享的 Dart 堆存储区的初始状态,用于更快的启动 Dart VM。
-
vm_snapshot_instr:包含 VM 中所有的 isolates 之间共享的常见例程的指令。
isolate_snapshot_data 和 isolate_snapshot_instr 跟业务相关,而 vm_snapshot_data 和 vm_snapshot_instr 则是跟 VM 相关,无关业务。
我们可以使用 strings 查看下 isolate_snapshot_data 中内容:
小结
上面两种模式相关的代码如下:
final String assembly = fs.path.join(outputDir.path, 'snapshot_assembly.S');
if (buildSharedLibrary || platform == TargetPlatform.ios) {
// Assembly AOT snapshot.
outputPaths.add(assembly);
genSnapshotArgs.add('--snapshot_kind=app-aot-assembly');
genSnapshotArgs.add('--assembly=$assembly');
} else {
// Blob AOT snapshot.
final String vmSnapshotData = fs.path.join(outputDir.path, 'vm_snapshot_data');
final String isolateSnapshotData = fs.path.join(outputDir.path, 'isolate_snapshot_data');
final String vmSnapshotInstructions = fs.path.join(outputDir.path, 'vm_snapshot_instr');
final String isolateSnapshotInstructions = fs.path.join(outputDir.path, 'isolate_snapshot_instr');
outputPaths.addAll([vmSnapshotData, isolateSnapshotData, vmSnapshotInstructions, isolateSnapshotInstructions]);
genSnapshotArgs.addAll([
'--snapshot_kind=app-aot-blobs',
'--vm_snapshot_data=$vmSnapshotData',
'--isolate_snapshot_data=$isolateSnapshotData',
'--vm_snapshot_instructions=$vmSnapshotInstructions',
'--isolate_snapshot_instructions=$isolateSnapshotInstructions',
]);
}
从执行速度来看,app-aot-assemble 是要快于 app-aot-blobs 的,因为它不需要 Dart VM 环境,只需要 Dart Runtime 即可,而 snapshots 文件是需要 Dart VM 去加载执行的。但使用 snapshots 使得动态执行代码变成可能。
iOS 默认使用 app-aot-assemble 模式,更多是 App Store 本身的限制:
> 引用于[flutters-compilation-patterns](https://proandroiddev.com/flutters-compilation-patterns-24e139d14177)
>
> App Store does not allow dispatch binary executable code.
而 Android 默认使用 app-aot-blobs 模式,可能更多是从性能方面考虑,必须调用从 so 文件中调用 native 函数,需要用 JNI,有性能损耗,而且调用也比较麻烦,不过在 Flutter SDK 1.7.x 已经改成 app-aot-assemble 模式。
#### Build Bundle
当执行 `flutter build bundle` 时,相关的代码逻辑在 BuildBundleCommand 中,build bundle 主要做两件事:第一,如果没有添加 `--precompiled` 选项时,会先编译 kernel;第二,生成 assets(图片、字体等)。
1. 编译 kernel。这个步骤和 build aot 的第一个步骤是一样的,最终会生成 app.dill,这是业务代码编译后的产物。同时,这个会创建一个 kernelContent,这个在第二个步骤会讲到:
``` dart
kernelContent = DevFSFileContent(fs.file(compilerOutput.outputFilename));
```
2. 生成 assets。首先,会收集图片资源、字体等:
``` dart
final AssetBundle assets = await buildAssets(
manifestPath: manifestPath,
assetDirPath: assetDirPath,
packagesPath: packagesPath,
reportLicensedPackages: reportLicensedPackages,
);
```
其中包含有以下内容:

接着,会将这些,包含上面生成 kernelContent,一起收集到指定目录,kernelContent 就是编译生成的 app.dill,但这里会拷贝并重命名为 kernel_blob.bin:
``` dart
const String _kKernelKey = 'kernel_blob.bin';
const String _kVMSnapshotData = 'vm_snapshot_data';
const String _kIsolateSnapshotData = 'isolate_snapshot_data';
final String vmSnapshotData = artifacts.getArtifactPath(Artifact.vmSnapshotData, mode: buildMode);
final String isolateSnapshotData = artifacts.getArtifactPath(Artifact.isolateSnapshotData, mode: buildMode);
assetEntries[_kKernelKey] = kernelContent;
assetEntries[_kVMSnapshotData] = DevFSFileContent(fs.file(vmSnapshotData));
assetEntries[_kIsolateSnapshotData] = DevFSFileContent(fs.file(isolateSnapshotData));
```
我们注意到,这里同样会生成 vm_snapshot_data 和 isolate_snapshot_data,但并没有生成相应的指令集。在这里的 isolate_snapshot_data 中并不会包含我们的业务代码,业务代码会存放在 kernel_blob.bin 文件中。可以使用 `strings` 命令查看,而且这两个文件的 MD5 值是一致的。
```
MD5 (app.dill) = 3876e8c6f4b13a88cc3cfc3b9fd108c4
MD5 (flutter_assets/kernel_blob.bin) = 3876e8c6f4b13a88cc3cfc3b9fd108c4
```
关于 snapshot 生成相关可以去看 **gen_snapshot**。
#### 小结
##### debug
debug 模式下,会执行一个命令:
``` shell
flutter build bundle release
它会先生成 app.dill,而且这里分为两种模式: app-aot-assemble 和 app-aot-blobs。iOS 或者 添加了 --build-shared-library 会使用 app-aot-assemble,这种模式会生成 App.Framework 或 app.so。Android 默认使用 app-aot-blobs,这种模式会生成 isolate_snapshot_data、isolate_snapshot_instr、vm_snapshot_data 和 vm_snapshot_instr 四个文件。
flutter build bundle --precompiled这里只会生成 assets。
调试源码
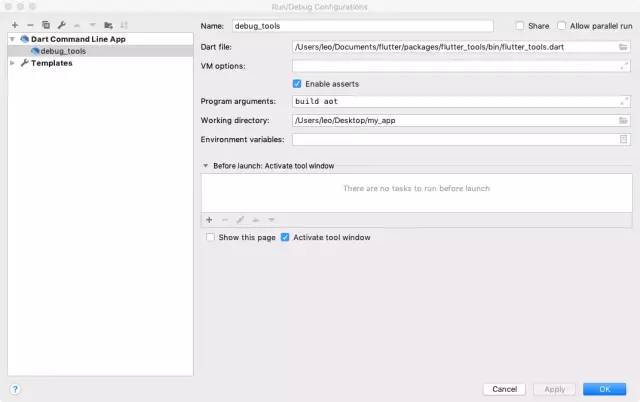
调试是阅读源码最好的帮手,调试 flutter_tools 的方式比较简单,我用的是 IntelliJ,Android Studio 应该也类似,先导入源码,源码位于 sdk/packages/flutter_tools;新建一个 Dart Command Line App,设置 Dart file 为 bin/flutter_tools.dart,Program arguments 设置你要调试的命令,比如 build aot,Working directory 则用 flutter create 创建个项目即可;最后打好断点,debug 运行。
因为源码中有很多异步代码,用 await 修饰的,可以使用 Force run to Cursor 直接执行到下一行即可。
结尾
为了避免篇幅太长,文章尽量避免贴很多的代码,只是贴了关键函数,感兴趣的读者可以去阅读相关的源码。
Android 在 release 模式下,使用 app-aot-blobs 模式,用的是 snapshot 文件,这里要实现动态下发代码,应该还是有可能的,需要进一步研究。下一步应该会研究下热加载的实现,这对于实现动态化应该很有帮助。
最后,Flutter 是一个非常好玩的事物,Dart 也是一个非常优秀的语言,enjoy it。
"开发者说·DTalk" 面向中国开发者们征集 Google ![]() 移动应用 (apps & games) 相关的产品/技术内容。欢迎大家前来分享您对移动应用的行业洞察或见解、移动开发过程中的心得或新发现、以及应用出海的实战经验总结和相关产品的使用反馈等。我们由衷地希望可以给这些出众的中国开发者们提供更好展现自己、充分发挥自己特长的平台。我们将通过大家的技术内容着重选出优秀案例进行谷歌开发技术专家 (GDE) 的推荐。
移动应用 (apps & games) 相关的产品/技术内容。欢迎大家前来分享您对移动应用的行业洞察或见解、移动开发过程中的心得或新发现、以及应用出海的实战经验总结和相关产品的使用反馈等。我们由衷地希望可以给这些出众的中国开发者们提供更好展现自己、充分发挥自己特长的平台。我们将通过大家的技术内容着重选出优秀案例进行谷歌开发技术专家 (GDE) 的推荐。
![]() 点击屏末 | 阅读原文 | 了解更多 "开发者说·DTalk" 活动详情与参与方式
点击屏末 | 阅读原文 | 了解更多 "开发者说·DTalk" 活动详情与参与方式
长按右侧二维码
报名参与


