简介
ansible是新出现的自动化运维工具,基于Python开发,集合了众多运维工具(puppet、chef、func、fabric)的优点,实现了批量系统配置、批量程序部署、批量运行命令等功能。
ansible是基于 paramiko 开发的,并且基于模块化工作,本身没有批量部署的能力。真正具有批量部署的是ansible所运行的模块,ansible只是提供一种框架。ansible不需要在远程主机上安装client/agents,因为它们是基于ssh来和远程主机通讯的。ansible目前已经已经被红帽官方收购,是自动化运维工具中大家认可度最高的,并且上手容易,学习简单。是每位运维工程师必须掌握的技能之一。
ansible 特点
- 部署简单,只需在主控端部署Ansible环境,被控端无需做任何操作;
- 默认使用SSH协议对设备进行管理;
- 有大量常规运维操作模块,可实现日常绝大部分操作;
- 配置简单、功能强大、扩展性强;
- 支持API及自定义模块,可通过Python轻松扩展;
- 通过Playbooks来定制强大的配置、状态管理;
- 轻量级,无需在客户端安装agent(代理),更新时,只需在操作机上进行一次更新即可;
- 提供一个功能强大、操作性强的Web管理界面和REST API接口——AWX平台。
- Ansible适用于中小型应用环境;SaltStack适合大型(Ansible由于不需要代理,只是通过ssh,因此只能性能不如Saltstack高)
Ansible安装
法1.在已有python-pip的情况下
$ pip install ansible
法2:
sudo apt-get install software-properties-common
sudo apt-add-repository ppa:ansible/ansible
sudo apt-get update
sudo apt-get install ansible
如果安装失败请换源sudo sed -i -re 's/\w+\.archive\.ubuntu\.com/archive.ubuntu.com/g' /etc/apt/sources.list,更新安装库sudo apt-get update
ansible 架构图
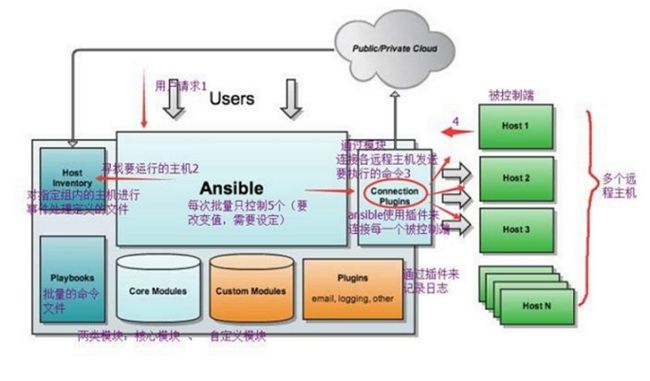
上图中我们看到的主要模块如下:
Ansible:Ansible核心程序。
HostInventory:主机清单 , 记录由Ansible管理的主机信息,包括端口、密码、ip等。
Playbooks:“剧本”YAML格式文件,多个任务定义在一个文件中,定义主机需要调用哪些模块来完成的功能。
CoreModules:核心模块,主要操作是通过调用核心模块来完成管理任务。
CustomModules:自定义模块,完成核心模块无法完成的功能,支持多种语言。
ConnectionPlugins:连接插件,Ansible和Host通信使用
ansible配置文件查找顺序
- 检查环境变量
ANSIBLE_CONFIG指向的路径文件(export ANSIBLE_CONFIG=/etc/ansible.cfg); - HOME目录下的配置文件
~/.ansible.cfg - 检查当前目录下的ansible.cfg配置文件;
-
/etc/ansible.cfg检查etc目录的配置文件。
使用特性
- 模块化:调用特定的模块,完成特定任务
- 有Paramiko,PyYAML,Jinja2(模板语言)三个关键模块支持自定义模块
- 基于Python语言实现
- 部署简单,基于python和SSH(默认已安装),agentless安全,基于OpenSSH支持playbook编排任务
- 幂等性:一个任务执行1遍和执行n遍效果一样,不因重复执行带来意外情况
- 无需代理不依赖PKI(无需ssl)可使用任何编程语言写模块
- YAML格式,编排任务,支持丰富的数据结构
- 较强大的多层解决方案
管理方式:
- Ad-Hoc,及Ansible命令,主要用于临时命令使用场景
- Ansible-Playbook,脚本,用于长期规划好,大型项目的场景,需要有提前的规划
Ansible-playbook(剧本)执行过程:
- 将已有编排好的任务集写入Ansible-Playbook
- 通过ansible-playbook命令分拆任务集至逐条ansible命令,按预定规则逐条执行
相关文件
配置文件
/etc/ansible/ansible.cfg 主配置文件,配置ansible工作特性
/etc/ansible/hosts 主机清单
/etc/ansible/roles/存放角色的目录
程序
/usr/bin/ansible 主程序,临时命令执行工具
/usr/bin/ansible-doc 查看配置文档,模块功能查看工具
/usr/bin/ansible-galaxy 下载/上传优秀代码或Roles模块的官网平台
/usr/bin/ansible-playbook定制自动化任务,编排剧本工具/usr/bin/ansible-pull远程执行命令的工具
/usr/bin/ansible-vault 文件加密工具
/usr/bin/ansible-console 基于console界面与用户交互的执行工具
1.设置被管理的主机清单vim /etc/ansible/hosts
2.1口令验证方式.ansible 192.168.30.101 -m ping -k用账号密码去确认受控端的身份
▲如果出现了这样的情况,需要先安装sshpass , sudo apt install sshpass
192.168.100.180 | FAILED! => {
    "failed": true,
    "msg": "ERROR! to use the 'ssh' connection type with passwords, you must install the sshpass program"
}
2.2基于key验证
$ ssh-keygen
$ ssh-copy-id 192.168.30.101

Generating public/private rsa key pair.
Enter file in which to save the key (/xxxxxx/):
Enter passphrase (empty for no passphrase):
Enter same passphrase again:
Your identification has been saved in xxxxxxxxx.
Your public key has been saved in xxxxx.
The key fingerprint is:
SHA256:xxxxxxxxxxxxxx
The key's randomart image is:
如果设置了passphrase,那么链接时需要输入passphrase,如果是ad-hoc就相当麻烦,而playbooks中有解决方法
ad-hoc使用
将host_key_checking取消注释,否则链接对象必须在known_hosts中
$ sudo vim /etc/ansible/ansible.cfg
 uncomment this to disable SSH key host checking
#host_key_checking = False
显示日志,取消注释log_path = /var/log/ansible.log
△.ansible不是长期执行的服务,不长期执行,因此修改配置后不需要重启服务
ansible [-m module_name][-a args]

ansible dbsrvs -m command -a 'ls /root'-u wang-k -b-K
 -u 以wang的身份登录,-b将wang切换成root,-K 输入root密码.
 -m 指定模块名,-a指定模块参数
ansible的Host-pattern即匹配主机的列表
All:表示所有Inventory中的所有主机
ansible all-m ping
:通配符
ansible""-m ping
ansible 192.168.1.-m ping
ansible"srvs"-m ping
或关系
ansible"websrvsiappsrvs"-m ping
ansible"192.168.1.10:192.168.1.20"-m ping
逻辑与
ansible "websrvs:&dbsrvs" -m ping在websrvs组并且在dbsrvs组中的主机,单引号、双引号都行
逻辑非
ansible 'websrvs:ldbsrvs'-m ping在websrvs组,但不在dbsrvs组中的主机
注意:此处为单引号
综合逻辑
ansible 'websrvs:dbsrvs:&appsrvs:lftpsrvs'-m ping
正则表达式
ansible "websrvs:&dbsrvs" -m ping
ansible "~(webldb).*\.magedu\.com" -m ping
ansible command
- creates=
- 存在,不执行
- removes=
- 不存在,不执行
- chdir=
- 切换目录后执行
命令返回颜色说明
绿色: 表示查看信息,对远程主机未做改动的命令
红色: 批量管理产生错误信息
黄色: 对远程主机做了相应改动
紫色: 对操作提出建议或忠告
常用模块
- command
- shell : 远程节点执行模块
ansible all -m shel1 -a 'getenforce'
- script: 在远程执行本地的脚本
ansible test -m script -a "/sh/test.sh"
- copy : 复制模块
ansible all -m copy -a 'src=/root/ansible/selinux dest=/etc/selinux/config backup=yes'ansible all -m copy-a 'src=/etc/shadow dest=/data/mode=000 owner=wang'
- fetch : 远程获取
ansible srv-m fetch -a 'src=/root/a. sh dest=/data/scripts'
- file : 文件操作,删除、创建
ansible test -m file -a "dest=/tmp/hello state=touch"
- unarchieve、achieve : 压缩解压
ansible test -m unarchive -a 'src=/srv/tomcat8/apache-tomcat-8.0.29.tar.gz dest=/usr/local copy=no mode=0755'
- cron
- 开启
ansible all-m cron -a 'minute=* weekday=1,3,5 jcb="/usr/bin/wall FBI warning" name=warningcron' - 禁用
ansible all -m cron -a 'disabled=true job="/usr/bin/wall FBI warning"name=warningcron'、启用ansible all -m cron -a 'disabled=falsejob="/usr/bin/wall FBI warning"name=warningcron' - 删除
ansible all -m cron -a 'job="/usr/bin/wall FBI warning"name=warningcron state=absent'
- 开启
- apt、yum
ansible all -m apt 'name=vim update_cache=yes'
- user
- group
- service
service:name=httpd state=started enabled=yes
- setup
ansible websrvs -m setup -a 'filter=*address*'
- template(不能放在ad-hoc)中,只能在playbook中使用
command模块在针对管道、重定向有…*有问题==>使用shell模块
常用模块介绍
▲一般 present 表示生成、下载, absent 表示删除或卸载。
系列命令
galaxy
ansible-galaxy install geerlingguy.nginx 其中geerlingguy为角色在./ansible/roles/
playbooks
Yaml
YAML Ain't Markup Language,即YAML不是XML。不过,在开发的这种语言时,YAML的意思其实是:"Yet Another Markup Language"(仍是一种标记语言)
核心元素
- Hosts 执行的远程主机列表
- Tasks 任务集
- Varniables 内置变量或自定义变量在playbook中调用Templates 模板,可替换模板文件中的变量并实现一些简单逻辑的文件Handlers 和notity结合使用,由特定条件触发的操作,满足条件方才执行,否则不执行
- tags 标签指定某条任务执行,用于选择运行playbook中的部分代码。
- ansible具有幂等性,因此会自动跳过没有变化的部分,即便如此,有些代码为测试其确实没有发生变化的时间依然会非常地长。此时,如果确信其没有变化,就可以通过tags跳过此些代码片断
ansible-playbook-t tagsname useradd.yml
- ansible具有幂等性,因此会自动跳过没有变化的部分,即便如此,有些代码为测试其确实没有发生变化的时间依然会非常地长。此时,如果确信其没有变化,就可以通过tags跳过此些代码片断
加密
加密ansible-vault encrypt hello.yml
解密查看ansible-vault view hello.yml
重新制定口令ansible-vault rekey hello.yml
基础组件
如果命令或脚本的退出码不为零,可以使用如下方式替代
tasks:
  - name:run this command and ignore the result
    shell: /usr/bin/somecommand || /bin/true
或者使用ignore_errors来忽略错误信息:
tasks:
  - name:run this command and ignore the result
    shell:/usr/bin/somecommand
ignore_errors:True
运行playbook的方式
ansible-playbook
常见选项
-check(-C)只检测可能会发生的改变,但不真正执行操作
--list-hosts列出运行任务的主机
--limit主机列表只针对主机列表中的主机执行
-V显示过程-vw-vwv更详细
handlers和notify
tasks:
  - name: install httpd package
    yum: name=httpd
  - name: copy conf file copy:src=files/httpd.conf dest=/etc/httpd/conf/backup=yes
    notify: restart service
  - name: start service
    service: name=httpd state=started enabled=yes
  handlers:
    - name:restart service
      service:name=httpd state=restarted
标签
指定标签来执行指定任务
ansible-playbook -t rshttp,xxxx httpd.yml
变量使用
jinjia2语法
{{ var }}
- 法一:ansible setup facts 远程主机的所有变量都可直接调用
- 法二:在
/etc/ansible/hosts中定义普通变量:主机组中主机单独定义,优先级高于公共变量公共(组)变量:针对主机组中所有主机定义统一变量
[websrvs]
192.168.30.101 http_port=81
192.168.30.102 http_port=82
[websrvs:vars]
nodename=www
domainname=magedu.com
- 法三:
ansible-playbook -e 'var=xxx' app.html,优先级比法二高 - 法四:
- hosts:
  remote_user: root
  vars:
    - var: xxx
  tasks:
    - name:
       yum: ...
迭代机制
  tasks:
    - name:
      file: name=/data/{{ item }}
      with_items:
        - file1
        - file2
        - file3
迭代嵌套自变量
- hosts: websrvs
  remote_user: root
  tasks:
    - name: add some groups
    group: name={{ item ]} state=present
    with_items:
      - group1
      - group2
      - group3
    - name: add some users
      user: name={{ item. name ]} group={{ item. group )} state=present
      with items:
        - { name: user1, group:' group1'}
        - { name: 'user2, group:' group2'}
        - { name: 'user3', group:' group3'}
{% for vhost in nginx_vhosts%}
server{
listen{{ vhost }}
{% endfor %}
- hosts: websrvs
  remote_user: root
  vars:
    ports:
      - listen_port: 81
      - listen_port: 82
      - listen_port: 83
  tasks:
  - name: copy conf
    template: src=forl.conf.j2 dest=/data/for1.conf
条件判断
- hosts: all
  remote_user: root
  tasks:
#如果系统中存在主机名为nfs或者backup的主机,则创建文件
    - name: Create File
      file: path=/tmp/this_is_{{ ansible_hostname }}_file state=touch
      when: (ansible_hostname == "nfs") or (ansible_hostname == "backup")

#系统为centos的主机才会执行
    - name: Centos Install httpd
      yum: name=httpd state=present
      when: (ansible_distribution == "CentOS")

#系统为ubuntu的主机才会执行
    - name: Ubuntu Install httpd
      yum: name=httpd2 state=present
      when: (ansible_distribution == "Ubuntu")
tasks:
  - name: run df -h
    sudo_user: test
    sudo: yes
    shell: name=df -h
ansible sudo 即将变更为become
[s21]
#代替原来192.168.1.21  ansible_ssh_user=i  ansible_ssh_pass=i的写法
192.168.1.21  ansible_ssh_user=i
ansible_ssh_private_key_file=/home/i/.ssh/id_rsa
ansible_become=true
ansible_become_user=root
ansible_become_pass='i'
获取执行命令的输出 –Register[转]
- name: echo date
  command: date
  register: date_output

 - name: echo date_output
  command: echo "30"
  when: date_output.stdout.split(' ')[2] == "30"
判断文件是否存在[转]
- name: judge a file or dir is exits
  shell: ls /home/sfy
  ignore_errors: True
  register: result

- shell: echo "file exit"
  when: result|succeeded

- shell: echo "file not exit"
  when: result|failed
权限问题
关于权限问题,可以通过ansible -h查看
  Privilege Escalation Options:
    control how and which user you become as on target hosts

    -s, --sudo          run operations with sudo (nopasswd) (deprecated, use
                        become)
    -U SUDO_USER, --sudo-user=SUDO_USER
                        desired sudo user (default=root) (deprecated, use
                        become)
    -S, --su            run operations with su (deprecated, use become)
    -R SU_USER, --su-user=SU_USER
                        run operations with su as this user (default=None)
                        (deprecated, use become)
    -b, --become        run operations with become (does not imply password
                        prompting)
    --become-method=BECOME_METHOD
                        privilege escalation method to use (default=sudo),
                        valid choices: [ sudo | su | pbrun | pfexec | doas |
                        dzdo | ksu | runas | pmrun ]
    --become-user=BECOME_USER
                        run operations as this user (default=root)
    --ask-sudo-pass     ask for sudo password (deprecated, use become)
    --ask-su-pass       ask for su password (deprecated, use become)
    -K, --ask-become-pass
                        ask for privilege escalation password
▲其中deprecated表示是将被弃用的,将全部被become代替,(即参数-b)
关于-b和-K的作用,可以通过如下命令进行测试
$ ansible test -m shell -a "whoami"  -K
 mrli身份使用sudo权限
$ ansible test -m shell -a "whoami"  -b
 切换到root身份
$ ansible test -m shell -a "whoami"  -b -K
▲这个权限问题在ansible执行shell脚本的时候需要特别注意
个人写过的Playbook-demo
- hosts: 192.168.100.190
  remote_user: apollo3d
  become: yes
  vars:
    spark: /home/apollo3d/SimSpark/spark/build
    rcssserver3d: /home/apollo3d/SimSpark/rcssserver3d/build
  tasks:
  - name: judge former platform directory Exsit
    shell: 'ls /home/apollo3d/simspark-0.3.0/build'
    ignore_errors: True
    register: formerDirExsit

  - name: uninstall
    command: 'chdir={{ item }} make uninstall'
    with_items:
      - /home/apollo3d/simspark-0.3.0/build
      - /home/apollo3d/rcssserver3d-0.7.1/build
    when: formerDirExsit|succeeded

  - name: remove
    file:
      dest: '{{ item }}'
      state: absent
    with_items:
      - /home/apollo3d/simspark-0.3.0/
      - /home/apollo3d/rcssserver3d-0.7.1/
    when: formerDirExsit|succeeded

  - name: judge new zip
    shell: ls /home/apollo3d/SimSpark.tar.gz
    ignore_errors: True
    register: zipExsit

  - name: jieya
    unarchive:
      src: /home/apollo3d/SimSpark.tar.gz
      dest: /home/apollo3d/
      copy: no
      mode: 0755
    when: zipExsit|succeeded


  - name: mk dirs
    file: "dest={{ item }} state=directory"
    with_items:
      - /home/apollo3d/SimSpark/spark/build
      - /home/apollo3d/SimSpark/rcssserver3d/build
    when: zipExsit|succeeded

  - name: install1
    command: 'chdir={{ spark }} {{ item }}'
    with_items:
      - cmake ..
      - make -j4
      - make install
    when: zipExsit|succeeded

  - name: install2
    command: 'chdir={{ rcssserver3d }} {{ item }}'
    with_items:
      - cmake ..
      - make -j4
      - make install
    when: zipExsit|succeeded

  - name: config
    shell: '{{ item }}'
    with_items:
      - echo '/usr/local/lib/simspark\n/usr/local/lib/rcssserver3d' | sudo tee /etc/ld.so.conf.d/spark.conf
      - ldconfig
    when: zipExsit|succeeded
roles
ansilbe自1.2版本引入的新特性,用于层次性、结构化地组织playbook。roles能够根据层次型结构自动装载变量文件、tasks以及handlers等。要使用roles只需要在playbook中使用include指令即可。简单来讲,roles就是通过分别将变量、文件、任务、模板及处理器放置于单独的目录中,并可以便捷地include它们的一种机制。角色一般用于基于主机构建服务的场景中,但也可以是用于构建守护进程等场景中
复杂场景:建议使用roles,代码复用度高
- 变更指定主机或主机组
- 如命名不规范维护和传承成本大
- 某些功能需多个Playbook,通过Includes即可实现
roles目录结构:
playbook.yml
roles/
project/
tasks/
files/
vars/不常用
default/不常用
templates/
handlers/
meta/不常用
附录
Ansible 配置SSH公钥认证
安装好Ansible之后,要开始工作,还需要创建一个被控制主机列表清单.默认读取/etc/ansible/hosts,如果该文件不存在,则要收到进行创建.
也可以通过环境变量 ANSIBLE_INVENTORY 来设置默认清单文件,1.9版本之前用 ANSIBLE_HOSTSexport ANSIBLE_INVENTORY=~/ansible_hosts
创建SSH认证文件
该操作是在控制主机中进行。
SSH认证文件创建成功之后,将控制主机的公钥文件 id_rsa.pub 添加到被控制主机的~/.ssh/authorized_keys。
\ ~指的是控制主机和被控制主机通信的用户家目录。
\ id_rsa 是控制主机的私钥文件,要严格保管。
\ id_rsa.pub是控制主机的公钥文件,可随意分发。
法一:ansible all -m shell -a "cat /tmp/authorized_keys >> /root/.ssh/authorized_keys" -k
▲注意
如果被控制主机中用户家目录中不存在.ssh目录,就创建。
然后将上传的公钥文件追加到用户的authorized_keys文件中
法二: (亲测)
通过authorized_key模块来进行添加
ansible para -i /tmp/inventory.txt -m authorized_key -a "user=root key='{{ lookup('file','/root/.ssh/id_rsa.pub') }}'" -k
lookup('file','/root/.ssh/id_rsa.pub')是读取/root/.ssh/id_rsa.pub的内容
使用公钥密钥对验证的方法登录
1. 在本地也创建一个 apple 用户,并创建 /home/apple/.ssh/ 目录
$ useradd apple -s /bin/bash -d /home/apple/
创建 .ssh 目录mkdir /home/apple/.ssh
修改 .ssh 目录的权限chmod 700 /home/apple/.ssh
创建 /home/apple/.ssh/known_hosts 文件
2.收集所有远程主机的公钥,保存在上 /home/apple/.ssh/known_hosts 文件。这一步的作用,是为了在后面第一次ssh 连接时,不需要再输密码。
收集所有远程主机的 公钥,主要是利用 ssh-keyscan 命令:ssh-keyscan -f ip.txt >> /home/apple/.ssh/known_hosts 说明: ip.txt 文件存放所有的远程主机 ip 地址,一行代表一台主机。
3.创建公钥私钥对:
一般在对应用户的 /home/apple/.ssh/ 目录下创建。这也不是强制的,因为在ssh 发起连接时,可以指定使用的私钥文件。 ssk-keygen -t rsa 一直按回车键就可以了。但要注意生成的 id_rsa 和 id_rsa.pub 存放的路径。
4.将公钥推送到所有的远程主机
我们编写playbook 文件,利用authorized_key 模块就可以快速完成:
[root@centos_7 roles]$   cat ssh-addkey.yml ---- hosts: apps         对apps 组里的所有远程主机
gather_facts: False
tasks:
- name: install sshkey
authorized_key:
user: apple
key: "{{ lookup('file', '/home/apple/.ssh/id_rsa.pub') }}"
state: present
说明: 在前面1,2,3步中,我们已经准备好了公私钥对了。推送到远程主机,可以手动推送,或者使用scp 复制到远程主机。但是利用scp 复制之后,还需要修改远程主机上的 /home/apple/.ssh/authorize_keys 文件的权限等等。 ansible 的 authorized_key 模块就自动帮我们做了这些工作。 执行, ansible-playbook ssh-addkye.yml
在多台远程主机中创建用户
不用ansible,单个操作
 在 root 用户下运行这条命令创建一个新用户,yangxg 是用户名
 因为我叫杨学光,所以我取的用户名是 yangxg
 选择一个你喜欢的用户名,不一定非得和我的相同
root@localhost:~ useradd -m -s /bin/bash yangxg

 把新创建的用户加入超级权限组
root@localhost:~ usermod -a -G sudo yangxg

 为新用户设置密码
 注意在输密码的时候不会有字符显示,不要以为键盘坏了,正常输入即可
root@localhost:~ passwd yangxg

 切换到创建的新用户
root@localhost:~ su - yangxg

 切换成功,@符号前面已经是新用户名而不是 root 了
yangxg@localhost:~$
ansible
---
- hosts: all
  vars:
    user: test
    password: "$6$rounds=100000$O2BHfT2XIF6oDb9w$8Hhv4vOrLN6JF/nRVYDd8zZdnn9TNkQutyYYywIcPF2kRiHgkwAjqHIN7sDUkd1DcjLRABWT9ULHZPBOF2bZS/"
  remote_user: root
  tasks:
  - name: Add user {{ user }}
    user: name={{user}} comment="ceph user" password={{ password }}
  - name: Config /etc/sudoers
    lineinfile: dest=/etc/sudoers state=present  line='{{item}}' validate='visudo -cf %s'
    with_items:
           - "{{ user}} ALL=(ALL) NOPASSWD: ALL"
           - "Defaults: {{user}}  !requiretty"
$ python -c 'import crypt; print crypt.crypt("rescue", "hadoop")'
 hadoop为salt,可以改成其他的。rescue是需要加密的内容

$ ansible rescue -m user -a "name=rescue shell=/bin/bash  home=/home/rescue password= state=present" -b -K

$ ansible rescue -m shell -a "usermod -a -G sudo rescue" -b -K

 user模块增加 update_password=always时,可以更新密码
一键挂载NFS:
ansible full -m mount -a "name=/data src=192.168.100.179:/data fstype=nfs state=mounted" -b -K
挂载需要用SUDO权限,所以-K必不可少.同时,在这之前已经使用过ssh进行了配对因此不需要输入登录用户密码.
其他命令记录
ss -ntl | grep 80
vim /etc/sysconfig/network-scripts/ifcfg-eth0建议可以使用Alias
service network restart重启网络服务