Flink DataStream使用
DataStream
- DataSources
- SourceFunction简介
- Stream Sources
- File-based
- Socket-based
- Collectionbased
- Custom
- SourceFunction基本使用
- SourceFunction& ParallelSourceFunction
- 案例代码
- 具体讲解
- RichParallelSourceFunction
- 实现MySQLSource
- 实现思路
- 案例代码
- 接收Kafka数据
- operate
- Transformations
- 常见算子介绍
- 案例代码
- physical partitioning
- DataSinks
- 简介
- 数据写入Kafka
- log2kafka
- kafka2kafka
- 自定义MySQLSink
- 实现思路
- 案例代码
- 数据写入redis
- 实现思路
- 案例代码
- Spark&Flink数据读写的对比
本章节介绍Flink DataStream常见的使用,主要从DataSources、operate、DataSinks三大主题切入进行讲解
DataSources
SourceFunction简介
通过env我们是可以addSource进来的,需要传入SourceFunction,而SourceFunction也是实现了Function接口的;SourceFunction是实现所有流式数据的顶层接口,我们可以基于该接口进行自定义实现数据源,Flink提供了3种方式:
- SourceFunction接口是不支持并发的,并行度为1,一般情况下用的不多
- ParallelSourceFunction接口
- RichParallelSourceFunction接口,生产上推荐使用
Stream Sources
File-based
主要用来读取文件类型的数据:
- readTextFile
- readFile
值得注意的是,线上流式处理的场景,用这些API的可能性是不大的
Socket-based
读取数据冲socket中过来,使用socketTextStream即可
Collectionbased
一般用于数据测试的时候来造数据的,见代码CollectionSourceApp
- fromCollection(Seq)
- fromCollection(Iterator)
- fromElements(elements: _*)
- fromParallelCollection(SplittableIterator) 用的不多
- generateSequence(from, to) 用的不多
Custom
可以通过addSource来添加新的Source Function,比如可以通过addSource(new FlinkKafkaConsumer08<>(…))这种方式去读取kafka的数据
SourceFunction基本使用
SourceFunction& ParallelSourceFunction
案例代码
AccessSourceFunction.scala:
/**
  * 自定义SourceFunction,并行度只能为1
  * 自定义ParallelSourceFunction,只需将extends SourceFunction改为ParallelSourceFunction即可,其余代码无需变动
  *
  * @Author: huhu
  * @Date: 2020-03-07 21:15
  */
class AccessSourceFunction extends SourceFunction[Access]{

  var running = true

  override def run(ctx: SourceFunction.SourceContext[Access]): Unit = {

    val random = new Random()
    val domains = Array("ruozedata.com","zhibo8.cc","dongqiudi.com")

    // 模拟数据产生
    while (running) {
      val timestamp = System.currentTimeMillis()
      1.to(10).map(x => {
        ctx.collect(Access(timestamp, domains(random.nextInt(domains.length)), random.nextInt(1000+x)))
      })
      Thread.sleep(5000)
    }

  }

  override def cancel(): Unit = {
    running = false
  }

}
SourceFunctionApp.scala:
/**
  * @Author: huhu
  * @Date: 2020-03-07 21:22
  */
object SourceFuctionApp {
  def main(args: Array[String]): Unit = {
    val env = StreamExecutionEnvironment.getExecutionEnvironment

    // 并行度只能为1,若设置大于1则会报错
    env.addSource(new AccessSourceFunction).setParallelism(1).print()
    env.addSource(new AccessRichParallelSourceFunction).setParallelism(3).print()

    env.execute(this.getClass.getSimpleName)
  }
}
具体讲解
如果设置并行度为1,则会产生如下报错:

查看源码DataStreamSource中我们也可以发现在代码中对并行度进行了判断:

对于ParallelSourceFunction只需要将extends SourceFunction改为ParallelSourceFunction即可,其余代码不需要做变动
RichParallelSourceFunction
与SourceFunction、ParallelSourceFunction不同的是,RichParallelSourceFunction的顶层接口是AbstractRichFunction,因此它是有对应的生命周期的
见代码AccessRichParallelSourceFunction,里面重写了open、close方法,其中对于open来说,1个task就会执行1次
实现MySQLSource
实现思路
- 采用原生JDBC的方式去实现MySQLSource,见代码MySQLSource
- 使用ScalikeJDBC的方式来实现MySQLSource,这种方式更加的优雅一些,见代码ScalikeJDBCMySQLSource
案例代码
MySQLSource.scala:
class MySQLSource extends RichSourceFunction[Student]{

  // 用_占坑得带上类型,不确定类型是占坑不了的
  var connection:Connection = _
  var pstmt:PreparedStatement = _

  /**
    * 在open方法中建立连接
    * @param parameters
    */
  override def open(parameters: Configuration): Unit = {
    super.open(parameters)

    connection = MySQLUtils.getConnection()
    pstmt = connection.prepareStatement("select * from student")
  }

  /**
    * 释放连接
    */
  override def close(): Unit = {
    super.close()

    MySQLUtils.release(connection, pstmt)
  }

  override def run(ctx: SourceFunction.SourceContext[Student]): Unit = {
    val rs = pstmt.executeQuery()
    while (rs.next()) {
      val student = Student(rs.getInt("id"), rs.getString("name"), rs.getInt("age"))
      ctx.collect(student)
    }
  }

  override def cancel(): Unit = {

  }

}
ScalikeJDBCMySQLSource.scala:
/**
  * 使用ScalikeJDBC来实现MySQLSource,这种方式更加的优雅一些
  *
  * @Author: huhu
  * @Date: 2020-03-07 22:47
  */
class ScalikeJDBCMySQLSource extends RichParallelSourceFunction[Student]{

  override def run(ctx: SourceFunction.SourceContext[Student]): Unit = {
    // 解析配置文件
    DBs.setupAll()

    DB.readOnly( implicit session => {
      SQL("select * from student").map(rs => {
        val student = Student(rs.int("id"),rs.string("name"),rs.int("age"))
        ctx.collect(student)
      }).list().apply()
    })
  }

  override def cancel(): Unit = {

  }

}
接收Kafka数据
使用方式可以参考官网
在pom.xml中添加依赖:
    <dependency>
      <groupId>org.apache.flink</groupId>
      <artifactId>flink-connector-kafka-0.10_2.11</artifactId>
      <version>${flink.version}</version>
    </dependency>
具体使用代码如下:
object SourceFuctionApp {
  def main(args: Array[String]): Unit = {
    val env = StreamExecutionEnvironment.getExecutionEnvironment
    // kafkasource使用
    val properties = new Properties()
    properties.setProperty("bootstrap.servers", "localhost:9093,localhost:9094,localhost:9095")
    properties.setProperty("group.id", "huhu_group")
    val consumer = new FlinkKafkaConsumer010[String]("huhu_offset", new SimpleStringSchema(), properties)
    consumer.setStartFromLatest()    //从最近的开始消费,flink底层对offset做了很好的维护
    env.addSource(consumer).print()
    env.execute(this.getClass.getSimpleName)
  }
}
Flink底层对offset做了很好的管理,有4种消费的模式:
- setStartFromEarliest()
start from the earliest record possible - setStartFromLatest()
start from the latest record - setStartFromTimestamp(…)
start from specified epoch timestamp (milliseconds) 生产上不太使用 - setStartFromGroupOffsets()
默认的消费规则
同样也可以指定分区进行消费:

在修数据的场景下会这样进行使用,只需要指定topic、分区编号、开始修数据的偏移量即可进行修数
operate
Transformations
常见算子介绍
Flink中常见的算子有如下:
- map:进来1个返回1个
- flatMap:进来1个出去多个
- filter:过滤
- keyBy:根据key分组聚合,类似于reduceByKey
- aggregation/window:后面会讲
分流与合流:
- Flink中有分流的概念,可以将流拆开,使用split算子即可
- Flink中同样也有合流的概念,主要涉及union和connect算子:
union可以合并多个流,但是数据结构需要相同
connect可以将2个流合并(只能合并2个流),是用来连接2个数据流,而且数据结构可以是不一样的
案例代码
/**
  * Transformation操作
  *
  * @Author: huhu
  * @Date: 2020-03-08 00:35
  */
object TransformationApp {

  def main(args: Array[String]): Unit = {
    val env = StreamExecutionEnvironment.getExecutionEnvironment

    val stream = env.readTextFile("data/access.log").map(x => {
      val splits = x.split(",")
      Access(splits(0).toLong, splits(1), splits(2).toLong)
    })

//    stream.keyBy("domain").sum("traffic").print("sum")

    // 使用reduce算子,内容就可以灵活的定义
    // 根据domain分好组后,将这份数据两两相邻传入reduce中进行处理,这里的x和y其实是将相同domain的数据放在了一块
//    stream.keyBy("domain").reduce((x,y) => {
//        Access(x.time, x.domain, (x.traffic+y.traffic+100))
//    }).print()

    // split算子使用,流的分流概念
//    val splitStream = stream.keyBy("domain").sum("traffic").split(x => {
//      if (x.traffic > 6000) {
//        Seq("大客户")
//      } else {
//        Seq("一般客户")
//      }
//    })
//    splitStream.select("大客户").print("大客户")
//    splitStream.select("一般客户").print("一般客户")
//    splitStream.select("大客户", "一般客户").print("ALL")

    // 流的合并
    val stream1 = env.addSource(new AccessSourceFunction)
    val stream2 = env.addSource(new AccessSourceFunction)
    // stream1和stream2的数据类型是一样的
    stream1.union(stream2).map(x => {
      println("接收到的数据:" + x)
      x
    }).print()
    // stream2的数据类型改变后,2个流就不能union了,union算子要求2个流的数据类型是一致的
    val stream2New = stream2.map(x => ("huhu", x))
    // connect算子可以将不同数据类型的流进行合并
    stream1.connect(stream2New).map(x=>x, y=>y).print()

    env.execute(this.getClass.getSimpleName)
  }

}
physical partitioning
Flink同时也支持自定义实现分区器,具体实现方式可以参见官网
案例代码,CustomPartitioner.scala:
/**
  * 自定义分区器
  *
  * @Author: huhu
  * @Date: 2020-03-08 15:39
  */
class CustomPartitioner extends Partitioner[String]{

  override def partition(key: String, numPartitions: Int): Int = {
    println("partitions: " + numPartitions)

    if (key == "ruozedata.com") {
      0
    } else if (key == "dongqiudi.com") {
      1
    } else {
      2
    }
  }

}
PartitionApp.scala:
/**
  * 自定义分区器的使用
  *
  * @Author: huhu
  * @Date: 2020-03-08 15:41
  */
object PartitionApp {
  def main(args: Array[String]): Unit = {
    val env = StreamExecutionEnvironment.getExecutionEnvironment
    env.setParallelism(3)

    env.addSource(new AccessSourceFunction)
       .map(x => (x.domain, x))
       .partitionCustom(new CustomPartitioner, 0)  //根据第0个字段进行分区
       .map(x => {
          println("current thread id is:" + Thread.currentThread().getId + ", value is: " + x) //相同的线程ID处理同一个分区里的数据
          x._2
        }).print()

    env.execute(this.getClass.getSimpleName)
  }
}
DataSinks
简介
常见的DataSinks有:
- writeAsText(),使用的TextOutputFormat
- writeAsCsv(),使用的CsvOutputFormat
- print()
- writeUsingOutputFormat(),使用的FileOutputFormat
- writeToSocket
- addSink,会触发自定义的function,也可以使用connectors(比如kafka)
Spark Streaming与Flink输出数据的不同:
对比Spark Streaming将数据写出去会使用foreach、foreachPartition的方法
在Flink当中会调用addSink来将数据给写出去,以writeAsText()为例,最底层也是调用的addSink:

SinkFunction体系结构:
- OutputFormatSinkFunction继承了RichSinkFunction
- RichSinkFunction继承了AbstractRichFunction并实现SinkFunction
其实我们可以发现与SourceFunction的体系结构是一样的
数据写入Kafka
log2kafka
从日志文件中读取数据进来,对这份数据清洗过后写入到Kafka中去
启动kafka-console-consumer查看数据写入情况:
bin/kafka-console-consumer.sh --bootstrap-server localhost:9093,localhost:9094,localhost:9095 --topic huhu_offset
KafkaSinkApp.scala:
/**
  * 数据写入Kafka
  *
  * @Author: huhu
  * @Date: 2020-03-14 16:44
  */
object KafkaSinkApp {
  def main(args: Array[String]): Unit = {
    val env = StreamExecutionEnvironment.getExecutionEnvironment

    val stream = env.readTextFile("data/access.log").map(x=>{
      val splits = x.split(",")
      Access(x(0).toLong, splits(1), splits(2).toLong).toString
    })

    // TODO... 业务逻辑的处理

    // 将数据写入到Kafka中去 ruoedata_offset(topic)
    val producer = new FlinkKafkaProducer010[String](
      "localhost:9093,localhost:9094,localhost:9095",
      "ruozedata_offset",
      new SimpleStringSchema)

    stream.addSink(producer) //数据写入Kafka
    stream.print() //数据打印到本地

    env.execute(this.getClass.getSimpleName)
  }
}
kafka2kafka
从kafka中读取数据并写入到kafka中去:
/**
  * 数据写入Kafka
  *
  * @Author: huhu
  * @Date: 2020-03-14 16:44
  */
object KafkaSinkApp {
  def main(args: Array[String]): Unit = {
    val env = StreamExecutionEnvironment.getExecutionEnvironment

    // 接入Kafka huhu_offset(topic)中的数据
    val properties = new Properties()
    properties.setProperty("bootstrap.servers", "localhost:9093,localhost:9094,localhost:9095")
    properties.setProperty("group.id", "huhu_group")
    val consumer = new FlinkKafkaConsumer010[String]("huhu_offset", new SimpleStringSchema(), properties)
    val stream = env.addSource(consumer)

    // TODO... 业务逻辑的处理

    // 将数据写入到Kafka中去 ruoedata_offset(topic)
    val producer = new FlinkKafkaProducer010[String](
      "localhost:9093,localhost:9094,localhost:9095",
      "ruozedata_offset",
      new SimpleStringSchema)

    stream.addSink(producer) //数据写入Kafka
    stream.print() //数据打印到本地

    env.execute(this.getClass.getSimpleName)
  }
}
自定义MySQLSink
实现思路
在将数据写入到MySQL的时候,需要注意:
- Spark Streaming是来一个批次往里写一次数据
- Flink是来一条数据就往里写一条数据
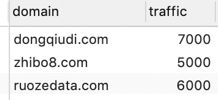
因此在使用Flink向MySQL写入数据的时候就需要注意数据更新的问题,不能够每次进来就无脑insert进去,对此我们采取的方案是:先查询一下,有就更新,没有就插入
案例代码
MySQLSink.scala:
/**
  * 数据写入MySQL
  *
  * @Author: huhu
  * @Date: 2020-03-14 23:22
  */
class MySQLSink extends RichSinkFunction[(String, Double)]{

  var connection:Connection = _
  // 先查询一下,有就更新,没有就插入
  var insertPstmt:PreparedStatement = _
  var updatePstmt:PreparedStatement = _


  /**
    * 打开链接
    *
    * @param parameters
    */
  override def open(parameters: Configuration): Unit = {
    super.open(parameters)

    connection = MySQLUtils.getConnection()
    insertPstmt = connection.prepareStatement("insert into ruozedata_traffic(domain, traffic) values (?, ?)")
    updatePstmt = connection.prepareStatement("update ruozedata_traffic set traffic=? where domain=?")
  }

  /**
    * 写数据
    * 涉及到数据的插入与更新
    *
    * @param value
    * @param context
    */
  override def invoke(value: (String, Double), context: SinkFunction.Context[_]): Unit = {
    updatePstmt.setDouble(1, value._2)
    updatePstmt.setString(2, value._1)
    updatePstmt.execute()

    // 如果没有涉及更新操作,就代表第一次写入则执行insert操作
    if (updatePstmt.getUpdateCount == 0) {
      insertPstmt.setString(1, value._1)
      insertPstmt.setDouble(2, value._2)
      insertPstmt.execute()
    }
  }

  /**
    * 释放资源
    */
  override def close(): Unit = {
    super.close()

    if (insertPstmt != null) insertPstmt.close()
    if (updatePstmt != null) updatePstmt.close()
    if (connection != null) connection.close()
  }

}
数据写入redis
实现思路
具体使用步骤可以参见官网
在pom.xml中引入依赖:
<dependency>
    <groupId>org.apache.bahir</groupId>
    <artifactId>flink-connector-redis_2.11</artifactId>
    <version>1.0</version>
</dependency>
写入到Redis中有3种模式:
- Single Redis Server
- Redis Cluster
- Redis Sentinel
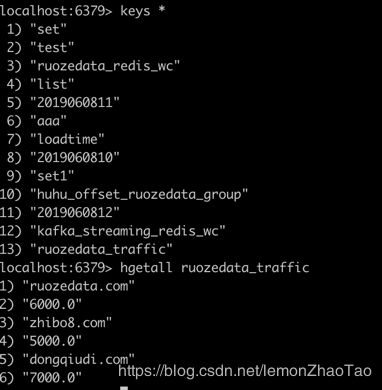
我们写到Single Redis Server中去,需要继承RedisMapper接口,并实现3个方法:
- getCommandDescription
写入到redis的时候,需要选择redis的数据结构 - getKeyFromData
- getValueFromData
案例代码
CustomRedisSink.scala:
/**
  * 数据写入到Redis
  *
  * @Author: huhu
  * @Date: 2020-03-16 00:06
  */
class CustomRedisSink extends RedisMapper[(String,Double)]{

  override def getCommandDescription: RedisCommandDescription = {
    new RedisCommandDescription(RedisCommand.HSET, "ruozedata_traffic")
  }

  override def getKeyFromData(data: (String, Double)): String = {
    data._1
  }

  override def getValueFromData(data: (String, Double)): String = {
    data._2 + ""
  }

}
Spark&Flink数据读写的对比
Spark读写(外部数据源):
- spark.read.format(“”).option(“”, “”).load()
spark.write.format(“”).xxx.save()
Flink读写:
- addSource(new XXXSourceFunction)
- addSink(new XXXSinkFunction)
相比较之下是Spark方便很多的
不管是使用Flink还是Spark的外部数据源的时候,我们都可以发现其设计理念都是可插拔的;如果遇到官方没有支持的数据源,我们完全可以自定义开发然后打成jar包,在其余需要应用的工程中直接引入即可

