龙书D3D11章节习题答案(第十章)
以下答案仅供参考,有错欢迎留言。
Chapter 10 : Stenciling
1. Prove that the general shadow matrix S reduced to Sdir if Lw = 0 and S reduces to Spoint for Lw = 1.
P.833~834的C.4.7 Ray/Plane Intersection给出了S的推导过程,Sdir和Spoint唯一的区别在于Sdir所用的L为(Lx,Ly,Lz,0), 而Spoint所用的L为(Lx,Ly,Lz,1),为了在处理阴影时统一用一个Shadow Matrix计算,引入Lw来表示0和1,具体证明可用笔验算。
2. Prove that ![]() by doing the matrix multiplication for each component, as was done in §10.5.1 for directional lights.
by doing the matrix multiplication for each component, as was done in §10.5.1 for directional lights.
 // Lw=1
首先把![]() 变形为s = (-p*n·(p-L) + (n·p+d)*(p-L))/(-n·(p-L))
变形为s = (-p*n·(p-L) + (n·p+d)*(p-L))/(-n·(p-L))
由S’ = [Px, Py, Pz, 1] * S,
Sw = -PxNx - PyNy - PzNz + n·L= -n·(p-L),
即上式的分母(在投影到齐次空间w=1上时会自动做除法,所以接下来只要证明[Px, Py, Pz, 1] * S计算得出的分子与公式变形得到的分子(-p*n·(p-L) + (n·p+d)*(p-L))是相同的即可)。
将分子(-p*n·(p-L) + (n·p+d)*(p-L))
化简:-p*n·p + p*n·L + n·p*p - n·p*L + d*p - d*L = p*n·L - L*n·p + d*p - d*L = p*(n·L+d) - L*(n·p+d)
由S’ = [Px, Py, Pz, 1] * S,
Si = Pi*(n·L + d) - Li*(PxNx+PyNy+PzNz+d) = Pi*(n·L + d) - Li*(n·p + d),
即计算所得的Si与上述由分子得到的化简式相同,证毕。
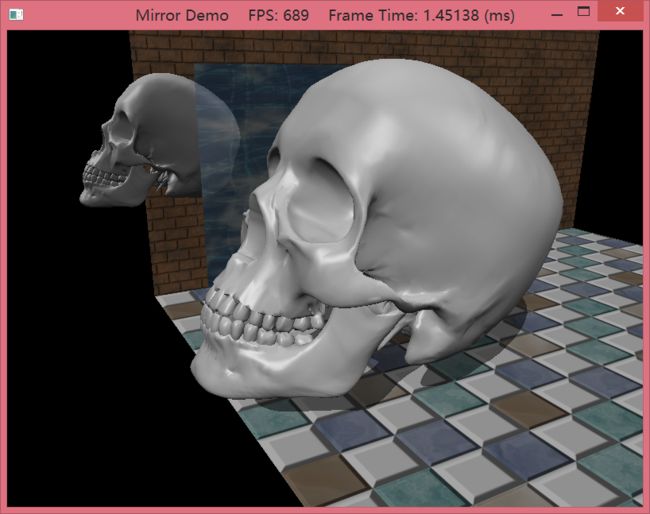
3. Modify the “Mirror” demo to produce the “Left” image in Figure 10.1.

首先,你要理解镜像效果是什么?在本场景中镜像效果就是在镜面上绘制骷髅头,那要如何实现呢?最原始的当然是在镜面的背后绘制出另一个骷髅头,然后因为镜面的z坐标比骷髅头镜像的大,所以在视角上看不到这个骷髅头,再通过一次镜面和骷髅头的blend就形成了一种以透视为原理的镜面效果。
在MirrorDemo中,我们可以在DrawSkullReflection时将StencilEnable设为false来达到如左图这样的透视效果(Blend在DrawMirror时完成)模拟镜面。
这里使用默认的DSS即可(是关闭StencilTest的)。
md3dImmediateContext->OMSetDepthStencilState(0, 0);
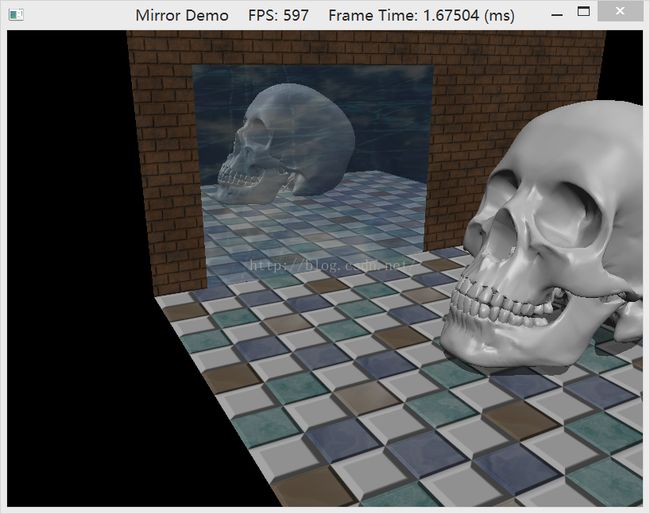
4. Modify the “Mirror” demo to produce the “Left” image in Figure 10.10.

noDoubleBlendDesc.FrontFace.StencilPassOp = D3D11_STENCIL_OP_KEEP;查文档得:

INCR操作默认增量为1,然后当StencilValue超过阈值时(即允许的最大值,8 bits stencil buffer的阈值为255)输出0(wrap the result)。
如若超过255不想让它wrap to 0,可以使用D3D11_STENCIL_OP_INCR_SAT, 超过阈值时输出阈值。
5. Modify the “Mirror” demo in the following way.
First, draw a wall with the following depth settings:
	depthStencilDesc.DepthEnable = false;
	depthStencilDesc.DepthWriteMask = D3D11_DEPTH_WRITE_MASK_ALL;
	depthStencilDesc.DepthFunc = D3D11_COMPARISON_LESS;
Next, draw the skull behind the wall with the depth settings:
	depthStencilDesc.DepthEnable = true;
	depthStencilDesc.DepthWriteMask = D3D11_DEPTH_WRITE_MASK_ALL;
depthStencilDesc.DepthFunc = D3D11_COMPARISON_LESS; depthStencilDesc.DepthEnable = true;
depthStencilDesc.DepthWriteMask = D3D11_DEPTH_WRITE_MASK_ALL;
depthStencilDesc.DepthFunc = D3D11_COMPARISON_LESS;注意Next,draw the skull behind the wall with the depth settings:...
所以我们像第3题一样在绘制墙后的Skull时用默认的DSS设置即可。
而对于墙,DepthEnable设为false时,由于depth信息(即z坐标)没写入depth/stencil buffer里面,所以在depth test时,墙不会挡住墙后的骷髅头,本应在墙后面的骷髅头会绘制在墙之前(wtf...)。
DrawWall时启用DepthEnable当然一切正常。
6. Modify the “Mirror” demo by not reversing the triangle winding order convention. Does the reflected teapot render correctly?
由于绘制ReflectionSkull时,骷髅头各个点的法线向量的坐标没有发生变化(Reflection矩阵仅仅变换了Skull的空间坐标x,y,z),而Reflect得到的Skull是不正常的(就像我们侧身照镜子,你的右手对应镜子中人的左手),所以Skull各个点的法线向量需要做一个Reverse,反转一下才能得到正常的图形。
Figure.not reversing the triangle winding order(墙背面的Skull的表面被Cull,而Skull内部被描画出来):

7. Modify the “Blend” demo from Chapter 9 to draw a cylinder (with no caps) at the center of the scene. Texture the cylinder with the 60 frame animated electric bolt animation found in this chapter’s directory using additive blending. Figure 10.11 shows an example of the output. (Hint: Refer back to §9.5.5 for the depth states to use
when rendering additive blending geometry.)

首先,因为要做到Additive Blend,我们增加一个用于做累加Blend的BS和设DepthEnable为false的DSS。
	//
	// AdditiveBS
	//

	D3D11_BLEND_DESC additiveDesc = {0};
	additiveDesc.AlphaToCoverageEnable = false;
	additiveDesc.IndependentBlendEnable = false;

	additiveDesc.RenderTarget[0].BlendEnable = true;
	additiveDesc.RenderTarget[0].SrcBlend       = D3D11_BLEND_ONE;
	additiveDesc.RenderTarget[0].DestBlend      = D3D11_BLEND_ONE;
	additiveDesc.RenderTarget[0].BlendOp        = D3D11_BLEND_OP_ADD;
	additiveDesc.RenderTarget[0].SrcBlendAlpha  = D3D11_BLEND_ZERO;
	additiveDesc.RenderTarget[0].DestBlendAlpha = D3D11_BLEND_ZERO;
	additiveDesc.RenderTarget[0].BlendOpAlpha   = D3D11_BLEND_OP_ADD;
	additiveDesc.RenderTarget[0].RenderTargetWriteMask = D3D11_COLOR_WRITE_ENABLE_ALL;

	HR(device->CreateBlendState(&additiveDesc, &AdditiveBS));
//
// DepthWriteOffDSS
//
D3D11_DEPTH_STENCIL_DESC depthWriteOffDesc;
ZeroMemory(&depthWriteOffDesc, sizeof(D3D11_DEPTH_STENCIL_DESC));
depthWriteOffDesc.DepthEnable = true;
depthWriteOffDesc.DepthWriteMask = D3D11_DEPTH_WRITE_MASK_ZERO;
depthWriteOffDesc.DepthFunc = D3D11_COMPARISON_LESS;
HR(device->CreateDepthStencilState(&depthWriteOffDesc, &DepthWriteOffDSS));第二项准备工作是加载60张Bolt的纹理图片到内存中,再用Effects11库Set到显存中。
可以简单地用数组或者std::vector来存放ID3D11ShaderResourceView*的类型的一组图片。
在处理文件名时注意每张图片的数字id都是三位数,可以用两种方法处理:
wchar[]+sprintf(_s版本, 即safe版本,检查了下标越界之类的异常):
	for(UINT i=0; i<60; ++i){
		wchar_t bmpPath[50];
		if(i+1<10)
			swprintf_s(bmpPath, L"Textures//BoltAnim//Bolt00%u.bmp", i+1);
		else if(i+1<100)
			swprintf_s(bmpPath, L"Textures//BoltAnim//Bolt0%u.bmp", i+1);

		OutputDebugStringW(bmpPath);

		HR(D3DX11CreateShaderResourceViewFromFile(md3dDevice,
			bmpPath, 0, 0, &mBoltMapVector[i], 0 ));
} for(int i = 0; i < 60; ++i)
{
std::wstring filename = L"Textures/BoltAnim/Bolt";
if( i+1 <= 9 )
filename += L"0";
if( i+1 <= 99 )
filename += L"0";
std::wstringstream frameNum;
frameNum << i+1;
filename += frameNum.str();
filename += L".bmp";
HR(D3DX11CreateShaderResourceViewFromFile(md3dDevice,
filename.c_str(), 0, 0, &mBoltMapSRV[i], 0 ));
}
	//
	// Animate bolt animation frame.
	//

	static float t = 0.0f;
	t += dt;

	if( t >= 0.033333f )
	{
		mBoltFrameIndex++;
		t = 0.0f;

		if(mBoltFrameIndex == 60)
			mBoltFrameIndex = 0;
} md3dImmediateContext->RSSetState(RenderStates::NoCullRS);
md3dImmediateContext->OMSetBlendState(RenderStates::AdditiveBS, blendFactor, 0xffffffff);
md3dImmediateContext->OMSetDepthStencilState(RenderStates::DepthWriteOffDSS, 0);
boltTech->GetPassByIndex(p)->Apply(0, md3dImmediateContext);
md3dImmediateContext->DrawIndexed(mBoltIndexCount, 0, 0);
	//
	// Animate bolt texture.
	//

	XMMATRIX boltScale = XMMatrixScaling(3.0f, 1.5f, 1.0f);
	XMMATRIX boltTranslation = XMMatrixTranslation(mTimer.TotalTime() * 0.02f, 0.0f, 0.0f);
	XMStoreFloat4x4(&mBoltTexTransform, boltScale*boltTranslation);
8.原题叙述过长,略
尝试可视化场景中每个像素点(或者说pixel fragment)的深度复杂度(depth complexity),以作为性能分析的手段。
因为Pixel Shader(PS)在Output Merge Stage(OM Stage)之前发生,所以Depth Test(发生在OM Stage)是在PS之后进行的。
这就是说,那些在Depth Test中失败的像素信息也会被PS处理一遍,这显然是不必要的开支,比如说绘制一系列不发生融合的对象,如果有early z-test(进行在PS之前),然后从前往后绘制这些对象(相对于摄像机),那么就可以省去被遮挡对象的PS处理。
那为什么不在PS之前进行Depth Test(即early z-test)?这是因为在D3D中PS可能会修改像素点的Z坐标(PS输出的可以不仅仅是float4,还可以是自定义的结构体,如struct PixelOut{float4 color : SV_Target; float depth : SV_Depth};,是可以修改对应像素深度值的,详见P.397)而造成错误。
我的解题思路是:
0.设置一个深度复杂度对应各种颜色的colorMap,比如0对应黑色,1对应红色,2对应蓝色....
1.初始化stencil buffer的stencil value为0。
2.将depth test设为false,不开启深度测试。
3.将stencil test设为true,且通过方式设为ALWAYS,通过的处理是INCR,即为stencil value++。
4.接着绘制场景中的物体到RenderTargetView及其DepthStencilView上。
5.设一个整数n=0,将stencil test的通过方式设为EQUAL,EQUAL的值为n。
6.SetMaterial为colorMap中n对应的颜色,绘制一遍场景,此时相当于深度复杂度为0的像素被填充为此色。
7.n++,返回第5步。(n最大为多少自己根据场景复杂程度估计,或者直接设stencil value大于某个值时,填充为同一种颜色)。
9. Another way to implement depth complexity visualization is to use additive blending. First, clear the back buffer black and disable the depth test.
Next, set the source and destination blend factors both to D3D11_BLEND_ONE,
and the blend operation to D3D11_BLEND_OP_ADD so that the blending equation looks like C = Csrc + Cdst.
Observe that with this formula, for each pixel, we are accumulating the colors of all the pixel fragments written to it.
Now render all the objects in the scene with a pixel shader that outputs a low intensity color like (0.05, 0.05,0.05).
The more overdraw a pixel has, the more of these low intensity colors will be summed in, thus increasing the brightness of the pixel.
If a pixel was overdrawn 10 times, for example, then it will have a color intensity of (0.5, 0.5, 0.5). Thus by looking at the intensity of each pixel after rendering the scene, we obtain an idea of the scene depth complexity.
Implement this version of depth complexity measurement using the “Blend” demo from Chapter 9 as a test scene.
1.关闭深度测试。
2.开启融合,融合方式是C = Csrc + Cdst。
3.ps仅返回float4(0.03, 0.03, 0.03, 1);即可,删去其他纹理采样、光照计算、alpha裁剪的内容。

10. Explain how you can count the number of pixels that pass the depth test. Explain how you can count the number of pixels that fail the depth test.
11. Modify the “Mirror” demo to reflect the floor into the mirror in addition to the skull.
按绘制Skull镜像的方式绘制地板即可。
	activeTech->GetDesc( &techDesc );
	for(UINT p = 0; p < techDesc.Passes; ++p)
    {
		ID3DX11EffectPass* pass = activeTech->GetPassByIndex( p );
		md3dImmediateContext->IASetVertexBuffers(0, 1, &mRoomVB, &stride, &offset);

		// Set per object constants.
		XMVECTOR mirrorPlane = XMVectorSet(0.0f, 0.0f, 1.0f, 0.0f); // xy plane
		XMMATRIX R = XMMatrixReflect(mirrorPlane);
		XMMATRIX world = XMLoadFloat4x4(&mRoomWorld)*R;
		XMMATRIX worldInvTranspose = MathHelper::InverseTranspose(world);
		XMMATRIX worldViewProj = world*view*proj;

		Effects::BasicFX->SetWorld(world);
		Effects::BasicFX->SetWorldInvTranspose(worldInvTranspose);
		Effects::BasicFX->SetWorldViewProj(worldViewProj);
		Effects::BasicFX->SetTexTransform(XMMatrixIdentity());
		Effects::BasicFX->SetMaterial(mRoomMat);
		Effects::BasicFX->SetDiffuseMap(mFloorDiffuseMapSRV);

		// Cache the old light directions, and reflect the light directions.
		XMFLOAT3 oldLightDirections[3];
		for(int i = 0; i < 3; ++i)
		{
			oldLightDirections[i] = mDirLights[i].Direction;

			XMVECTOR lightDir = XMLoadFloat3(&mDirLights[i].Direction);
			XMVECTOR reflectedLightDir = XMVector3TransformNormal(lightDir, R);
			XMStoreFloat3(&mDirLights[i].Direction, reflectedLightDir);
		}

		Effects::BasicFX->SetDirLights(mDirLights);

		// Cull clockwise triangles for reflection.
		md3dImmediateContext->RSSetState(RenderStates::CullClockwiseRS);
		md3dImmediateContext->OMSetDepthStencilState(RenderStates::DrawReflectionDSS, 1);

		// Floor
		pass->Apply(0, md3dImmediateContext);
		md3dImmediateContext->Draw(6, 0);

		// Restore default states.
		md3dImmediateContext->RSSetState(0);
		md3dImmediateContext->OMSetDepthStencilState(0, 0);

		// Restore light directions.
		for(int i = 0; i < 3; ++i)
		{
			mDirLights[i].Direction = oldLightDirections[i];
		}

		Effects::BasicFX->SetDirLights(mDirLights);
	}