tensorflow+tensorflow-serving+docker+grpc模型上线部署(不需bazel编译,有代码)
系统环境ubuntu14.04(mac上装的parallels虚拟机)
Python36
Tensroflow 1.8.0
Tensorflow-serving 1.9.0(1.8官方不支持python3)
Docker 18.03.1-ce
grpc
Tensorflow-model-server
1.安装Tensorflow
Pip3 install tensorflow
2.安装tensorflow-serving
先安装grpc相关依赖:
sudo apt-get update && sudo apt-get install -y \
automake \
build-essential \
curl \
libcurl3-dev \
git \
libtool \
libfreetype6-dev \
libpng12-dev \
libzmq3-dev \
pkg-config \
python-dev \
python-numpy \
python-pip \
software-properties-common \
swig \
zip \
zlib1g-dev
安装grpc:
Pip3 install grpcio
安装tensorflow-serving-api
Pip install tensorflow-serving-api (tensorflow-serving-api1.9同时支持py2和py3,所以pip和pip3应该不影响)
安装tensorflow-model-server(这一步实际上是替代了bazel编译tensorflow-serving,因为bazel编译有时候很难完全编译成功,本人试了三天的bazel都没成功,估计是人品)
echo "deb [arch=amd64] http://storage.googleapis.com/tensorflow-serving-apt stable tensorflow-model-server tensorflow-model-server-universal" | sudo tee /etc/apt/sources.list.d/tensorflow-serving.list
curl https://storage.googleapis.com/tensorflow-serving-apt/tensorflow-serving.release.pub.gpg | sudo apt-key add -
这两句是把tensorflow_model_server的网址映射到服务器环境中,让apt-get可以访问到
sudo apt-get update && sudo apt-get install tensorflow-model-server
注:这一句可能有时候执行不成功,可能是网络原因,多试几次即可,本人也是试了好几天,才装成功的,随缘吧
3.安装docker
第一步:
sudo apt-get install \
linux-image-extra-$(uname -r) \
linux-image-extra-virtual
第二步:
sudo dpkg -i /path/to/package.deb
第三步:
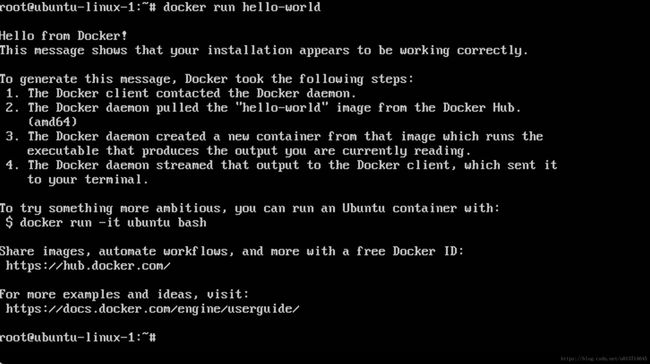
sudo docker run hello-world
测试通过则说明docker安装成功,如下图:
4.相关环境已经安装完成,下面开始进行模型部署
网上下载serving镜像:
docker pull tensorflow/serving:latest-devel
由于我之前pull了,所以显示镜像已安装了,第一次运行这句的话,应该需要挺久,整个镜像应该有1.17M左右(devel版本),看你网速了,下图是我的image(镜像)
用 serving镜像创建容器:
docker run -it -p 8500:8500 tensorflow/serving:latest-devel
即进入了容器,如下图
可以ls一下,看看docker容器是什么样子的,在容器里面实际上就和在系统终端一样,shell命令都可以使用,docker容器的基本原理感觉和虚拟机比较像,就是开辟了一个空间,感觉也是一个虚拟机,但是里面的命令都是docker命令,而不是shell,但两者很相似。可以直接cd root 进入到根目录下,然后你就会发现,实际上和linux文件系统差不多,几乎一样。
在ubuntu终端(需要另开一个终端,记住不要在docker容器里面)将自己的模型文件拷贝到容器中,model的下级目录是包括模型版本号,我的本地模型文件路径/media/psf/AllFiles/Users/daijie/Downloads/docker_file/model/1533369504,1533369504下面一级包括的是.pb文件和variable文件夹
docker cp /media/psf/AllFiles/Users/daijie/Downloads/docker_file/model acfcf6826643:/online_model
注:acfcf6826643为container id,这句有点坑,一定要理解对路径,docker cp 就和linux 中的cp一样,如果指定目标路径文件名,就相当于复制之后重命名,如果不指定文件夹名,相当于直接复制
容器中运行tensorflow_model_server服务
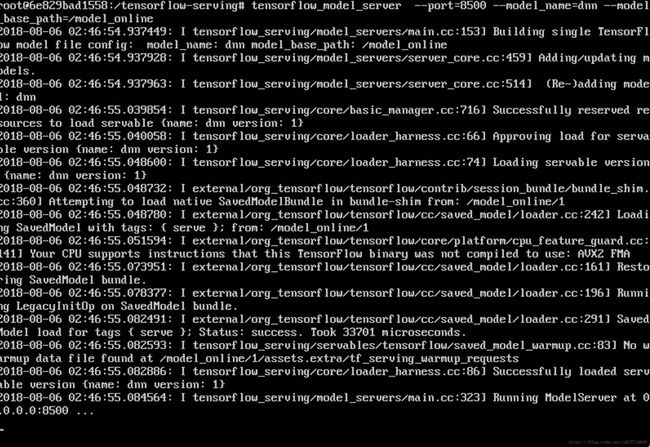
tensorflow_model_server —port=8500 —-model_name=dnn —model_base_path=/online_model
如下图,即服务器端运行成功
即完成了server端的部署
5.在服务器端运行client.py
# -*- coding: utf-8 -*-
import tensorflow as tf
from tensorflow_serving.apis import classification_pb2
from tensorflow_serving.apis import prediction_service_pb2
from grpc.beta import implementations

#
def get_input(a_list):

	def _float_feature(value):
		if value=='':
			value=0.0
		return tf.train.Feature(float_list=tf.train.FloatList(value=[float(value)]))

	def _byte_feature(value):
		return tf.train.Feature(bytes_list=tf.train.BytesList(value=[value]))
	'''
	age,workclass,fnlwgt,education,education_num,marital_status,occupation,
	relationship,race,gender,capital_gain,capital_loss,hours_per_week,
	native_country,income_bracket=a_list.strip('\n').strip('.').split(',')
	'''
	feature_dict={
		'age':_float_feature(a_list[0]),
		'workclass':_byte_feature(a_list[1].encode()),
		'education':_byte_feature(a_list[3].encode()),
		'education_num':_float_feature(a_list[4]),
		'marital_status':_byte_feature(a_list[5].encode()),
		'occupation':_byte_feature(a_list[6].encode()),
		'relationship':_byte_feature(a_list[7].encode()),
		'capital_gain':_float_feature(a_list[10]),
		'capital_loss':_float_feature(a_list[11]),
		'hours_per_week':_float_feature(a_list[12]),
	}
	model_input=tf.train.Example(features=tf.train.Features(feature=feature_dict))
	return model_input

def main():
	channel = implementations.insecure_channel('10.211.44.8', 8500)#the ip and port of your server host
	stub = prediction_service_pb2.beta_create_PredictionService_stub(channel)

	# the test samples
	examples = []
	f=open('adult.test','r')
	for line in f:
		line=line.strip('\n').strip('.').split(',')
		example=get_input(line)
		examples.append(example)

	request = classification_pb2.ClassificationRequest()
	request.model_spec.name = 'dnn'#your model_name which you set in docker  container
	request.input.example_list.examples.extend(examples)

	response = stub.Classify(request, 20.0)

	for index in range(len(examples)):
		print(index)
		max_class = max(response.result.classifications[index].classes, key=lambda c: c.score)
		re=response.result.classifications[index]
		print(max_class.label,max_class.score)# the prediction class and probability
if __name__=='__main__':
	main()
github代码:https://github.com/DJofOUC/tensorflow_serving_docker_deploy/blob/master/client.py
以上即完成了模型部署。
可能出现的错误:
运行client.py时出现:
Traceback (most recent call last):
  File "client.py", line 70, in
    main()
  File "client.py", line 57, in main
    response = stub.Classify(request, 20.0)
  File "/Library/Frameworks/Python.framework/Versions/3.6/lib/python3.6/site-packages/grpc/beta/_client_adaptations.py", line 309, in __call__
    self._request_serializer, self._response_deserializer)
  File "/Library/Frameworks/Python.framework/Versions/3.6/lib/python3.6/site-packages/grpc/beta/_client_adaptations.py", line 195, in _blocking_unary_unary
    raise _abortion_error(rpc_error_call)
grpc.framework.interfaces.face.face.ExpirationError: ExpirationError(code=StatusCode.DEADLINE_EXCEEDED, details="Deadline Exceeded")
可能的原因:
1)ip地址和port号设置不对,查看一下
2)可能是端口被占用了,如果不会kill,就直接重启服务器,
ps -ef | grep 端口号
kill进程掉就行, 可能需要sudo,-9啥的。
反正楼主也在这卡了很久很久,当时实在没办法,然后万念俱灰的时候直接重启机器,再运行,完美通过。
有疑问的话可以再下面留言,基本上每天都会登CSDN,会的一定会回的


