Android自定义流式布局-FlowLayout
Android自定义流式布局-FlowLayout
FlowLayout我们经常会用到,例如在热门标签里,新闻App中关注的频道等。之前我在用的时候也是经常要去找大神们写好的代码,直接改吧改吧就用了,但是有时候阅读代码、修改代码并不是一件简单的事,所以,我就自己琢磨了下怎样才能写出一个自定义的FlowLayout呢?后来有幸看了鸿洋大神的视频,并根据自己的理解完成了FlowLayout,下面我会详细的记录下我完成这个自定义FlowLayout的步骤。鸿洋大神的视频链接:FlowLayout
一、何为流式布局
我们来看一张图
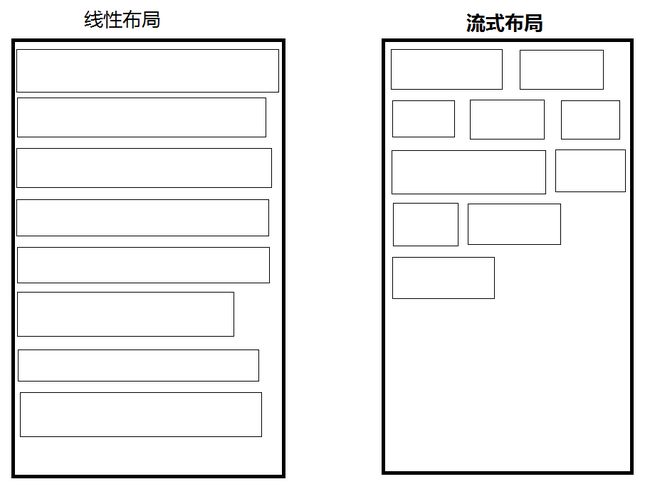
左边的就是我们正常使用的线性布局,右边的就是流式布局。流式布局的特点就是,它会判断当前行的剩余宽度是否可以容纳下一个View的宽度,如果可以就将View放在后面,否则,就换行。
二、实现效果
图中所显示的是多选效果,我们也会实现单选效果,在这里就不放图了,好了,废话不多说,我们开始干起来吧。
三、开始干
1.自定义属性
在看到效果图时,我们就要想到是否需要自定义属性,如果有自定义属性,我们需要哪些自定义属性。就我们现在看到的效果而言,我们需要在res/values中新建attrs.xml文件,定义一些自定义属性:
<resources>
    // 是否是多选模式
    <attr name="flow_isMultiSelect" format="boolean" />
    // 多选模式下,正常的view的背景
    <attr name="flow_background_normal" format="reference" />
    // 多选模式下,被选中的view的背景
    <attr name="flow_background_selected" format="reference" />
    // 单选模式下,view的背景
    <attr name="flow_background" format="reference" />
    // textView的字体大小
    <attr name="flow_textSize" format="dimension" />
    // textView的字体颜色
    <attr name="flow_textColor" format="color" />
    // 多选模式下,textView被选中的字体颜色
    <attr name="flow_textSelectedColor" format="color" />
    // 内边距
    <attr name="flow_padding" format="dimension" />
    <declare-styleable name="FlowLayout">
        <attr name="flow_isMultiSelect" />
        <attr name="flow_background_normal" />
        <attr name="flow_background_selected" />
        <attr name="flow_background" />
        <attr name="flow_textSelectedColor" />
        <attr name="flow_textSize" />
        <attr name="flow_textColor" />
        <attr name="flow_padding" />
    declare-styleable>
resources>
ok,自定义属性文件已经写好,如果大家对自定义属性有疑惑的话,就去搜索一下,我就不赘述了。
2.自定义FlowLayout
- 新建一个FlowLayout继承ViewGroup,并实现三种构造方法,重写onLayout、onMeasure、generateLayoutParams。
public class FlowLayout extends ViewGroup {
    public FlowLayout(Context context) {
        this(context,null);
    }

    public FlowLayout(Context context, AttributeSet attrs) {
        this(context, attrs,0);
    }

    public FlowLayout(Context context, AttributeSet attrs, int defStyleAttr) {
        super(context, attrs, defStyleAttr);
    }

    @Override
    protected void onMeasure(int widthMeasureSpec, int heightMeasureSpec) {
        super.onMeasure(widthMeasureSpec, heightMeasureSpec);
    }

    @Override
    protected void onLayout(boolean changed, int l, int t, int r, int b) {

    }

    @Override
    public LayoutParams generateLayoutParams(AttributeSet attrs) {
        return super.generateLayoutParams(attrs);
    }
}
在这里有一个要注意的地方是,我们新建的类名要和attrs.xml中declare-styleable标签的name属性值一致,否则在我们后面获取自定义属性值时会获取不到。
现在,我们整个代码的框架基本上已经搭好了,接下来就是具体实现了。
- 根据自定义属性初始化一些全局变量
    private static final boolean DEFAULT_ISMULTISELECT = false;// 默认单选
    private static final int DEFAULT_TEXT_SIZE = 14;//默认字体大小
    private static final int DEFAULT_TEXT_COLOR = 0XFF383838;// 默认字体颜色
    private static final int DEFAULT_TEXT_SELECTED_COLOR = 0XFFCD6600;// 默认字体颜色
    private static final int DEFAULT_PADDING = 6;// 默认内边距
    private int mTextSize = sp2px(DEFAULT_TEXT_SIZE);// 字体大小
    private int mTextColor = DEFAULT_TEXT_COLOR;// 字体颜色
    private int mTextSelectedColor = DEFAULT_TEXT_SELECTED_COLOR;// 被选中后的字体颜色
    private int padding = dp2px(DEFAULT_PADDING);// 内边距
    private boolean isMultiSelect = DEFAULT_ISMULTISELECT;// 是否多选
    private int backgroundNormal = R.drawable.flow_background_normal;// 多选时正常的背景
    private int backgroundSelected = R.drawable.flow_background_selected;// 多选时被选中的背景
    private int background = R.drawable.flow_background;// 单选时被选中的背景

    // 是否需要动画效果
private boolean isNeedAnim = true;- 是时候获取自定义属性值了,当然,我们如何设置自定义属性值,下面再说。
// 在有自定义属性时调用
public FlowLayout(Context context, AttributeSet attrs, int defStyleAttr) {
   super(context, attrs, defStyleAttr);
   // 获取自定义属性值
   TypedArray typedArray = context.getTheme().obtainStyledAttributes(attrs, R.styleable.FlowLayout, defStyleAttr, 0);
   // 自定义字体大小,默认值是初始化时设置的
   mTextSize = typedArray.getInt(R.styleable.FlowLayout_flow_textSize, mTextSize);
   // 自定义字体颜色,默认值是初始化时设置的
   mTextColor = typedArray.getInt(R.styleable.FlowLayout_flow_textColor, mTextColor);
   // 自定义字体被选中颜色,默认值是初始化时设置的
   mTextSelectedColor = typedArray.getInt(R.styleable.FlowLayout_flow_textSelectedColor, mTextSelectedColor);
   // 自定义内边距,默认值是初始化时设置的
   padding = typedArray.getInt(R.styleable.FlowLayout_flow_padding, padding);
   // 自定义是否多选,默认值是初始化时设置的
   isMultiSelect = typedArray.getBoolean(R.styleable.FlowLayout_flow_isMultiSelect, isMultiSelect);
   if (isMultiSelect) {
      // 自定义多选模式下,正常背景,默认值是初始化时设置的
      backgroundNormal = typedArray.getResourceId(R.styleable.FlowLayout_flow_background_normal, R.drawable.flow_background_normal);
      // 自定义多选模式下,被选中背景,默认值是初始化时设置的
      backgroundSelected = typedArray.getResourceId(R.styleable.FlowLayout_flow_background_selected, R.drawable.flow_background_selected);
   } else
      // 自定义单选模式背景,默认值是初始化时设置的
      background = typedArray.getResourceId(R.styleable.FlowLayout_flow_background, R.drawable.flow_background);
   // 一定要释放
   typedArray.recycle();
}
那么,这里就要说到为什么我们只实现带有3个参数的构造方法了。带有1个参数的构造方法是在我们new这个ViewGroup对象时调用的,带有2个参数的构造方法是我们使用布局文件时调用的,带有3个参数的构造方法是我们使用自定义属性时调用的。我们上面让1个参数的构造方法调用2个参数的构造方法,2个参数的构造方法又调用3个参数的构造方法,所以我们只需要实现这个带有3个参数的构造方法就可以了。当然,如果大家不需要自定义属性的话,也可以使用2个参数的构造方法。
- 测量子View的宽高与ViewGroup的宽高
    @Override
    protected void onMeasure(int widthMeasureSpec, int heightMeasureSpec) {
        // 获取测量宽度的模式
        int widthMode = MeasureSpec.getMode(widthMeasureSpec);
        // 获取宽度的测量值
        int widthSize = MeasureSpec.getSize(widthMeasureSpec);
        // 获取高度的测量模式
        int heightMode = MeasureSpec.getMode(heightMeasureSpec);
        // 获取高度的测量值
        int heightSize = MeasureSpec.getSize(heightMeasureSpec);
        //最终需要测量的ViewGroup的宽高
        int width = 0;
        int height = 0;
        //一行的宽度和高度
        int lineWidth = 0;
        int lineHeight = 0;
        // 获取子View 的数量
        int childCount = getChildCount();
        for (int i = 0; i < childCount; i++) {
            // 获取每一个子View,并测量子View的宽高
            View childView = getChildAt(i);
            measureChild(childView, widthMeasureSpec, heightMeasureSpec);
            // 获取子View 的LayoutParams
            MarginLayoutParams lp = (MarginLayoutParams) childView.getLayoutParams();
            // 获取子View的宽高
            int childWidth = childView.getMeasuredWidth() + lp.leftMargin + lp.rightMargin;
            int childHeight = childView.getMeasuredHeight() + lp.topMargin + lp.bottomMargin;
            // 判断已有的一行的宽度+当前子View的宽度是否大于父控件的宽度,则需要换行
            if (lineWidth + childWidth > widthSize - getPaddingLeft() - getPaddingRight()) {
                // 获取一行的最大宽度
                width = Math.max(lineWidth, width);
                // 重置一行的宽度为当前子View 的宽度
                lineWidth = childWidth;
                // 父控件的高度等于父控件原高度加上当前的行高度
                height += lineHeight;
                // 将行高度重置为子View的高度
                lineHeight = childHeight;
            } else {
                // 未换行时
                // 一行的宽度等于之前的宽度加上当前子View 的宽度
                lineWidth += childWidth;
                // 一行的高度等于之前的高度与当前子View的高度的最大值
                lineHeight = Math.max(lineHeight, childHeight);
            }
            // 最后一行时,我们还未考虑
            // 当循环到最后一个子View时
            if (i == getChildCount() - 1) {
                // 获取一行的最大宽度
                width = Math.max(lineWidth, width);
                // 父控件的高度等于父控件原高度加上当前的行高度
                height += lineHeight;
            }
        }
        // 测量方法
        setMeasuredDimension(
                widthMode == MeasureSpec.EXACTLY ? widthSize : width,
                heightMode == MeasureSpec.EXACTLY ? heightSize : height);

        super.onMeasure(widthMeasureSpec, heightMeasureSpec);
    }
在onMeasure方法中,我们需要了解MeasureSpec的三种测量模式:
- MeasureSpec.EXACTLY:精确值测量,如设置宽度200dp或者match_parent等;
- MeasureSpec.AT_MOST:最多不能超过某个值,如wrap_content,最多不能超过父控件的宽高;
- MeasureSpec.UNPECIFIED:不限制大小,使用与ListView、ScrollView中,使用的较少。
解释一下测量的逻辑:
1.首先,获取宽高的测量模式与测量值;
2.其次,测量子View的宽高:

这是子View循环测量宽高,并测量父控件在MeasureSpec.AT_MOST模式下的宽高的逻辑图,图中给出的是大致的逻辑,我们还要考虑到父控件的padding值,子View的margin值以及最后一行的测量考虑,具体的还要看代码,相信大家都能看懂。
在代码里有一个MarginLayoutParams,那是因为,我们在当前的需求下只需要考虑到子View的margin值,而不需要考虑其他的,所以可以使用MarginLayoutParams。
3.设置测量值,当父控件的宽高是MeasureSpec.EXACTLY模式,则直接将我们获取到的测量值widthSize与heightSize设置,如果不是,则设置我们根据子View测量得到的值。这里我们不考虑MeasureSpec.UNPECIFIED模式。
- 设置ViewGroup的LayoutParams
    @Override
    public LayoutParams generateLayoutParams(AttributeSet attrs) {
        return new MarginLayoutParams(getContext(), attrs);
    }
在上面已经说过为啥用MarginLayoutParams,这里就不赘述了。
- 为所有的子View布局
最最重要的部分来了,废话不多说,先贴代码
    @Override
    protected void onLayout(boolean changed, int l, int t, int r, int b) {
        if (changed) {
            allChildViewLayout();
        }
    }

    /**
     * 给所有的子View布局
     */
    private void allChildViewLayout() {
        // 父控件的宽度
        int parentWidth = getMeasuredWidth();
        // 行宽度
        int lineWidth = 0;
        // 行高度
        int lineHeight = 0;
        // 父控件的左内边距
        int leftPadding = getPaddingLeft();
        // 父控件的右内边距
        int rightPadding = getPaddingRight();
        // 父控件的上内边距
        int topPadding = getPaddingTop();
        // 每个子View的左坐标
        int left;
        // 每个子View的上坐标
        int top = 0;
        // 循环取出所有的子View
        for (int i = 0; i < getChildCount(); i++) {
            View childView = getChildAt(i);
            // 获取子View 的LayoutParams
            MarginLayoutParams lp = (MarginLayoutParams) childView.getLayoutParams();
            // 获取子View的宽高
            int childWidth = childView.getMeasuredWidth();
            int childHeight = childView.getMeasuredHeight();

            // 判断已有的一行的宽度+当前子View的宽度是否大于父控件的宽度,则需要换行
            if (lineWidth + childWidth + lp.leftMargin + lp.rightMargin > parentWidth - leftPadding - rightPadding) {
                // 重置一行的宽度为当前子View 的宽度
                lineWidth = childWidth + lp.leftMargin + lp.rightMargin;
                // 设置left,top
                left = leftPadding + lp.leftMargin;
                top += lineHeight;
                // 重置行高
                lineHeight = childHeight + lp.topMargin + lp.bottomMargin;
            } else {
                // 设置left
                left = leftPadding + lineWidth + lp.leftMargin;
                // 设置行宽度
                lineWidth += childWidth + lp.leftMargin + lp.rightMargin;
                // 设置行高度
                lineHeight = Math.max(lineHeight, childHeight + lp.topMargin + lp.bottomMargin);
            }
            int lc = left;
            int tc = top + lp.topMargin + topPadding;
            int rc = lc + childWidth;
            int bc = tc + childHeight;
            childView.layout(lc, tc, rc, bc);
        }
    }
onLayout方法中的逻辑与onMeasure方法中逻辑有些类似,我就不画图了,相信理解了onMeasure方法的大家看段代码应该不难。
onLayout方法中最主要做的事就是确定left与top的值,当这两个值确定后,就可以根据childView的测量宽高画出这个childView了。
- 添加子View,并为子View添加点击事件
    private OnClickListener mListener;
    // 在多选模式下,存储被点击的View的position
    private List posList = new ArrayList<>();
    // 在多选模式下,存储被点击的文本
    private List titleList = new ArrayList<>();
    // 在多选模式下,存储被点击的View
    private List viewList = new ArrayList<>();

    /**
     * 自定义一个点击事件接口
     */
    public interface OnClickListener {
        // 单选模式下
        void onClick(TextView view, int position);

        // 多选模式下
        void onClick(List viewList, List posList, List textList);
    }

    /**
     * 设置点击事件接口
     *
     * @param listener
     */
    public void setOnClickListener(OnClickListener listener) {
        this.mListener = listener;
    }

    /**
     * 动态添加button
     *
     * @param titles 文本数组
     * @param margin 外边距
     */
    public void generateButton(String[] titles, int margin) {
        generateButton(titles, margin, margin, margin, margin);
    }

    /**
     * 动态添加button
     *
     * @param titles 文本集合
     * @param margin 外边距
     */
    public void generateButton(List titles, int margin) {
        generateButton(titles, margin, margin, margin, margin);
    }

    /**
     * 动态添加button
     *
     * @param titles        文本数组
     * @param margin_left   左外边距
     * @param margin_top    上外边距
     * @param margin_right  右外边距
     * @param margin_bottom 下外边距
     */
    public void generateButton(String[] titles, int margin_left, int margin_top, int margin_right, int margin_bottom) {
        for (int i = 0; i < titles.length; i++) {
            String title = titles[i];
            setButtonWithTitle(margin_left, margin_top, margin_right, margin_bottom, title, i);
        }
    }

    /**
     * 动态添加button
     *
     * @param titles        文本集合
     * @param margin_left   左外边距
     * @param margin_top    上外边距
     * @param margin_right  右外边距
     * @param margin_bottom 下外边距
     */
    public void generateButton(List titles, int margin_left, int margin_top, int margin_right, int margin_bottom) {
        for (int i = 0; i < titles.size(); i++) {
            String title = titles.get(i);
            setButtonWithTitle(margin_left, margin_top, margin_right, margin_bottom, title, i);
        }
    }

    /**
     * 设置button
     */
    private void setButtonWithTitle(int margin_left, int margin_top, int margin_right, int margin_bottom, final String title, final int position) {
        final TextView textView = new TextView(getContext());
        // 设置View的LayoutParams
        MarginLayoutParams lp = new MarginLayoutParams(LayoutParams.WRAP_CONTENT, LayoutParams.WRAP_CONTENT);
        // 设置margin值
        lp.leftMargin = dp2px(margin_left);
        lp.topMargin = dp2px(margin_top);
        lp.rightMargin = dp2px(margin_right);
        lp.bottomMargin = dp2px(margin_bottom);
        textView.setLayoutParams(lp);
        // 设置padding值
        textView.setPadding(padding, padding / 4, padding, padding / 4);
        // 设置文本
        textView.setText(title);
        // 设置字体大小
        textView.setTextSize(mTextSize);
        // 设置字体默认颜色
        textView.setTextColor(mTextColor);
        // 根据是否多选设置背景
        textView.setBackgroundResource(isMultiSelect ? backgroundNormal : background);
        // 添加点击事件,因为点击事件被我们占用,所以我们需要释放出一个接口,以便用户处理点击事件
        textView.setOnClickListener(new View.OnClickListener() {
            @Override
            public void onClick(View v) {
                // 如果需要点击时动画,则添加动画,默认添加
                if (isNeedAnim)
                    v.startAnimation(getSelectedAnim());
                // 判断是否多选,执行不同的流程
                if (!isMultiSelect)
                    mListener.onClick((TextView) v, position);
                else {
                    boolean isExist = false;
                    for (int i = 0; i < posList.size(); i++) {
                        if (position == posList.get(i)) {
                            viewList.remove(i);
                            posList.remove(i);
                            titleList.remove(i);
                            textView.setBackgroundResource(backgroundNormal);
                            textView.setTextColor(mTextColor);
                            isExist = true;
                            break;
                        }
                    }
                    if (!isExist) {
                        viewList.add(textView);
                        posList.add(position);
                        titleList.add(title);
                        textView.setTextColor(mTextSelectedColor);
                        textView.setBackgroundResource(backgroundSelected);
                    }
                    mListener.onClick(viewList, posList, titleList);
                }
            }
        });
        // 将每个子View添加到ViewGroup中
        addView(textView);
    }

    /**
     * 获取View被点击时的动画
     *
     * @return
     */
    private Animation getSelectedAnim() {
        ScaleAnimation anim = new ScaleAnimation(1f, 1.2f, 1f, 1.2f, Animation.RELATIVE_TO_SELF, 0.5f, Animation.RELATIVE_TO_SELF, 0.5f);
        anim.setFillAfter(false);
        anim.setDuration(100);
        return anim;
    }
    /**
     * dp转px
     */
    private int dp2px(int dpValue) {
        return (int) TypedValue.applyDimension(TypedValue.COMPLEX_UNIT_DIP, dpValue, getResources().getDisplayMetrics());
    }

    /**
     * sp转px
     */
    private int sp2px(int spValue) {
        return (int) TypedValue.applyDimension(TypedValue.COMPLEX_UNIT_SP, spValue, getResources().getDisplayMetrics());
} - 提供设置属性的方法
    /**
     * 设置是否多选
     * 须在调用generateButton()方法之前调用
     *
     * @param isMultiSelect
     */
    public void setIsMultiSelect(boolean isMultiSelect) {
        this.isMultiSelect = isMultiSelect;
    }

    /**
     * 多选模式下设置正常状态的背景
     * 须在调用generateButton()方法之前调用
     *
     * @param resId
     */
    public void setBackgroundNormal(int resId) {
        backgroundNormal = resId;
    }

    /**
     * 多选模式下设置选中状态的背景
     * 须在调用generateButton()方法之前调用
     *
     * @param resId
     */
    public void setBackgroundSelected(int resId) {
        backgroundSelected = resId;
    }

    /**
     * 单选模式下设置背景
     * 须在调用generateButton()方法之前调用
     *
     * @param resId
     */
    public void setBackground(int resId) {
        background = resId;
    }

    /**
     * 设置字体大小
     * 须在调用generateButton()方法之前调用
     *
     * @param size
     */
    public void setTextSize(int size) {
        mTextSize = size;
    }

    /**
     * 设置字体颜色
     * 须在调用generateButton()方法之前调用
     *
     * @param color
     */
    public void setTextColor(int color) {
        mTextColor = color;
    }

    /**
     * 设置被选中后的字体颜色
     *
     * @param color
     */
    public void setTextSelectedColor(int color) {
        mTextSelectedColor = color;
    }

    /**
     * 设置是否需要动画效果
     *
     * @param isNeed
     */
    public void setNeedAnimation(boolean isNeed) {
        isNeedAnim = isNeed;
    }

    /**
     * 内边距
     *
     * @param padding
     */
    public void setPadding(int padding) {
        this.padding = dp2px(padding);
   }
至此,我们的FlowLayout就已经全部写完了,相信大家理解起来应该不是很难,可能比较难一些的就是onMeasure方法与onLayout方法的逻辑,大家可以在草稿纸上多画画,多想想,一定可以想通的。
- 在MainActivity中测试
activity_main.xml:
<com.kevinlee.flowlayout.FlowLayout xmlns:android="http://schemas.android.com/apk/res/android"
    xmlns:kevin="http://schemas.android.com/apk/res/com.kevinlee.flowlayout"
    android:id="@+id/fl"
    android:layout_width="match_parent"
    android:layout_height="match_parent"
    android:padding="10dp"
    kevin:flow_isMultiSelect="true"
    kevin:flow_background_normal="@drawable/flow_background_normal"
    kevin:flow_background_selected="@drawable/flow_background_selected"
    kevin:flow_background="@drawable/flow_background"
    >

com.kevinlee.flowlayout.FlowLayout>
这里我只测试了一部分的自定义属性,其他的大家可以自己去测试一下,包括FLowLayout的width与height。
大家如果要在布局文件中定义自定义属性,则需要声明命名空间:xmlns:kevin=”http://schemas.android.com/apk/res/com.kevinlee.flowlayout”
kevin:大家可以换成你们想换的;
com.kevinlee.flowlayout:是我这个工程的包名,大家换成你们的包名,然后在下面使用就可以了。
MainActivity.java
public class MainActivity extends Activity {

    private FlowLayout fl;
    private String[] titles = new String[]{"titles", "titles123234", "titles welcome", "titles lalala", "titles",
            "titles", "titles321", "titles hello", "titles come on", "titles", "titles haha", "titles 456", "titles"};

    @Override
    protected void onCreate(Bundle savedInstanceState) {
        super.onCreate(savedInstanceState);
        setContentView(R.layout.activity_main);
        initViews();
    }

    /**
     * 初始化View
     */
    private void initViews() {
        fl = (FlowLayout) findViewById(R.id.fl);
        fl.setTextSize(14);
        fl.setPadding(10);
        // 此方法需要在自定义属性之后调用
        fl.generateButton(titles, 5);
        fl.setOnClickListener(new FlowLayout.OnClickListener() {
            @Override
            public void onClick(TextView view, int position) {
                Toast.makeText(MainActivity.this, view.getText() + "," + position, Toast.LENGTH_LONG).show();
            }

            @Override
            public void onClick(List viewList, List posList, List textList) {
                StringBuffer sb = new StringBuffer();
                for (int i = 0; i < viewList.size(); i++) {
                    int position = posList.get(i);
                    String title = textList.get(i);
                    sb.append(title + "," + position + "\n");
                }
                Toast.makeText(MainActivity.this, sb.toString(), Toast.LENGTH_LONG).show();
            }
        });
    }
}
好了,整个工程就结束了,希望可以帮到有需要的人,如果写的不好,大家多多包涵。
github工程链接:https://github.com/KevinLeeV/FlowLayout
CSDN资源链接:http://download.csdn.net/detail/kevinlxy/9691694