SpringBoot2.0+版本和以前版本相比出现的一些问题
1、SpringBoot访问html必须是html5的版本,html4不能访问报405
2、不支持put、delete请求,需在application.properties配置文件里手动配置:
spring.mvc.hiddenmethod.filter.enabled=true
3、SpringBoot2.0+拦截器后 , 静态资源会被拦截问题;在2.0之前的spring boot拦截器是不会拦截静态资源的
拦截器处理方法
实现自定义拦截器只需要3步:
1、创建我们自己的拦截器类并实现 HandlerInterceptor 接口。
2、创建一个Java类继承WebMvcConfigurerAdapter,并重写 addInterceptors 方法。
2、实例化我们自定义的拦截器,然后将对像手动添加到拦截器链中。
先来自定义一个MyInterceptor拦截器;
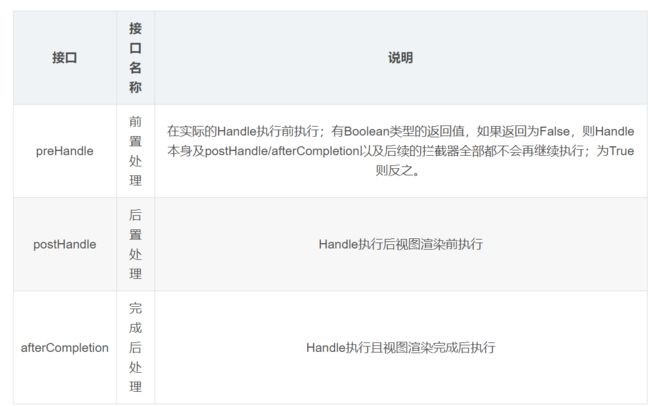
拦截器一般需要继承HandlerInterceptor接口,并需要实现以下三个接口方法:
package com.atguigu.springboot.component;

import org.springframework.web.servlet.HandlerInterceptor;
import org.springframework.web.servlet.ModelAndView;
import javax.servlet.http.HttpServletRequest;
import javax.servlet.http.HttpServletResponse;

/**
 * 登陆检查,登录拦截器
 */
public class LoginHandlerInterceptor implements HandlerInterceptor {

    //目标方法执行之前
    @Override
    public boolean preHandle(HttpServletRequest request, HttpServletResponse response, Object handler) throws Exception {
        Object user = request.getSession().getAttribute("loginUser");
        System.out.println("拦截用户========"+user);
        if(user == null){
            //未登陆,返回登陆页面
            request.setAttribute("msg","没有权限请先登陆");
            request.getRequestDispatcher("/index.html").forward(request,response);
            return false;
        }else{
            //已登陆,放行请求
            return true;
        }

    }

    @Override
    public void postHandle(HttpServletRequest request, HttpServletResponse response, Object handler, ModelAndView modelAndView) throws Exception {

    }

    @Override
    public void afterCompletion(HttpServletRequest request, HttpServletResponse response, Object handler, Exception ex) throws Exception {

    }
}
package com.atguigu.springboot.config;

import com.atguigu.springboot.component.LoginHandlerInterceptor;
import com.atguigu.springboot.component.MyLocaleResolver;
import org.springframework.context.annotation.Bean;
import org.springframework.context.annotation.Configuration;
import org.springframework.web.servlet.LocaleResolver;
import org.springframework.web.servlet.config.annotation.InterceptorRegistry;
import org.springframework.web.servlet.config.annotation.ViewControllerRegistry;
import org.springframework.web.servlet.config.annotation.WebMvcConfigurerAdapter;

/**
 * 使用WebMvcConfigurerAdapter可以扩展SpringMVC的功能
 */
//@EnableWebMvc  不要接管springmvc
@Configuration
public class MymvcConfig extends WebMvcConfigurerAdapter {
    @Override
    public void addViewControllers(ViewControllerRegistry registry) {
        //super.addViewControllers(registry);
        //浏览器发送/atguigu,请求来到success
        registry.addViewController("/atguigu").setViewName("success");
    }

    //所有的WebMvcConfigurerAdapter都會一起起作用
    @Bean//将组件注册在容器中
    public WebMvcConfigurerAdapter webMvcConfigurerAdapter(){
        WebMvcConfigurerAdapter adapter = new WebMvcConfigurerAdapter() {
            向WebMvcConfigurerAdapter组件添加拦截器
            @Override
            public void addInterceptors(InterceptorRegistry registry) {
                //super.addInterceptors(registry);
                //静态资源 :*.css  *.js
                //SpringBoot 已经做好了静态资源映射
                registry.addInterceptor(new LoginHandlerInterceptor()).addPathPatterns("/**")
                        .excludePathPatterns("/index.html","/","user/login","/asserts/**","/user/login","/webjars/bootstrap/**");
            }

            //向WebMvcConfigurerAdapter组件添加视图控制器
            @Override
            public void addViewControllers(ViewControllerRegistry registry) {
                //super.addViewControllers(registry);
                registry.addViewController("/").setViewName("login");
                registry.addViewController("/index.html").setViewName("login");
                registry.addViewController("/main.html").setViewName("dashboard");
            }

        };
        return adapter;
    }
    @Bean
    public LocaleResolver localeResolver(){
        return new MyLocaleResolver();
    }

}
public void addInterceptors(InterceptorRegistry registry) {
//拦截处理操作的匹配路径 //放开静态拦截
registry.addInterceptor(new LoginHandlerInterceptor()).addPathPatterns("/**") //拦截所有路径
.excludePathPatterns("/index.html","/","user/login","/user/login");//排除路径 .excludePathPatterns("/asserts/**","/webjars/bootstrap/**");//排除静态资源拦截
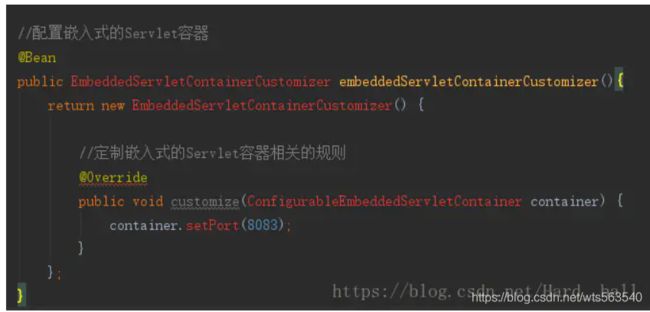
4、Spring Boot2.0以上版本EmbeddedServletContainerCustomizer被WebServerFactoryCustomizer替代
下面是自己结合原文根据自己练手的项目做的一些小修改:
在自己的Server配置类里面添加配置嵌入式的Servlet容器的组件EmbeddedServletContainerCustomizer不存在
使用WebServerFactoryCustomizer接口替换EmbeddedServletContainerCustomizer组件完成对嵌入式Servlet容器的配置
,配置代码如下:
@Bean
    public WebServerFactoryCustomizer webServerFactoryCustomizer(){
        return new WebServerFactoryCustomizer() {
            @Override
            public void customize(ConfigurableWebServerFactory factory) {
                factory.setPort(8081);
            }
        };
    }
5、springboot2.0x 配置执行 schema.sql 脚本
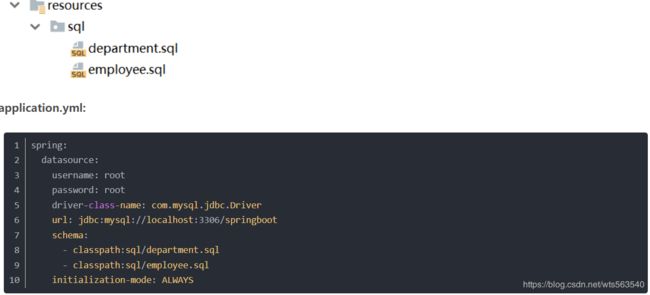
springboot2.0x 执行schema.sql脚本注意要加上一个配置:spring.datasource.initialization-mode=always表示始终执行初始化。
默认执行的sql脚本是在类路径下,名为schema.sql,要想修改,可以通过 spring.datasource.schema 指定。
例如:
sql脚本位置:
6、Spring安全及java.lang.IllegalArgumentException:There is no PasswordEncoder mapped for the id错误
java.lang.IllegalArgumentException: There is no PasswordEncoder mapped for the id “null”
在Spring Security 5.0之前,默认值PasswordEncoder是NoOpPasswordEncoder需要纯文本密码。在Spring Security 5中,默认值为DelegatingPasswordEncoder,这需要密码存储格式。
解决方案1:- 添加密码存储格式,对于纯文本,添加
{noop}
7、Springboot2.0以上版本配置RedisCacheManage
先看Springboot1.5的配置方法
@Configuration
public class MyRedisConfig {
@Bean
public RedisTemplate RedisTemplate(
RedisConnectionFactory redisConnectionFactory)
throws UnknownHostException {
RedisTemplate template = new RedisTemplate();
template.setConnectionFactory(redisConnectionFactory);
//采用Jackson2JsonRedisSerializer序列化机制
Jackson2JsonRedisSerializer Springboot2.0版本以上的配置方式
@Configuration
public class MyRedisConfig {

    @Bean
    public RedisCacheManager cacheManager(RedisConnectionFactory connectionFactory) {
        //初始化一个RedisCacheWriter输出流
        RedisCacheWriter redisCacheWriter = RedisCacheWriter.nonLockingRedisCacheWriter(connectionFactory);
		//采用Jackson2JsonRedisSerializer序列化机制
        Jackson2JsonRedisSerializer serializer = new Jackson2JsonRedisSerializer(Employee.class);
		//创建一个RedisSerializationContext.SerializationPair给定的适配器pair
        RedisSerializationContext.SerializationPair pair = RedisSerializationContext.SerializationPair.fromSerializer(serializer);
		//创建CacheConfig
        RedisCacheConfiguration defaultCacheConfig = RedisCacheConfiguration.defaultCacheConfig().serializeValuesWith(pair);

        return new RedisCacheManager(redisCacheWriter, defaultCacheConfig);
    }
}


