Unity 一些有用的碎片知识整理 之 四 (持续更新中...)
Unity 一些有用的碎片知识整理 之 四 (持续更新中...)
—— 系列文章链接
Unity 一些有用的碎片知识整理 之 一 点击可跳转链接
Unity 一些有用的碎片知识整理 之 二 点击可跳转链接
Unity 一些有用的碎片知识整理 之 三 点击可跳转链接
目录
Unity 一些有用的碎片知识整理 之 四 (持续更新中...)
五十二、Unity Android 端无需多余Android架包,直接 Unity 端代码,调起 Android 其他 APK
五十三、Unity 模拟实现磁铁的吸附效果
五十四、Unity中反转模型的法线(Normal)
五十五、Unity Mesh 或者 粒子系统绘制点云效果
五十六、鼠标点击屏幕,屏幕坐标转为世界坐标赋值给物体
五十二、Unity Android 端无需多余Android架包,直接 Unity 端代码,调起 Android 其他 APK
using UnityEngine;

public class CallApp : MonoBehaviour
{
    // Start is called before the first frame update
    void Start()
    {

    }

    void OnGUI() {

        if (GUILayout.Button("LoadApk"))
        {
            openPackage("com.xan.test");
        }

    }

    void openPackage(string pkgName)
    {
        using (AndroidJavaClass jcPlayer = new AndroidJavaClass("com.unity3d.player.UnityPlayer"))
        {
            using (AndroidJavaObject joActivity = jcPlayer.GetStatic("currentActivity"))
            {
                using (AndroidJavaObject joPackageManager = joActivity.Call("getPackageManager"))
                {
                    using (AndroidJavaObject joIntent = joPackageManager.Call("getLaunchIntentForPackage", pkgName))
                    {
                        if (null != joIntent)
                        {
                            joActivity.Call("startActivity", joIntent);
                        }
                    }
                }
            }
        }
    }
}
五十三、Unity 模拟实现磁铁的吸附效果
1、Physics.OverlapSphere 获取周边的吸附物体
2、rigidbody.AddExplosionForce 给对应的物体添加吸附力效果
3、效果图(在范围外的求吸附不了,添加阻力的球吸附较慢)
4、实现步骤
1)给吸力物体添加脚本 Magnetic
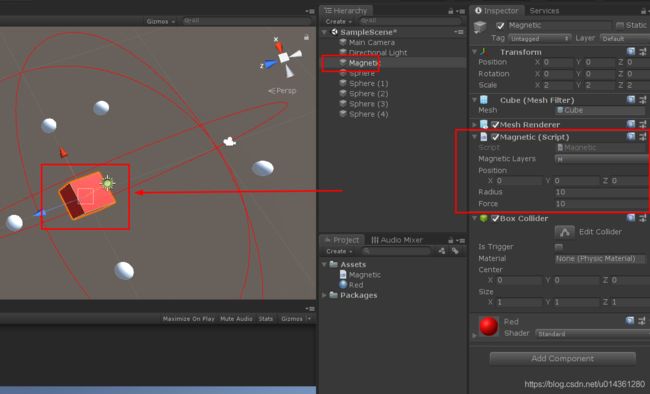
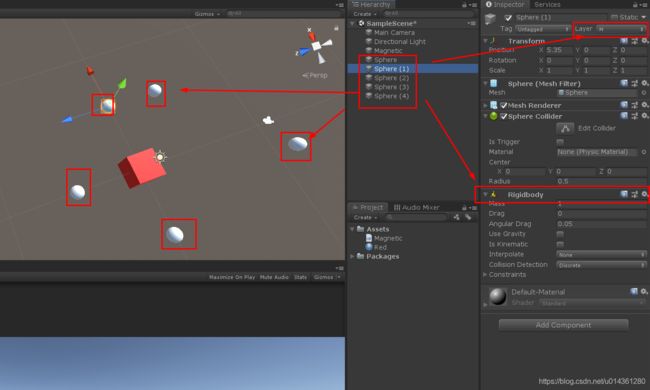
2)给要被吸附的物体添加刚体和设置为指定吸附层
3)运行场景
5、实现代码
using System.Collections;
using System.Collections.Generic;
using UnityEngine;

public class Magnetic : MonoBehaviour
{
    public LayerMask m_MagneticLayers;//作用的层
    public Vector3 m_Position;//磁铁在物体的相对位置
    public float m_Radius; //磁铁作用的范围
    public float m_Force;//定义物体的力
    void FixedUpdate()
    {
        Collider[] colliders;
        Rigidbody rigidbody;
        colliders = Physics.OverlapSphere(transform.position + m_Position, m_Radius, m_MagneticLayers);
        foreach (Collider collider in colliders)
        {
            rigidbody = (Rigidbody)collider.gameObject.GetComponent(typeof(Rigidbody));
            if (rigidbody == null)
            {
                continue;
            }
            rigidbody.AddExplosionForce(m_Force * -1, transform.position + m_Position, m_Radius);
        }
    }
    void OnDrawGizmosSelected()
    {
        Gizmos.color = Color.red;
        Gizmos.DrawWireSphere(transform.position + m_Position, m_Radius);//绘制一个球(有利于我们的观察)
    }
}
五十四、Unity中反转模型的法线(Normal)
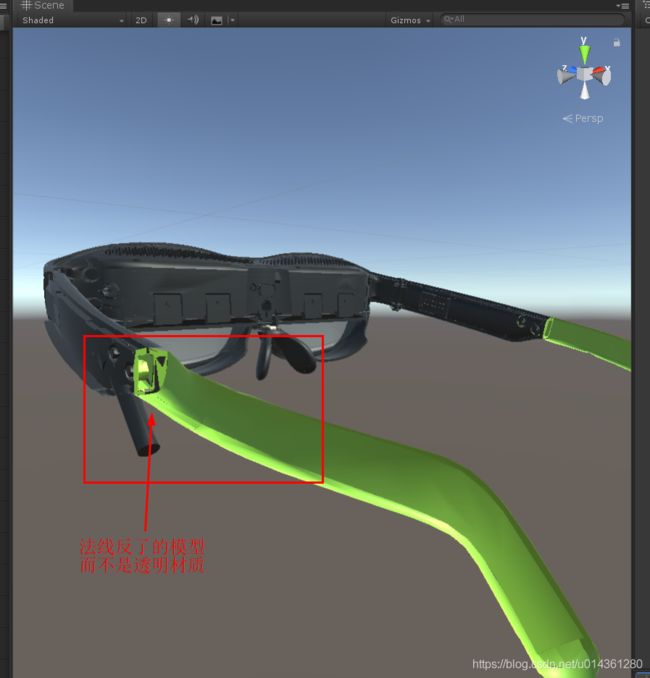
有时候从3dmax或者Maya 导出的模型中的某些模型的法线反了,不是透明的模型,有了透明的感觉。
当然最好的方式就是让美工修改过来,重新导出。
在特别的情况下Unity也可以适当解决一下,通过修改 MeshFilter 的 mesh.triangles 的顺序,简单实现反转法线的效果。
using System.Collections;
using System.Collections.Generic;
using UnityEngine;

public class InversionOfTheNormal : MonoBehaviour
{

    public GameObject target;

    // Start is called before the first frame update
    void Start()
    {
        ToInverseNormal();
    }

    // Update is called once per frame
    void Update()
    {

    }

    ///
    /// Mesh.vertices中,保存的是图形的顶点信息。
    /// Mesh.triangles中,保存的是对应于Mesh.vertices的顶点的索引。就是一个三角形在渲染中的三个顶点的顺序,所以Mesh.triangles的长度应该是3的倍数(Mesh.triangles的类型为int[])
    ///
    void ToInverseNormal() {

        int[] triangles = target.GetComponent().mesh.triangles;
        for (int i = 0; i < triangles.Length; i += 3)
        {
            // 交换第一点跟第三点的位置
            int t = triangles[i];
            triangles[i] = triangles[i + 2];
            triangles[i + 2] = t;
        }
        target.GetComponent().mesh.triangles = triangles;
    }

}

下面是参考的资料:
直接上干货
        Vector3[] normals = line.GetComponent().mesh.normals;
        for (int i = 0; i < normals.Length; i++) {
            normals[i] = -normals[i];
        }
        line.GetComponent().mesh.normals = normals;

        int[] triangles = line.GetComponent().mesh.triangles;
        for (int i = 0; i < triangles.Length; i += 3) {
            int t = triangles[i];
            triangles[i] = triangles[i + 2];
            triangles[i + 2] = t;
        }
        line.GetComponent().mesh.triangles = triangles;
刚开始想到做法线翻转,只想到了直接把法线取负值,就是第一段代码
        Vector3[] normals = line.GetComponent().mesh.normals;
        for (int i = 0; i < normals.Length; i++) {
            normals[i] = -normals[i];
        }
        line.GetComponent().mesh.normals = normals;
结果是这样子:

就是一个没有任何光线信息的样子(纯黑)
然后呢,我就一直百度,以求找到解决办法,百度了一个晚上,都是说,“为什么不到3dmax/MAYA中翻转法线呢”,你大爷的!
然后转战Google,5分钟后解决问题= =
        int[] triangles = line.GetComponent().mesh.triangles;
        for (int i = 0; i < triangles.Length; i += 3) {
            int t = triangles[i];
            triangles[i] = triangles[i + 2];
            triangles[i + 2] = t;
        }
        line.GetComponent().mesh.triangles = triangles;
加上了第二段代码之后,是这样子的:

(是的,我做的是卡通渲染的描边,没使用shader)
Mesh.vertices中,保存的是图形的顶点信息。Mesh.triangles中,保存的是对应于Mesh.vertices的顶点的索引。就是一个三角形在渲染中的三个顶点的顺序,所以Mesh.triangles的长度应该是3的倍数(Mesh.triangles的类型为int[])
那为什么要交换第一点跟第三点的位置呢?

假如现在一个三角形是由P0、P1、P2,三个点组成的一个三角形。
那么,他的绘制的顺序应该是这样子的:
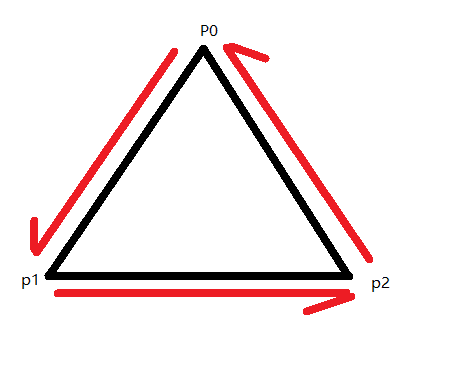
呈现一个逆时针的样子。图形学中(前几天看蓝宝书看到的,忘了是OpenGL中的还是说图形学中都是这样,请指正。Ps. 应该是逆时针吧)将拥有逆时针环绕的多边形为正面。
即上面这个三角形为正面
若我们从屏幕后面那个方向看这个三角形的话,那你看到的是他的背面。
当我们交换三角形的第一点跟第三点后,他的渲染顺序将变成这样子:

变成了从P2到P1再到P0的这么一个顺序。即这个三角形现在是一个顺时针环绕,我们看到的这个面,是他的背面。
在Unity中,默认的渲染是不会渲染背面的。
这样子就会出现刚才的这个效果
五十五、Unity Mesh 或者 粒子系统绘制点云效果

1、粒子系统绘制点云实现
using UnityEngine;
using System.Collections;
using System.IO;

public class DrawParticlePoint : MonoBehaviour {

    ParticleSystem particleSystem;                  // 整个粒子系统
    int pointCount;                                 // 粒子数目

    ArrayList list = new ArrayList();

    // Use this for initialization
    void Start()
    {
        particleSystem = GetComponent();

        // 1. 读取数据
        list = ReadFile();

        //2.粒子显示
        DrawPointCloud(list);

    }

    ArrayList ReadFile()
    {
        // 提前将点云存成csv文件放在Assert/StreamingAssets文件夹下,文本的每行代表一个点,由点的x,y,z
        //csv文件存储数据,用逗号分隔,比较容易读取处理
        string path = (Application.streamingAssetsPath + "/" + "elephant.csv");
        FileInfo fInfo = new FileInfo(path);

        string s = "";
        StreamReader r;
        ArrayList vecList = new ArrayList();

        if (fInfo.Exists)
        {
            r = new StreamReader(path);
        }
        else
        {
            Debug.Log("文件不存在");
            return null;
        }
        // 点云数据存入队列
        while ((s = r.ReadLine()) != null)
        {
            string[] words = s.Split(","[0]);

            Vector3 xyz = new Vector3(float.Parse(words[0]), -float.Parse(words[1]), float.Parse(words[2])) * 10;
            vecList.Add(xyz);
        }

        return vecList;
    }

    ParticleSystem.Particle[] allParticles;         // 所有粒子的集合
    void DrawPointCloud(ArrayList drawList)
    {
        var main = particleSystem.main;
        main.startSpeed = 0.0f;                           // 设置粒子的初始速度为0
        main.startLifetime = 1000.0f;

        var pointCount = drawList.Count;
        allParticles = new ParticleSystem.Particle[pointCount];
        main.maxParticles = pointCount;
        particleSystem.Emit(pointCount);
        particleSystem.GetParticles(allParticles);
        for (int i = 0; i < pointCount; i++)
        {
            allParticles[i].position = (Vector3)drawList[i];    // 设置每个点的位置
            allParticles[i].startColor = Color.yellow;    // 设置每个点的rgb
            allParticles[i].startSize = 0.02f;
        }

        particleSystem.SetParticles(allParticles, pointCount);      // 将点云载入粒子系统
    }
}
2、Mesh 绘制实现
using UnityEngine;
using System.Collections;
using System.IO;
public class DrawMeshPointCloud : MonoBehaviour
{
ArrayList list = new ArrayList();
void Start()
{
// 1. 读取数据
list = ReadFile();
// 2. 渲染
CreateMesh();
}
ArrayList ReadFile()
{
// 提前将点云存成csv文件放在Assert/StreamingAssets文件夹下,文本的每行代表一个点,由点的x,y,z
//csv文件存储数据,用逗号分隔,比较容易读取处理
string path = (Application.streamingAssetsPath + "/" + "elephant.csv");
FileInfo fInfo = new FileInfo(path);
string s = "";
StreamReader r;
ArrayList vecList = new ArrayList();
if (fInfo.Exists)
{
r = new StreamReader(path);
}
else
{
Debug.Log("文件不存在");
return null;
}
// 点云数据存入队列
while ((s = r.ReadLine()) != null)
{
string[] words = s.Split(","[0]);
Vector3 xyz = new Vector3(float.Parse(words[0]), -float.Parse(words[1]), float.Parse(words[2])) * 10;
vecList.Add(xyz);
}
return vecList;
}
void CreateMesh()
{
int num = list.Count;
GameObject pointObj = new GameObject();
pointObj.name = "new";
//处理大象朝向
pointObj.transform.rotation = Quaternion.Euler(new Vector3(180, -180, 0));
pointObj.AddComponent();
pointObj.AddComponent();
Mesh meshNeed = new Mesh();
Material mat = new Material(Shader.Find("Custom/VertexColor"));
pointObj.GetComponent().mesh = meshNeed;
pointObj.GetComponent().material = mat;
Vector3[] points = new Vector3[num];
Color[] colors = new Color[num];
int[] indecies = new int[num];
for (int i = 0; i < num; ++i)
{
points[i] = (Vector3)list[i];
indecies[i] = i;
colors[i] = Color.white;
}
meshNeed.vertices = points;
meshNeed.colors = colors;
meshNeed.SetIndices(indecies, MeshTopology.Points, 0);
}
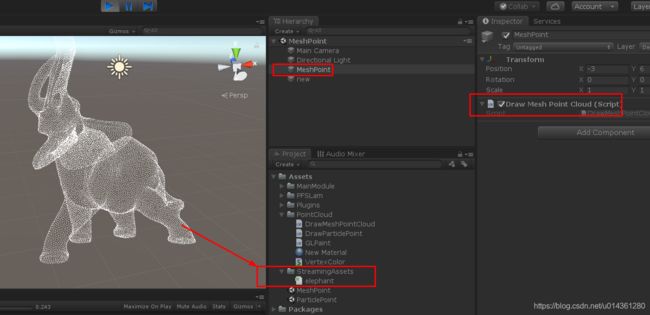
} 3、数据存放到StreamingAssets文件夹下
(文件可以到链接下载 https://download.csdn.net/download/u014361280/11985614)
4、里面用到的shader
// Upgrade NOTE: replaced 'mul(UNITY_MATRIX_MVP,*)' with 'UnityObjectToClipPos(*)'

Shader "Custom/VertexColor" {
	SubShader{
		Pass{
		LOD 200

		CGPROGRAM
#pragma vertex vert
#pragma fragment frag

		struct VertexInput {
		float4 v : POSITION;
		float4 color: COLOR;
	};

	struct VertexOutput {
		float4 pos : SV_POSITION;
		float4 col : COLOR;
	};

	VertexOutput vert(VertexInput v) {

		VertexOutput o;
		o.pos = UnityObjectToClipPos(v.v);
		o.col = v.color;

		return o;
	}

	float4 frag(VertexOutput o) : COLOR{
		return o.col;
	}

		ENDCG
	}
	}

}
五十六、鼠标点击屏幕,屏幕坐标转为世界坐标赋值给物体
using UnityEngine;

public class ScreenPosition : MonoBehaviour
{
    public GameObject cube;
    // Start is called before the first frame update
    void Start()
    {

    }


    void Update()
    {
        // 获取物体的屏幕坐标,世界坐标->屏幕坐标
        Vector3 mousePos = Input.mousePosition;
        Debug.Log("x = " + mousePos.x + ", y = " + mousePos.y + ", z = " + mousePos.z);
        mousePos.z = 10;
        Vector3 wolrdPos = Camera.main.ScreenToWorldPoint(mousePos);
        Debug.Log("wolrdPosx = " + wolrdPos.x + ", wolrdPosy = " + wolrdPos.y + ", wolrdPosz = " + wolrdPos.z);
        cube.transform.position = wolrdPos;
    }


}