Andorid资源瘦身去重丶图片压缩丶混淆插件(1)
前介
APK 瘦身是很多公司忽略的问题,因为现在网速快速发展以及流量的降费,这个问题也越来越被忽略。但是大项目还是很在意瘦身的,支付宝对瘦身就做到了极致(参考链接)。
网上大部分的方案都是:
- 压缩图片
- 减少多余的so
- 删除无用资源
- 代码混淆
这些方案大部分都是在编写代码时期做的操作,容易出错和遗漏,我觉得这都算不上什么瘦身只能说是常识。于是我想能不能开发一款插件,在 APK 编译期间对 Apk 进行一系列的优化呢?
Android的Plugin插件
现在的 Android 集成开发工具 Android Studio 构建 APK 是通过 Gralde 脚本去构建,Gradle 完美兼容 Groovy Java Kotlin 语法。所以说 Android Studio 只是一个集成开发工具,没有这个工具我们也能 打包 运行 安装 APK。
我们每个项目根路径都有一个 build.gradle 配置文件。开发 Android 根目录里面会配置一个 classpath 'com.android.tools.build:gradle:x.x.x' 的配置。这意思就是要 Android 的编译插件,这里面定义了所有的 Apk打包,签名,安装等的一系列 Task。
buildscript {
    ....
    dependencies {
        ....
        classpath 'com.android.tools.build:gradle:x.x.x'
    }
}
classpath 'com.android.tools.build:gradle:x.x.x'是基于Gralde开发的,所以他们是有一个对应版本对象关系的。
一般我们升级自己项目的Gralde也需要去升级下Android编译插件。查看版本对应关系
最后我们会在项目的 build.gradle 配置使用插件,apply plugin: 'com.android.application' 或 apply plugin: 'com.android.library',也就是使用插件啦。
输出Apk编译的所有Task
根据上面的内容,我们知道了 APK 的打包流程,都是通过 apply plugin: 'com.android.application' 顺序执行 Task 完成的。我们来看看输出的有哪些 Task 吧。
在 App 项目中 build.gradle 编写以下代码。
project.afterEvaluate {
    def tasks = ['preDebugBuild',
                 'compileDebugAidl',
                 'compileDebugRenderscript',
                 'checkDebugManifest',
                 'generateDebugBuildConfig',
                 'prepareLintJar',
                 'generateDebugResValues',
                 'generateDebugResources',
                 'mergeDebugResources',
                 'createDebugCompatibleScreenManifests',
                 'processDebugManifest',
                 'splitsDiscoveryTaskDebug',
                 'processDebugResources',
                 'generateDebugSources',
                 'javaPreCompileDebug',
                 'compileDebugJavaWithJavac',
                 'compileDebugNdk',
                 'compileDebugSources',
                 'mergeDebugShaders',
                 'compileDebugShaders',
                 'generateDebugAssets',
                 'mergeDebugAssets',
                 'transformClassesWithDexBuilderForDebug',
                 'transformDexArchiveWithExternalLibsDexMergerForDebug',
                 'transformDexArchiveWithDexMergerForDebug',
                 'mergeDebugJniLibFolders',
                 'transformNativeLibsWithMergeJniLibsForDebug',
                 'processDebugJavaRes',
                 'transformResourcesWithMergeJavaResForDebug',
                 'validateSigningDebug',
                 'packageDebug',
                 'assembleDebug'
    ]
    for (String taskName : tasks) {
        printTaskInputsOutputs(taskName)
    }
}

def printTaskInputsOutputs(String taskName) {
    def realTask = project.tasks.findByName(taskName)

    if (realTask) {
        println 'find ' + taskName + ' task -----------------------'

        realTask.doLast {
            realTask.inputs.files.each { fileTemp ->
                println 'input file:' + fileTemp.absolutePath
            }

            println '---------------------------------------------------'
            realTask.outputs.files.each { fileTemp ->
                println 'output file:' + fileTemp.absolutePath
            }
        }
    }
}
我查看了部分
Task的输入输出,并不是所有哦,大家可以自行输出一个项目的所有Task或者官网Task依赖关系(相信我你会疯掉的)。
创建插件工程
大家用什么工具开发呢?我反正用的是 Android studio ,当然你也可以用 InteliJ IDEA 他俩兄弟都是可以通过 Gralde 构建项目的。
我用的是 Android studio ,因为是给 APP 用比较方便调试。
-
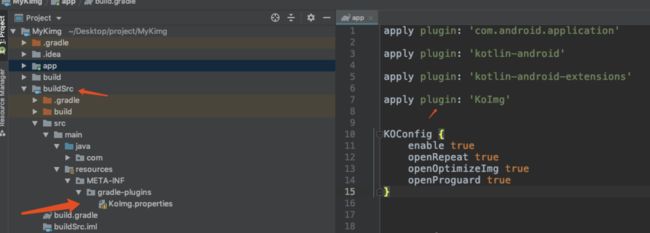
在工程目录中创建文件夹
buildSrc,一定要是buildSrc文件夹哦。因为这样命名的项目,无需将插件项目打包在本地也可以在任意子项目使用插件(相当方便哦)。 -
创建
buildSrc/build.gradle文件,编写以下内容,由于我用的是Kotlin编写,所以我依赖了Kotlin插件(也可以用Groovy语法哦)。
apply plugin: 'java'
apply plugin: 'kotlin'


sourceCompatibility = 1.8

buildscript {
    ext.kotlin_version = '1.3.50'
    repositories {
        jcenter()
        google()

    }
    dependencies {
        classpath "org.jetbrains.kotlin:kotlin-gradle-plugin:$kotlin_version"
    }
}

allprojects {
    repositories {
        jcenter()
        google()
    }
}

dependencies {
    implementation gradleApi()
    implementation localGroovy()
    implementation 'com.android.tools.build:gradle:3.3.0'
    implementation 'org.jetbrains.kotlinx:kotlinx-coroutines-core:1.3.2'
    implementation "pink.madis.apk.arsc:android-chunk-utils:0.0.7"
}

compileKotlin {
    kotlinOptions.jvmTarget = "1.8"
}
compileTestKotlin {
    kotlinOptions.jvmTarget = "1.8"
}
- 创建插件入口
buildSrc/src/main/java/com/qihoo/koimg/KoImgPlugin.kt,插件的入口,所有的开始都是从个类出发。
class KoImgPlugin : Plugin {

    override fun apply(project: Project) {
        println("我要起飞来!!")
    }
}
-
项目创建路径
buildSrc/src/main/resources/META-INF/gradle-plugins/KoImg.properties(记住KoImg.properties的文件昵称,因为在子项目使用的的apply plugin: 'XXX',用的就是这个文件的昵称)
文件里面的内容写implementation-class=com.qihoo.koimg.KoImgPlugin,第 2 步骤创建类的全路径名。 -
直接在应用项目的
build.gradle加入apply plugin: 'KoImg'即可。
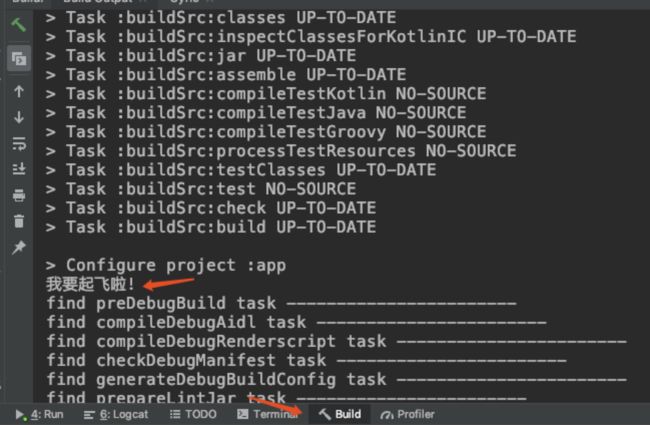
好啦,随便运行下,就能在 Build 控制台中看到。
总结
这章节只负责教大家搭建一个简单的 Plugin 工程,以及 Apk 是如何编译的,下一篇正式讲解资源优化。
源代码
QOptimize 插件是一款,在 Apk 编译期间对 Apk 进行体积优化的一款插件。
git地址
博客地址

