特征金字塔网络代码详解——FPN的Tensorflow版本
FPN的代码详解——特征提取
- 特征提取原理
- 对应代码分析
特征金字塔网络最早于2017年发表于CVPR,与Faster RCNN相比其在多池度特征预测的方式使得其在小目标预测上取得了较好的效果。FPN也作为mmdeteciton的Neck模块,成为常用的目标检测策略之一。分别提供论文地址 特征金字塔论文地址以及代码链接 Github链接。
本文以介绍论文中的原理以及其具体的实现方式为主,代码的环境配置和以及各个脚本文件的内容会根据需要补充。按照数据读入到输出的过程带大家走一遍流程。
特征提取原理
![]()
FPN与传统Faster RCNN框架相比,其最大的创新点就是自底向上又自顶向下的金字塔结构。图中A对应的特征图金字塔,直接利用不同大小的图像进行预测推理,图中B是传统的单池度预测,选择网络输出的最后一层的结果进行预测,图中C的层次金字塔则是在不同池度的特征图上进行预测。到FPN则是在层次金字塔的基础上,将相邻层的特征进行融合得到新的特征图,作为特征信息进行预测。
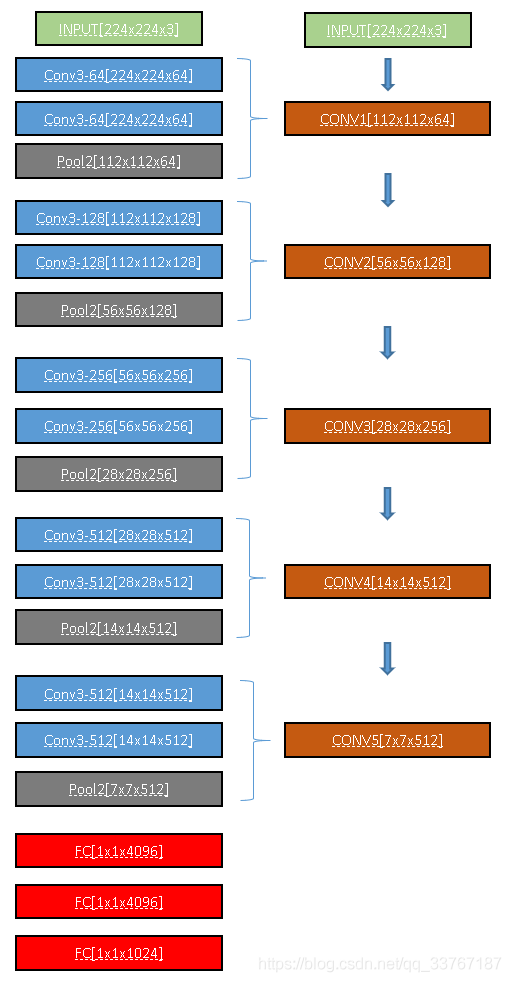
- 自底向上:自底向上即对应着CNN网络的特征提取的过程,以VGG16为例。VGG16由13个卷积层、3个全连接层以及5个池化层组成。那么在特征提取的过程中,每经过一层Max-pooling层,特征图大小就会缩放为原来的1/4。将卷积到每个池化操作合并为一次特征提取过程,记作CONV。那么VGG16可以视为由5个CONV层+3个FC层组成。

图中是VGG16的网络示意图,每个CONV块由2个3x3的卷积以及一个步长为2的最大池化构成,实现了对特征图在HxW上的信息变为原来的1/4,而通道信息变为原来的2倍。那么把这样的一系列操作记作CONV,特征图宽高的缩放通过POOL实现,而通道的升维通过3x3的卷积实现。(选择不同的backbone的CONV的实现方式不同,但结果一致),那么通过5个CONV操作得到的特征图C5即是单特征图预测的输入。而层次金字塔则通过不同CONV层输出的特征图C_list={C1,C2,C3,C4,C5}中选择后三层作为RPN的输入进行预测。
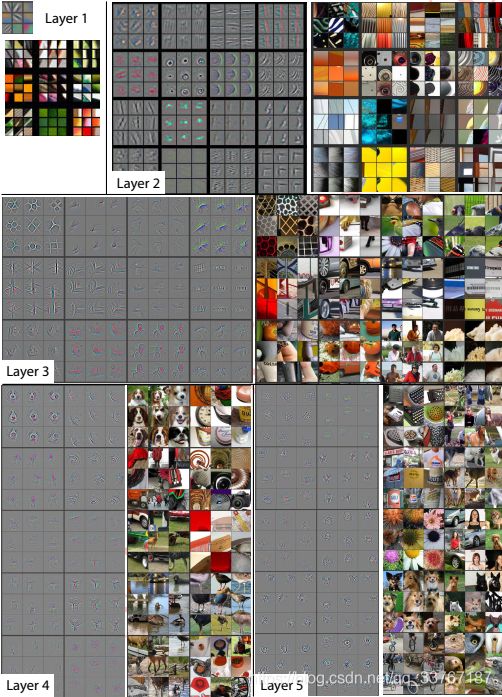
那么我们可以将通过不同的CONV模块获得C_list的一系列操作的过程称为自底向上。也就是传统CNN中的特征提取阶段。 - 自顶向下:与传统CNN不同,FPN在得到C_list之后没有直接选择其作为RPN的输入进行目标预测,而是将不同层的特征相融合来获得更加充分的信息。这一操作的思想是基于浅层的卷积层往往包含更多纹理、形状等特征,而高层的卷积层则包含更多的语义信息。将二者有效结合起来则能更好的提升网络的表达能力。

可以看到,随着网络层数的加深,提取到的特征可视化后就越抽象。如果仅仅选用C_list中的某一层进行预测,则无法利用到其他层的语义信息。特征利用不充分。

为了充分利用不同层的语义信息,FPN将最高层C5的通道数通过1x1的卷积固定到256得到融合层特征P5。而P4则是通过将P5层通过双线性插值的方式上采样到14x14x256大小,再与C4层通过1x1卷积固定通道得到的结果相加,实现相邻层之间的特征融合。以此类推即可相应的得到P3和P2层特征。而P6层特征则是通过对P5层用max-pooling的方式下采样得到的,注意有些博客写的是通过C6层得到的,是不对的。那么我们将通过特征融合的方式将高层语义传播到低层卷积得到P_list的过程叫做自顶向下。
对应代码分析
在掌握原理的前提下就比较好对代码进行消化吸收了。在讲代码的时候我会从/FPN_Tensorflow_master/libs/networks/build_whole_network.py开始讲起。这一部分对应着网络的搭建,也就是Tensorflow构建图的过程。根据讲解的需要会调到具体的函数仔细分析,类似于你在Debug的过程。主要带大家体会一下Tensor在图中流动的感觉。
那么我们要看的第一个函数就是build_whole_detection_network这个函数,在这里我们搭建了整个FPN框架。我会依次的讲解FPN的每个部件是如何实现的。
def build_whole_detection_network(self, input_img_batch, gtboxes_batch):

    if self.is_training:
        # ensure shape is [M, 5]
        gtboxes_batch = tf.reshape(gtboxes_batch, [-1, 5])
        gtboxes_batch = tf.cast(gtboxes_batch, tf.float32)

    img_shape = tf.shape(input_img_batch)

    # 1. build base network
    P_list = self.build_base_network(input_img_batch)  # [P2, P3, P4, P5, P6]
这里我们可以看到,函数的输入由两部分构成:图片Batch以及标签Batch。在训练时将gtboxes_batch变形为(N,5)的tensor,其中N为批次大小。img_shape这里存储了图片形状以便后面使用。
而FPN用来预测的特征图则是通过build_base_network函数实现的。
def build_base_network(self, input_img_batch):

    if self.base_network_name.startswith('resnet_v1'):
        return resnet.resnet_base(input_img_batch, scope_name=self.base_network_name, is_training=self.is_training)

    elif self.base_network_name.startswith('MobilenetV2'):
        return mobilenet_v2.mobilenetv2_base(input_img_batch, is_training=self.is_training)

    else:
raise ValueError('Sry, we only support resnet or mobilenet_v2')这里根据全局变量cfgs文件中的输入选择不同的Backbone来得到P_list。这个版本的代码只支持ResNet和MobileNet两个网络,本文仅以ResNet为例。根据调用我们接着看resnet_base这个函数(这里我不全粘贴,根据需求只粘贴部分代码片。)
def resnet_base(img_batch, scope_name, is_training=True):
    '''
    this code is derived from light-head rcnn.
    https://github.com/zengarden/light_head_rcnn

    It is convenient to freeze blocks. So we adapt this mode.
    '''
    if scope_name == 'resnet_v1_50':
        middle_num_units = 6
    elif scope_name == 'resnet_v1_101':
        middle_num_units = 23
    else:
        raise NotImplementedError('We only support resnet_v1_50 or resnet_v1_101. Check your network name....yjr')

    blocks = [resnet_v1_block('block1', base_depth=64, num_units=3, stride=2),
              resnet_v1_block('block2', base_depth=128, num_units=4, stride=2),
              resnet_v1_block('block3', base_depth=256, num_units=middle_num_units, stride=2),
              resnet_v1_block('block4', base_depth=512, num_units=3, stride=1)]
函数输入为图像Batch、变量名称以及是否为训练。变量名用来判断选择ResNet50还是ResNet101,其主要改变的是CONV4中残差单元的个数。这里采用的是瓶颈残差单元,用Conv1x1、Conv3x3、Conv1x1来代替Conv3x3的卷积操作。这样可以在低纬度上进行3x3运算,减少了计算代价。
![]()
其在实现的过程也是如图所示,因此每个Bottleneck包含3个卷积层。ResNet101的卷积层数=(3+4+23+3)x3=99,如果加上后续的两个FC层即101层。
def bottleneck(inputs,
               depth,
               depth_bottleneck,
               stride,
               rate=1,
               outputs_collections=None,
               scope=None):
  """Bottleneck residual unit variant with BN after convolutions.

  This is the original residual unit proposed in [1]. See Fig. 1(a) of [2] for
  its definition. Note that we use here the bottleneck variant which has an
  extra bottleneck layer.

  When putting together two consecutive ResNet blocks that use this unit, one
  should use stride = 2 in the last unit of the first block.

  Args:
    inputs: A tensor of size [batch, height, width, channels].
    depth: The depth of the ResNet unit output.
    depth_bottleneck: The depth of the bottleneck layers.
    stride: The ResNet unit's stride. Determines the amount of downsampling of
      the units output compared to its input.
    rate: An integer, rate for atrous convolution.
    outputs_collections: Collection to add the ResNet unit output.
    scope: Optional variable_scope.

  Returns:
    The ResNet unit's output.
  """
  with variable_scope.variable_scope(scope, 'bottleneck_v1', [inputs]) as sc:
    depth_in = utils.last_dimension(inputs.get_shape(), min_rank=4)
    if depth == depth_in:
      shortcut = resnet_utils.subsample(inputs, stride, 'shortcut')
    else:
      shortcut = layers.conv2d(
          inputs,
          depth, [1, 1],
          stride=stride,
          activation_fn=None,
          scope='shortcut')

    residual = layers.conv2d(
        inputs, depth_bottleneck, [1, 1], stride=1, scope='conv1')
    residual = resnet_utils.conv2d_same(
        residual, depth_bottleneck, 3, stride, rate=rate, scope='conv2')
    residual = layers.conv2d(
        residual, depth, [1, 1], stride=1, activation_fn=None, scope='conv3')

    output = nn_ops.relu(shortcut + residual)

    return utils.collect_named_outputs(outputs_collections, sc.name, output)
这里解释了ResNet50和101参数选择的影响。接着往下看:
with slim.arg_scope(resnet_arg_scope(is_training=False)):
    with tf.variable_scope(scope_name, scope_name):
        # Do the first few layers manually, because 'SAME' padding can behave inconsistently
        # for images of different sizes: sometimes 0, sometimes 1
        net = resnet_utils.conv2d_same(
            img_batch, 64, 7, stride=2, scope='conv1')
        net = tf.pad(net, [[0, 0], [1, 1], [1, 1], [0, 0]])
        net = slim.max_pool2d(
            net, [3, 3], stride=2, padding='VALID', scope='pool1')

not_freezed = [False] * cfgs.FIXED_BLOCKS + (4-cfgs.FIXED_BLOCKS)*[True]
# Fixed_Blocks can be 1~3
由于SAME padding在不同大小特征图上的不稳定性,选择手动的方式搭建C1层。首先通过一个卷积核7x7、步长为2、通道数64的卷积。再对其HW维度上下左右补一圈0,通过Max_pooling下采样得到C1层。
not_freezed控制是否冻结权重,在fine-tuning的时候可以微调网络参数。
with slim.arg_scope(resnet_arg_scope(is_training=(is_training and not_freezed[0]))):
    C2, end_points_C2 = resnet_v1.resnet_v1(net,
                                            blocks[0:1],
                                            global_pool=False,
                                            include_root_block=False,
                                            scope=scope_name)

# C2 = tf.Print(C2, [tf.shape(C2)], summarize=10, message='C2_shape')
add_heatmap(C2, name='Layer2/C2_heat')这里按照blocks给出的参数搭建CONV块,实现比较复杂,有兴趣可以自己去看一下。将C1层的结果输入得到C2层,以及C2的节点字典。add_heatmap用于绘制热力图。后续C3-C5层类似。
def add_heatmap(feature_maps, name):
    '''

    :param feature_maps:[B, H, W, C]
    :return:
    '''

    def figure_attention(activation):
        fig, ax = tfp.subplots()
        im = ax.imshow(activation, cmap='jet')
        fig.colorbar(im)
        return fig

    heatmap = tf.reduce_sum(feature_maps, axis=-1)
    heatmap = tf.squeeze(heatmap, axis=0)
    tfp.summary.plot(name, figure_attention, [heatmap])
将NHWC的tensor的通道维度求和压缩,squee去除B和C维度得到HW的热力图绘制到Tensorboard中。
feature_dict = {'C2': end_points_C2['{}/block1/unit_2/bottleneck_v1'.format(scope_name)],
                'C3': end_points_C3['{}/block2/unit_3/bottleneck_v1'.format(scope_name)],
                'C4': end_points_C4['{}/block3/unit_{}/bottleneck_v1'.format(scope_name, middle_num_units - 1)],
                'C5': end_points_C5['{}/block4/unit_3/bottleneck_v1'.format(scope_name)],
                # 'C5': end_points_C5['{}/block4'.format(scope_name)],
                }
将C2到C5层的结果保存到C_list完成自下到上过程。
pyramid_dict = {}
with tf.variable_scope('build_pyramid'):
    with slim.arg_scope([slim.conv2d], weights_regularizer=slim.l2_regularizer(cfgs.WEIGHT_DECAY),
                        activation_fn=None, normalizer_fn=None):

        P5 = slim.conv2d(C5,
                         num_outputs=256,
                         kernel_size=[1, 1],
                         stride=1, scope='build_P5')
        if "P6" in cfgs.LEVLES:
            P6 = slim.max_pool2d(P5, kernel_size=[1, 1], stride=2, scope='build_P6')
            pyramid_dict['P6'] = P6

        pyramid_dict['P5'] = P5

        for level in range(4, 1, -1):  # build [P4, P3, P2]

            pyramid_dict['P%d' % level] = fusion_two_layer(C_i=feature_dict["C%d" % level],
                                                           P_j=pyramid_dict["P%d" % (level+1)],
                                                           scope='build_P%d' % level)
        for level in range(4, 1, -1):
            pyramid_dict['P%d' % level] = slim.conv2d(pyramid_dict['P%d' % level],
                                                      num_outputs=256, kernel_size=[3, 3], padding="SAME",
                                                      stride=1, scope="fuse_P%d" % level)
for level in range(5, 1, -1):
    add_heatmap(pyramid_dict['P%d' % level], name='Layer%d/P%d_heat' % (level, level))

# return [P2, P3, P4, P5, P6]
print("we are in Pyramid::-======>>>>")
print(cfgs.LEVLES)
print("base_anchor_size are: ", cfgs.BASE_ANCHOR_SIZE_LIST)
print(20 * "__")
return [pyramid_dict[level_name] for level_name in cfgs.LEVLES]接着根据自顶到下的思想,首先计算得到P5层。后续层融合通过fusion_two_layer函数实现。再通过3x3卷积处理P4-P2,将热力图保存,返回P_list,完成特征提取过程。
def fusion_two_layer(C_i, P_j, scope):
    '''
    i = j+1
    :param C_i: shape is [1, h, w, c]
    :param P_j: shape is [1, h/2, w/2, 256]
    :return:
    P_i
    '''
    with tf.variable_scope(scope):
        level_name = scope.split('_')[1]
        h, w = tf.shape(C_i)[1], tf.shape(C_i)[2]
        upsample_p = tf.image.resize_bilinear(P_j,
                                              size=[h, w],
                                              name='up_sample_'+level_name)

        reduce_dim_c = slim.conv2d(C_i,
                                   num_outputs=256,
                                   kernel_size=[1, 1], stride=1,
                                   scope='reduce_dim_'+level_name)

        add_f = 0.5*upsample_p + 0.5*reduce_dim_c

        # P_i = slim.conv2d(add_f,
        #                   num_outputs=256, kernel_size=[3, 3], stride=1,
        #                   padding='SAME',
        #                   scope='fusion_'+level_name)
        return add_f
对于输入P进行上采样,使得于C有同样大小。对于C进行通道固定,使得其与P通道维度相同,求和实现融合。