OpenGL(十一) BMP真彩文件的显示和复制操作
glut窗口除了可以绘制矢量图之外,还可以显示BMP文件,用函数glDrawPixels把内存块中的图像数据绘制到窗口上,glDrawPixels函数原型:
glDrawPixels (GLsizei width, GLsizei height, GLenum format, GLenum type, const GLvoid *pixels);- 第一到第四个参数分别表示图象宽度、图象高度、像素数据内容、像素数据在内存中的格式。
- 第五个参数表示用于绘制的像素数据在内存中的位置。glDrawPixels函数会把该快内存中的图像数据绘制到窗口上。
glDrawPixel在窗口上绘制的位置可以由函数glRasterPos2d/glRasterPos2f定义,glRasterPos2d有两个GLdoulbe类型的参数,范围都是-1~1,(-1,-1)是窗口的左下角位置,(1,1)是窗口的右上角位置 ,(0,0)是中心位置,默认是从(-1,-1)即窗口的左下角位置开始绘制。
glPixelZoom函数可以实现把图像按比例缩放功能,两个参数分别是在x和y方向上的缩放比例。
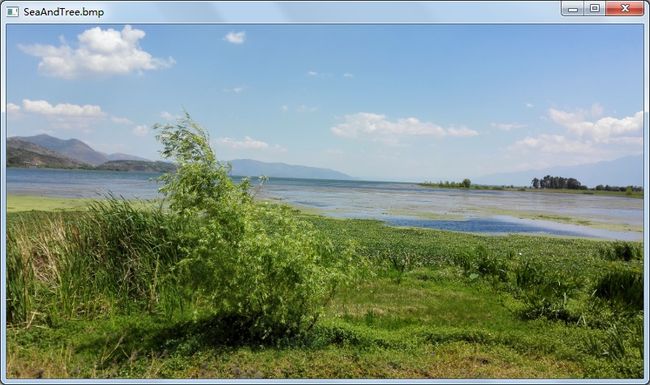
glDrawPixel的应用实例,把一幅图像的图像数据读入内存,并通过glDrawPixel绘制到窗口上:
#include "glut.h"
#include
#include

#define FileName "SeaAndTree.bmp"

static GLint    ImageWidth;  //BMP图像宽
static GLint    ImageHeight; //BMP图像高
static GLint    PixelLength;  //图像数据长度
static GLubyte* PixelData;


void ReadBmpFile()
{
	// 打开文件
	FILE* pFile = fopen("SeaAndTree.bmp", "rb");
	if( pFile == 0 )
		exit(0);

	// 读取图象的宽高信息
	fseek(pFile, 0x0012, SEEK_SET);
	fread(&ImageWidth, sizeof(ImageWidth), 1, pFile);
	fread(&ImageHeight, sizeof(ImageHeight), 1, pFile);

	// 计算像素数据长度,不足4位补齐4位
	PixelLength = ImageWidth * 3;
	while( PixelLength % 4 != 0 )
		++PixelLength;
	PixelLength *= ImageHeight;

	// 读取像素数据
	PixelData = (GLubyte*)malloc(PixelLength);
	if( PixelData == 0 )
		exit(0);

	fseek(pFile, 54, SEEK_SET);  //跳过文件头和信息头
	fread(PixelData, PixelLength, 1, pFile);

	// 关闭文件
	fclose(pFile);
}

void display(void)
{
	glClear(GL_COLOR_BUFFER_BIT);
	glPixelZoom(0.5f,0.5f);
	glRasterPos2f(-0.5,-0.5);

	// 绘制像素
	glDrawPixels(ImageWidth, ImageHeight,
		GL_BGR_EXT, GL_UNSIGNED_BYTE, PixelData);

	// 完成绘制
	glutSwapBuffers();
}

int main(int argc, char* argv[])
{
	ReadBmpFile();   //读取BMP图像数据到内存,并获取图像的宽高信息
	// 初始化GLUT并运行
	glutInit(&argc, argv);
	glutInitDisplayMode(GLUT_DOUBLE | GLUT_RGBA);
	glutInitWindowPosition(100, 100);
	glutInitWindowSize(ImageWidth, ImageHeight);
	glutCreateWindow(FileName);
	glutDisplayFunc(&display);
	glutMainLoop();
	// 释放内存
	free(PixelData);
	return 0;
}
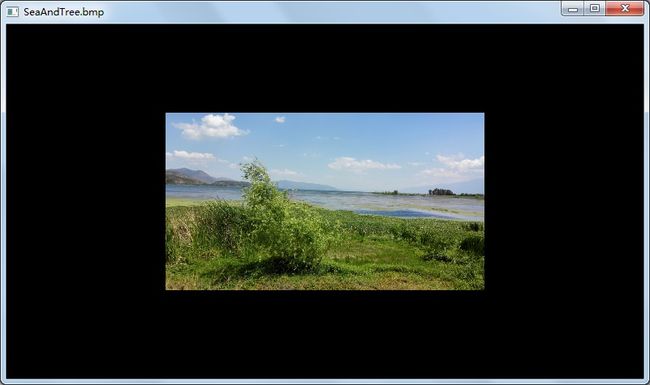
宽高缩小一半,并且改变绘制起点:
图像数据的复制
另外可以通过glCopyPixels函数实现图像数据的复制功能,glCopyPixels直接从像素数据复制出新的像素数据,避免了多余的数据的格式转换,并且可能直接由显卡负责复制,不需要经过主内存,因此效率比较高。
glCopyPixels函数原型:
glCopyPixels (GLint x, GLint y, GLsizei width, GLsizei height, GLenum type);- 第一、二个参数表示复制像素来源的矩形的左下角坐标;
- 第三、四个参数表示复制像素来源的矩形框的宽度和高度;
- 第五个参数通常使用GL_COLOR,表示复制像素的颜色;也可以是GL_DEPTH或GL_STENCIL,分别表示复制深度缓冲数据或模板缓冲数据。
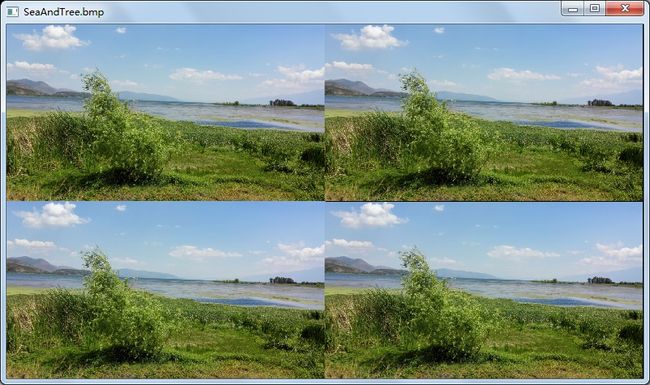
更改上边程序中的display函数,加入glCopyPixels对图像数据的复制功能:
void display(void)
{
	glClear(GL_COLOR_BUFFER_BIT);
	glPixelZoom(0.5f,0.5f);
	glRasterPos2f(-1,-1);

	// 绘制像素
	glDrawPixels(ImageWidth, ImageHeight,
		GL_BGR_EXT, GL_UNSIGNED_BYTE, PixelData);

	// 完成绘制
	glutSwapBuffers();

	//重新定义图像的缩放比例和绘制位置
	glPixelZoom(1,1);
	glRasterPos2f(0,0);

	glCopyPixels(0, 0,
		ImageWidth/2, ImageHeight/2, GL_COLOR);

	//更改图像的绘制位置为左上部分
	glRasterPos2f(-1,0);
	glCopyPixels(0, 0,
		ImageWidth/2, ImageHeight/2, GL_COLOR);

	//更改图像的绘制位置为左下部分
	glRasterPos2f(0,-1);
	glCopyPixels(0, 0,
		ImageWidth/2, ImageHeight/2, GL_COLOR);

	glutSwapBuffers();
}
读入原图像并且宽高缩小一倍后绘制,之后使用glCopyPixels复制3份图像,分别绘制在窗口的另外3个区域: