《深度学习之PyTorch实战计算机视觉》学习笔记(11)
这部分是利用pytorch 进行实战,利用RNN(循环神经网络)来实现手写字体的识别问题
代码基于python3.7, pytorch 1.0,cuda 10.0 .
PyTorch之循环神经网络实战
利用循环神经网络中的LSTM搭建网络实现手写字体的识别
import torch
import torchvision
from torchvision import datasets, transforms
from torch.autograd import Variable
import matplotlib.pyplot as plt
%matplotlib inline
# 数据预处理
transform = transforms.Compose([transforms.ToTensor(),
                               transforms.Normalize(mean = [0.5],std = [0.5])])
特别注意
这里我真的是吃了个大亏,因为是按照书本的代码进行实现,书上的写法是: transforms.Normalize(mean = [0.5,0.5.0.5],std = [0.5,0.5,0.5]).这句语句的意思就是对每张图像进行normalize,所以我不在意就照着写了,而且,这样写在实验室的pytorch 0.3(实验室的环境)版本以下是不会报错,而且可以完美运行的,这就导致我以为这么写是没问题的。而我在我自己电脑跑却出错了,报的是:RuntimeError: output with shape [1, 28, 28] doesn’t match the broadcast shape [3, 28, 28] 找了好久才注意到这里的问题,就是MNSIT这个数据集的图像是单通道的,在pytorch 1.0 的版本不能这么写,单通道只能写transforms.Normalize(mean = [0.5],std = [0.5] 若按照之前的写法,则会默认为三通道,而原图没有三通道,因此会报错。至于之前的pytorch版本可以跑,只能说是之前版本存在bug,导致不恰当的写法可以通过,现在修正了。
# 读取数据
dataset_train = datasets.MNIST(root = './data',
                              transform = transform,
                              train = True,
                              download = False)
dataset_test = datasets.MNIST(root = './data',
                             transform = transform,
                             train = False)
# 加载数据
train_load = torch.utils.data.DataLoader(dataset = dataset_train,
                                        batch_size = 64,
                                        shuffle = True)
test_load = torch.utils.data.DataLoader(dataset = dataset_test,
                                       batch_size = 64,
                                       shuffle = True)
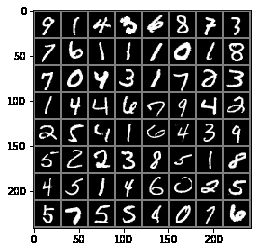
# 数据可视化
images, label = next(iter(train_load))

images_example = torchvision.utils.make_grid(images)
images_example = images_example.numpy().transpose(1,2,0) # 将图像的通道值置换到最后的维度,符合图像的格式
mean = [0.5,0.5,0.5]
std = [0.5,0.5,0.5]
images_example = images_example * std + mean
plt.imshow(images_example)
plt.show()
input_size:用于指定输入数据的特征数。
hidden_size:用于指定最后隐藏层的输出特征数。
num_layers:用于指定循环层堆叠的数量,默认会使用1。
bias:这个值默认是True,如果我们将其指定为False,就代表我们在循环层中不再使用偏置参与计算。
batch_first:在我们的循环神经网络模型中输入层和输出层用到的数据的默认维度是(seq, batch, feature),其中,seq为序列的长度,batch为数据批次的数量,feature为输入或输出的特征数。如果我们将该参数指定为True,那么输入层和输出层的数据维度将重新对应为(batch, seq, feature)。
我们定义的input_size为28,这是因为输入的手写数据的宽高为28×28,所以可以将每一张图片看作序列长度为28且每个序列中包含28个数据的组合。模型最后输出的结果是用作分类的,所以仍然需要输出10个数据,在代码中的体现就是self.output=torch.nn.Linear(128,10)。
再来看前向传播函数forward中的两行代码,首先是output,_ =self.rnn(input, None),其中包含两个输入参数,分别是input输出数据和H0的参数。在循环神经网络模型中,对隐层的初始化我们一般采用0初始化,所以这里传入的参数就是None。再看代码output =self.output(output[:,-1,:]),因为我们的模型需要处理的是分类问题,所以需要提取最后一个序列的输出结果作为当前循环神经网络模型的输出。------来自《深度学习之PyTorch实战计算机视觉》
# 搭建RNN网络
class RNN(torch.nn.Module):
    def __init__(self):
        super(RNN,self).__init__()
        self.rnn = torch.nn.RNN(
            input_size = 28,
            hidden_size = 128,
            num_layers = 2,
            batch_first = True)
        self.output = torch.nn.Linear(128,10)

    def forward(self,input):
        output, _ = self.rnn(input, None)
        output = self.output(output[:,-1,:])   # 去掉中间的batch_size维度,使得输出为图像的维度
        return output

model = RNN()
print(model)
RNN(
  (rnn): RNN(28, 128, num_layers=2, batch_first=True)
  (output): Linear(in_features=128, out_features=10, bias=True)
)
# 设置优化方法和损失函数
optimizer = torch.optim.Adam(model.parameters())
loss_f = torch.nn.CrossEntropyLoss()
# 训练函数
epoch_n = 10
for epoch in range(epoch_n):
    running_loss = 0.0
    running_correct = 0.0
    testing_correct = 0.0
    print('Epoch{}/{}'.format(epoch,epoch_n))
    print('-'*10)

    for data in train_load:
        X_train,Y_train = data
        X_train = X_train.view(-1,28,28)   #这里-1表示一个不确定的数,就是你如果不确定你想要batch size多大,但是你很肯定要reshape成28步,每步28维,那不确定的地方就可以写成-1
        X_train,Y_train = Variable(X_train),Variable(Y_train)
        y_pred = model(X_train)
        loss = loss_f(y_pred,Y_train)
        _,pred = torch.max(y_pred.data,1)

        optimizer.zero_grad()
        loss.backward()
        optimizer.step()

        running_loss += loss.data.item()
        running_correct += torch.sum(pred == Y_train.data)

    for data in test_load:
        X_test,Y_test = data
        X_test = X_test.view(-1,28,28)
        X_test,Y_test = Variable(X_test),Variable(Y_test)
        output = model(X_test)
        _,pred = torch.max(output.data,1)
        testing_correct += torch.sum(pred == Y_test.data)

print('Loss is:{:.4f}, Train ACC is:{:.4f}%, Test ACC is:{:.4f}'.format(running_loss/len(dataset_train),100*running_correct/len(dataset_train),100*testing_correct/len(dataset_test)))
Epoch0/10
----------
Epoch1/10
----------
Epoch2/10
----------
Epoch3/10
----------
Epoch4/10
----------
Epoch5/10
----------
Epoch6/10
----------
Epoch7/10
----------
Epoch8/10
----------
Epoch9/10
----------
Loss is:0.0018, Train ACC is:96.0000%, Test ACC is:95.0000
