【自定义控件】自定义View实现TextView的简单功能
1、自定义属性
自定义控件需要什么功能?
文本 text
文本颜色 textColor
文本大小 textSize
自定义属性的定义方法:
Style.xml
<resources>
<style name="AppTheme" parent="Theme.AppCompat.Light.DarkActionBar">
-- Customize your theme here. -->
<item name="colorPrimary">@color/colorPrimary
- "colorPrimaryDark"
>@color/colorPrimaryDark
- "colorAccent">@color/colorAccent
style>
<declare-styleable name="CusTextView">
<attr name="cusText" format="string" />
<attr name="cusTextSize" format="dimension" />
<attr name="cusTextColor" format="color|reference" />
declare-styleable>
resources>建议:CusTextView和自定义控件的类名一致
2、创建自定义控件
public class CusTextView extends View {

    private String cusText;
    private float cusTextSize;
    private int cusTextColor;

    public CusTextView(Context context) {
        this(context, null);
    }

    public CusTextView(Context context, AttributeSet attrs) {
        this(context, attrs, 0);
    }

    public CusTextView(Context context, AttributeSet attrs, int defStyleAttr) {
        super(context, attrs, defStyleAttr);
        //获取自定义属性
        TypedArray typedArray = context
                .getTheme()
                .obtainStyledAttributes(attrs, R.styleable.CusTextView, defStyleAttr, 0);
        //有多少个属性
        int indexCount = typedArray.getIndexCount();
        for (int i = 0; i < indexCount; i++) {
            //将属性取出来
            int index = typedArray.getIndex(i);
            switch (index) {
                case R.styleable.CusTextView_cusText:
                    cusText = typedArray.getString(index);
                    break;
                case R.styleable.CusTextView_cusTextSize:
                    cusTextSize = typedArray.getDimensionPixelSize(index,-1);
                    break;
                case R.styleable.CusTextView_cusTextColor:
                    cusTextColor = typedArray.getColor(index, Color.BLUE);
                    break;
            }
        }
    typedArray.recycle();//很占用资源,需要释放
    }
}
在as中如何使用自定义属性?
在最外层布局中引入:
xmlns:tools="http://schemas.android.com/tools"
布局:
<com.tjstudy.custextview.CusTextView
    android:layout_width="300dp"
    android:layout_height="100dp"
    android:background="#ccc"
    customerview:cusText="tjstudy"
    customerview:cusTextColor="#f00"
    customerview:cusTextSize="20sp" />
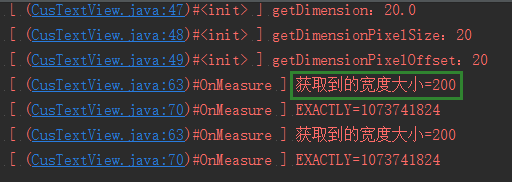
3、 在自定义控件的构造函数中打印自定义控件中设置的属性值
效果:
疑问:打印的textsize 竟然是40。为什么会是40,难道是px值?
测试:将cusTextSize设置为为20px,查看效果
结论:
自定义控件中所获取到的自定义属性的大小都是px值,会将你在自定义控件中实际设置的值转换为px。
注:在设置字体的大小和控件的宽度的时候,不需要将获取到的px转换为其他。—–如果需要直接对控件设置字体大小,mTextView.setTextSize(); 这个时候才需要进行转换。
4、将属性效果设置到界面上
怎么做?
1) 发现,有这三个方法
//测量 能够获取到父控件对child的期望 和child自己的值  这两个值来决定子控件的大小
@Override
protected void onMeasure(int widthMeasureSpec, int heightMeasureSpec) {
    super.onMeasure(widthMeasureSpec, heightMeasureSpec);
}

//子控件位置确定
@Override
protected void onLayout(boolean changed, int left, int top, int right, int bottom) {
    super.onLayout(changed, left, top, right, bottom);
}

//界面什么样子
@Override
protected void onDraw(Canvas canvas) {
    super.onDraw(canvas);
}onMeasure疑问:
这里的父控件,子控件是什么鬼?
假设:是自定义控件的父布局
验证:设置父布局的宽度300dp,自定义控件的宽度设置为100dp,然后打印下在onMeasure中获取到的宽度
widthMeasureSpec 封装了模式和大小,直接看代码
int widthMode = MeasureSpec.getMode(widthMeasureSpec);//父控件期望子控件的模式
int widthSize = MeasureSpec.getSize(widthMeasureSpec);//父控件期望子控件的大小
KLog.e("获取到的宽度大小=" + widthSize);
switch (widthMode) {
    case MeasureSpec.UNSPECIFIED://表示子布局想要多大就多大,很少使用
        KLog.e("UNSPECIFIED=" + widthMode);
    case MeasureSpec.AT_MOST://表示子布局限制在一个最大值内,一般为WARP_CONTENT
        KLog.e("AT_MOST=" + widthMode);
    case MeasureSpec.EXACTLY://一般是设置了明确的值或者是MATCH_PARENT
        KLog.e("EXACTLY=" + widthMode);
}显示结果:
200px 即为自定义控件本身的宽度
结论:
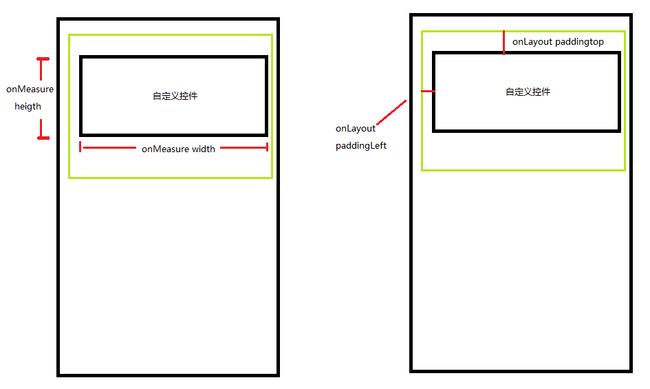
onMeasure()方法中获取到的宽高是自定义控件本身的宽高。
onLayout疑问:onLayout参数是什么意思?
假设:是padding的值,是什么的padding的值。父控件还是自定义控件自己,或者是自定义控件在屏幕上的距离。或者测试的是margin
结论:
onLayout参数是自定义控件的父控件中设置的padding,与margin无关。其实测量的就是自定义控件到父控件的距离(padding值)
2) 怎么将设置的属性展示到界面上,利用画笔画到画布上
—初始化画笔:onDraw方法属于频繁操作的方法,尽量不要在里面初始化画笔。
在构造方法里初始的画笔:
mPaint = new Paint();
mPaint.setTextSize(cusTextSize);//上面获取到的大小都px单位 由于是使用画笔画到界面上,不需要转换成dp或者sp
mPaint.setColor(cusTextColor);
//测量文字的宽高
mBounds = new Rect();
mPaint.getTextBounds(cusText, 0, cusText.length(), mBounds);—确定位置
要固定设置到一个位置上,所以需要获取到位置信息
在onDraw()中通过下列方式能够直接获取到位置
KLog.e("onDraw getWidth="+getWidth());
KLog.e("onDraw getHeight="+getHeight());//获取到的宽度和高度是onMeasure里面测量到的

KLog.e("getPaddingLeft="+getPaddingLeft());
KLog.e("getPaddingTop="+getPaddingTop());//获取到的onLayout里面的padding
对应上面的图进行位置对应。
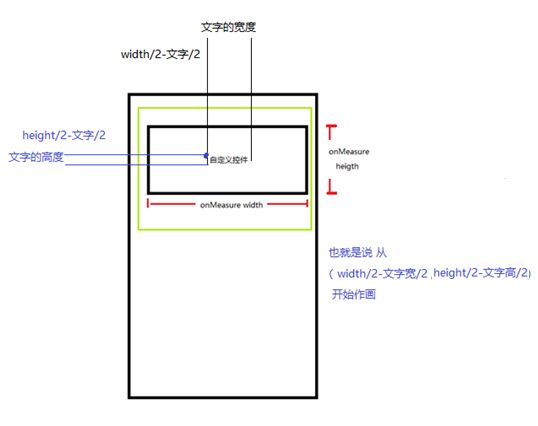
需求:我们需要将字体画到控件的中间,怎么画?
位置:
疑问:画出来的文本明显没有在自定义控件的中间。而是偏上
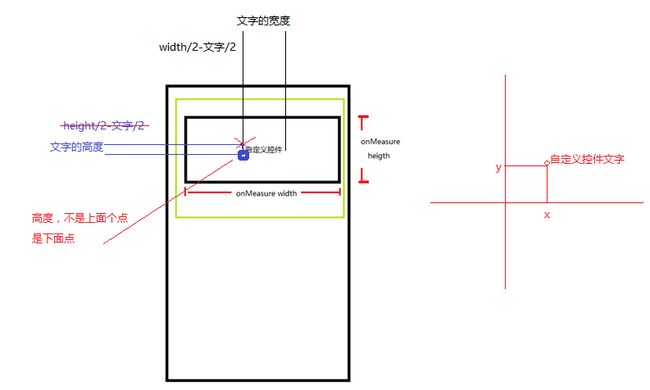
位置有误,改为(getWidth()/2-width/2,getHeigth/2+height/2)
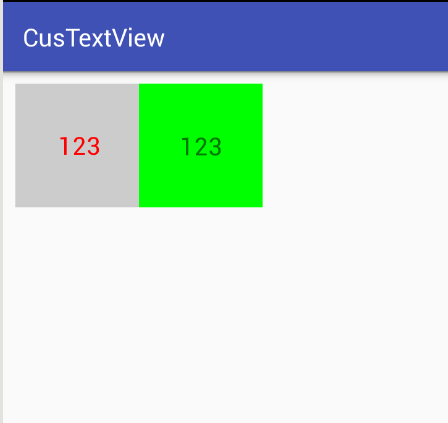
效果图:
左侧是自定义控件,右侧是一个TextView
疑问:为什么画文本的时候,是左下角的这个点开始而不是做上角?
5、自定义控件不确定宽高的情况(wrap_content)处理
默认情况下,自定义一个控件如果使用wrap_content 最终的效果是match_parent的效果。这个时候,就需要特殊处理一下。—-onMeasure()
这里,假设,wrap_content时,设置宽高为字体的宽高。
@Override
protected void onMeasure(int widthMeasureSpec, int heightMeasureSpec) {
    super.onMeasure(widthMeasureSpec, heightMeasureSpec);
    int widthMode = MeasureSpec.getMode(widthMeasureSpec);//父控件期望子控件的模式
    int widthSize = MeasureSpec.getSize(widthMeasureSpec);//父控件期望子控件的大小
    switch (widthMode) {
        case MeasureSpec.UNSPECIFIED://表示子布局想要多大就多大,很少使用
            KLog.e("UNSPECIFIED=" + widthMode);
        case MeasureSpec.AT_MOST://表示子布局限制在一个最大值内,一般为WARP_CONTENT
            widthSize = mBounds.width();

            KLog.e("AT_MOST=" + widthMode);
        case MeasureSpec.EXACTLY://一般是设置了明确的值或者是MATCH_PARENT
            KLog.e("EXACTLY=" + widthMode);
    }

    int heightMode = MeasureSpec.getMode(heightMeasureSpec);
    int heightSize = MeasureSpec.getSize(heightMeasureSpec);
    if(heightMode==MeasureSpec.AT_MOST){
        heightSize = mBounds.height();
    }

    setMeasuredDimension(widthSize,heightSize);
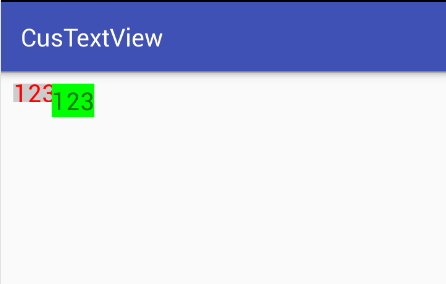
}显示效果:
自定义控件的wrap和系统的textView 效果对比。
不一样的原因:自定义控件中计算文本宽高的方式有误,存在一定的误差。
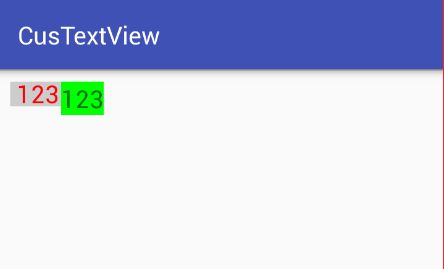
处理:当自定义控件设置为wrap的时候,设置wrap的宽高为文本的宽+10px 高+20px
效果:
关于字体居中,推荐文章:http://blog.csdn.net/carrey1989/article/details/10399727
6、自定义TextView初步学习 总结
自定义控件也是一个类,它的执行过程:
构造函数 获取自定义属性和初始化画笔(重点,怎么设置和获取自定义属性)
onMeasure 测量自定义控件的宽高
onlayout 测量自定义控件所在的父控件设置的padding 值
ondraw 将自定义控件画到界面上
7、demo下载
http://download.csdn.net/detail/u012391876/9673087


