Spark2.3.2源码解析: 4.1.Yarn cluster 模式 SparkSubmit源码分析(一)

因为所有的任务提交代表都是从SparkSubmit开始,所以先从开始看源码,但是这个估计会有点复杂,先通读一下。


准备工作:

启动脚本 --name spark-test --class WordCount --master yarn --deploy-mode cluster /A/spark-test/spark-test.jar  /tmp/zl/data/data.txt
执行jar包 spark-test.jar
代码

核心:


val conf = new SparkConf()
conf.setAppName("WordCount")
val sc = new SparkContext(conf)

val textFile = sc.textFile(args(0))
val counts = textFile.flatMap(line => line.split(" "))
  .map(word => (word, 1))
  .reduceByKey(_ + _)

println(" result  : " + counts.count())


文件下载地址:

链接:https://pan.baidu.com/s/1lCSY9bVeTIvaS9jhlPr5FA  密码:jb2z


首先从启动脚本开始看:

spark-submit --name 'spark-test'  --class WordCount --master yarn  /A/spark-test.jar /mysqlClean.sql


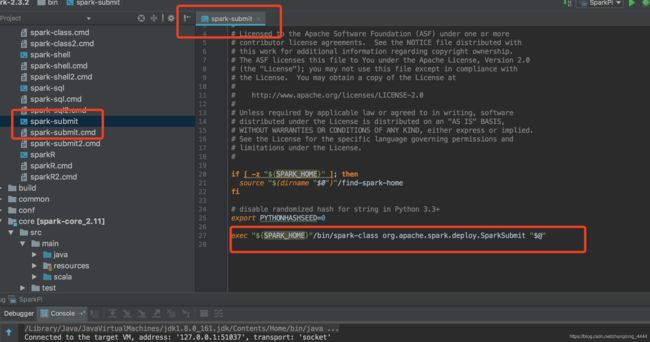
启动脚本调用的是spark-submit  ,所以直接看spark-submit脚本

Spark2.3.2源码解析: 4.1.Yarn cluster 模式 SparkSubmit源码分析(一)_第1张图片


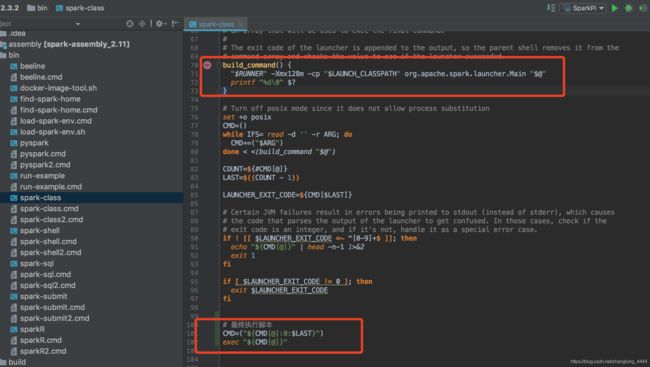
脚本里面调用的是 /bin/spark-class 脚本

所以直接看脚本

Spark2.3.2源码解析: 4.1.Yarn cluster 模式 SparkSubmit源码分析(一)_第2张图片

脚本中会调用org.apache.spark.launcher.Main 类生成shell 执行脚本,

因为前面说master和worker的启动流程的时候又说这个类作用以及里面都干了啥,

所以我直接写出输出脚本命令


/Library/java/JavaVirtualMachines/jdk1.8.0_161.jdk/Contents/Home/bin/java


-cp /workspace/spark-2.3.2/conf/:/workspace/spark-2.3.2/assembly/target/scala-2.11/jars/*

-Xmx1g

org.apache.spark.deploy.SparkSubmit

--name spark-test  --class WordCount --master yarn  /A/spark-test.jar /mysqlClean.sql 0


调用org.apache.spark.deploy.SparkSubmit  类,执行提交操作。

参数: --name spark-test  --class WordCount --master yarn  /A/spark-test.jar /mysqlClean.sql 0

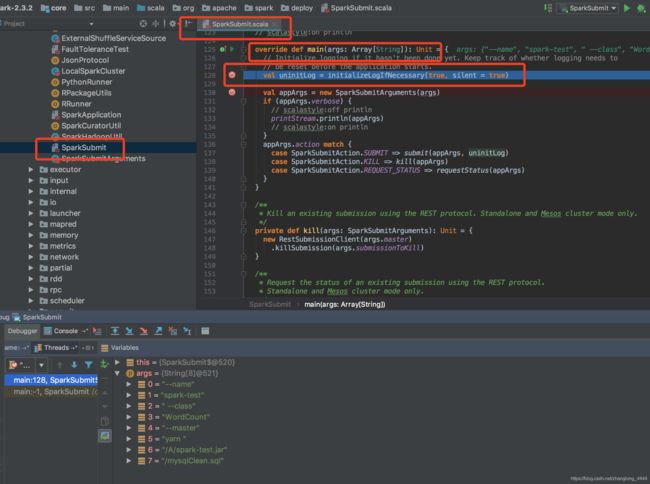
直接看类org.apache.spark.deploy.SparkSubmit

Spark2.3.2源码解析: 4.1.Yarn cluster 模式 SparkSubmit源码分析(一)_第3张图片


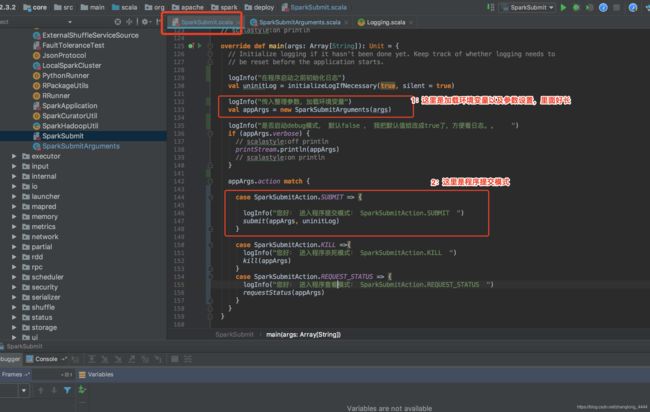
Spark2.3.2源码解析: 4.1.Yarn cluster 模式 SparkSubmit源码分析(一)_第4张图片


核心:

1.加载环境变量

2.提交任务 (杀死和查看状态先不管)


加载环境变量这部分有点麻烦

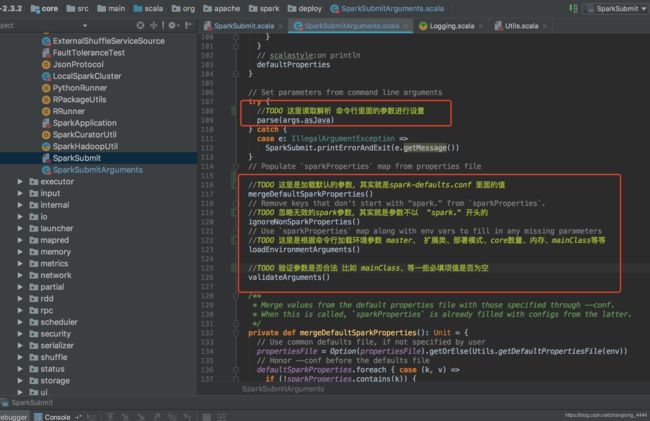
val appArgs = new SparkSubmitArguments(args)

主要三部分:解析命令行数据、加载环境变量到内存、验证参数

Spark2.3.2源码解析: 4.1.Yarn cluster 模式 SparkSubmit源码分析(一)_第5张图片

接下来看提交代码:

submit(appArgs, uninitLog)


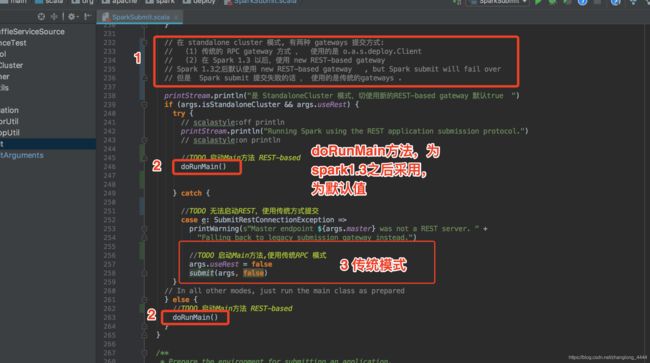
Spark2.3.2源码解析: 4.1.Yarn cluster 模式 SparkSubmit源码分析(一)_第6张图片


在 standalone cluster 模式, 有两种 gateways 提交方式: 由args.useRest 控制

  (1) 传统的 RPC gateway 方式 ,  使用的是 o.a.s.deploy.Client      args.useRest 值为false
  (2) 在 Spark 1.3 以后,使用 new REST-based gateway    args.useRest 值为ture(默认)
Spark 1.3之后默认使用 new REST-based gateway   , but Spark submit will fail over
但是  Spark submit 提交失败的话 , 使用的是传统的gateways .


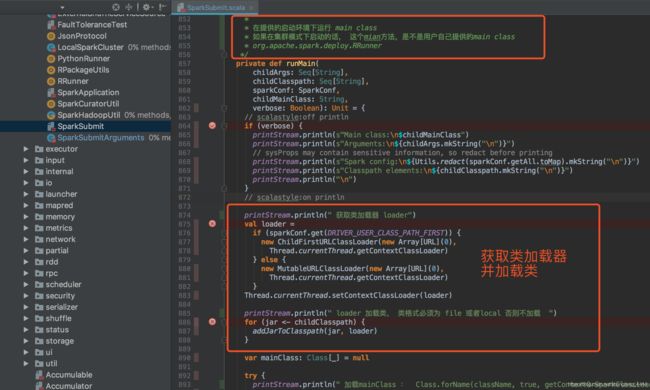
接下来看doRunMain方法 ,这个方法有待长

1、获取类加载器,并加载类

Spark2.3.2源码解析: 4.1.Yarn cluster 模式 SparkSubmit源码分析(一)_第7张图片

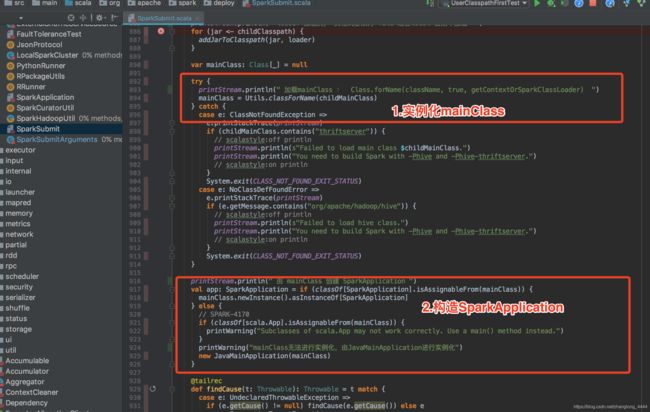
2.构造 SparkApplication  (YarnClusterApplication

Spark2.3.2源码解析: 4.1.Yarn cluster 模式 SparkSubmit源码分析(一)_第8张图片

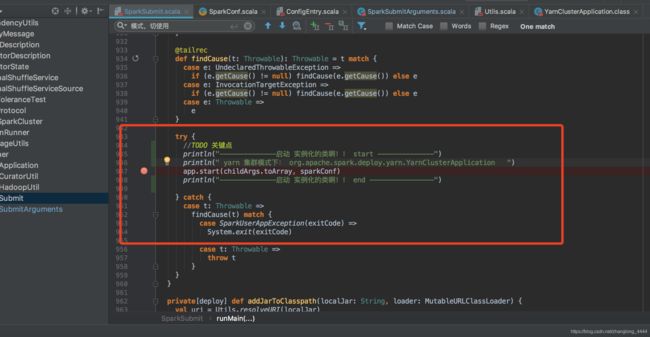
3.启动动SparkApplication

Spark2.3.2源码解析: 4.1.Yarn cluster 模式 SparkSubmit源码分析(一)_第9张图片


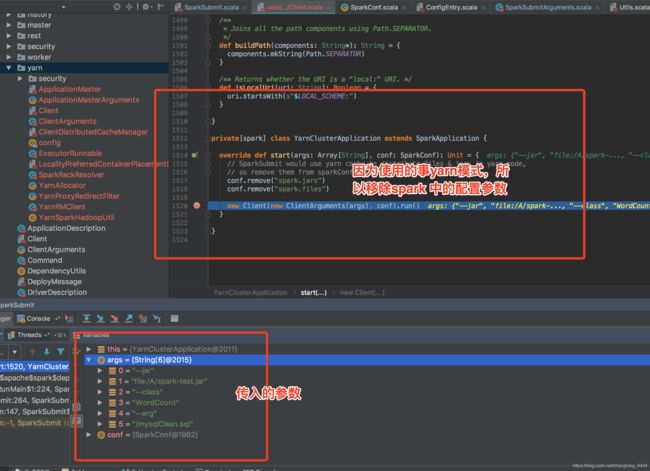
实际调用的是  YarnClusterApplication 类中的 start方法


Spark2.3.2源码解析: 4.1.Yarn cluster 模式 SparkSubmit源码分析(一)_第10张图片

注意:

实际会调用这个方法

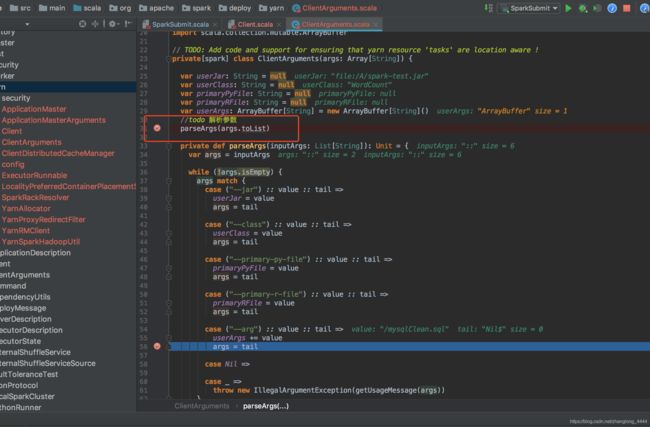
new Client(new ClientArguments(args), conf).run()


ClientArguments(args)这个我就不细说了,就是加载参数,直接看run方法吧

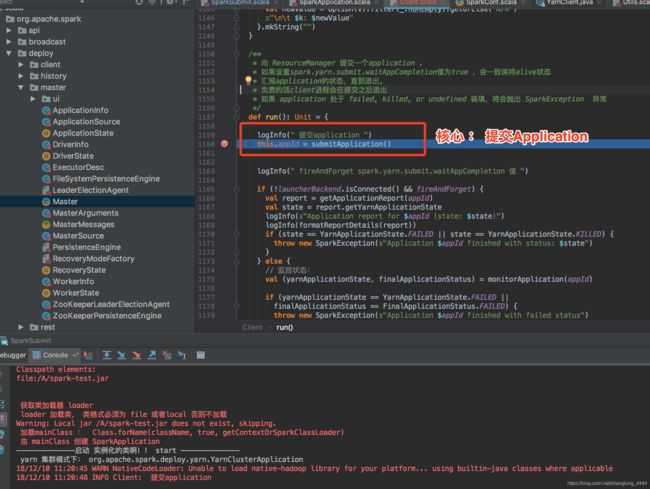
Spark2.3.2源码解析: 4.1.Yarn cluster 模式 SparkSubmit源码分析(一)_第11张图片


Spark2.3.2源码解析: 4.1.Yarn cluster 模式 SparkSubmit源码分析(一)_第12张图片

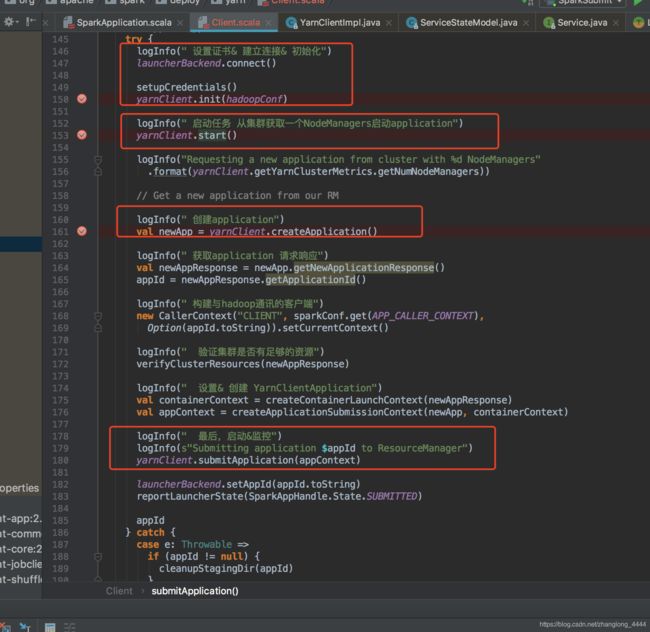
submitApplication主要流程如下:
 

Spark2.3.2源码解析: 4.1.Yarn cluster 模式 SparkSubmit源码分析(一)_第13张图片


设置证书& 建立连接& 初始化 这三部分就不说了,

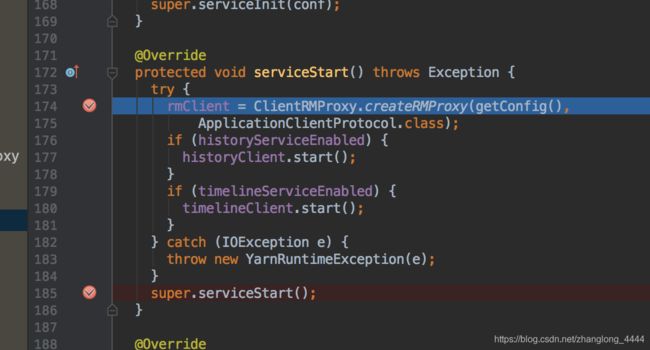
直接看yarnClient.start() 

这个直接调用的是hadoop-yarn-client jar包里YarnClientImpl类中的start方法 理解为建立一个连接启动服务
historyClient.start();
timelineClient.start();


Spark2.3.2源码解析: 4.1.Yarn cluster 模式 SparkSubmit源码分析(一)_第14张图片


logInfo(" 创建application")
val newApp = yarnClient.createApplication()

logInfo(" 获取application 请求响应")
val newAppResponse = newApp.getNewApplicationResponse()
appId = newAppResponse.getApplicationId()

logInfo(" 构建与hadoop通讯的客户端")
new CallerContext("CLIENT", sparkConf.get(APP_CALLER_CONTEXT),
  Option(appId.toString)).setCurrentContext()
logInfo("  验证集群是否有足够的资源")
verifyClusterResources(newAppResponse)
logInfo("  设置& 创建 YarnClientApplication")
val containerContext = createContainerLaunchContext(newAppResponse)
val appContext = createApplicationSubmissionContext(newApp, containerContext)

logInfo("  最后,提交&监控")
logInfo(s"Submitting application $appId to ResourceManager")
yarnClient.submitApplication(appContext)

launcherBackend.setAppId(appId.toString)
reportLauncherState(SparkAppHandle.State.SUBMITTED)


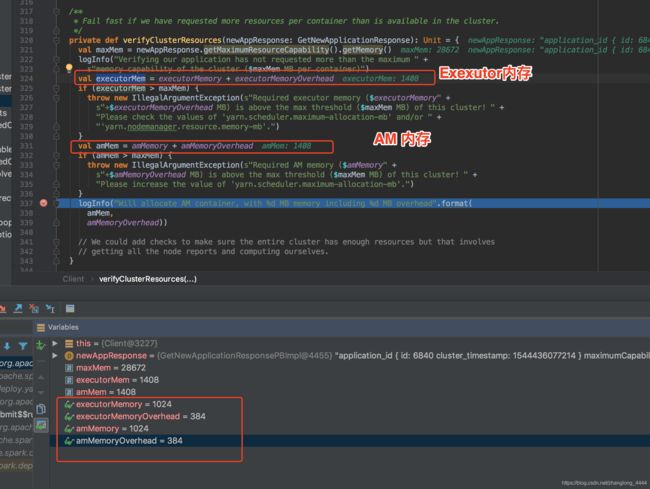
验证资源是否足够verifyClusterResources(newAppResponse)


Spark2.3.2源码解析: 4.1.Yarn cluster 模式 SparkSubmit源码分析(一)_第15张图片

AM container, with 1408 MB memory including 384 MB overhead

executorMemory  :  spark.executor.memory  (默认1G)
executorMemoryOverhead : spark.executor.memoryOverhead (默认为 executor的0.1 ,最小为384M)


amMemory : 集群模式: spark.driver.memory 
                       非集群模式: spark.yarn.am.memory (默认512M) 

amMemoryOverhead  :  集群模式: spark.driver.memoryOverhead
                                         非集群模式: spark.yarn.am.memoryOverhead (默认为 amMemory 的0.1 ,最小为384M)


主要说一下: createContainerLaunchContext 这个方法吧

这个方法的作用是创建一个createContainerLaunchContext

主要任务:

1.加载环境launchEnv

val launchEnv = setupLaunchEnv(appStagingDirPath, pySparkArchives)

2.加载资源文件

val launchEnv = setupLaunchEnv(appStagingDirPath, pySparkArchives)

上传目录:hdfs://hadoop002:8020/user/hadoop/.sparkStaging/application_1544436077214_6463 

主要有三类文件:

2.1.依赖zip包:__spark_libs__6945786770822454051.zip (里面是多个jar包)

  存放路径:

hdfs://hadoop002:8020/user/hadoop/.sparkStaging/application_1544436077214_6469/__spark_libs__6945786770822454051.zip


2.2.运行程序jar包:spark-test.jar

 存放路径: 

hdfs://hadoop002:8020/user/hadoop/.sparkStaging/application_1544436077214_6469/spark-test.jar


2.3.配置文件zip包:__spark_conf__.zip

hdfs://hadoop002:8020/user/hadoop/.sparkStaging/application_1544436077214_6469/__spark_conf__.zip


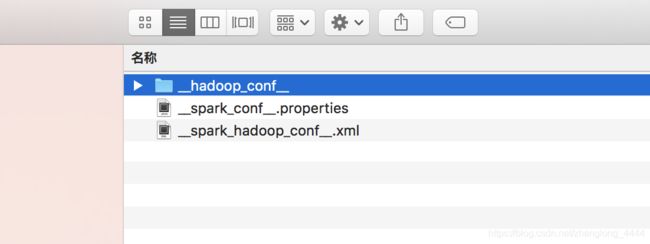
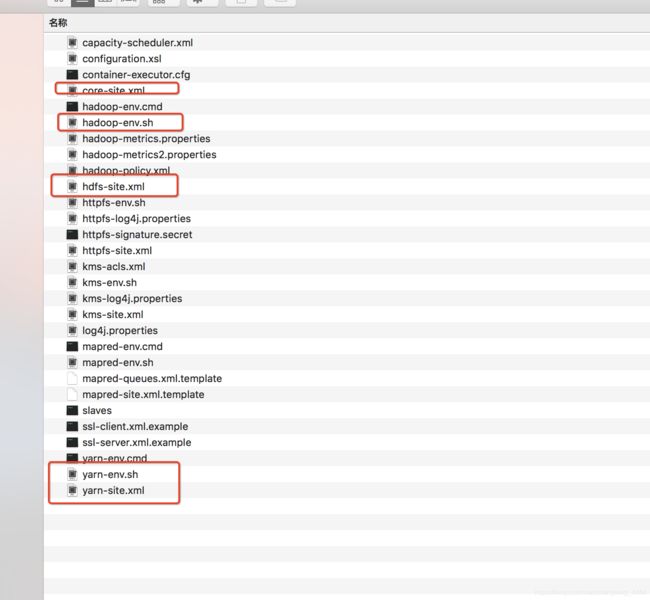
这个配置文件解压出来有三个文件:

目录: __hadoop_conf__                      -----hadoop配置文件
文件: __spark_conf__.properties         -----spark的配置文件
文件: __spark_hadoop_conf__.xml      -------spark和hadoop的配置文件
 

Spark2.3.2源码解析: 4.1.Yarn cluster 模式 SparkSubmit源码分析(一)_第16张图片

目录: __hadoop_conf__

Spark2.3.2源码解析: 4.1.Yarn cluster 模式 SparkSubmit源码分析(一)_第17张图片


__spark_conf__.properties

对应的内容

#Spark configuration.
#Tue Dec 18 14:56:43 CST 2018
spark.yarn.cache.visibilities=PRIVATE,PRIVATE
spark.yarn.cache.types=ARCHIVE,FILE
spark.yarn.cache.timestamps=1545116201152,1545116201602
spark.app.name=spark-test
spark.master=yarn
spark.yarn.cache.sizes=217705632,27358
spark.yarn.cache.confArchive=hdfs\://bj-rack001-hadoop002\:8020
                                /user/hadoop/.sparkStaging/application_1544436077214_7116
                                /__spark_conf__.zip
spark.yarn.cache.filenames=hdfs\://bj-rack001-hadoop002\:8020
                                /user/hadoop/.sparkStaging/application_1544436077214_7116/
                                __spark_libs__1219492803532987487.zip\#__spark_libs__,

                                hdfs\://bj-rack001-hadoop002\:8020/user/hadoop/.sparkStaging
                                /application_1544436077214_7116/spark-test.jar\#__app__.jar
                                
spark.submit.deployMode=cluster


启动日志:


4.设置AM内存&启动参数

Spark2.3.2源码解析: 4.1.Yarn cluster 模式 SparkSubmit源码分析(一)_第18张图片

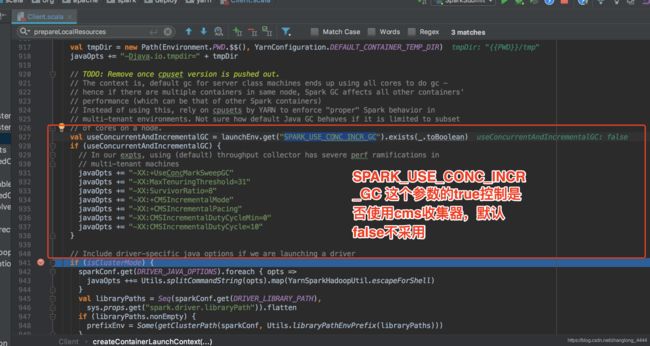
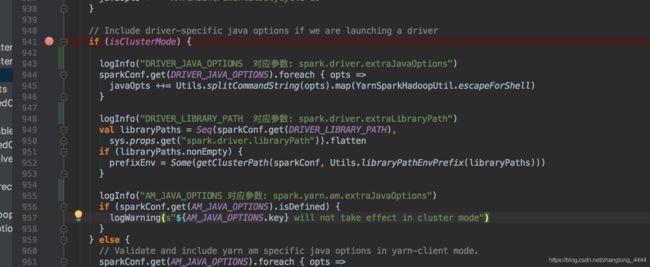
如果是集群模式的话,需要调整三个参数:

DRIVER java参数

DRIVER 依赖包

AM 的java参数


设置启动driver的时候,特定的java 参数

Spark2.3.2源码解析: 4.1.Yarn cluster 模式 SparkSubmit源码分析(一)_第19张图片


Spark2.3.2源码解析: 4.1.Yarn cluster 模式 SparkSubmit源码分析(一)_第20张图片


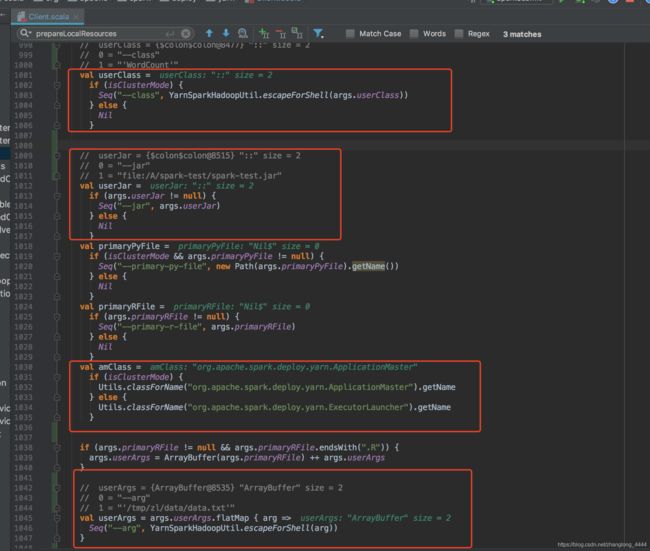
最终其实就是要生成:ApplicationMaster的命令

Spark2.3.2源码解析: 4.1.Yarn cluster 模式 SparkSubmit源码分析(一)_第21张图片

cmmands中的参数:


ApplicationMaster 命令
  0 = "{{JAVA_HOME}}/bin/java"
  1 = "-server"
  2 = "-Xmx1024m"
  3 = "-Djava.io.tmpdir={{PWD}}/tmp"
  4 = "-Dspark.yarn.app.container.log.dir="
  5 = "org.apache.spark.deploy.yarn.ApplicationMaster"
  6 = "--class"
  7 = "'WordCount'"
  8 = "--jar"
  9 = "file:/A/spark-test/spark-test.jar"
  10 = "--arg"
  11 = "'/tmp/zl/data/data.txt'"
  12 = "--properties-file"
  13 = "{{PWD}}/__spark_conf__/__spark_conf__.properties"
  14 = "1>"
  15 = "/stdout"
  16 = "2>"
  17 = "/stderr"


{{JAVA_HOME}}/bin/java -server -Xmx1024m -Djava.io.tmpdir={{PWD}}/tmp -Dspark.yarn.app.container.log.dir= org.apache.spark.deploy.yarn.

--class 'WordCount' --jar file:/A/spark-test/spark-test.jar --arg '/tmp/zl/data/data.txt' --properties-file {{PWD}}/__spark_conf__/__spark_conf__.properties 1> /stdout 2> /stderr


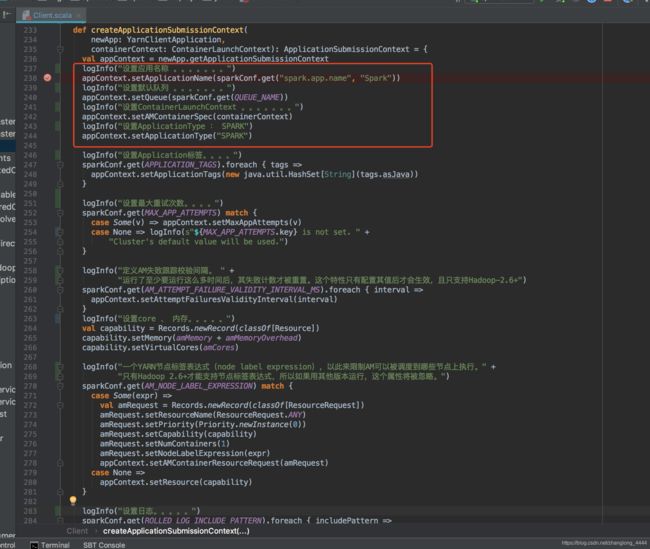
创建 : YarnClientApplication

val appContext = createApplicationSubmissionContext(newApp, containerContext)

Spark2.3.2源码解析: 4.1.Yarn cluster 模式 SparkSubmit源码分析(一)_第22张图片


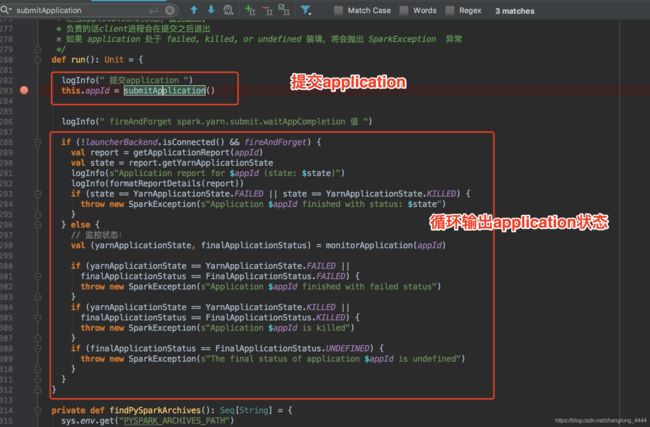
提交完成之后

接着回到client.scala方法查看run方法。 其实接下来就是循环查看任务状态了

Spark2.3.2源码解析: 4.1.Yarn cluster 模式 SparkSubmit源码分析(一)_第23张图片


{{JAVA_HOME}}/bin/java 
-server 
-Xmx1024m 
-Djava.io.tmpdir={{PWD}}/tmp 
-Dspark.yarn.app.container.log.dir= 
org.apache.spark.deploy.yarn.ApplicationMaster 
--class 'WordCount' 
--jar file:/A/spark-test/spark-test.jar 
--arg '/tmp/zl/data/data.txt' --properties-file {{PWD}}/__spark_conf__/__spark_conf__.properties 1> /stdout 2> /stderr
 

这个是上面启动ApplicationMaster的命令,下篇文章从给这里开始。。。


https://blog.csdn.net/zhanglong_4444/article/details/85064735


*******


*******
*******
*******
*******
*******
*******
*******
*******
*******
*******
*******
*******
*******
*******
*******
*******
*******
*******
*******
*******
*******
*******
*******

你可能感兴趣的:(Spark,Spark2.3.2源码解析)