【小白学PyTorch】11 MobileNet详解及PyTorch实现
文章来自微信公众号【机器学习炼丹术】。我是炼丹兄,欢迎加我微信好友交流学习:cyx645016617。
文章目录
-
- 1 背景
- 2 深度可分离卷积
-
- 2.2 一般卷积计算量
- 2.2 深度可分离卷积计算量
- 2.3 网络结构
- 3 PyTorch实现
本来计划是想在今天讲EfficientNet PyTorch的,但是发现EfficientNet是依赖于SENet和MobileNet两个网络结构,所以本着本系列是给“小白”初学者学习的,所以这一课先讲解MobileNet,然后下一课讲解SENet,然后再下一课讲解EfficientNet,当然,每一节课都是由PyTorch实现的。
1 背景
Mobile是移动、手机的概念,MobileNet是Google在2017年提出的轻量级深度神经网络,专门用于移动端、嵌入式这种计算力不高、要求速度、实时性的设备。
2 深度可分离卷积
主要应用了深度可分离卷积来代替传统的卷积操作,并且放弃pooling层。把标准卷积分解成:
- 深度卷积(depthwise convolution)
- 逐点卷积(pointwise convolution)。
这么做的好处是可以大幅度降低参数量和计算量。
2.2 一般卷积计算量
我们先来回顾一下什么是一般的卷积:

先说一下题目:特征图尺寸是H(高)和W(宽),尺寸(边长)为K,M是输入特征图的通道数,N是输出特征图的通道数。
现在简化问题,如上图所示,输入单通道特征图,输出特征图也是单通道的, 我们知道每一个卷积结果为一个标量,从输出特征图来看,总共进行了9次卷积。每一次卷积计算了9次,因为每一次卷积都需要让卷积核上的每一个数字与原来特征图上对应的数字相乘(这里只算乘法不用考虑加法)。所以图6.18所示,总共计算了:
9 ∗ 9 = 3 ∗ 3 ∗ 3 ∗ 3 = 81 9*9=3*3*3*3=81 9∗9=3∗3∗3∗3=81
如果输入特征图是一个2通道的 ,那么意味着卷积核也是要2通道的卷积核才行,此时输出特征图还是单通道的。这样计算量就变成:
9 ∗ 9 ∗ 2 = 3 ∗ 3 ∗ 3 ∗ 3 ∗ 2 = 162 9*9*2=3*3*3*3*2=162 9∗9∗2=3∗3∗3∗3∗2=162
原本单通道特征图每一次卷积只用计算9次乘法,现在因为输入通道数变成2,要计算18次乘法才能得到输出中的1个数字。现在假设输出特征图要输出3通道的特征图。 那么就要准备3个不同的卷积核,重复上述全部操作3次才能拿的到3个特征图。所以计算量就是:
9 ∗ 9 ∗ 2 ∗ 3 = 3 ∗ 3 ∗ 3 ∗ 3 ∗ 2 ∗ 3 = 486 9*9*2*3=3*3*3*3*2*3=486 9∗9∗2∗3=3∗3∗3∗3∗2∗3=486
现在解决原来的问题:特征图尺寸是H(高)和W(宽),卷积核是正方形的,尺寸(边长)为K,M是输入特征图的通道数,N是输出特征图的通道数。 那么这样卷积的计算量为:
H ∗ W ∗ K ∗ K ∗ M ∗ N H*W*K*K*M*N H∗W∗K∗K∗M∗N
这个就是卷积的计算量的公式。
2.2 深度可分离卷积计算量
- 深度可分离卷积(Depthwise Separable Convolution,DSC)
假设在一次一般的卷积中,需要将一个输入特征图64×7×7,经过3×3的卷积核,变成128×7×7的输出特征图。计算一下这个过程需要多少的计算量:
7 ∗ 7 ∗ 3 ∗ 3 ∗ 64 ∗ 128 = 3612672 7*7*3*3*64*128=3612672 7∗7∗3∗3∗64∗128=3612672
如果用了深度可分离卷积,就是把这个卷积变成两个步骤:
- Depthwise:先用64×7×7经过3×3的卷积核得到一个64×7×7的特征图。注意注意!这里是64×7×7的特征图经过3×3的卷积核,不是64×3×3的卷积核!这里将64×7×7的特征图看成64张7×7的图片,然后依次与3×3的卷积核进行卷积;
- Pointwise:在Depthwise的操作中,不难发现,这样的计算根本无法整合不同通道的信息,因为上一步把所有通道都拆开了,所以在这一步要用64×1×1的卷积核去整合不同通道上的信息,用128个64×1×1的卷积核,产生128×7×7的特征图。
最后的计算量就是:
7 ∗ 7 ∗ 3 ∗ 3 ∗ 64 + 7 ∗ 7 ∗ 1 ∗ 1 ∗ 64 ∗ 128 = 429632 7*7*3*3*64+7*7*1*1*64*128=429632 7∗7∗3∗3∗64+7∗7∗1∗1∗64∗128=429632
计算量减少了百分之80以上。
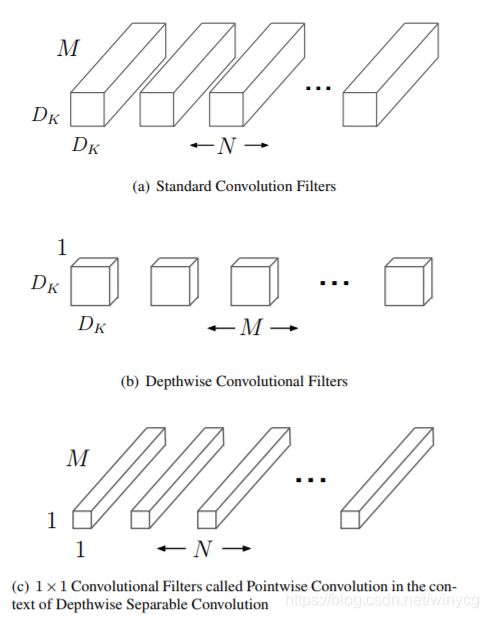
在图中可以看到:
- (a)表示一般卷积过程, 卷积核都是M个通道,然后总共有N和卷积核,意味着输入特征图有M个通道,然后输出特征图有N个通道。
- (b)表示depthwise过程, 总共有M个卷积核,这里是对输入特征图的M个通道分别做一个卷积,输出的特征图也是M个通道的;
- ©表示pointwise过程,总共有N个 1 × 1 1 \times 1 1×1的卷积核,这样来整合不同通道的信息,输出特征图有N个通道数。
2.3 网络结构

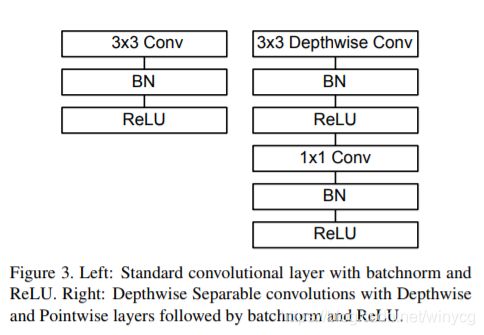
左图表示的是一般卷积过程,卷积之后跟上BN和ReLU激活层,因为DBC将分成了两个卷积过程,所以就变成了图右这种结构,Depthwise之后加上BN和ReLU,然后Pointwise之后再加上Bn和ReLU。
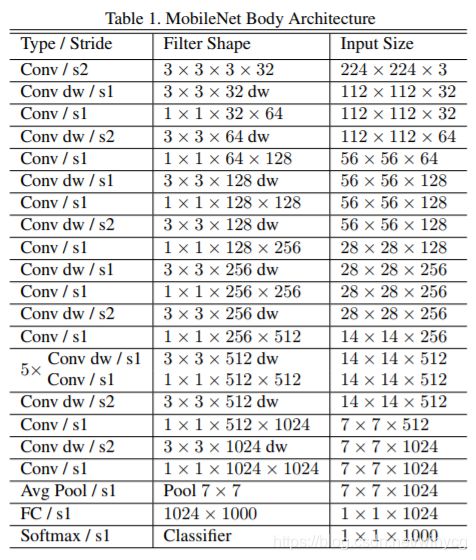
- 除了第一层为标准的卷积层之外,其他的层都为深度可分离卷积。
- 整个网络没有使用Pooling层。
3 PyTorch实现
import torch
import torch.nn as nn
import torch.nn.functional as F


class Block(nn.Module):
    '''Depthwise conv + Pointwise conv'''
    def __init__(self, in_planes, out_planes, stride=1):
        super(Block, self).__init__()
        self.conv1 = nn.Conv2d\
            (in_planes, in_planes, kernel_size=3, stride=stride,
             padding=1, groups=in_planes, bias=False)
        self.bn1 = nn.BatchNorm2d(in_planes)
        self.conv2 = nn.Conv2d\
            (in_planes, out_planes, kernel_size=1,
            stride=1, padding=0, bias=False)
        self.bn2 = nn.BatchNorm2d(out_planes)

    def forward(self, x):
        out = F.relu(self.bn1(self.conv1(x)))
        out = F.relu(self.bn2(self.conv2(out)))
        return out


class MobileNet(nn.Module):
    # (128,2) means conv planes=128, conv stride=2,
    # by default conv stride=1
    cfg = [64, (128,2), 128, (256,2), 256, (512,2),
           512, 512, 512, 512, 512, (1024,2), 1024]

    def __init__(self, num_classes=10):
        super(MobileNet, self).__init__()
        self.conv1 = nn.Conv2d(3, 32, kernel_size=3,
        	stride=1, padding=1, bias=False)
        self.bn1 = nn.BatchNorm2d(32)
        self.layers = self._make_layers(in_planes=32)
        self.linear = nn.Linear(1024, num_classes)

    def _make_layers(self, in_planes):
        layers = []
        for x in self.cfg:
            out_planes = x if isinstance(x, int) else x[0]
            stride = 1 if isinstance(x, int) else x[1]
            layers.append(Block(in_planes, out_planes, stride))
            in_planes = out_planes
        return nn.Sequential(*layers)

    def forward(self, x):
        out = F.relu(self.bn1(self.conv1(x)))
        out = self.layers(out)
        out = F.avg_pool2d(out, 2)
        out = out.view(out.size(0), -1)
        out = self.linear(out)
        return out

net = MobileNet()
x = torch.randn(1,3,32,32)
y = net(x)
print(y.size())
> torch.Size([1, 10])
正常情况下这个预训练模型都会输出1024个线性节点,然后这里我自己加上了一个1024->10的一个全连接层。
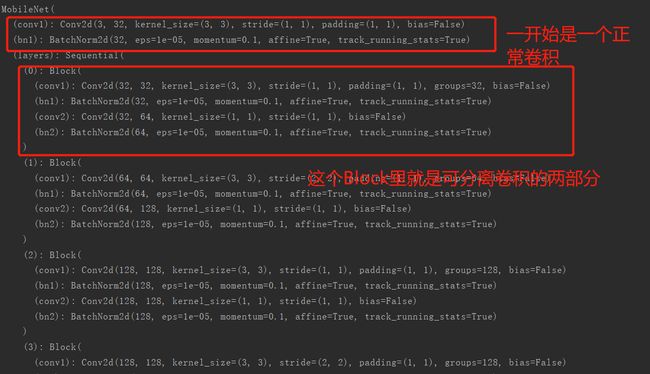
我们来看一下这个网络结构:
print(net)
MobileNet就差不多完事了,下一节课为SENet的PyTorch实现和详解。
文章来自微信公众号【机器学习炼丹术】。我是炼丹兄,欢迎加我微信好友交流学习:cyx645016617。


