实时 摔倒识别 /运动分析/打架等异常行为识别/控制手势识别等所有行为识别全家桶 原理 + 代码 + 数据+ 模型 开源!
文章目录
-
- 一、 基本过程和思想
- 二 、视频理解还有哪些优秀框架
- 三、效果体验~使用
- 手势:
-
-
- python run_gesture_recognition.py
-
- 健身_跟踪器:
- 卡路里计算
- 三、训练自己数据集步骤
-
- 然后,打开这个网址:
- 点击一下start new project
- 但是官方的制作方法是有着严重bug的~我们该怎么做呢!
- 原代码解读
大家好,我是cv君,很多大创,比赛,项目,工程,科研,学术的炼丹术士问我上述这些识别,该怎么做,怎么选择框架,今天可以和大家分析一下一些方案:
用单帧目标检测做的话,前后语义相关性很差(也有优化版),效果不能达到实际项目需求,尤其是在误检上较难,并且目标检测是需要大量数据来拟合的。标注需求极大。
用姿态加目标检测结合的方式,效果是很不错的,不过一些这样类似Two stage的方案,速度较慢(也有很多实时的),同样有着一些不能通过解决时间上下文的问题。
即:摔倒检测 我们正常是应该有一个摔倒过程,才能被判断为摔倒的,而不是人倒下的就一定是摔倒(纯目标检测弊病)
运动检测 比如引体向上,和高抬腿计数,球类运动,若是使用目标检测做,那么会出现什么问题呢? 引体向上无法实现动作是否规范(当然可以通过后处理判断下巴是否过框,效果是不够人工智能的),高抬腿计数,目标检测是无法计数的,判断人物的球类运动,目标检测是有很大的误检的:第一种使用球检测,误检很大,第二种使用打球手势检测,遇到人物遮挡球类,就无法识别目标,在标注上也需要大量数据…
今天cv君铺垫了这么多,只是为了给大家推荐一个全新出炉视频序列检测方法,目前代码已开源至Github:https://github.com/CVUsers/CV-Action欢迎star~
欢迎移步。只需要很少的训练数据,就可以拟合哦!不信你来试试吧~几个训练集即可。
神经网络使用的是这两个月开源的实时动作序列强分类神经网络:realtimenet 。
我的github将收集 所有的上述说到的动作序列视频数据,训练出能实用的检测任务:目前实现了手势控制的检测,等等,大家欢迎关注公众号,后续会接着更新。
开始
目前以手势和运动识别为例子,因为cv君没什么数据哈哈
项目演示:
本人做的没转gif,所以大家可以看看其他的演示效果图,跟我的是几乎一样的~ 只是训练数据不同
一、 基本过程和思想
基本思想是将数据集中视频及分类标签转换为图像(视频帧)和其对应的分类标签,也可以不标注,单独给一个小视频标注上分类类别,再采用CNN网络对图像进行训练学习和测试,将视频分类问题转化为图形分类问题。具体步骤包括:
(1) 对每个视频(训练和测试视频)以一定的FPS截出视频帧(jpegs)保存为训练集和测试集,将对图像的分类性能作为所对应视频的分类性能
(2)训练一个人物等特征提取模型,并采用模型融合策略,一个特征提取,一个分类模型。特征工程部分通用人物行为,分类模型,训练自己的类别的分类模型即可。
(4) 训练完成后载入模型对test set内所有的视频帧进行检查验证,得出全测试集上的top1准确率和top5准确率输出。
(5)实时检测。
二 、视频理解还有哪些优秀框架
第一个 就是我github这个了,比较方便,但不敢排前几,因为没有什么集成,
然后MMaction ,就是视频理解框架了,众所周知,他们家的东西很棒
第二个就是facebook家的一些了,
再下来基本上就不多了,全面好用的实时框架。
好,所以我们先来说说我的使用过程。
三、效果体验~使用
体验官方的一些模型 (模型我已经放在里面了)
pip install -r requirements.txt
将模型放置此处:
resources
├── backbone
│   ├── strided_inflated_efficientnet.ckpt
│   └── strided_inflated_mobilenet.ckpt
├── fitness_activity_recognition
│   └── ...
├── gesture_recognition
│   └── ...
└── ...
首先,请试用我们提供的演示。在sense/examples目录中,您将找到3个Python脚本, run_gesture_recognition.py ,健身_跟踪器 run_fitness_tracker.py .py,并运行卡路里_估算 run_calorie_estimation .py. 启动每个演示就像在终端中运行脚本一样简单,如下所述。
手势:
cd examples/
python run_gesture_recognition.py
健身_跟踪器:
python examples/run_fitness_tracker.py --weight=65 --age=30 --height=170 --gender=female
  --camera_id=CAMERA_ID           ID of the camera to stream from
  --path_in=FILENAME              Video file to stream from. This assumes that the video was encoded at 16 fps.
卡路里计算
python examples/run_calorie_estimation.py --weight=65 --age=30 --height=170 --gender=female
三、训练自己数据集步骤
首先 clone一下我的github,或者原作者github,
然后自己录制几个视频,比如我这里capture 一个类别,录制了几个视频,可以以MP4 或者avi后缀,再来个类别,再录制一些视频,以名字为类别。
然后
cd tools\sense_studio\sense_studio.py
这一步,会显示:
然后,打开这个网址:
来到前端界面
点击一下start new project
这样编写
然后点击create project 即可制作数据。
但是官方的制作方法是有着严重bug的~我们该怎么做呢!
下面,我修改后,可以这样!
这里请仔细看:
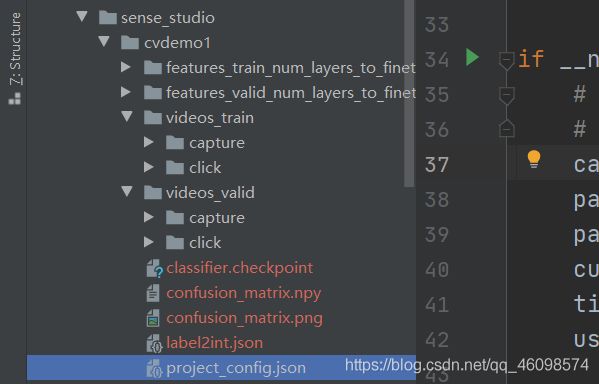
我们在sense_studio 文件夹下,新建一个文件夹:我叫他cvdemo1
然后新建两个文件夹:videos_train 和videos_valid 里面存放的capture是你的类别名字的数据集,capture存放相关的训练集,click存放click的训练集,同样的videos_valid 存放验证集,
在cvdemo1文件夹下新建project_config.json ,里面写什么呢? 可以复制我的下面的代码:
{

  "name": "cvdemo1",
  "date_created": "2021-02-03",
  "classes": {

    "capture": [
      "capture",
      "capture"
    ],
    "click": [
      "click",
      "click"
    ]
  }
}
里面的name 改成你的文件夹名字即可。
就这么简单!
然后就可以训练:
python train_classifier.py 你可以将main中修改一下。
将path in修改成我们的训练数据地址,即可,其他的修改不多,就按照我的走即可,
    # Parse arguments
    # args = docopt(__doc__)
    path_in = './sense_studio/cvdemo1/'
    path_out = path_in
    os.makedirs(path_out, exist_ok=True)
    use_gpu = True
    path_annotations_train = None
    path_annotations_valid =None
    num_layers_to_finetune = 9
    temporal_training = False

    # Load feature extractor
    feature_extractor = feature_extractors.StridedInflatedEfficientNet()
    checkpoint = torch.load('../resources/backbone/strided_inflated_efficientnet.ckpt')
    feature_extractor.load_state_dict(checkpoint)
    feature_extractor.eval()

    # Get the require temporal dimension of feature tensors in order to
    # finetune the provided number of layers.
    if num_layers_to_finetune > 0:
        num_timesteps = feature_extractor.num_required_frames_per_layer.get(-num_layers_to_finetune)
        if not num_timesteps:
            # Remove 1 because we added 0 to temporal_dependencies
            num_layers = len(feature_extractor.num_required_frames_per_layer) - 1
            raise IndexError(f'Num of layers to finetune not compatible. '
                             f'Must be an integer between 0 and {num_layers}')
    else:
        num_timesteps = 1
训练特别快,10分钟即可,
然后,你可以运行run_custom_classifier.py
   # Parse arguments
    # args = docopt(__doc__)
    camera_id = 0
    path_in = None
    path_out = None
    custom_classifier = './sense_studio/cvdemo1/'
    title = None
    use_gpu = True

    # Load original feature extractor
    feature_extractor = feature_extractors.StridedInflatedEfficientNet()
    feature_extractor.load_weights_from_resources('../resources/backbone/strided_inflated_efficientnet.ckpt')
    # feature_extractor = feature_extractors.StridedInflatedMobileNetV2()
    # feature_extractor.load_weights_from_resources(r'../resources\backbone\strided_inflated_mobilenet.ckpt')
    checkpoint = feature_extractor.state_dict()

    # Load custom classifier
    checkpoint_classifier = torch.load(os.path.join(custom_classifier, 'classifier.checkpoint'))
    # Update original weights in case some intermediate layers have been finetuned
    name_finetuned_layers = set(checkpoint.keys()).intersection(checkpoint_classifier.keys())
    for key in name_finetuned_layers:
        checkpoint[key] = checkpoint_classifier.pop(key)
    feature_extractor.load_state_dict(checkpoint)
    feature_extractor.eval()
    print('[debug] net:', feature_extractor)
    with open(os.path.join(custom_classifier, 'label2int.json')) as file:
        class2int = json.load(file)
    INT2LAB = {
     value: key for key, value in class2int.items()}

    gesture_classifier = LogisticRegression(num_in=feature_extractor.feature_dim,
                                            num_out=len(INT2LAB))
    gesture_classifier.load_state_dict(checkpoint_classifier)
    gesture_classifier.eval()
    print(gesture_classifier)
同样修改路径即可。
结果就可以实时检测了
原代码解读
同样的,我们使用的是使用efficienct 来做的特征,你也可以改成mobilenet 来做,有示例代码,就是训练的时候,用mobilenet ,检测的时候也是,只需要修改几行代码即可。
efficienct 提取特征部分代码:
class StridedInflatedEfficientNet(StridedInflatedMobileNetV2):

    def __init__(self):

        super().__init__()

        self.cnn = nn.Sequential(
            ConvReLU(3, 32, 3, stride=2),
            InvertedResidual(32, 24, 3, spatial_stride=1),
            InvertedResidual(24, 32, 3, spatial_stride=2, expand_ratio=6),
            InvertedResidual(32, 32, 3, spatial_stride=1, expand_ratio=6, temporal_shift=True),
            InvertedResidual(32, 32, 3, spatial_stride=1, expand_ratio=6),
            InvertedResidual(32, 32, 3, spatial_stride=1, expand_ratio=6),
            InvertedResidual(32, 56, 5, spatial_stride=2, expand_ratio=6),
            InvertedResidual(56, 56, 5, spatial_stride=1, expand_ratio=6, temporal_shift=True, temporal_stride=True),
            InvertedResidual(56, 56, 5, spatial_stride=1, expand_ratio=6),
            InvertedResidual(56, 56, 5, spatial_stride=1, expand_ratio=6),
            InvertedResidual(56, 112, 3, spatial_stride=2, expand_ratio=6),
            InvertedResidual(112, 112, 3, spatial_stride=1, expand_ratio=6, temporal_shift=True),
            InvertedResidual(112, 112, 3, spatial_stride=1, expand_ratio=6),
            InvertedResidual(112, 112, 3, spatial_stride=1, expand_ratio=6),
            InvertedResidual(112, 112, 3, spatial_stride=1, expand_ratio=6, temporal_shift=True, temporal_stride=True),
            InvertedResidual(112, 112, 3, spatial_stride=1, expand_ratio=6),
            InvertedResidual(112, 160, 5, spatial_stride=1, expand_ratio=6),
            InvertedResidual(160, 160, 5, spatial_stride=1, expand_ratio=6, temporal_shift=True),
            InvertedResidual(160, 160, 5, spatial_stride=1, expand_ratio=6),
            InvertedResidual(160, 160, 5, spatial_stride=1, expand_ratio=6),
            InvertedResidual(160, 160, 5, spatial_stride=1, expand_ratio=6, temporal_shift=True),
            InvertedResidual(160, 160, 5, spatial_stride=1, expand_ratio=6),
            InvertedResidual(160, 272, 5, spatial_stride=2, expand_ratio=6),
            InvertedResidual(272, 272, 5, spatial_stride=1, expand_ratio=6, temporal_shift=True),
            InvertedResidual(272, 272, 5, spatial_stride=1, expand_ratio=6),
            InvertedResidual(272, 272, 5, spatial_stride=1, expand_ratio=6, temporal_shift=True),
            InvertedResidual(272, 272, 5, spatial_stride=1, expand_ratio=6),
            InvertedResidual(272, 272, 5, spatial_stride=1, expand_ratio=6),
            InvertedResidual(272, 272, 5, spatial_stride=1, expand_ratio=6),
            InvertedResidual(272, 272, 5, spatial_stride=1, expand_ratio=6),
            InvertedResidual(272, 448, 3, spatial_stride=1, expand_ratio=6),
            ConvReLU(448, 1280, 1)
        )
这个InvertedResidual 在这,
class InvertedResidual(nn.Module):  # noqa: D101

    def __init__(self, in_planes, out_planes, spatial_kernel_size=3, spatial_stride=1, expand_ratio=1,
                 temporal_shift=False, temporal_stride=False, sparse_temporal_conv=False):
        super().__init__()
        assert spatial_stride in [1, 2]
        hidden_dim = round(in_planes * expand_ratio)
        self.use_residual = spatial_stride == 1 and in_planes == out_planes
        self.temporal_shift = temporal_shift
        self.temporal_stride = temporal_stride

        layers = []
        if expand_ratio != 1:
            # Point-wise expansion
            stride = 1 if not temporal_stride else (2, 1, 1)
            if temporal_shift and sparse_temporal_conv:
                convlayer = SteppableSparseConv3dAs2d
                kernel_size = 1
            elif temporal_shift:
                convlayer = SteppableConv3dAs2d
                kernel_size = (3, 1, 1)
            else:
                convlayer = nn.Conv2d
                kernel_size = 1
            layers.append(ConvReLU(in_planes, hidden_dim, kernel_size=kernel_size, stride=stride,
                                   padding=0, convlayer=convlayer))

        layers.extend([
            # Depth-wise convolution
            ConvReLU(hidden_dim, hidden_dim, kernel_size=spatial_kernel_size, stride=spatial_stride,
                     groups=hidden_dim),
            # Point-wise mapping
            nn.Conv2d(hidden_dim, out_planes, 1, 1, 0),
            # nn.BatchNorm2d(out_planes)
        ])
        self.conv = nn.Sequential(*layers)

    def forward(self, input_):  # noqa: D102
        output_ = self.conv(input_)
        residual = self.realign(input_, output_)
        if self.use_residual:
            output_ += residual
        return output_

    def realign(self, input_, output_):  # noqa: D102
        n_out = output_.shape[0]
        if self.temporal_stride:
            indices = [-1 - 2 * idx for idx in range(n_out)]
            return input_[indices[::-1]]
        else:
            return input_[-n_out:]
我们finetune自己的数据集
def extract_features(path_in, net, num_layers_finetune, use_gpu, num_timesteps=1):
    # Create inference engine
    inference_engine = engine.InferenceEngine(net, use_gpu=use_gpu)

    # extract features
    for dataset in ["train", "valid"]:
        videos_dir = os.path.join(path_in, f"videos_{dataset}")
        features_dir = os.path.join(path_in, f"features_{dataset}_num_layers_to_finetune={num_layers_finetune}")
        video_files = glob.glob(os.path.join(videos_dir, "*", "*.avi"))

        print(f"\nFound {len(video_files)} videos to process in the {dataset}set")

        for video_index, video_path in enumerate(video_files):
            print(f"\rExtract features from video {video_index + 1} / {len(video_files)}",
                  end="")
            path_out = video_path.replace(videos_dir, features_dir).replace(".mp4", ".npy")

            if os.path.isfile(path_out):
                print("\n\tSkipped - feature was already precomputed.")
            else:
                # Read all frames
                compute_features(video_path, path_out, inference_engine,
                                 num_timesteps=num_timesteps, path_frames=None, batch_size=16)

        print('\n')
构建数据的dataloader
def generate_data_loader(dataset_dir, features_dir, tags_dir, label_names, label2int,
                         label2int_temporal_annotation, num_timesteps=5, batch_size=16, shuffle=True,
                         stride=4, path_annotations=None, temporal_annotation_only=False,
                         full_network_minimum_frames=MODEL_TEMPORAL_DEPENDENCY):
    # Find pre-computed features and derive corresponding labels
    tags_dir = os.path.join(dataset_dir, tags_dir)
    features_dir = os.path.join(dataset_dir, features_dir)
    labels_string = []
    temporal_annotation = []
    if not path_annotations:
        # Use all pre-computed features
        features = []
        labels = []
        for label in label_names:
            feature_temp = glob.glob(f'{features_dir}/{label}/*.npy')
            features += feature_temp
            labels += [label2int[label]] * len(feature_temp)
            labels_string += [label] * len(feature_temp)
    else:
        with open(path_annotations, 'r') as f:
            annotations = json.load(f)
        features = ['{}/{}/{}.npy'.format(features_dir, entry['label'],
                                          os.path.splitext(os.path.basename(entry['file']))[0])
                    for entry in annotations]
        labels = [label2int[entry['label']] for entry in annotations]
        labels_string = [entry['label'] for entry in annotations]

    # check if annotation exist for each video
    for label, feature in zip(labels_string, features):
        classe_mapping = {
     0: "counting_background",
                          1: f'{label}_position_1', 2:
                              f'{label}_position_2'}
        temporal_annotation_file = feature.replace(features_dir, tags_dir).replace(".npy", ".json")
        if os.path.isfile(temporal_annotation_file):
            annotation = json.load(open(temporal_annotation_file))["time_annotation"]
            annotation = np.array([label2int_temporal_annotation[classe_mapping[y]] for y in annotation])
            temporal_annotation.append(annotation)
        else:
            temporal_annotation.append(None)

    if temporal_annotation_only:
        features = [x for x, y in zip(features, temporal_annotation) if y is not None]
        labels = [x for x, y in zip(labels, temporal_annotation) if y is not None]
        temporal_annotation = [x for x in temporal_annotation if x is not None]

    # Build dataloader
    dataset = FeaturesDataset(features, labels, temporal_annotation,
                              num_timesteps=num_timesteps, stride=stride,
                              full_network_minimum_frames=full_network_minimum_frames)
    data_loader = torch.utils.data.DataLoader(dataset, shuffle=shuffle, batch_size=batch_size)

    return data_loader
如何实时检测视频序列的?
这个问题,主要是通过 系列时间内帧间图像组合成一个序列,送到网络中进行分类的,可以在许多地方找到相关参数,比如 display.py :
class DisplayClassnameOverlay(BaseDisplay):
    """
    Display recognized class name as a large video overlay. Once the probability for a class passes the threshold,
    the name is shown and stays visible for a certain duration.
    """

    def __init__(
            self,
            thresholds: Dict[str, float],
            duration: float = 2.,
            font_scale: float = 3.,
            thickness: int = 2,
            border_size: int = 50,
            **kwargs
    ):
        """
        :param thresholds:
            Dictionary of thresholds for all classes.
        :param duration:
            Duration in seconds how long the class name should be displayed after it has been recognized.
        :param font_scale:
            Font scale factor for modifying the font size.
        :param thickness:
            Thickness of the lines used to draw the text.
        :param border_size:
            Height of the border on top of the video display. Used for correctly centering the displayed class name
            on the video.
        """
        super().__init__(**kwargs)
        self.thresholds = thresholds
        self.duration = duration
        self.font_scale = font_scale
        self.thickness = thickness
        self.border_size = border_size

        self._current_class_name = None
        self._start_time = None

    def _get_center_coordinates(self, img: np.ndarray, text: str):
        textsize = cv2.getTextSize(text, FONT, self.font_scale, self.thickness)[0]

        height, width, _ = img.shape
        height -= self.border_size

        x = int((width - textsize[0]) / 2)
        y = int((height + textsize[1]) / 2) + self.border_size

        return x, y

    def _display_class_name(self, img: np.ndarray, class_name: str):
        pos = self._get_center_coordinates(img, class_name)
        put_text(img, class_name, position=pos, font_scale=self.font_scale, thickness=self.thickness)

    def display(self, img: np.ndarray, display_data: dict):
        now = time.perf_counter()

        if self._current_class_name and now - self._start_time < self.duration:
            # Keep displaying the same class name
            self._display_class_name(img, self._current_class_name)
        else:
            self._current_class_name = None
            for class_name, proba in display_data['sorted_predictions']:
                if class_name in self.thresholds and proba > self.thresholds[class_name]:
                    # Display new class name
                    self._display_class_name(img, class_name)
                    self._current_class_name = class_name
                    self._start_time = now
                    break
        return img
对了
每个类别只需要5个左右的视频,即可得到不错的效果嗷~
欢迎Star github~
因为后续会更新标题的所有模型。
欢迎各位目标检测以及其他AI领域的朋友进入精品AI知识星球
本星球面向所有AI领域的同学,工程师,甲方,乙方,爱好者等~
Q:什么是知识星球?他和微信QQ技术交流群的区别是什么?
A: 由于交流群水群太多,故而建立知识星球,星球里面有问有答,多对多的知识分享与问答。
Q:为什么要进知识星球?
A:这个知识星球里面专业人士较多,术业有专攻,都是AI领域的先行者,能得到他们的帮助,甚至与其交朋友,事半功倍,最重要的是,作为AI领域学子,进入以后能督促学习,养成自律的好习惯~
Q:为什么要付费?
A:由于内容质量高,不希望白嫖。
Q:里面有哪些人?
A: 清华北大北理中科大学子,Intel ,达摩院,腾讯,字节等大厂大佬,90% AI方向研究生学历以上,一群友善好学,有问必答的后浪们~
一个专注AI领域的知识星球 正式成立啦~
星球联系我,获取数据和模型嗷~


