计算机视觉life从零开始一起学习SLAM 学习笔记
题目: 点云融合实验。已经给定3帧(不连续)RGB-D相机拍摄的 RGB + depth 图像,以及他们之间的变换矩阵(以第一帧为参考帧),请将上述3帧RGB-D图像分别生成点云并融合出最终的点云输出。
代码框架及数据 链接:https://pan.baidu.com/s/1YPXvvR5bsXWnMk0juxqvgQ 提取码:7son
参考答案:
#include "slamBase.hpp"
int main( int argc, char** argv )
{
CAMERA_INTRINSIC_PARAMETERS cameraParams{
517.0,516.0,318.6,255.3,5000.0};
int frameNum = 3;
vector<Eigen::Isometry3d, Eigen::aligned_allocator<Eigen::Isometry3d>> poses;
PointCloud::Ptr fusedCloud(new PointCloud()); // 注意内存对齐!!!
string path = "./data/";
string cameraPosePath = path + "cameraTrajectory.txt";
readCameraTrajectory(cameraPosePath, poses);
for (int idx = 0; idx < frameNum; idx++)
{
string rgbPath = path + "rgb/rgb" + to_string(idx) + ".png";
string depthPath = path + "depth/depth" + to_string(idx) + ".png";
FRAME frm;
frm.rgb = cv::imread(rgbPath);
if (frm.rgb.empty()) {
cerr << "Fail to load rgb image!" << endl;
}
frm.depth = cv::imread(depthPath, -1);
if (frm.depth.empty()) {
cerr << "Fail to load depth image!" << endl;
}
if (idx == 0) // 如果是第一帧,把第一帧转为点云
{
fusedCloud = image2PointCloud(frm.rgb, frm.depth, cameraParams);
}
else // 如果非首帧,则把当前帧加入点云,即点云融合
{
fusedCloud = pointCloudFusion( fusedCloud, frm, poses[idx], cameraParams );
}
}
pcl::io::savePCDFile( "./fusedCloud.pcd", *fusedCloud ); // 保存点云
return 0;
}
slamBase.cpp,主要实现了几个重要函数的定义
#include "slamBase.hpp"
PointCloud::Ptr image2PointCloud(Mat rgb, Mat depth, CAMERA_INTRINSIC_PARAMETERS camera)
{
PointCloud::Ptr cloud ( new PointCloud );
for (int m = 0; m < depth.rows; m++)
for (int n = 0; n < depth.cols; n++)
{
// 获取深度图中(m,n)处的值
ushort d = depth.ptr<ushort>(m)[n];
// d 可能没有值,若如此,跳过此点
if (d == 0)
continue;
// d 存在值,则向点云增加一个点
PointT p;
// 计算这个点的空间坐标
p.z = double(d) / camera.scale;
p.x = (n - camera.cx) * p.z / camera.fx;
p.y = (m - camera.cy) * p.z / camera.fy;
// 从rgb图像中获取它的颜色
p.b = rgb.ptr<uchar>(m)[n * 3];
p.g = rgb.ptr<uchar>(m)[n * 3 + 1];
p.r = rgb.ptr<uchar>(m)[n * 3 + 2];
// 把p加入到点云中
cloud->points.push_back(p);
}
// 设置并保存点云
cloud->height = 1;
cloud->width = cloud->points.size();
cloud->is_dense = false;
return cloud;
}
PointCloud::Ptr pointCloudFusion( PointCloud::Ptr &original, FRAME& newFrame, Eigen::Isometry3d T, CAMERA_INTRINSIC_PARAMETERS camera )
{
// ---------- 开始你的代码 ------------- -//
// 简单的点云叠加融合
PointCloud::Ptr newCloud(new PointCloud()), transCloud(new PointCloud());
newCloud = image2PointCloud(newFrame.rgb, newFrame.depth,camera); // 此时的点云有像素信息,位置xyz为相机坐标系下的坐标
pcl::transformPointCloud(*newCloud,*transCloud,T.matrix()); // 将新点云从相机坐标系转为世界坐标系
*original += *transCloud; // 更新点云
return original;
// ---------- 结束你的代码 ------------- -//
}
void readCameraTrajectory(string camTransFile, vector<Eigen::Isometry3d, Eigen::aligned_allocator<Eigen::Isometry3d>> &poses) // 注意内存对齐
{
ifstream fcamTrans(camTransFile);
if(!fcamTrans.is_open())
{
cerr << "trajectory is empty!" << endl;
return;
}
// ---------- 开始你的代码 ------------- -//
// 参考作业8 绘制轨迹
string lineData;
while((getline(fcamTrans,lineData)) && !lineData.empty()){
Eigen::Quaterniond quad;
Eigen::Vector3d t;
Eigen::Isometry3d T = Eigen::Isometry3d::Identity();
if(lineData[0] == '#'){
continue;
}
istringstream strData(lineData);
strData>>t[0]>>t[1]>>t[2]>>quad.x()>>quad.y()>>quad.z()>>quad.w();
T.rotate(quad);
T.pretranslate(t);
//cout<<"test "<
poses.push_back(T);
}
// ---------- 结束你的代码 ------------- -//
}
当然还有头文件:
# pragma once //保证头文件只被编译一次
#include
// opencv
#include
#include
// pcl
#include
#include
#include
using namespace std;
using namespace cv;
typedef pcl::PointXYZRGB PointT;
typedef pcl::PointCloud<PointT> PointCloud;
// camera instrinsic parameters
struct CAMERA_INTRINSIC_PARAMETERS
{
double fx, fy, cx, cy, scale;
};
struct FRAME
{
cv::Mat rgb, depth;
};
PointCloud::Ptr image2PointCloud(Mat rgb, Mat depth, CAMERA_INTRINSIC_PARAMETERS camera);
PointCloud::Ptr pointCloudFusion( PointCloud::Ptr &original, FRAME& newFrame, Eigen::Isometry3d T, CAMERA_INTRINSIC_PARAMETERS camera );
void readCameraTrajectory(string camTransFile, vector<Eigen::Isometry3d, Eigen::aligned_allocator<Eigen::Isometry3d>> &poses);
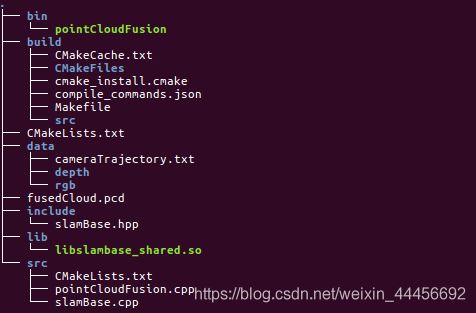
这个练习题的项目结构值得借鉴,用不同的文件夹放不同的文件,条理清晰。
学习一下CMakeLists.txt的写法:
第一个CMakeLists.txt:
CMAKE_MINIMUM_REQUIRED( VERSION 2.8 ) #设定版本
PROJECT(PointCloud) #设定工程名
SET( CMAKE_CXX_FLAGS "-std=c++11" )#设定编译器
SET(CMAKE_BUILD_TYPE Debug)
#设定可执行二进制文件的目录
SET( EXECUTABLE_OUTPUT_PATH ${
PROJECT_SOURCE_DIR}/bin)
#设定存放编译出来的库文件的目录
SET( LIBRARY_OUTPUT_PATH ${
PROJECT_SOURCE_DIR}/lib)
#设定头文件目录
INCLUDE_DIRECTORIES( ${
PROJECT_SOURCE_DIR}/include)
#并且把该目录设为连接目录
LINK_DIRECTORIES( ${
PROJECT_SOURCE_DIR}/lib)
#增加子文件夹,也就是进入源代码文件夹继续构建
ADD_SUBDIRECTORY( ${
PROJECT_SOURCE_DIR}/src)
第二个CMakeLists.txt,继续进入src文件夹进行构建:
# 增加PCL库的依赖
FIND_PACKAGE( PCL 1.7 REQUIRED )
FIND_PACKAGE( OpenCV REQUIRED )
ADD_DEFINITIONS( ${
PCL_DEFINITIONS} )
INCLUDE_DIRECTORIES( ${
PCL_INCLUDE_DIRS} )
LINK_LIBRARIES( ${
PCL_LIBRARY_DIRS} )
INCLUDE_DIRECTORIES( ${
PROJECT_SOURSE_DIR}/include )
ADD_LIBRARY(slambase_shared SHARED slamBase.cpp)
TARGET_LINK_LIBRARIES(slambase_shared
${
OpenCV_LIBS}
${
PCL_LIBRARIES} )
ADD_EXECUTABLE( pointCloudFusion pointCloudFusion.cpp )
TARGET_LINK_LIBRARIES(pointCloudFusion
slambase_shared
${
OpenCV_LIBS}
${
PCL_LIBRARIES}
)
cameraTrajectory文件里事先储存的相机位姿数据是怎么来的?
在单目SLAM中,通常是先提取特征点,然后对两幅图进行特征匹配,筛选,最后用匹配好的特征点对求基础矩
阵或本征矩阵,然后可以估计相机位姿,同时可以三角化求出特征点对应的三维点,称为地图点,然后不断的加入其它帧,用PNP方法来求位姿,维护三维点,同时用BA进行位姿优化。
/usr/include/eigen3/Eigen/src/Core/DenseStorage.h:128: Eigen::internal::plain_array<T, Size, MatrixOrArrayOptions, 32>::plain_array() [with T = double; int Size = 16; int MatrixOrArrayOptions = 0]: Assertion (reinterpret_cast<size_t>(eigen_unaligned_array_assert_workaround_gcc47(array)) & (31)) == 0 && "this assertion is explained here: " "http://eigen.tuxfamily.org/dox-devel/group__TopicU... " **** READ THIS WEB PAGE !!! ****"' failed.
然后我按照提示,到Eigen的文档里面查错误原因,说是和Fixed-size vectorizable Eigen objects有关,但是我经过调试发现,错误出现在readCameraTrajectory()函数,在poses.push_back(T)存入第三个位姿的时候就会报这个错误。而Eigen::Isometry3d查了一下,应该也不属于Fixed-size vectorizable Eigen objects。神奇的是,当我删掉第三帧位姿数据,只读取前两帧位姿数据的话,代码可以顺利执行,生成.pcd文件。
这个问题困扰了我两天时间,
解决办法:
初始化poses时加上内存对齐参数:
vector<Eigen::Isometry3d, Eigen::aligned_allocator<Eigen::Isometry3d>> poses并且在readCameraTrajectory()(相应调用该参数的函数)的引用和定义里面也对poses进行相同的改动
这是我当时刚安装pcl后的历史遗留问题,当时照着好几个教程装pcl库,那叫一个惨烈。不知到重装了多少次,终于能顺利编译了,但是唯一美中不足的是pcl_viewer用起来有点问题。
可能是同时安装了Ubuntu自带的pcl和自己编译的pcl两个版本,在使用pcl_viewer的时候会出现无法渲染点云,窗口一片漆黑的情况。
Loading fusedCloud.pcd [PCLVisualizer::setUseVbos] Has no effect when OpenGL version is ≥ 2
[done, 4361.73 ms : 706468 points]」
一直以为是opengl的版本问题,后来发现在/usr/bin/和usr/local/bin下各有一个pcl_viewer,默认执行的是/usr/local/bin下面的那个,试了试/usr/bin/下面那个,突然就能正常显示了。(感觉应该是Ubuntu内置的pcl起了作用)。
这两个史诗巨坑整整耗费了我三天的时间,不过也逼着我把Eigen库翻着看了一遍,多少增加了点处理错误的经验。
题目: 给定一个融合后的点云,请先对其进行下采样,再进行滤波,最后输出滤波后的结果及被滤掉的离群点。
点云滤波代码框架及待处理数据下载: 链接:https://pan.baidu.com/s/1EAP89pHV-Ec8glKxaATBAQ 提取码:as3x
#include
#include
#include
#include
#include
#include
#include
#include
typedef pcl::PointXYZRGB PointT;
int main(int argc, char** argv)
{
// 加载点云初始化
pcl::PointCloud<PointT>::Ptr cloud(new pcl::PointCloud<PointT>);
pcl::PointCloud<PointT>::Ptr cloud_downSampled(new pcl::PointCloud<PointT>);
pcl::PointCloud<PointT>::Ptr cloud_filtered(new pcl::PointCloud<PointT>);
pcl::PointCloud<PointT>::Ptr noise(new pcl::PointCloud<PointT>);
pcl::PointCloud<PointT>::Ptr cloud_filtered_R(new pcl::PointCloud<PointT>);
if (pcl::io::loadPCDFile("./data/fusedCloud.pcd", *cloud) == -1)
{
cout << "点云数据读取失败!" << endl;
}
std::cout << "Points number after filtering: " << cloud->points.size() << std::endl;
// ----------- 开始你的代码,参考http://docs.pointclouds.org/trunk/group__filters.html --------
// 下采样,同时保持点云形状特征
pcl::VoxelGrid<PointT> downSampled; // 创建滤波对象
downSampled.setInputCloud(cloud); //设置需要过滤的点云给滤波对象
downSampled.setLeafSize(0.01f, 0.01f, 0.01f); // 设置滤波时创建的体素为边长1cm的立方体
downSampled.filter(*cloud_downSampled); // 执行滤波操作,存储输出
// 统计滤波
pcl::StatisticalOutlierRemoval<PointT> statisOutlierRemoval; // 创建滤波对象
statisOutlierRemoval.setInputCloud(cloud_downSampled); // 设置滤波的点云
statisOutlierRemoval.setMeanK(50); // 设置在进行统计时考虑查询点临近点数
statisOutlierRemoval.setStddevMulThresh(1.0); // 设置判断是否为离群点的阈值:均值+1.0×标准差
statisOutlierRemoval.filter(*cloud_filtered); // 滤波结果存储到cloud_filtered
// 试试半径滤波效果
pcl::RadiusOutlierRemoval<PointT> RoutlierRemoval; //创建滤波器对象
RoutlierRemoval.setInputCloud(cloud_downSampled); // 设置待滤波的点云
RoutlierRemoval.setRadiusSearch(0.02); // 设置搜索半径
RoutlierRemoval.setMinNeighborsInRadius(2); // 设置一个内点最少的邻居数目
RoutlierRemoval.filter(*cloud_filtered_R);
std::cout << "Points number after filtering: " << cloud_filtered->points.size() << std::endl;
// 输出内点
pcl::PCDWriter writer;
writer.write<PointT>("./data/cloud_inliers.pcd", *cloud_filtered, false);
// 输出离群点
statisOutlierRemoval.setNegative(true);
statisOutlierRemoval.filter(*noise);
writer.write<PointT>("./data/cloud_outliers.pcd", *noise, false);
// ----------- 结束你的代码 --------
// 显示滤波结果,或者用pcl_viewer 命令查看
boost::shared_ptr<pcl::visualization::PCLVisualizer> viewer(new pcl::visualization::PCLVisualizer("3D Viewer"));
viewer->setBackgroundColor(0, 0, 0);
pcl::visualization::PointCloudColorHandlerRGBField<PointT> rgb(cloud_filtered);
viewer->addPointCloud<PointT> (cloud_filtered, rgb, "sample cloud");
while (!viewer->wasStopped())
{
viewer->spinOnce(100);
// boost::this_thread::sleep(boost::posix_time::microseconds(100000));
}
return (0);
}
附CMakeLists.txt, 与点云融合大同小异,这里只放进入src构建的cmakelists:
FIND_PACKAGE( PCL 1.7 REQUIRED )
FIND_PACKAGE( OpenCV REQUIRED )
ADD_DEFINITIONS( ${
PCL_DEFINITIONS} )
INCLUDE_DIRECTORIES( ${
PCL_INCLUDE_DIRS} )
LINK_LIBRARIES( ${
PCL_LIBRARY_DIRS} )
ADD_EXECUTABLE( pointCloudFilter pointCloudFilter.cpp )
TARGET_LINK_LIBRARIES(pointCloudFilter
${
OpenCV_LIBS}
${
PCL_LIBRARIES}
${
Boost_LIBRARIES}
)
体素是体积元素(Volume Pixel)的简称,包含体素的立体可以通过立体渲染或者提取给定阈值轮廓的多边形等值面表现出来。一如其名,是数字数据于三维空间分割上的最小单位,体素用于三维成像、科学数据与医学影像等领域。概念上类似二维空间的最小单位——像素,像素用在二维计算机图像的影像数据上。有些真正的三维显示器运用体素来描述它们的分辨率,举例来说:可以显示512×512×512体素的显示器。
缩小图像(或称为下采样(subsampled)或降采样(downsampled))的主要目的有两个:1、使得图像符合显示区域的大小;2、生成对应图像的缩略图。放大图像(或称为上采样(upsampling)或图像插值(interpolating))的主要目的是放大原图像,从而可以显示在更高分辨率的显示设备上。对图像的缩放操作并不能带来更多关于该图像的信息, 因此图像的质量将不可避免地受到影响。然而,确实有一些缩放方法能够增加图像的信息,从而使得缩放后的图像质量超过原图质量的。
感觉和CNN过程中的卷积差不多啊。
pcl提供了下采样类,emplate
其原理是,利用一个体素的质心来作为这个体素范围内所有点的近似值。
对每个点的邻域进行一个统计分析,并修剪掉一些不符合标准的点。具体方法为在输入数据中对点到临近点的距离分布的计算,对每一个点,计算它到所有临近点的平均距离(假设得到的结果是一个高斯分布,其形状是由均值和标准差决定),那么平均距离在标准范围之外的点,可以被定义为离群点并从数据中去除。
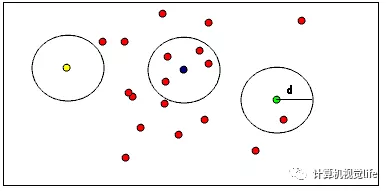
如下图所示,有助于形象化理解RadiusOutlierRemoval的作用,在点云数据中,用户指定每个的点一定范围内周围至少要有足够多的近邻。例如,如果指定至少要有1个邻居,只有黄色的点会被删除,如果指定至少要有2个邻居,黄色和绿色的点都将被删除。
另外就是又碰到了一个bug,在编译的时候,boost那儿出了错误:
CMakeFiles/pointCloudFilter.dir/pointCloudFilter.cpp.o:在函数‘boost::this_thread::sleep(boost::posix_time::ptime const&)’中:
/usr/include/boost/thread/pthread/thread_data.hpp:278:对‘boost::this_thread::hiden::sleep_until(timespec const&)’未定义的引用
collect2: error: ld returned 1 exit status
未解决……不过这句函数的作用是休眠延时,去掉也无伤大雅(个人认为)。
题目: 给定一个融合后的点云,已经对其进行下采样和滤波(代码已给)。请对其进行平滑(输出结果),然后计算
法线,并讲法线显示在平滑后的点云上。
代码框架 链接:https://pan.baidu.com/s/1zbCA8WgE0PUD4eqDyxFrkw 提取码:j7zc
参考资料:从零开始一起学习SLAM | 点云平滑法线估计
知识点:平滑和法线估计
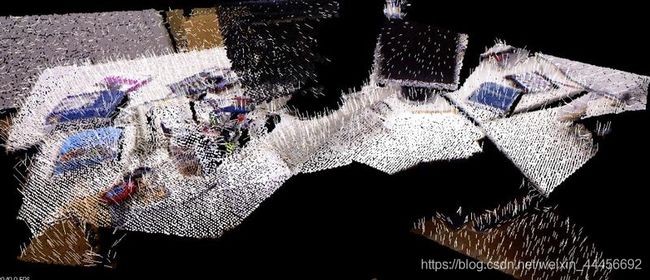
参考结果:如果一切顺利,将得到附图结果。可以通过调整法线的稠密,放大查看法线计算的是否符合预期
该代码是在上一个作业的基础上做的,即对滤波处理后的点云再进行平滑处理,主要是使用重采样。
#include
#include
#include
#include
#include
#include
#include
#include
#include
typedef pcl::PointXYZRGB PointT;
int main(int argc, char** argv)
{
// Load input file
pcl::PointCloud<PointT>::Ptr cloud(new pcl::PointCloud<PointT>);
pcl::PointCloud<PointT>::Ptr cloud_downSampled(new pcl::PointCloud<PointT>);
pcl::PointCloud<PointT>::Ptr cloud_filtered(new pcl::PointCloud<PointT>);
pcl::PointCloud<PointT>::Ptr cloud_smoothed(new pcl::PointCloud<PointT>);
if (pcl::io::loadPCDFile("./data/fusedCloud.pcd", *cloud) == -1)
{
cout << "点云数据读取失败!" << endl;
}
std::cout << "Orginal points number: " << cloud->points.size() << std::endl;
// 下采样,同时保持点云形状特征
pcl::VoxelGrid<PointT> downSampled; //创建滤波对象
downSampled.setInputCloud (cloud); //设置需要过滤的点云给滤波对象
downSampled.setLeafSize (0.01f, 0.01f, 0.01f); //设置滤波时创建的体素体积为1cm的立方体
downSampled.filter (*cloud_downSampled); //执行滤波处理,存储输出
pcl::io::savePCDFile ("./downsampledPC.pcd", *cloud_downSampled);
// 统计滤波
pcl::StatisticalOutlierRemoval<PointT> statisOutlierRemoval; //创建滤波器对象
statisOutlierRemoval.setInputCloud (cloud_downSampled); //设置待滤波的点云
statisOutlierRemoval.setMeanK (50); //设置在进行统计时考虑查询点临近点数
statisOutlierRemoval.setStddevMulThresh (3.0); //设置判断是否为离群点的阀值:均值+1.0*标准差
statisOutlierRemoval.filter (*cloud_filtered); //滤波结果存储到cloud_filtered
pcl::io::savePCDFile ("./filteredPC.pcd", *cloud_filtered);
// ----------------------开始你的代码--------------------------//
// 请参考PCL官网实现以下功能
// 对点云重采样
pcl::search::KdTree<PointT>::Ptr treeSampling(new pcl::search::KdTree<PointT>); // 创建最近邻的KD-tree
pcl::MovingLeastSquares<PointT,PointT> mls_filter; // 定义最小二乘实现的对象
mls_filter.setInputCloud(cloud_filtered); // 输入待处理点云
mls_filter.setComputeNormals(false); // 设置在最小二乘计算中是否需要存储计算的法线
mls_filter.setPolynomialOrder(2); // 2阶多项式拟合
mls_filter.setSearchMethod(treeSampling); //设置KD-tree作为搜索方法
mls_filter.setSearchRadius(0.05); //设置用于拟合的K近邻半径
mls_filter.process(*cloud_smoothed); //输出
// 输出重采样结果
pcl::io::savePCDFile("./smoothedPC.pcd", *cloud_smoothed);
// 法线估计
pcl::NormalEstimation<PointT, pcl::Normal> normalEstimation; // 创建法线估计的对象
normalEstimation.setInputCloud(cloud_smoothed); // 输入点云
pcl::search::KdTree<PointT>::Ptr tree(new pcl::search::KdTree<PointT>); //创建KD-tree
normalEstimation.setSearchMethod(tree);
pcl::PointCloud<pcl::Normal>::Ptr normals(new pcl::PointCloud<pcl::Normal>); //定义云法线
normalEstimation.setKSearch(10); // 使用当前点周围最近的10个点
//normalEstimation.setRadiusSearch(0.03);
normalEstimation.compute(*normals); // 计算法线
// ----------------------结束你的代码--------------------------//
// 显示结果
boost::shared_ptr<pcl::visualization::PCLVisualizer> viewer (new pcl::visualization::PCLVisualizer ("PCL Viewer"));
viewer->setBackgroundColor (0, 0, 0);
pcl::visualization::PointCloudColorHandlerRGBField<PointT> rgb(cloud_smoothed);
viewer->addPointCloud<PointT> (cloud_smoothed, rgb, "smooth cloud");
viewer->setPointCloudRenderingProperties (pcl::visualization::PCL_VISUALIZER_POINT_SIZE, 3, "smooth cloud");
viewer->addPointCloudNormals<PointT, pcl::Normal> (cloud_smoothed, normals, 20, 0.05, "normals");
viewer->initCameraParameters ();
while (!viewer->wasStopped ())
{
viewer->spinOnce (100);
// boost::this_thread::sleep (boost::posix_time::microseconds (100000));
}
return 1;
}
CMakeLists.txt与前连个练习一样,无非就是引入PCL和OpenCV两个库。
主要是重采样和法线估计:
点云重采样,我们实际上是通过一种叫做“移动最小二乘”(MLS, Moving Least Squares )法来实现的,对应的类名叫做:pcl::MovingLeastSquares。
移动最小二乘法是在最小二乘法基础上加以改进的,添加了权函数等,具体的可以参考论文,“移动最小二乘法论文”链接,这篇论文对MLS讲解的很详细,最后还给出了程序设计思路。
法线很有用的,尤其是在三维建模中应用非常广泛,比如在计算机图形学(computer graphics)领域里,法线决定着曲面与光源(light source)的强弱处理(Flat Shading),对于每个点光源位置,其亮度取决于曲面法线的方向。
这里主要直接使用近似值直接从点云数据集推断出曲面法线,近似估计点云中每个点的表面法线。
具体来说,就是把估计某个点的表面法线问题简化为:从该点最近邻计算的协方差矩阵的特征向量和特征值的分析,这里就不多做介绍了。PCL已经帮我们封装好了函数。
K邻域:需要从该点的周围点邻域(也称为k邻域)估计一点处的表面法线 ,所以这个K邻域的选取也很关键
Kd-Tree是一种数据结构,是空间二分树的一种特殊情况,可以很方便的用于进行范围搜索。在这里用KD-Tree就是为了便于管理、搜索点云,这种结构来可以很方便的找到最近邻点。
(k-d树(k-dimensional树的简称),是一种分割k维数据空间的数据结构。主要应用于多维空间关键数据的搜索(如:范围搜索和最近邻搜索)。K-D树是二进制空间分割树的特殊的情况。)
下面是一个3-tree:
k-d在邻域查找上比较有优势,但在大数据量的情况下,若划分粒度较小时,建树的开销也较大,但比八叉树灵活些。在小数据量的情况下,其搜索效率比较高,但在数据量增大的情况下,其效率会有一定的下降,一般是线性上升的规律。
参考:https://www.cnblogs.com/zfyouxi/p/4795584.html
题目: 给定输入点云,结合之前的内容对点云进行滤波、平滑,并计算法线,最后用贪心投影三角化方法进行网格化,显示出网格化结果。
代码框架: 链接:https://pan.baidu.com/s/1avSGdi4IG3ry3wNCI_jDLQ 提取码:cxjy
知识点: 贪心投影三角化方法
#include
#include
#include
#include
#include
#include
#include
#include
#include
#include
#include
typedef pcl::PointXYZ PointT;
int main(int argc, char** argv)
{
// Load input file
pcl::PointCloud<PointT>::Ptr cloud(new pcl::PointCloud<PointT>);
pcl::PointCloud<PointT>::Ptr cloud_downSampled(new pcl::PointCloud<PointT>);
pcl::PointCloud<PointT>::Ptr cloud_filtered(new pcl::PointCloud<PointT>);
pcl::PointCloud<PointT>::Ptr cloud_smoothed(new pcl::PointCloud<PointT>);
if (pcl::io::loadPCDFile("./data/fusedCloud.pcd", *cloud) == -1)
{
cout << "点云数据读取失败!" << endl;
}
std::cout << "Orginal points number: " << cloud->points.size() << std::endl;
// ----------------------开始你的代码--------------------------//
// 请参考之前文章中点云下采样,滤波、平滑等内容,以及PCL官网实现以下功能。代码不难。
// 下采样 降噪
pcl::VoxelGrid<PointT> downSampled; //创建滤波对象
downSampled.setInputCloud(cloud);
downSampled.setLeafSize(0.01f,0.01f,0.01f);
downSampled.filter(*cloud_downSampled);
pcl::io::savePCDFile("./downsampled.pcd", *cloud_downSampled);
// 统计滤波 再次降噪
pcl::StatisticalOutlierRemoval<PointT> statisOutlierRemoval;
statisOutlierRemoval.setInputCloud(cloud_downSampled);
statisOutlierRemoval.setMeanK(50); // 设置在进行统计时考虑查询点临近点数
statisOutlierRemoval.setStddevMulThresh(1.0); // 设置判断是否为离群点的阈值:均值+1.0×标准差
statisOutlierRemoval.filter(*cloud_filtered);
pcl::io::savePCDFile("./filteredPC.pcd", *cloud_filtered);
// 对点云重采样
pcl::search::KdTree<PointT>::Ptr treeSampling(new pcl::search::KdTree<PointT>);
pcl::PointCloud<PointT> mls_points; //输出MLS
pcl::MovingLeastSquares<PointT, PointT> mls; // 定义最小二乘实现对象mls
mls.setInputCloud(cloud_filtered);
mls.setComputeNormals(false); // 设置在最小二乘计算中是否需要存储计算的法线
mls.setPolynomialOrder(2); // 二阶多项式拟合
// mls.setPolynomialFit(false); // 设置为false可以加速smooth 新版本不推荐
mls.setSearchMethod(treeSampling); // 设置搜索方法
mls.setSearchRadius(0.05); // 单位为m 设置用于拟合的K近邻半径
mls.process(mls_points); // 输出 也可以直接输出为cloud_smoothed,下面的转换是为了实验这两种数据结构
// mls 结果先转化为pointcloud2,然后再转回来实验
pcl::PCLPointCloud2 tmp;
pcl::toPCLPointCloud2(mls_points, tmp);
pcl::fromPCLPointCloud2(tmp, *cloud_smoothed);
pcl::io::savePCDFile("./resampledPC.pcd", mls_points);
std::cout<<"Points number after filtering and resampling:"<<cloud_smoothed->points.size()<<std::endl;
// 法线估计
pcl::NormalEstimation<PointT, pcl::Normal> normalEstimation;
normalEstimation.setInputCloud(cloud_smoothed);
pcl::search::KdTree<PointT>::Ptr tree(new pcl::search::KdTree<PointT>);
normalEstimation.setSearchMethod(tree);
pcl::PointCloud<pcl::Normal>::Ptr normals(new pcl::PointCloud<pcl::Normal>); // 定义点云的输出法线
// K 近邻确定方法,使用K个最近点,或者确定一个以r为半径的园的点集来确定都可以 两种方法取1
normalEstimation.setKSearch(10); // 使用当前点周围最近的10个点
// normalEstimation.setRadiusSearch(0.03) // 对于每一个点都用半径为3cm的近邻搜索方式
normalEstimation.compute(*normals); // 计算法线
// 将点云位姿、法线信息连接到一起,即PointNormal类型,有向点云
pcl::PointCloud<pcl::PointNormal>::Ptr cloud_with_normals(new pcl::PointCloud<pcl::PointNormal>);
pcl::concatenateFields(*cloud_smoothed, *normals,*cloud_with_normals);
pcl::PolygonMesh mesh; // 存储最终三角化的网络模型
// 定义搜索树对象
pcl::search::KdTree<pcl::PointNormal>::Ptr tree2(new pcl::search::KdTree<pcl::PointNormal>);
tree2->setInputCloud(cloud_with_normals);
// 贪心投影三角化
pcl::GreedyProjectionTriangulation<pcl::PointNormal> gp3; // 定义三角化对象
// 设置三角化参数
gp3.setSearchRadius(0.1); // 设置搜索时的半径,也就是KNN的求半径
gp3.setMu(2.5); // 设置样本点搜索其临近点的最远距离为2.5倍(典型值为2.5-3),这样使得算法自使用点云密度的变化
gp3.setMaximumNearestNeighbors(100); // 设置样本点最多可搜索的邻域个数,典型是50-100
gp3.setMinimumAngle(M_PI/18); // 设置三角化后得到的三角形内角的最小角度为10
gp3.setMaximumAngle(2*M_PI/3); //设置三角湖后三角形内角为120
gp3.setMaximumSurfaceAngle(M_PI/4); // 设置某点法线方向偏离样本点法线的最大角度为45 如果超过,连接时不考虑该点
gp3.setNormalConsistency(true); // 设置该参数保证法线朝向一致,设置为false的话不会进行法线一致性检查
gp3.setInputCloud(cloud_with_normals); // 设置输入点云为有向点云
gp3.setSearchMethod(tree2); // 设置搜索方式
gp3.reconstruct(mesh); // 重建提取三角化
// ----------------------结束你的代码--------------------------//
// 显示网格化结果
boost::shared_ptr<pcl::visualization::PCLVisualizer> viewer(new pcl::visualization::PCLVisualizer("3D Viewer"));
viewer->setBackgroundColor(0, 0, 0); //
viewer->addPolygonMesh(mesh, "mesh"); //
while (!viewer->wasStopped())
{
viewer->spinOnce(100);
//boost::this_thread::sleep(boost::posix_time::microseconds(100000));
}
return 1;
}
关于网格化,这里面的内容还是很多的,可以参考六哥写的一起做系列, 时间有限,对其原理不再深究,以后有时间了可以好好玩儿玩儿这个模块。
**建议:**使用的贪心投影三角化GreedyProjectionTriangulation 并不常用。实际使用泊松重建方法比较多,可以试试
看有何不同。
**问:**什么是有向点云,实际中获取的点云不都是无序的吗?有序的点云与与无序的点云生成网格化的方式一下吗?
答:有序点云(organiesd)是指点云按顺序排列,可以理解为类似2D图像的索引方式,所以可以很容易的找到它的相邻点信息。不过一般情况下我们拿到的点云都是无序点云(unorganised )。不管是有序还是无序点云,网格化时没有什么区别。网格化需要找邻域信息,有序点云本身就有信息,无序点云我们在网格化时都会创建kdtree之类的对象,目的就是寻找邻域进行索引。总之,可以认为使用时没什么区别。
对于函数setPolynomialFit(false)
mls.setPolynomialFit(false); // 设置为false可以加速smooth*
// 使用时警告
‘void pcl::MovingLeastSquares<PointInT, PointOutT>::setPolynomialFit(bool) [with PointInT = pcl::PointXYZ; PointOutT = pcl::PointXYZ]’ is deprecated: use setPolynomialOrder() instead (It will be removed in PCL 1.12) [-Wdeprecated-declarations]
可以看到,这是不推荐的用法,该函数在PCL1.12将被移除(我目前用的PCL1.10),根据描述该函数应该是和setPolynomialOrder()取代了???用的时候可将这句代码直接注释掉即可。
参考:
从零开始一起学习SLAM | 你好,点云
从零开始一起学习SLAM | 点云平滑法线估计
从零开始一起学习SLAM | 点云到网格的进化