# 前言
Google推出flutter这样一个新的高性能跨平台(Android,ios)快速开发框架之后,被业界许多开发者所关注。我接触了flutter之后,确实发现它的一些优越性。
今天我来给大家分享的是底部导航功能的实现。废话不多说开工啦。
# 学到知识?
1.拆分组件
2.构建简单布局
3.创建底部导航
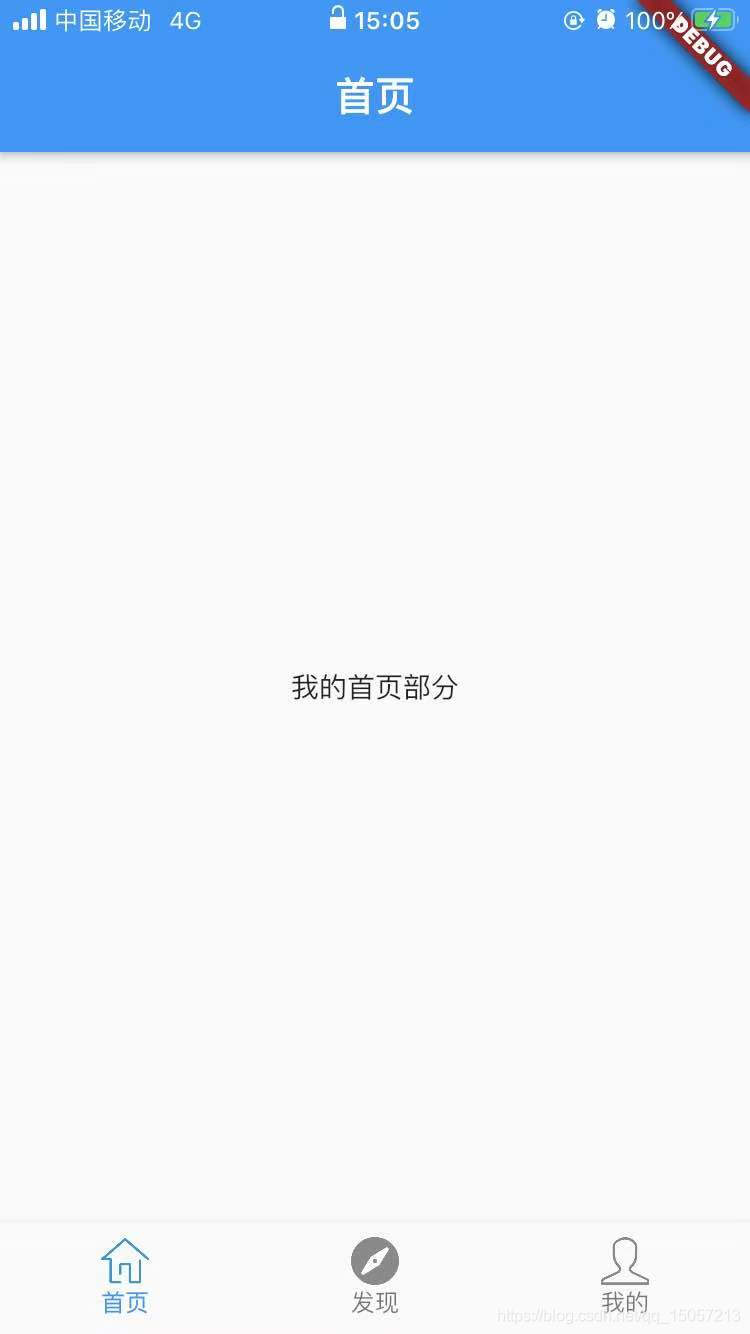
最终效果如下:

这也是我刚开始接触的,学到的知识,如有错误,请指教。
# 搭建布局
## 1. 绘制布局视图
不可缺少的,main() 相当于入口方法,是必须要实现的。
```javascript
void main() => runApp(MyApp());
```
首先要实现MyApp
```javascript
class MyApp extends StatelessWidget {
// This widget is the root of your application.
@override
Widget build(BuildContext context) {
return MaterialApp(
title: '首页',
theme: ThemeData(
// This is the theme of your application.
//
// Try running your application with "flutter run". You'll see the
// application has a blue toolbar. Then, without quitting the app, try
// changing the primarySwatch below to Colors.green and then invoke
// "hot reload" (press "r" in the console where you ran "flutter run",
// or simply save your changes to "hot reload" in a Flutter IDE).
// Notice that the counter didn't reset back to zero; the application
// is not restarted.
primarySwatch: Colors.blue,
),
home: new Scaffold(
body: new Center(
child: new MainTab(),
),
),
);
}
}
```
这里有些同学或许对StatelessWidget 和 StatefulWidget 分不太清楚。或许有疑问他们两者区别在哪里?
我们先查看StatelessWidget 的源码:
```javascript
abstract class StatelessWidget extends Widget {
/// Initializes [key] for subclasses.
const StatelessWidget({ Key key }) : super(key: key);
/// Creates a [StatelessElement] to manage this widget's location in the tree.
///
/// It is uncommon for subclasses to override this method.
@override
StatelessElement createElement() => StatelessElement(this);
/// Describes the part of the user interface represented by this widget.
///
/// The framework calls this method when this widget is inserted into the
/// tree in a given [BuildContext] and when the dependencies of this widget
/// change (e.g., an [InheritedWidget] referenced by this widget changes).
///
/// The framework replaces the subtree below this widget with the widget
/// returned by this method, either by updating the existing subtree or by
/// removing the subtree and inflating a new subtree, depending on whether the
/// widget returned by this method can update the root of the existing
/// subtree, as determined by calling [Widget.canUpdate].
///
/// Typically implementations return a newly created constellation of widgets
/// that are configured with information from this widget's constructor and
/// from the given [BuildContext].
///
/// The given [BuildContext] contains information about the location in the
/// tree at which this widget is being built. For example, the context
/// provides the set of inherited widgets for this location in the tree. A
/// given widget might be built with multiple different [BuildContext]
/// arguments over time if the widget is moved around the tree or if the
/// widget is inserted into the tree in multiple places at once.
///
/// The implementation of this method must only depend on:
///
/// * the fields of the widget, which themselves must not change over time,
/// and
/// * any ambient state obtained from the `context` using
/// [BuildContext.dependOnInheritedWidgetOfExactType].
///
/// If a widget's [build] method is to depend on anything else, use a
/// [StatefulWidget] instead.
///
/// See also:
///
/// * [StatelessWidget], which contains the discussion on performance considerations.
@protected
Widget build(BuildContext context);
}
```
再看StatefulWidget 的源码:
```javascript
abstract class StatefulWidget extends Widget {
/// Initializes [key] for subclasses.
const StatefulWidget({ Key key }) : super(key: key);
/// Creates a [StatefulElement] to manage this widget's location in the tree.
///
/// It is uncommon for subclasses to override this method.
@override
StatefulElement createElement() => StatefulElement(this);
/// Creates the mutable state for this widget at a given location in the tree.
///
/// Subclasses should override this method to return a newly created
/// instance of their associated [State] subclass:
///
/// ```dart
/// @override
/// _MyState createState() => _MyState();
/// ```
///
/// The framework can call this method multiple times over the lifetime of
/// a [StatefulWidget]. For example, if the widget is inserted into the tree
/// in multiple locations, the framework will create a separate [State] object
/// for each location. Similarly, if the widget is removed from the tree and
/// later inserted into the tree again, the framework will call [createState]
/// again to create a fresh [State] object, simplifying the lifecycle of
/// [State] objects.
@protected
State createState();
}
```
我们发现最大的不同是:**createState**这个方法。就是可以改变状态。
那么它们的区别就是:__是否可以状态改变(在App中则是交互---按钮的响应、页面刷新等)__
## 2. 搭建底部导航
```javascript
class MainTab extends StatefulWidget{
@override
State
return new _MainBottomTab();
}
}
class _MainBottomTab extends State
int _currentIndex = 0;
List
@override
Widget build(BuildContext context) {
return new Scaffold(
body: pages[_currentIndex],
bottomNavigationBar: new BottomNavigationBar(
items: [
new BottomNavigationBarItem(icon: _currentIndex == 0 ? new Image.asset(Images.main,width: 24,height: 24,) : new Image.asset(Images.main_nor,width: 24,height: 24,),
title: Text(
"首页",
)),
new BottomNavigationBarItem(icon: _currentIndex == 1 ? new Image.asset(Images.find,width: 24,height: 24,) : new Image.asset(Images.find_nor,width: 24,height: 24,),
title: Text(
"发现",
)),
new BottomNavigationBarItem(icon: _currentIndex == 2 ? new Image.asset(Images.me,width: 24,height: 24,) : new Image.asset(Images.me_nor,width: 24,height: 24,),
title: Text(
"我的",
)),
],
fixedColor: Colors.blue,
currentIndex: _currentIndex,
onTap: (int index){
setState(() {
_currentIndex = index;
});
},
type: BottomNavigationBarType.fixed,
selectedFontSize: 12,
),
);
}
}
```
Scaffold 是flutter常用的布局控件之一。为什么用Scaffold?
因为Scaffold有一个默认的bottomNavigationBar的属性。bottomNavigationBar就是底部导航的关键。我在这里给它一个bottomNavigationBar,并在这个bottomNavigationBar放了三个BottomNavigationBarItem。每个BottomNavigationBarItem就是底部的一个导航按钮。
不仅如此,BottomNavigationBar还为我们提供了一个currentIndex的属性,它代表了当前再BottomNavigationBarItem中被选中的index。源码如下:
```javascript
/// The index into [items] for the current active [BottomNavigationBarItem].
final int currentIndex;
```
BottomNavigationBar还提供了一个onTap方法。
```javascript
/// Called when one of the [items] is tapped.
///
/// The stateful widget that creates the bottom navigation bar needs to keep
/// track of the index of the selected [BottomNavigationBarItem] and call
/// `setState` to rebuild the bottom navigation bar with the new [currentIndex].
final ValueChanged
```
当底部导航的一个BottomNavigationBarItem被点击时,它会调用此方法,并传入当前BottomNavigationBarItem的index值,这样就能改变焦点到当前的index上的BottomNavigationBarItem了。
# 创建切换页面
我们的App不只是单页面切换,我需要切换不同的页面。
下面我们来创建不同的页面
创建页面如下:
```javascript
import 'package:flutter/material.dart';
class MainPage extends StatelessWidget{
@override
Widget build(BuildContext context) {
return MaterialApp(
home: new Scaffold(
appBar: new AppBar(
title: Text("首页"),
),
body: new Center(
child: Text("我的首页部分"),
),
),
);
}
}
```
如以上方式创建。
# 显示到页面上,并可以切换
由于我们是通过currentIndex这个变量来控制跳转的,页面要想同步也必须依赖于这个变量。这里我们使用一个List
```javascript
List
```
然后在_MainBottomTab的build中body中实现
```javascript
body: pages[_currentIndex],
```
现在基本可以显示。但是切换的时候需要改变items选中的图片,怎么办?
我们还是利用之前定义的_currentIndex,来和选中 BottomNavigationBarItem进行比较即可。
```javascript
new BottomNavigationBarItem(icon: _currentIndex == 0 ? new Image.asset(Images.main,width: 24,height: 24,) : new Image.asset(Images.main_nor,width: 24,height: 24,),
title: Text(
"首页",
)),
```
在我医用图片的时候发现图片一直显示不出来。现在推荐一种方法。
在根目录下创建resource文件,吧图片放到这个文件中。然后在pubspec.yaml 中添加所需要的图片路径。


然后在需要的地方用
```javascript
Image.asset("resource/images/main.png",width: 24,height: 24,)
```
这样就可以正常显示图片了。如有其它方法还望告知,我也是学习中。大家一起努力。
如有问题可以私信我哦。