orbslam2稠密版建图
一、获取代码
高博的工作是对基本 ORB SLAM2 的扩展,基本思想是为每个关键帧构造相应的点云,然后依据从 ORB SLAM2 中获取的关键帧位置信息将所有的点云拼接起来,形成一个全局点云地图。
git clone https://github.com/gaoxiang12/ORBSLAM2_with_pointcloud_map.git
二、配置
参考:https://www.jianshu.com/p/5e7b8358893f
三、运行官方数据集
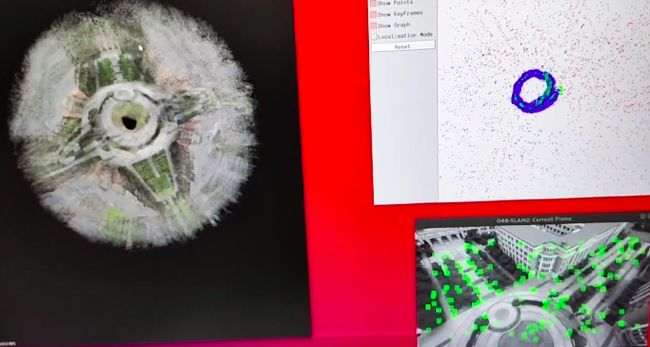
3.1 普通模式运行
在使用数据之前,需要对 rgbd_dataset_freiburg1_xyz 中的 RGB 文件和 Depth 文件进行匹配。TUM 数据官网 提供了匹配的程序 associate.py,命令为:
python associate.py rgb.txt depth.txt > association.txt在 ~/ORB_SLAM2_modified 文件夹下运行如下格式的命令:
./Examples/RGB-D/rgbd_tum Vocabulary/ORBvoc.txt Examples/RGB-D/TUM1.yaml /home/darren/darren_file/rgbd_dataset_freiburg1_xyz /home/darren/darren_file/rgbd_dataset_freiburg1_xyz/association.txt 稠密版图

生成的稠密点云只有灰度,修改步骤如下:
1)在Tracking.h中声明RGB矩阵
Frame mCurrentFrame;
cv::Mat mImRGB; //new declared
cv::Mat mImGray;
2)在Tracking.cc中定义RGB矩阵
cv::Mat Tracking::GrabImageRGBD(const cv::Mat &imRGB,const cv::Mat &imD, const double ×tamp)
{
mImRGB = imRGB; // new
mImGray = imRGB;
......
3)在Tracking.cc中定义RGB点云映射
mpPointCloudMapping->insertKeyFrame( pKF, this->mImGray, this->mImDepth );//change the mImGray to mImRGB as next row
mpPointCloudMapping->insertKeyFrame( pKF, this->mImRGB, this->mImDepth );// new
原文链接:https://blog.csdn.net/FRIGIDWINTER/article/details/119986760
3.2 ros模式下运行
略
四、运行自己的数据集
4.1 zed录制bag包
4.2 bag包制作成自己的数据集
rosbag record -O image.bag /rgb/image_raw /depth_to_rgb/image_raw
4.2.1 查看zed相机订阅话题
rosbag info image.bag4.2.2 使用python脚本得到深度图和rgb 图
python get_pic.py
import numpy
import rosbag
import cv2
import os
from sensor_msgs.msg import Image
from cv_bridge import CvBridge
from cv_bridge import CvBridgeError
rgb_path = '/path/to/save/re-edit-bag/rgb/'# absolute path of extracted rgb images
depth_path = '/path/to/save/re-edit-bag/depth/'# absolute path of extracted depth images
bridge = CvBridge()
with rosbag.Bag('/path/to/image.bag', 'r') as bag:
	num = 1
    for topic,msg,t in bag.read_messages():

        if topic == "/depth_to_rgb/image_raw":
            cv_image = bridge.imgmsg_to_cv2(msg, '32FC1')
            cv_image = cv_image * 255  # 不知为何转化的深度图显示不出来。将其乘以 255 才能看到显示效果.

            # timestr = "%.8f" %  msg.header.stamp.to_sec() # 时间戳命名
            # image_name = timestr + '.png'# an extension is necessary
            image_name = str(num) + '.png'# 编号命名
            cv2.imwrite(depth_path + image_name, cv_image)
            # 实际应用可直接保存为 numpy array
            # np.save(depth_path + image_name, cv_image)
            print(depth_path + image_name)
        if topic == "/rgb/image_raw":
            cv_image = bridge.imgmsg_to_cv2(msg, "bgr8")
            timestr = "%.8f" %  msg.header.stamp.to_sec()
            image_name = str(num) + '.png'
            cv2.imwrite(rgb_path + image_name, cv_image)
       num += 1
————————————————
版权声明:本文为CSDN博主「zxxRobot」的原创文章,遵循CC 4.0 BY-SA版权协议,转载请附上原文出处链接及本声明。
原文链接:https://blog.csdn.net/zxxxiazai/article/details/111616502
4.2.3 在上面脚步深度和rgb相应位置添加两行代码,得到depth.txt和rgb.txt
depth.txt和rgb.txt里面保存的是时间戳
with open('depth.txt', 'a') as depth_time_file:
depth_time_file.write(timestr+" depth/"+image_name+"\n")
with open('rgb.txt', 'a') as rgb_time_file:
rgb_time_file.write(timestr+" rgb/"+image_name+"\n")
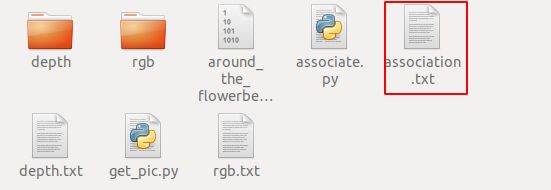
4.2.4 得到的depth.txt和rgb.txt通过脚本得到association.txt
python associate.py rgb.txt depth.txt > association.txt4.2.5 下面是得到的基本信息
rgb图
深度图
association.txt文件
4.2.6 运行代码
./Examples/RGB-D/rgbd_tum Vocabulary/ORBvoc.txt Examples/RGB-D/TUM1_self.yaml /home/darren/darren_file/vedio_darren/around_ground /home/darren/darren_file/vedio_darren/around_ground/association.txt
Tip: TUM1_self.yaml里面需要修改自己的相机参数
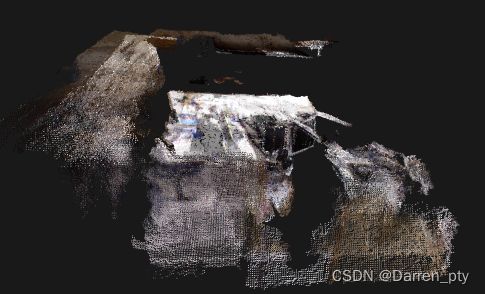
4.2.7 得到稠密地图