huggingface/transformers快速上手
目录
- 1. 预训练模型下载
- 2. 官方 Quick tour
-
- 1. pipeline API
- 2. pipeline的工作原理
-
- 2.1 使用分词器(tokenizer)
- 2.2 使用模型(model)
- 2.3 定制模型参数
参考资料
huggingface transformers预训练模型如何下载至本地,并使用? - 于晨晨的文章 - 知乎
pytorch快速加载预训练模型参数的方式
transformers v4.15.0 官方文档: quick-tour
现在做NLP方面的研究实在离不开预训练语言模型,尤其是BERT。
huggingface的transformers包是目前使用BERT最主流最方便的工具之一,写一遍博客记录如何快速上手。
注:由于官方文档和网页时常更新,链接失效是很有可能的!
本篇博客使用的transformers版本为 4.15.0
1. 预训练模型下载
huggingface/transformers 支持的所有模型:https://huggingface.co/models
如果环境支持科学上网,可以通过git lfs命令直接下载模型。
git lfs install
git clone https://huggingface.co/bert-base-chinese
如果需要手动下载模型并上传至服务器,则可以在 huggingface 的网页中手动下载模型。
通常我们需要保存的是三个文件及一些额外的文件
-
配置文件 config.json
-
词典文件 vocab.json
-
预训练模型文件,如果你使用pytorch则保存 pytorch_model.bin,如果你使用tensorflow 2则保存 tf_model.h5
额外的文件,指的是merges.txt、special_tokens_map.json、added_tokens.json、tokenizer_config.json、sentencepiece.bpe.model等,这几类是tokenizer需要使用的文件,如果出现的话,也需要保存下来。没有的话,就不必在意。如果不确定哪些需要下,哪些不需要的话,可以把类似的文件全部下载下来。
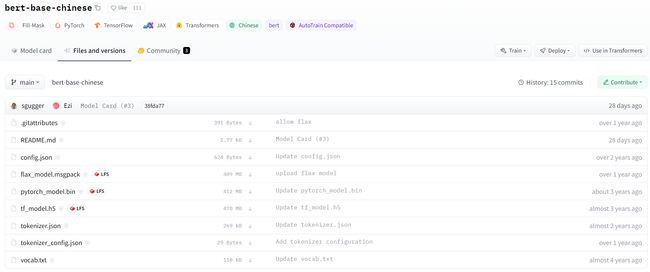
以 bert-base-chinese 模型为例,点击 Files and versions,下载所需的文件,放入与模型同名的文件夹中。
下载后,需保持文件夹和文件名称与仓库中的一致。
模型的快速使用
from transformers import AutoTokenizer, AutoModelForMaskedLM
tokenizer = AutoTokenizer.from_pretrained("bert-base-chinese")
model = AutoModelForMaskedLM.from_pretrained("bert-base-chinese")
from_pretrained()的参数pretrained_model_name_or_path,可以接受的参数有如下几种:
-
short-cut name(缩写名称,类似于gpt2这种)
-
identifier name(类似于microsoft/DialoGPT-small这种)
-
文件夹
-
文件
对于short-cut name 或 identifier name,这种情况下,本地有文件,可以使用本地的,本地没有文件,则会自动下载。
一些常用的short-cut name,可以在 https://huggingface.co/models 中查看
对于文件夹,则会从文件夹中找vocab.json、pytorch_model.bin、tf_model.h5、merges.txt、special_tokens_map.json、added_tokens.json、tokenizer_config.json、sentencepiece.bpe.model等进行加载。所以这也是为什么下载的时候,一定要保证这些名称是这几个,不能变。
对于文件,则会直接加载文件。
官方给的样例,通常都是 short-cut name,我们可以将之替换为下载好的模型文件夹路径。
from transformers import AutoTokenizer, AutoModelForMaskedLM
tokenizer = AutoTokenizer.from_pretrained(local_model_path)
model = AutoModelForMaskedLM.from_pretrained(local_model_path)
2. 官方 Quick tour
Quick tour代码实时运行(google Colab)
1. pipeline API
在给定任务上使用预训练模型的最简单方法是使用pipeline()。Transformers为以下任务提供了开箱即用的接口:
- 情感分析(Sentiment analysis)
- 英语文本生成(Text generation in English)
- 命令实体识别(Name entity recognition, NER)
- QA
- 文本填空: 给定带有被屏蔽词的文本(例如,用[mask]替换),然后填入空白处
- 摘要(Summarization)
- 翻译
- 特征提取: 返回文本的向量表示
所有任务的示例代码
下面以情感分析任务为例
from transformers import pipeline
classifier = pipeline('sentiment-analysis')
第一次键入此命令时,将下载对应的预训练模型和它的分词器(tokenizer)。分词器的作用是将文本先进行预处理,然后将分词结果输入模型进行预测。管道将所有这些信息组合在一起,并对预测进行后期处理,使其可读。
简单使用:
classifier('We are very happy to show you the Transformers library.')
也可以输入句子的list,返回的结果将是一个字典列表。
results = classifier(["We are very happy to show you the  Transformers library.",
           "We hope you don't hate it."])
for result in results:
    print(f"label: {result['label']}, with score: {round(result['score'], 4)}")
# label: POSITIVE, with score: 0.9998
# label: NEGATIVE, with score: 0.5309
默认这个pipeline下载的模型是 “distilbert-base-uncased-finetuned-sst-2-english”,我们可以在huggingface的网站中找到更多用于文本分类的BERT模型,地址为https://huggingface.co/models?pipeline_tag=text-classification
选择使用模型的代码如下:
classifier = pipeline('sentiment-analysis', model="techthiyanes/chinese_sentiment")
我们也可以使用保存在本地的预训练模型。我们需要向pipeline中传递一个模型对象和其相应的分词器。
我们将需要两个类来完成这个工作。
第一个是 AutoTokenizer,我们将使用它下载与我们选择的模型关联的分词器,并对它进行实例化。
第二个是 AutoModelForSequenceClassification,我们将使用它来下载模型本身。
from transformers import AutoTokenizer, AutoModelForSequenceClassification
model_name = "nlptown/bert-base-multilingual-uncased-sentiment"
model = AutoModelForSequenceClassification.from_pretrained(model_name)
tokenizer = AutoTokenizer.from_pretrained(model_name)
classifier = pipeline('sentiment-analysis', model=model, tokenizer=tokenizer)
请注意,如果我们在其他任务中使用该库,则模型的类将发生更改。详情见Summary of the tasks
2. pipeline的工作原理
如下面的代码所示,模型和分词器是通过from_pretrained方法创建的。
from transformers import AutoTokenizer, AutoModelForSequenceClassification
model_name = "distilbert-base-uncased-finetuned-sst-2-english"
pt_model = AutoModelForSequenceClassification.from_pretrained(model_name)
tokenizer = AutoTokenizer.from_pretrained(model_name)
2.1 使用分词器(tokenizer)
第一步,tokenizer会将输入文本分成单词(或单词的一部分,标点符号等),通常称为标记(token)。因为存在不同的预处理方式,所以我们在实例化tokenizer的时候,需要传入预训练模型的模型名称。
第二步,将tokens转换为数字,从而把输入文本转化成tensor的形式,输入对应的模型中。tokenizer中有一个词表(vocab),在调用from_pretrained方法时下载的,因为我们需要使用和模型在预训练阶段用的一样的词表。
为了实现上述的功能,我们可以直接把文本传给tokenizer。
返回一个字典,包含的是input_ids,还有attention mask
"input_ids"是输入的tokens在词表中的id,"attention_mask"告诉模型哪些词需要关注,哪些词不需要关注。
inputs = tokenizer("We are very happy to show you the  Transformers library.")
print(inputs)
{
    'input_ids':[101, 2057, 2024, 2200, 3407, 2000, 2265, 2017, 1996, 100, 19081, 3075, 1012, 102], 	         'attention_mask': [1, 1, 1, 1, 1, 1, 1, 1, 1, 1, 1, 1, 1, 1]
}
设置tokenizer的参数,比如将输入文本全部填充到相同的长度,将它们们截断到模型可接受的最大长度,然后返回张量。
pt_batch = tokenizer(
    ["We are very happy to show you the  Transformers library.", "We hope you don't hate it."],
    padding=True,
    truncation=True,
    max_length=512,
    return_tensors="pt"
)
for key, value in pt_batch.items():
    print(f"{key}: {value.numpy().tolist()}")

# input_ids: [[101, 2057, 2024, 2200, 3407, 2000, 2265, 2017, 1996, 100, 19081, 3075, 1012, 102], [101, 2057, 3246, 2017, 2123, 1005, 1056, 5223, 2009, 1012, 102, 0, 0, 0]]
# attention_mask: [[1, 1, 1, 1, 1, 1, 1, 1, 1, 1, 1, 1, 1, 1], [1, 1, 1, 1, 1, 1, 1, 1, 1, 1, 1, 0, 0, 0]]
注意padding出来的地方,attention_mask为0。
对于填充的部分,也会生成对应的attention mask,但值为0,因为填充部分不需要模型进行关注。更多关于tokenizer见文档
2.2 使用模型(model)
一旦tokenizer处理好了对应的文本,我们就可以直接把处理好的结果传给对应的模型。
pt_outputs = pt_model(**pt_batch)
print(pt_outputs)
SequenceClassifierOutput(loss=None, logits=tensor([[-4.0833,  4.3364],
    [ 0.0818, -0.0418]], grad_fn=<AddmmBackward>), hidden_states=None, attentions=None)
输出的 logits 是什么?
形式:torch.FloatTensor of shape (batch_size, config.num_labels))
意义:Classification (or regression if config.num_labels==1) scores (before SoftMax)
全部的Transformers models(PyTorch或TensorFlow)返回模型在最终激活函数(如SoftMax)之前的激活,因为该最终激活功能通常与损失函数混淆。
在最后的结果中使用softmax函数来获得最终的预测
from torch import nn
pt_predictions = nn.functional.softmax(pt_outputs.logits, dim=-1)
print(pt_predictions)

tensor([[2.2043e-04, 9.9978e-01],
        [5.3086e-01, 4.6914e-01]], grad_fn=<SoftmaxBackward>)
如果除了输入之外,还为模型提供标签,则模型输出对象还将包含损失属性:
import torch
pt_outputs = pt_model(**pt_batch, labels = torch.tensor([1, 0]))
print(pt_outputs)
SequenceClassifierOutput(loss=tensor(0.3167, grad_fn=), logits=tensor([[-4.0833,  4.3364],
        [ 0.0818, -0.0418]], grad_fn=), hidden_states=None, attentions=None)
训练完成后,保存模型
pt_save_directory = './pt_save_pretrained'
tokenizer.save_pretrained(pt_save_directory)
pt_model.save_pretrained(pt_save_directory)
也可以这样载入模型,即不使用AutoModel和AutoTokenizer。
transformers库中每个架构加类的组合有一个模型类,因此如果需要,代码很容易访问和调整。
from transformers import DistilBertTokenizer, DistilBertForSequenceClassification
model_name = "distilbert-base-uncased-finetuned-sst-2-english"
model = DistilBertForSequenceClassification.from_pretrained(model_name)
tokenizer = DistilBertTokenizer.from_pretrained(model_name)
2.3 定制模型参数
如果要更改模型本身的构建方式,可以定义自定义配置类。每个体系结构都有自己的相关配置。例如,DistilBertConfig允许您为DistilBERT指定隐藏层维度、dropout rate等参数。如果您进行核心修改,例如更改隐藏层大小(hidden size),您将无法再使用预训练模型,需要从头开始训练。然后,您将直接从此配置实例化模型。
下面,我们使用from_pretrained()方法加载tokenizer的预定义词汇表。然而,我们希望从头开始初始化模型。因此,我们从配置实例化模型,而不是使用from_pretrained()方法。
from transformers import DistilBertConfig, DistilBertTokenizer, DistilBertForSequenceClassification
config = DistilBertConfig(n_heads=8, dim=512, hidden_dim=4*512)
tokenizer = DistilBertTokenizer.from_pretrained('distilbert-base-uncased')
model = DistilBertForSequenceClassification(config)
对于仅更改模型头部(例如,标签数量)的对象,仍然可以对主体使用预训练模型。
例如,让我们使用预训练体为10个不同的标签定义一个分类器。我们可以将配置需要的任何参数传递给from_pretrained()方法,它将适当地更新默认配置,而不是创建一个具有所有默认值的新配置来更改标签的数量:
from transformers import DistilBertConfig, DistilBertTokenizer, DistilBertForSequenceClassification
model_name = "distilbert-base-uncased"
model = DistilBertForSequenceClassification.from_pretrained(model_name, num_labels=10)
tokenizer = DistilBertTokenizer.from_pretrained(model_name)