【SLAM】——DynaSLAM项目环境配置(超多坑)
DynaSLAM
坑多,慢慢来,不要急
先整体说一下,项目是在ORB-SLAM2项目的基础上,加上maskrcnn的融合。主流程采用还是采用ORB-SLAM2的流程,maskrcnn部分采用c++调用python的实现。其中又穿插opencv2 mat数据转numpy实现c++和python之间数据的交换。所以很多地方容易有坑。慢慢来,先来一张成功的gif安慰一下,给大家一点希望
几大坑
- h5py
- opencv2.4.11(必须)
首先来看一下官方给定的安装步骤:
- Install ORB-SLAM2 prerequisites: C++11 or C++0x Compiler, Pangolin, OpenCV and Eigen3 (https://github.com/raulmur/ORB_SLAM2).
- Install boost libraries with the command sudo apt-get install libboost-all-dev.
- Install python 2.7, keras and tensorflow, and download the mask_rcnn_coco.h5 model from this GitHub repository: https://github.com/matterport/Mask_RCNN/releases.
Clone this repo:
git clone https://github.com/BertaBescos/DynaSLAM.git
cd DynaSLAM
cd DynaSLAM
chmod +x build.sh
./build.sh
Place the mask_rcnn_coco.h5 model in the folder DynaSLAM/src/python/.
1. 安装ORB-SLAM2的依赖
https://github.com/raulmur/ORB_SLAM2的安装我这里到是很顺利,直接按照官方的步骤一步一步来就ok了。
我没有安装ROS。
ORB-SLAM2跑TUM Dataset的例子,这里就不过多讲了。
2. 安装libboost
sudo apt-get install libboost-all-dev
我这里没有报错
3. mask-rcnn相关
-
下载模型
下载mask_rcnn_coco.h5把他放到DynaSLAM/src/python/文件夹下 -
安装tensorflow,keras
DynaSLAM采用ubuntu系统环境下的python2.7,用pip安装的时候注意
我安装的各软件版本:
- tensorflow-gpu (1.14.0)
- keras 2.0.9
到这里的时候,python的环境基本已经安装好了,可以测试python的环境:
cd DynaSLAM
python src/python/Check.py
输出:Mask R-CNN is correctly working,可能会没有问题
4. 编译DynaSLAM
cd DynaSLAM
chmod +x build.sh
./build.sh
注意,这里需要用opencv2.4.11,opencv3会有错误(亲测)
多个版本opencv的配置与使用,可参考:多个版本opencv的配置与使用
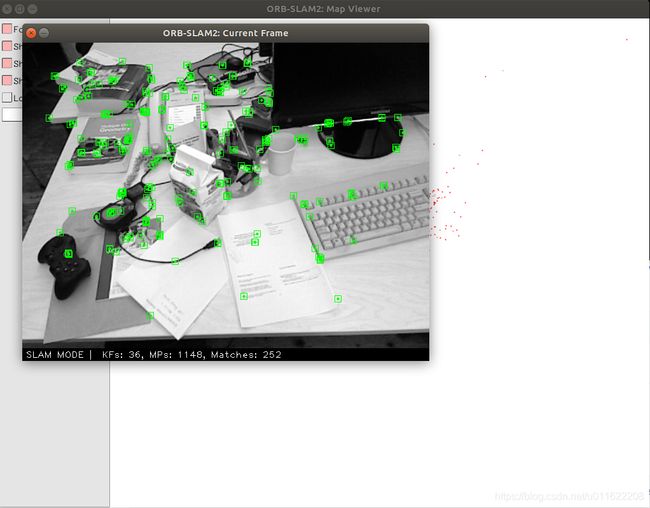
后面就可以运行DynaSLAM的例子了,这里我用的tum_data,最后的output是保存分割出来的mask。如下图所示:
./Examples/Monocular/mono_tum Vocabulary/ORBvoc.txt Examples/Monocular/TUM1.yaml ../slam_data/rgbd_dataset_freiburg1_xyz output
可能问题1:
this->net != NULL
这是MaskRCNN.py中的Mask类初始化错误造成的。可以首先在python层面进行验证。在MaskRCNN.py文件后添加
if __name__ == "__main__":
	net = Mask()
	image = np.zeros((480, 640))
	mask = net.GetDynSeg(image)
	T = 1
然后执行:
cd DynaSLAM
python src/python/MaskRCNN.py
如何没有报错,那就有可能是h5py的错,后面有方法排查。
排查是否是h5py的错
将src/python/model.py文件的1892行开始改为:
import h5py
from keras.engine import topology

if exclude:
    by_name = True
print("11111111111111111")
if h5py is None:
    raise ImportError('`load_weights` requires h5py.')
try:
    f = h5py.File(filepath, mode='r')
except Exception as err:
    print err
if 'layer_names' not in f.attrs and 'model_weights' in f:
    f = f['model_weights']
print("222222222222222222")
print err如果输出的是:
Invalid high library version bound (invalid high library version bound)
就是h5py的报错,需要手动编译安装h5py
5. 手动编译h5py
直接一条命令
PIP_NO_CACHE_DIR=off pip2 install --no-binary=h5py h5py
可能需要pkgconfig
PIP_NO_CACHE_DIR=off pip2 install pkgconfig
6. 编译opencv2.4.11
请参考:https://blog.csdn.net/u013453604/article/details/49781771
可能问题1.
解决方式:打开opencv2.4.13/cmake/ OpenCVDetectCXXCompiler.cmake,修改第67行"-dumpversion" 为 “-dumpfullversion”
可能问题2
CMake Error: The following variables are used in this project, but they are set to NOTFOUND.
Please set them or make sure they are set and tested correctly in the CMake files:
CUDA_nppi_LIBRARY (ADVANCED)
解决方式:
在编译的命令里面添加一条-D WITH_CUDA=OFF就行了。
我的cmake命令如下,供参考:
cmake -D CMAKE_BUILD_TYPE=RELEASE -D CMAKE_INSTALL_PREFIX=../install -D WITH_CUDA=OFF ..
可能问题3
/usr/include/c++/7/cstdlib:75:15: fatal error: stdlib.h: No such file or directory
这是因为ubuntu18.04自带的gcc是7.5.0的。难道又要换成gcc5。
解决方式:
参考:https://blog.csdn.net/qq_17783559/article/details/105078293
在cmake中添加-D ENABLE_PRECOMPILED_HEADERS=OFF
可能问题4
编译的时候,报错:
error: ‘CODEC_ID_H264’ was not declared in this scope
{ CODEC_ID_H264, MKTAG(‘H’, ‘2’, ‘6’, ‘4’) },
^~~~~~~~~~~~~
/home/darknet/CM/profile/opencv-2.4.11/modules/highgui/src/ffmpeg_codecs.hpp:104:7: note: suggested alternative: ‘AV_CODEC_ID_H264’
{ CODEC_ID_H264, MKTAG(‘H’, ‘2’, ‘6’, ‘4’) },
解决方式:在cmake时,将ffmpeg设置为OFF,即:-D WITH_FFMPEG=OFF
可能问题5
/home/yinton/opencv-2.4.11/modules/contrib/src/chamfermatching.cpp:969:30: error: the compiler can assume that the address of ‘annotate_img’ will never be NULL [-Werror=address]
if (&annotate_img!=NULL) {
^
/home/yinton/opencv-2.4.11/modules/contrib/src/chamfermatching.cpp:1016:34: error: the compiler can assume that the address of ‘annotate_img’ will never be NULL [-Werror=address]
if (&annotate_img!=NULL) {
^
/home/yinton/opencv-2.4.11/modules/contrib/src/chamfermatching.cpp: In member function ‘cv::ChamferMatcher::Match* cv::ChamferMatcher::Matching::localChamferDistance(cv::Point, cv::Mat&, cv::Mat&, cv::ChamferMatcher::Template*, float)’:
/home/yinton/opencv-2.4.11/modules/contrib/src/chamfermatching.cpp:1111:25: error: the compiler can assume that the address of ‘orientation_img’ will never be NULL [-Werror=address]
if (&orientation_img!=NULL) {
解决方式:
找到Opencv-2.4.11/build/modules/contrib/CMakeFiles/opencv_contrib.dir/flags.make
(如果没创建build来放编译文件的话就没有build),删去-Werror=address重新make,成功!参考自:https://zhuanlan.zhihu.com/p/364633955