经典论文--FCN
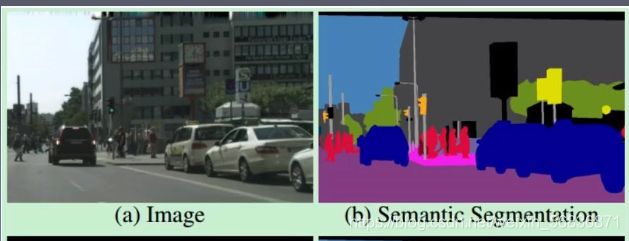
语义分割是啥:
文章来源:
论文名:《Fully Convolutional Networks for Semantic Segmentation》
论文下载地址:https://arxiv.org/abs/1411.4038
Git地址:https://github.com/shelhamer/fcn.berkeleyvision.org
文章意义:
- 在FCN之前基于图像块分割技术面临两大难题:效率较低,同时需要前期/后期处理;语义信息和位置信息不可兼得
- 语义分割的开山之作,后面的语义分割模型都是以此为基础进行魔改, 传统方法到(相对成熟)神经网络的分水岭;传统方法:Normalized
Cut/Sturctured Random Forests/SVM - 通过实践证明了端到端/像素到像素的网络为语义分割技术方向

常用评价指标
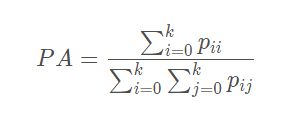
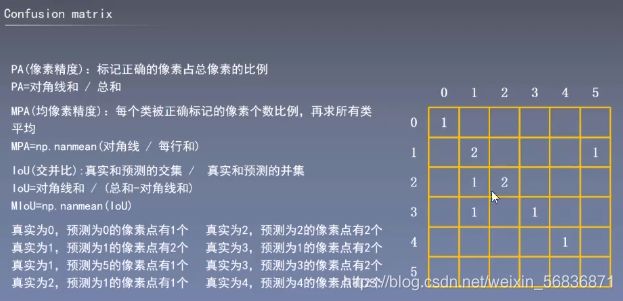
Pixel Accuracy(PA):像素精度是标记正确的像素占总像素的百分比
Mean Pixel Accuracy (MPA):对每个类别,计算该类别下预测正确的数量与该类别像素总数的比例,对所有类别的计算结果求平均
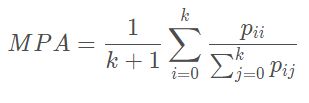
Mean Intersection over Union(MIOU):对每个类别,计算的是一个交集与并集的比例。这个比例的分子和MPA一样,是该类别下预测正确的数量;分母的范围更大,是指该类别预测为其他类别和其他类别预测为该类别的总和。
对所有类别的计算结果求平均

一般以MIOU为评价指标
常用数据集

Camvid比较规范,方便读进模型中,不需要做相关的预处理,适合新手上手SunRGBD/NYUDv2 是RGBD的图片,4通道的
相关概念:
- 浅层信息:网络中较浅层次特征提取的信息,物体的集合信息比较丰富,但感受野较小;有助于分割较小的目标
- 深层信息:网络中较深层次特征提取的信息,物体的空间信息系比较丰富,感受野较大;有助于分割较大的目标

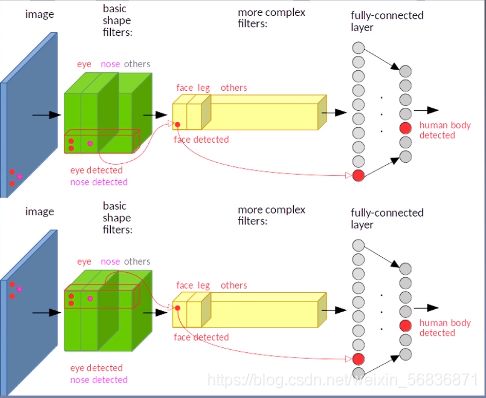
- 感受野(Receptive Field):卷积神经网络每一层输出的特征图(feature
map)上的像素点在输入图片上映射的区域大小。再通俗点的解释是,特征图上的一个点对应输入图上的区域,如图下所示:
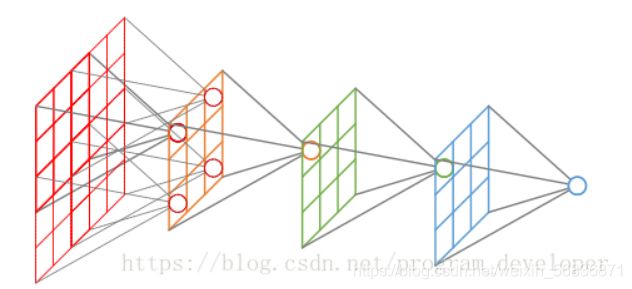
关于感受野大小的计算方式是采用从最后一层往下计算的方法,即先计算最深层在前一层上的感受野,然后逐层传递到第一层,使用的公式可以表示如下:
2019 年该论文以证实卷积神经网络是不具备平移不变性的《Why do deep convolutional networks generailize so poorly to small image transformations?》按照论文说法过多的二次采样导致了平移不变被破坏
- patch-wise training/ Shift-and-stich等技术不介绍,现在不用了
指标计算
-
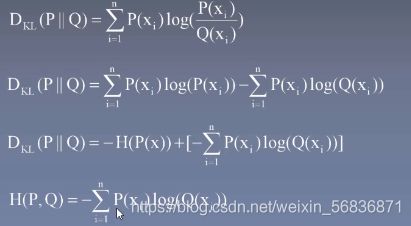
交叉熵:期望->熵->相对熵(KL散度)->交叉熵
-
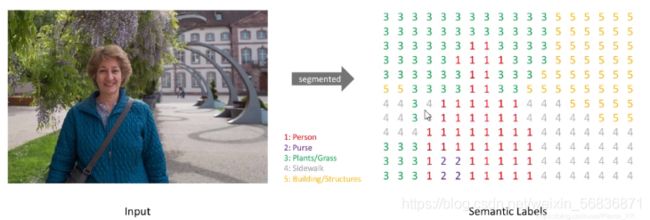
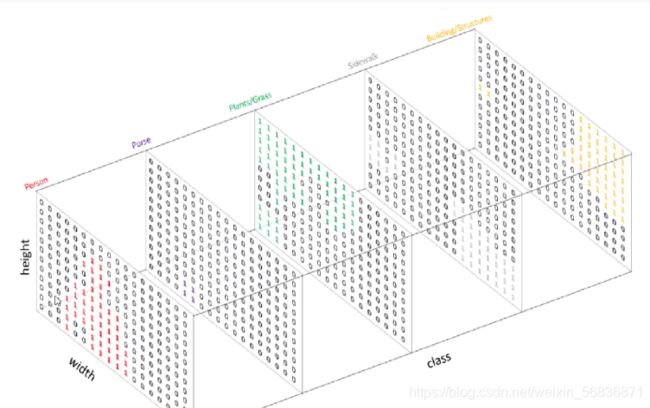
One-hot编码, 分类值到二进制向量的映射
又称一位有效编码,使用N位状态寄存器来对N个状态进行编码,每个状态都有独立的寄存器位,且任时刻只有一位有效
-
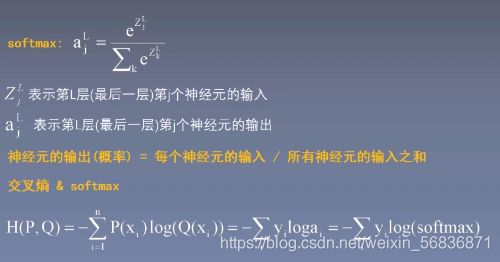
交叉熵与NLLoss
NLLoss: Negative Log Likehood 负对数似然损失函数,跟交叉熵数学上是一样的
只是在Pytorch中,NLLoss没有计算softmax需要手工补上 -
混淆矩阵(Confusion Matrix)
如下,一个6分类问题,L是标签值,P是预测值,bin就像个大计数器
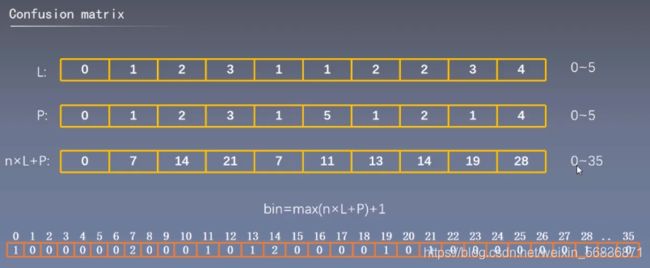
由bin转成一个二维矩阵(由行依次排开),即为混淆矩阵,用于计算PA/MPA/MIOU等指标
混淆矩阵实现代码:def calc_semantic_segmentation_confusion(pred_labels, gt_labels): """Collect a confusion matrix. 计算 混淆矩阵 The number of classes `n_class` is `max(pred_labels, gt_labels) + 1`, which is the maximum class id of the inputs added by one. Args: pred_labels(iterable of numpy.ndarray): A collection of predicted labels. The shape of a label array is `(H, W)`. `H` and `W` are height and width of the label. gt_labels(iterable of numpy.ndarray): A collection of ground truth labels. The shape of a ground truth label array is `(H, W)`, and its corresponding prediction label should have the same shape. A pixel with value `-1` will be ignored during evaluation. Returns: numpy.ndarray: A confusion matrix. Its shape is `(n_class, n_class)`. The `(i, j)` th element corresponds to the number of pixels that are labeled as class `i` by the ground truth and class `j` by the prediction. """ pred_labels = iter(pred_labels) gt_labels = iter(gt_labels) n_class = 12 # 定义一个数值容器 shape(12,12) confusion = np.zeros((n_class, n_class), dtype=np.int64) for pred_label, gt_label in six.moves.zip(pred_labels, gt_labels): # six.moves.zip in python2 if pred_label.ndim != 2 or gt_label.ndim != 2: raise ValueError('ndim of labels should be two.') if pred_label.shape != gt_label.shape: raise ValueError( 'Shape of ground truth and prediction should be same.') pred_label = pred_label.flatten() gt_label = gt_label.flatten() # Dynamically expand the confusion matrix if necessary. lb_max = np.max((pred_label, gt_label)) # print(lb_max) if lb_max >= n_class: expanded_confusion = np.zeros( (lb_max + 1, lb_max + 1), dtype=np.int64) expanded_confusion[0:n_class, 0:n_class] = confusion n_class = lb_max + 1 confusion = expanded_confusion # 原来的confusion矩阵就没有了,被expanded_confusion替换了 # Count statistics from valid pixels. mask = gt_label >= 0 confusion += np.bincount( n_class * gt_label[mask].astype(int) + pred_label[mask], # 这样处理axis=0 代表gt axis=1 代表pred…… minlength=n_class ** 2) \ # ……即 横表示gt ; 列表示pred .reshape((n_class, n_class)) # 抓住一个点,混淆矩阵中,对角线上的点是分类正确的 for iter_ in (pred_labels, gt_labels): # This code assumes any iterator does not contain None as its items. if next(iter_, None) is not None: raise ValueError('Length of input iterables need to be same') # confusion = np.delete(confusion, 11, axis=0) # confusion = np.delete(confusion, 11, axis=1) return confusion基于混淆矩阵计算IOU样例:
def calc_semantic_segmentation_iou(confusion):
    """Calculate Intersection over Union with a given confusion matrix.
    Args:
        confusion (numpy.ndarray): A confusion matrix. Its shape is
            `(n_class, n_class)`.
            The `(i, j)`th element corresponds to the number of pixels
            that are labeled as class `i` by the ground truth and
            class `j` by the prediction.
    Returns:
        numpy.ndarray:
        An array of IoUs for the `n_class` classes. Its shape is `(n_class,)`.
    """
    # iou_denominator 并集  np.diag(confusion) 交集
    iou_denominator = (
        confusion.sum(axis=1) + confusion.sum(axis=0) - np.diag(confusion))
    iou = np.diag(confusion) / iou_denominator
    return iou[:-1]  # 去掉最后一个类别,因为最后一个类别为 unlabelled
    # return iou
文章创新点:
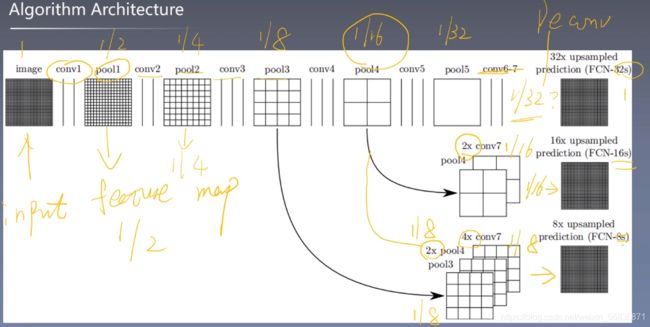
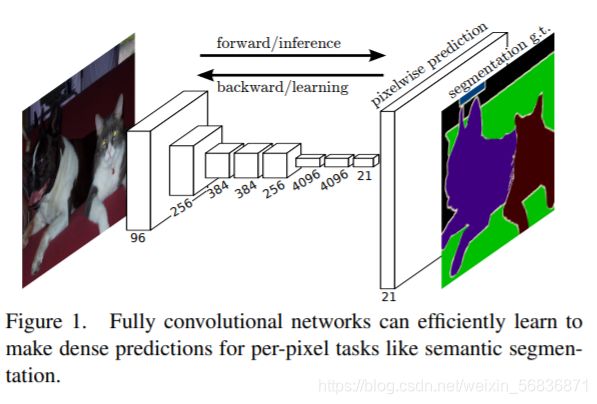
- 使用了端到端的网络模型:输入是图片输出也是图片,输入输出的尺度是一致的,如下图:
 - 将传统分类网络(AlexNet/VGG/GoogLeNet)改造为了全卷积的网络,将全连接层改为反卷积+上采样的方式(反卷积)。传统分类网络遇到的问题: 输入尺寸固定/全连接层丢失了位置信息。作者(大佬)认为全连接层也可看做是一个卷积核,以VGG back-bone为例网络结构:

- 上采样,传统上采样采用插值技术,本文采用反卷积(Deconvolution)技术。反卷积可以理解为卷积的逆运算,但不能恢复卷积造成的信息丢失,仅仅是将卷积步骤反向(本想放GIF上来展示,现在还不会)
- 使用迁移学习技术
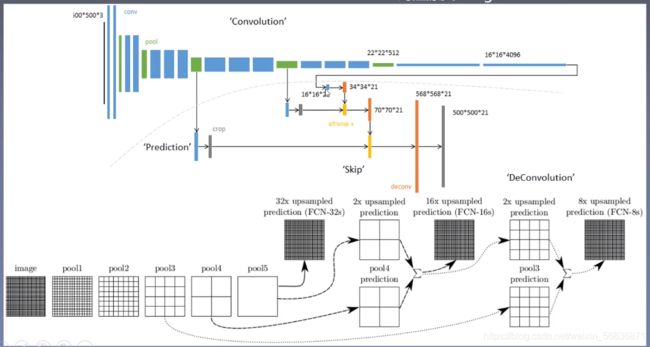
- 使用跳跃连接结构,是得浅层信息可以与深层信息融合,产生精确的分割
模型结构:
-
全连接层->卷积层的变化
假想:全连接层/卷积层从数学形式上看都是矩阵的点乘运算。两者的不同之处在于卷积层的输入只与局部区域相关而全连接是跟所有输入相连;另,卷积层中的权重本层共享
FCN将传统CNN中的全连接层转化成卷积层,对应CNN网络FCN把最后三层全连接层转换成为三层卷积层。在传统的CNN结构中,前5层是卷积层,第6层和第7层分别是一个长度为4096的一维向量,第8层是长度为1000的一维向量,分别对应1000个不同类别的概率。FCN将这3层表示为卷积层,卷积核的大小 (通道数,宽,高) 分别为 (4096,1,1)、(4096,1,1)、(1000,1,1),如下图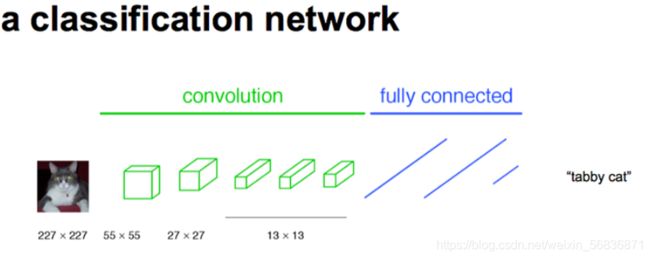
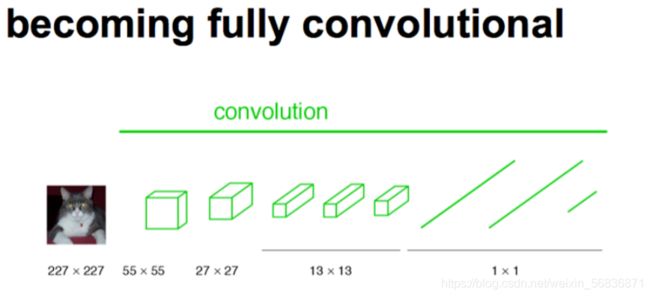
更一般化的FCN网络结构,如下图:

模型训练
- 加载预训练模型
- 初始化反卷积核(双线性插值)
- 至少175个epoch后算法才会收敛
- 学习率在100次之后进行调整
- pool3前的特征不需要融合
- 扩大数据规模,数据预处理Randomly mirroring
- 数据集不要类别平衡(被LINKNET论文证伪了,数据集类别平衡还是需要的)
- 数据集切分还是7-3开或者8-2开的原则
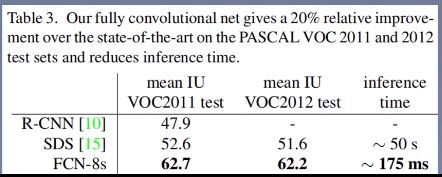
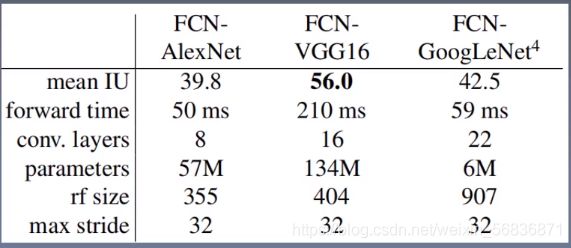
- 论文中的测试结果:

代码实现结构:
- 整体实现路径:
数据预处理/模型定义/训练&验证/损失函数计算/指标 - 整体代码目录结构:

- 数据预处理
- 图片预处理
在dataset.py::LoadDataset::img_transform中
转张量和正则化的参数都是经验值没啥讲的def img_transform(self, img, label): """对图片和标签做一些数值处理""" label = np.array(label) # 以免不是np格式的数据 label = Image.fromarray(label.astype('uint8')) transform_img = transforms.Compose( [ transforms.ToTensor(), transforms.Normalize([0.485, 0.456, 0.406], [0.229, 0.224, 0.225]) ] ) img = transform_img(img) - 标签编码
在dataset.py::LabelProcessor::encode_label_pix中
整体思路,通过哈希 cm[0] * 256 * 256 + cm[1] * 256 + cm[2]的方式形成颜色(RGB)到标签的映射关系
举例:像素点P(128, 64, 128)由上面哈希 P[0] * 256 * 256 + P[1] * 256 + P[2] = 8405120,将这个数字作为哈希表cm2lbl的索引,即cm2lbl[8405120]存储所对应的类别
def encode_label_pix(colormap): # data process and load.ipynb: 标签编码,返回哈希表 cm2lbl = np.zeros(256 ** 3) for i, cm in enumerate(colormap): cm2lbl[(cm[0] * 256 + cm[1]) * 256 + cm[2]] = i return cm2lbl def encode_label_img(self, img): data = np.array(img, dtype='int32') idx = (data[:, :, 0] * 256 + data[:, :, 1]) * 256 + data[:, :, 2] return np.array(self.cm2lbl[idx], dtype='int64')-
模型定义
- 反卷积核的初始化–双线性插值,不做过多解释,现在基本无人使用, 对应FCN.py::bilinear_kernel
- 加载预训练的模型
import torch from torchvision import models pretrained_net = models.vgg16_bn(pretrained=True) -
- 模型定义:
class FCN(nn.Module): def __init__(self, num_classes): super().__init__() self.stage1 = pretrained_net.features[:7] self.stage2 = pretrained_net.features[7:14] self.stage3 = pretrained_net.features[14:24] self.stage4 = pretrained_net.features[24:34] self.stage5 = pretrained_net.features[34:] self.scores1 = nn.Conv2d(512, num_classes, 1) self.scores2 = nn.Conv2d(512, num_classes, 1) self.scores3 = nn.Conv2d(128, num_classes, 1) self.conv_trans1 = nn.Conv2d(512, 256, 1) self.conv_trans2 = nn.Conv2d(256, num_classes, 1) self.upsample_8x = nn.ConvTranspose2d(num_classes, num_classes, 16, 8, 4, bias=False) self.upsample_8x.weight.data = bilinear_kernel(num_classes, num_classes, 16) self.upsample_2x_1 = nn.ConvTranspose2d(512, 512, 4, 2, 1, bias=False) self.upsample_2x_1.weight.data = bilinear_kernel(512, 512, 4) self.upsample_2x_2 = nn.ConvTranspose2d(256, 256, 4, 2, 1, bias=False) self.upsample_2x_2.weight.data = bilinear_kernel(256, 256, 4) def forward(self, x): # 352, 480, 3 s1 = self.stage1(x) # 176, 240, 64 s2 = self.stage2(s1) # 88, 120, 128 s3 = self.stage3(s2) # 44, 64, 256 s4 = self.stage4(s3) # 22, 128, 516 s5 = self.stage5(s4) # 11, 15, 256 scores1 = self.scores1(s5) # 11, 15, 12 s5 = self.upsample_2x_1(s5) # 22, 30, 512 add1 = s5 + s4 # 22, 30, 512 scores2 = self.scores2(add1) # 22, 30, 12 add1 = self.conv_trans1(add1) # 22, 30, 256 add1 = self.upsample_2x_2(add1) # 44, 60, 256 add2 = add1 + s3 # 44, 60, 256 output = self.conv_trans2(add2) # 44, 60, 12 output = self.upsample_8x(output) # 352, 480, 12 return output- 模型训练
device = t.device('cuda') if t.cuda.is_available() else t.device('cpu') fcn = FCN.FCN(num_class) fcn = fcn.to(device) criterion = nn.NLLLoss().to(device) optimizer = optim.Adam(fcn.parameters(), lr=1e-4) def train(model): best = [0] train_loss = 0 net = model.train() running_metrics_val = runningScore(12) # 训练轮次 for epoch in range(cfg.EPOCH_NUMBER): running_metrics_val.reset() print('Epoch is [{}/{}]'.format(epoch + 1, cfg.EPOCH_NUMBER)) # 更新学习率 if epoch % 50 == 0 and epoch != 0: for group in optimizer.param_groups: group['lr'] *= 0.5 # 训练批次 for i, sample in enumerate(train_data): # 载入数据 img_data = Variable(sample['img'].to(device)) img_label = Variable(sample['label'].to(device)) # 训练 out = net(img_data) out = F.log_softmax(out, dim=1) loss = criterion(out, img_label) optimizer.zero_grad() loss.backward() # 反向传播 optimizer.step() # 参数更新 train_loss += loss.item() # 评估 pre_label = out.max(dim=1)[1].data.cpu().numpy() true_label = img_label.data.cpu().numpy() running_metrics_val.update(true_label, pre_label) metrics = running_metrics_val.get_scores() for k, v in metrics[0].items(): print(k, v) train_miou = metrics[0]['mIou: '] if max(best) <= train_miou: best.append(train_miou) t.save(net.state_dict(), './Results/weights/FCN_weight/{}.pth'.format(epoch))- 模型验证
主体跟训练差不多,有点区别的地方在于加载预先训练好的模型&参数,不用再反向传播了,这里不再赘述
- 图片预处理
参考资料
https://www.bilibili.com/video/BV16K411W782?p=1 感谢COLA老师
https://www.cnblogs.com/xiaoboge/p/10502697.html
