threejs-纹理贴图
前言
threejs中的纹理贴图使用方法,参考《threejs开发指南》。
文章目录
- 前言
- 纹理的基本使用
- 纹理的常用属性
- 常用纹理的种类
-
- 1 普通贴图map
- 2 凹凸贴图bumpMap
- 3 法线贴图normalMap
- 4 位移贴图displacementMap
- 5 金属光泽度贴图metalnessMap,金属粗糙度贴图roughnessMap
- 6 Alpha贴图
- 7 自发光贴图
- 8 高光贴图emissiveMap
- 9 环境贴图cubeMap
- 10 GLSL 的texture2D() 方法
纹理的基本使用
// 外部引入纹理
import plaster from '../texture/plaster.jpg'
  ···
  // 引入纹理到几何体
const textureLoader = new THREE.TextureLoader()
const plasterTexture =  textureLoader.load(plaster)
···
  // 引入外部纹理
  const cubeGeometry = new THREE.BoxGeometry(10, 10, 10);
  const meshMaterial = new THREE.MeshBasicMaterial({
      color:"#ffff00",
      map:plasterTexture
    });
  const cube = new THREE.Mesh(cubeGeometry, meshMaterial);

纹理的常用属性
       plasterTexture.offset.x = 0.5; // 设置纹理偏移量
       plasterTexture.center.set (0.5,0.5)// 旋转中心点,默认左下角(0,0)
       plasterTexture.rotation = Math.PI / 4 // 设置旋转
       plasterTexture.repeat.set(3,5) // 设置重复:水平三次,竖直方向五次
       // wrapS, wrapT 设置在水平、竖直方向的重复方式
       plasterTexture.wrapS = THREE.RepeatWrapping
       plasterTexture.wrapT = THREE.RepeatWrapping

       plasterTexture.magFilter // 当前模型显示大小大于纹理图片的大小时,显示的方式
       plasterTexture.minFilter // 当前模型显示大小小于纹理图片的大小时,显示的方式
常用纹理的种类
1 普通贴图map
   // 引入纹理
 const textureLoader = new THREE.TextureLoader()
   // 引入外部纹理
   const cubeGeometry = new THREE.
   const meshMaterial = new THREE.MeshBasicMaterial({
       color:"#ffff00",
       map:textureLoader.load(url)
     });
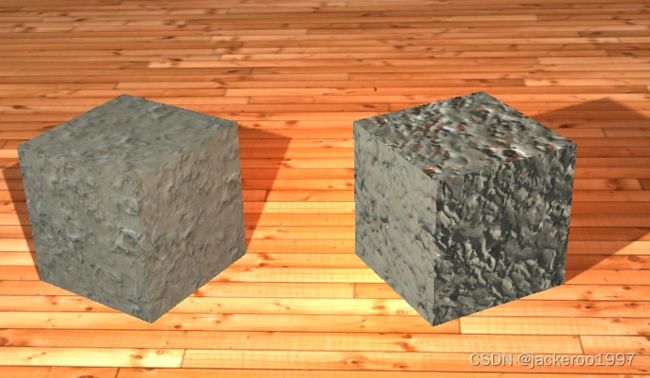
2 凹凸贴图bumpMap
凹凸贴图用于为材质添加厚度,通过像素的密集程度定义凹凸的高度
 const meshMaterial = new THREE.MeshBasicMaterial({
       color:"#ffff00",
       map:textureLoader.load(url),
       bumpMap = textureLoader.load(bumpUrl)
     });
增加凹凸贴图前(左)和增加凹凸贴图后(右)
3 法线贴图normalMap
法线贴图保存法线的法向量信息,可以构造出细节更加丰富的模型,如对光源做出更加自然的反应。
const meshMaterial = new THREE.MeshBasicMaterial({
      color:"#ffff00",
      map:textureLoader.load(url),
      normalMap: textureLoader.load(normalUrl)
    });
增加法向贴图前(左)和增加法向贴图后(右)
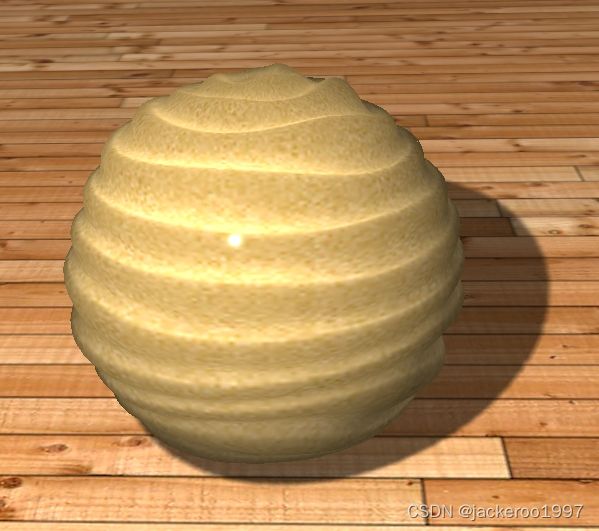
4 位移贴图displacementMap
位移贴图用于修改模型的顶点,与凹凸贴图和法向贴图只能造成一种凹凸不平的假象不同,位移贴图可以真正改变模型的形状。
const meshMaterial = new THREE.MeshBasicMaterial({
      color:"#ffff00",
      map:textureLoader.load(url),
      displacementMap = textureLoader.load(displacementUrl)
    });
    meshMaterial.displacementScale = 1.0 // 控制顶点位移程度
添加位移贴图
5 金属光泽度贴图metalnessMap,金属粗糙度贴图roughnessMap
金属材质THREE.MeshStandardMaterial提供了metalness和roughness两个属性来设置金属表面的光滑度和粗糙度,提供设置光泽度贴图和糙度贴图,可以在光滑金属表面设置局部粗糙或者在粗糙金属表面设置局部光滑,此时metalness和roughness的实际值等于他们本身的值与贴图的乘积。
const cubeMaterial = new THREE.MeshStandardMaterial({
    envMap: scene.background,
    // envMap: alternativeMap,
    color: 0xffffff,
    metalness: 1, // 材质像金属的程度。 0接近于木质或石头,1接近于金属
    roughness: 0.5 // 粗糙度。 0.0表示镜面反射,1.0表示漫反射
});

const cubeMaterialWithMetalMap = cubeMaterial.clone();
cubeMaterialWithMetalMap.metalnessMap = textureLoader.load(metalnessUrl)

const cubeMaterialWithRoughnessMap = cubeMaterial.clone();
cubeMaterialWithRoughnessMap.roughnessMap = textureLoader.load(roughnessUrl)
metalnessMap(左)和roughnessMap(右)

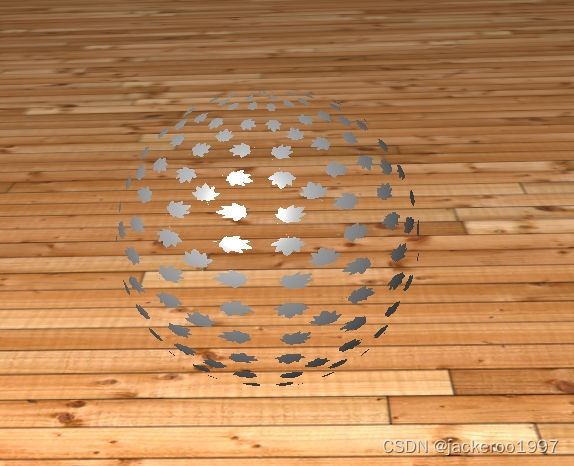
6 Alpha贴图
Alpha贴图用于控制物体的透明度,贴图中的黑色部分代表完全透明,白色部分带面完全不透明。
const sphere = new THREE.SphereGeometry(8, 180, 180)
const sphereMaterial = new THREE.MeshStandardMaterial({
    alphaMap: textureLoader.load(alphaUrl),
    metalness: 0.02,
    roughness: 0.07,
    color: 0xffffff,
    alphaTest: 0.5 // 避免出现小斑点问题
});
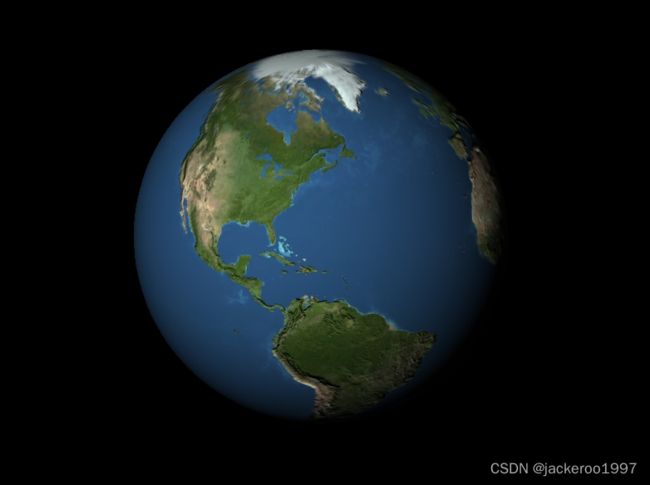
7 自发光贴图
自发光贴图可以给模型表面添加发光效果的纹理贴图,自发光贴图不受光源的影响,也不能影响周围的物体。在使用自发光贴图时,需要将emissive属性设置为非0
const sphere = new THREE.SphereGeometry(8, 180, 180)
const sphereMaterial = new THREE.MeshStandardMaterial({
   map: textureLoader.load(mapUrl),
    emissiveMap: textureLoader.load(emissiveUrl),
});

8 高光贴图emissiveMap
高光贴图可以给模型指定某一部分比较暗淡或者明亮,配合法向贴图效果更佳。
const sphere = new THREE.SphereGeometry(8, 180, 180)
const sphereMaterial = new THREE.MeshPhongMaterial({
    map: textureLoader.load(mapUrl),
    normalMap: textureLoader.load(normalUrl),
    specularMap: textureLoader.load(specularUrl)
});
9 环境贴图cubeMap
实际进行镜面反射是一个非常耗费性能的工作,可以使用环境贴图来起到类似于镜面反射的效果。将几何体所处的环境换做一个纹理赋给几何体。首先创建cubeMap对象,按照指定顺序加载贴图,并把该容器设置为场景的背景。
const urlMap = [  // 纹理集合,需要指定顺序
    rightUrl,
    leftUrl,
    topUrl,
    bottomUrl,
    frontUrl,
    BackUrl
];

// 创建cubeMap对象
const cubeLoader = new THREE.CubeTextureLoader();
const cubeMap = cubeLoader.load(urlMap);
  // 环境贴图
 scene.background = cubeMap;

const cubeMaterial = new THREE.MeshStandardMaterial({
    envMap: cubeMap,
    color: 0xffffff,
    metalness: 1,
    roughness: 0,
});

const sphereMaterial = cubeMaterial.clone();

// cubeMap.mapping = THREE.CubeRefractionMapping;  // 环境折射效果
// cubeMap.mapping = THREE.CubeReflectionMapping;  // 默认 环境反射效果

10 GLSL 的texture2D() 方法
GLSL ES内置函数texture2D()函数可以用来获取纹理要素的颜色,其使用方法如下:
 vec4 texture2D(sampler2D sampler, vec2 coord)
 参数:
- sampler: 纹理影像的单元编号
- coord:  纹理坐标
返回类型:vec4的颜色值,不一定是rgba
片元着色器代码
precision lowp float;
      varying vec2 v_uv;
      varying float f_height;
      uniform sampler2D uTexture;

      void main() {
        float height = (f_height + 0.05 );
        vec4 textureColor = texture2D(uTexture,v_uv);
        gl_FragColor = textureColor;
      }
js代码参考threejs-自定义着色器材质,更改的地方很少:
const textureLoader = new THREE.TextureLoader()
 const Texture =  textureLoader.load(texture)
 // 在RawShaderMaterial定义时加上 uTexture
uniforms: {
        uTime: { value: 0 },
        uTexture: { value: Texture }
      },
效果如下: