AT&T汇编风格16位Boot引导程序
.code16
.section .text
.globl _start
_start:
    movw %cs, %ax
    movw %ax, %ds
    movw %ax, %es

    movw $0x0600,%ax
    movw $0x7000,%bx
    movw $0x0,%cx
    movw $0x184f,%dx
    int $0x10

    movw $showString, %ax
    movw %ax, %bp
    movw $0x1301, %ax
    movw $10, %cx
    movw $0x0c, %bx
    movw $0x00, %dx
    int $0x10

    jmp .

showString:
    .ascii "Hello, OS!"

fillZeroToEnd:
    .space 510-(.-_start), 0

endNumber:
    .byte 0x55, 0xaa
sudo as -o gasOsBoot.o gasOsBoot.s进行汇编。
sudo ld -Ttext 0x7c00 -o gasOsBoot gasOsBoot.o进行链接。
sudo objcopy -O binary gasOsBoot gasOsBoot.bin进行提取。
bximage -hd=60 -func=create -imgmode="flat" -q boot.img创造一个60M模式为flat的硬盘。
sudo dd if=gasOsBoot.bin of=boot.img bs=512 count=1 conv=notrunc将gasOsBoot.bin写入硬盘。
bochsrc文件如下:
# configuration file generated by Bochs
plugin_ctrl: unmapped=true, biosdev=true, speaker=true, extfpuirq=true, parallel=true, serial=true
config_interface: textconfig

# display_library: x
# gdbstub: enabled=1, port=1234, text_base=0, data_base=0, bss_base=0

# 这两个一起开启
magic_break: enabled=1
#display_library: x, options="gui_debug"
display_library: x

memory: host=32, guest=32
romimage: file="/usr/local/share/bochs/BIOS-bochs-latest", address=0x00000000, options=none
vgaromimage: file="/usr/local/share/bochs/VGABIOS-lgpl-latest"
boot: disk
floppy_bootsig_check: disabled=0
ata0: enabled=true, ioaddr1=0x1f0, ioaddr2=0x3f0, irq=14
ata0-master: type=disk, path="boot.img", mode=flat
ata0-slave: type=none
ata1: enabled=true, ioaddr1=0x170, ioaddr2=0x370, irq=15
ata1-master: type=none
ata1-slave: type=none
ata2: enabled=false
ata3: enabled=false
optromimage1: file=none
optromimage2: file=none
optromimage3: file=none
optromimage4: file=none
optramimage1: file=none
optramimage2: file=none
optramimage3: file=none
optramimage4: file=none
pci: enabled=1, chipset=i440fx
vga: extension=vbe, update_freq=5, realtime=1
cpu: count=1, ips=4000000, model=bx_generic, reset_on_triple_fault=1, cpuid_limit_winnt=0, ignore_bad_msrs=1, mwait_is_nop=0
cpuid: level=6, stepping=3, model=3, family=6, vendor_string="GenuineIntel", brand_string="              Intel(R) Pentium(R) 4 CPU        "
cpuid: mmx=true, apic=xapic, simd=sse2, sse4a=false, misaligned_sse=false, sep=true
cpuid: movbe=false, adx=false, aes=false, sha=false, xsave=false, xsaveopt=false, smep=false
cpuid: smap=false, mwait=true
print_timestamps: enabled=0
# no gdb stub
port_e9_hack: enabled=0
private_colormap: enabled=0
clock: sync=none, time0=local, rtc_sync=0
# no cmosimage
log: -
logprefix: %t%e%d
debug: action=ignore
info: action=report
error: action=report
panic: action=ask
keyboard: type=mf, serial_delay=250, paste_delay=100000, user_shortcut=none
mouse: type=ps2, enabled=false, toggle=ctrl+mbutton
speaker: enabled=true, mode=system
parport1: enabled=true, file=none
parport2: enabled=false
com1: enabled=true, mode=null
com2: enabled=false
com3: enabled=false
com4: enabled=false
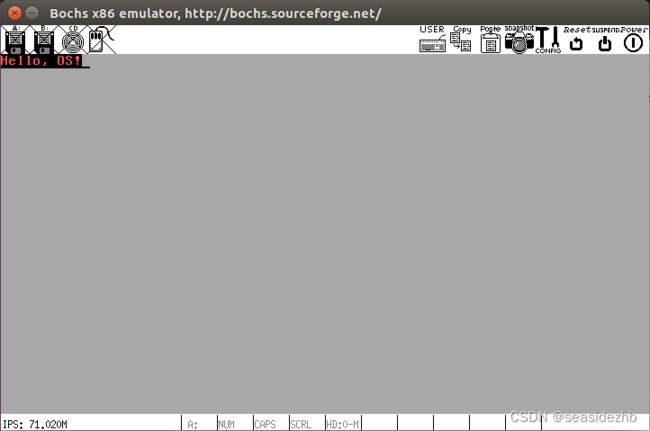
sudo bochs -f bochsrc开始模拟,然后需要在后台命令行里边输入“c”然后按回车,结果如下图:

此文章为4月Day 7学习笔记,内容来源于极客时间《操作系统实战 45 讲》。