React Native项目实战
调试接口
API 调试工具是用来对 API 接口进行调试的。比较出名的有 Postman,Insomnia、Postwoman 等。本节以 Insomnia 为例。
首先,需要跳转到 Insomnia 官网,下载(Insomnia Core):https://insomnia.rest/download然后执行安装。
配置完之后,就可以根据接口(例如:和风天气接口)的使用规则,在 Insomnia 中调试接口了。使用效果如下:

调用接口
React Native 提供了和 web 标准一致的 Fetch API,用于满足开发者访问网络的需求。
Get 调用
fetch(url, {
	method: 'GET'
}).then(function(response){
    //获取数据,数据处理
}).catch(function(err){
    //错误处理
});
POST 方式
let param = {user:'xxx',phone:'xxxxxx'};
fetch(url,{
	method:'post',
	body:JSON.stringify(param)
}).then(function(response){
	//获取数据,数据处理
});
当然,也可以通过Axios进行接口调用。
UI 界面
其中,涉及到的新的组件,有以下两个
react-native-linear-gradient
react-native-linear-gradient 是用来声明线性渐变的组件
-
安装
yarn add react-native-linear-gradient -
配置
如果 RN >= 0.60-
Android
不需要做任何操作,RN 启动时,会自动运行下面的链接命令react-native link react-native-linear-gradient -
iOS
npx pod-install如果 RN < 0.60 或上述自动链接无效。可以参考官网的手动链接
https://github.com/react-native-linear-gradient/react-native-linear-gradient
-
-
使用
import React, { Component } from 'react'
import { Text, StyleSheet, View } from 'react-native'
import LinearGradient from 'react-native-linear-gradient'
export default class LinearGradientDemo extends Component {
	render(){
		return(
			<View style={{flex:1,justifyContent:'center'}}>
				<LinearGradient
					colors={['#4c669f','#3b5998','#192f6a']}
					style={styles.linearGradient}
					>
					<Text style={styles.buttonText}>垂直渐变</Text>
				</LinearGradient>
				<LinearGradient
					start={{x:0,y:0}}
					end={{x:1,y:0}}
					colors={['#4c669f','#3b5998','#192f6a']}
					style={styles.linearGradient}
					>
					<Text style={styles.buttonText}>水平渐变</Text>
				</LinearGradient>
				<LinearGradient
					start={{x:0.0,y:0.2}}
					end={{x:0.15,y:1.2}}
					locations={[0,0.5,0.7]}
					colors={['#4c669f','#3b5998','#192f6a']}
					style={styles.linearGradient}
					>
					<Text style={styles.buttonText}>倾斜渐变</Text>
				</LinearGradient>
			</View>
		)
	}
}
const styles = StyleSheet.create({
	linearGradient:{
		flex:1,
		borderRadius:55,
		margin:10,
		justifyContent:'center'
	},
		buttonText:{
		fontSize:30,
		textAlign:'center',
		color:'#fff',
	},
})
LinearGradient 中要的属性
-
colors
必填项。声明颜色的数组,至少包含两个颜色值。
-
start
可选项。对象格式,声明渐变的开始的坐标位置。{ x: number, y: number }
x 或 y 的取值范围是 0 - 1, 1就是100%,{x:0, y:0} 表示左上角,{x:1, y:0} 表示右上角 -
end
可选项。对象格式,声明渐变的结束的坐标位置。{ x: number, y: number }
-
locations
可选项,声明渐变颜色结束位置的数组。例如:
[0.1,0.75,1]表示:
第一个颜色占据 0% - 10%,
第二个颜色占据 10% - 75%
最后一个颜色占据 75% - 100%
react-native-animatable
react-native-animatable 是非常流行的动画组件库。
-
安装
yarn add react-native-animatable -
使用
import * as Animatable from 'react-native-animatable';

//创建自定义组件
MyCustomComponent = Animatable.createAnimatableComponent(MyCustomComponent);

//使用现有组件
<Animatable.View animation="动画名称" duration={持续时间} style={{}}>
	...
</Animatable.View>
具体的
动画名称(animation)可以参考官网:https://github.com/oblador/react-native-animatable例如:
- 弹跳
- 进入
bounceIn
bounceInDown
bounceInUp
bounceInLeft
bounceInRight - 离开
bounceOut
bounceOutDown
bounceOutUp
bounceOutLeft
bounceOutRight
- 进入
- 淡入淡出
- 进入
fadeIn
fadeInDown
fadeInDownBig
fadeInUp
fadeInUpBig
fadeInLeft
fadeInLeftBig
fadeInRight
fadeInRightBig - 离开
fadeOut
fadeOutDown
fadeOutDownBig
fadeOutUp
fadeOutUpBig
fadeOutLeft
fadeOutLeftBig
fadeOutRight
fadeOutRightBig
- 进入
- 弹跳
其他动画名称(animation)可以参考官网:https://github.com/oblador/react-native-animatable
状态管理
Redux
Redux 是 React 中进行状态管理的工具,这里以复习回顾的方式。实现简单的计数器功能,打通 Redux流程。
-
安装 Redux
yarn add redux yarn add react-redux yarn add redux-thunk #支持异步操作 -
创建 store
redux/actions/actionTypes.js (用来集中管理 Action type)/** * 操作的细粒度划分 */ export default { COUNTER_INCREMENT: 'COUNTER_INCREMENT', COUNTER_DECREMENT: 'COUNTER_DECREMENT', }redux/reducers/Counter.js
import actionTypes from '../actions/actionTypes'

const initState = {
  num: 1
}

export default (state = initState, action) => {
  switch (action.type) {
    case actionTypes.COUNTER_INCREMENT:
      return {
        ...state,
        num: state.num + action.payload
      }
    case actionTypes.COUNTER_DECREMENT:
      return {
        ...state,
        num: state.num - action.payload
      }
    default:
      return state
  }
}
redux/reducers/index.js
import { combineReducers } from 'redux'

import Counter from './Counter'

export default combineReducers({
  Counter
})
redux/store.js
import { createStore, applyMiddleware } from 'redux' import reducers from './reducers' import reduxThunk from 'redux-thunk' const store = createStore( reducers, applyMiddleware(reduxThunk) ) export default store -
将 store 挂载到 App 组件上
import { Provider } from'react-redux' import store from './redux/store' export default class index extends Component { render(){ return( <Provider store={store}> <Routes/> </Provider> ) } } -
在组件内使用 redux 数据
import React, { Component } from 'react'
import { Text, StyleSheet, View, Button } from 'react-native'
import { connect } from 'react-redux'
import { increment, decrement } from '../../redux/actions/Counter'

const mapStateToProps = state => {
  return {
    num: state.Counter.num
  }
}

class Counter extends Component {
  render() {
    return (
      <View style={[styles.container]}>
        <Button title={'-'} onPress={() => this.props.decrement(1)} />
          <Text>{this.props.num}</Text>
        <Button title={'+'} onPress={() => this.props.increment(1)} />
      </View>
    )
  }
}

export default connect(mapStateToProps, { increment, decrement })(Counter)

const styles = StyleSheet.create({
  container: {
    flex: 1,
    flexDirection: 'row',
    justifyContent: 'space-around',
    alignItems: 'center'
  }
})
路由鉴权
大多数应用都有用户鉴权的要求,用户鉴权通过之后,才能访问与之相关的私有数据。
典型的鉴权流是这样的
- 用户打开应用
- 应用获取鉴权状态
- 初始会根据登录信息,从 Redux 中获取(此时可以将状态信息持久化存储)
- 再次进入 App,从持久化存储(例如:AsyncStorage)中获取鉴权状态
- 当状态加载后,判断用户鉴权状态是否合法,合法跳转到首页,否则弹出鉴权页面
- 当用户退出应用后,我们清除鉴权状态,并跳回鉴权页面
代码示例:
import React, { Component } from 'react'
import { Text, StyleSheet, View } from 'react-native'
import MainTab from './routes'
import { connect } from 'react-redux'
import { createStackNavigator } from '@react-navigation/stack';

import LoginScreen from './screens/NoAuth/Login'
import RegisterScreen from './screens/NoAuth/Register'
import SplashScreen from './screens/NoAuth/Splash'

const mapStateToProps = state => {
  return {
    isLogin: state.User.isLogin
  }
}

const Stack = createStackNavigator();

class index extends Component {
  render() {
    return (
      <>
      {
        this.props.isLogin
        ?
        (<MainTab />)
        :
        (
          <Stack.Navigator
            headerMode="none"
            initialRouteName={'Splash'}
          >
            <Stack.Screen name="Splash" component={SplashScreen} />
            <Stack.Screen name="Login" component={LoginScreen} />
            <Stack.Screen name="Register" component={RegisterScreen} />
          </Stack.Navigator>
        )
      }
      </>
    )
  }
}

export default connect(mapStateToProps)(index)

const styles = StyleSheet.create({})
项目优化
使用第三方 UI 组件
RN 官方组件太过简单,而自己去写样式又太浪费时间。而选择一些成熟的,第三方UI组件库。会让我们的项目开发事半功倍。
这里列出一些比较流行的
- NativeBase 目前在 Github 上有 14.5k 个星
官网:https://nativebase.io/ - react-native-paper 目前在 Github 上有 6.8k 个星
官网:https://reactnativepaper.com/
这里我们推荐 react-native-paper
-
安装
yarn add react-native-paper -
使用
先将整个应用,通过 Provider 包裹起来
import * as React from 'react';
import { AppRegistry } from 'react-native';
import { Provider as PaperProvider } from 'react-native-paper';
import { name as appName } from './app.json';
import App from './src/App';

export default function Main() {
  return (
    <PaperProvider>
      <App />
    </PaperProvider>
  );
}

AppRegistry.registerComponent(appName, () => Main);
然后再项目中使用具体的组件
import * as React from 'react';
import { Button } from 'react-native-paper';

const MyComponent = () => (
  <Button icon="camera" mode="contained" onPress={() => console.log('Pressed')}>
    Press me
  </Button>
);

export default MyComponent;
修改应用 logo
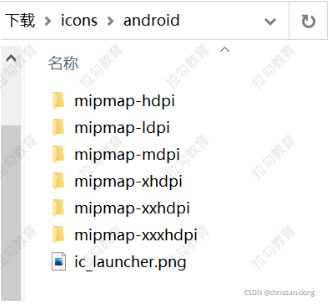
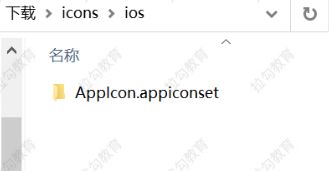
应用图标对尺寸有要求,比较简单地方式是,准备一张1024*1024的图片,然后在线生成。生成之后,我们可以将生成的图标下载下来。解压后,我们会得到两个目录:
分别将上述目录,复制到 RN 项目对应的位置中
- Android
替换android/app/src/main/res下对应的内容。 - iOS
换ios/项目名称/Images.xcassets/AppIcon.appiconset中的内容。
修改应用名称
-
Android
编辑android/app/src/main/res/values/strings.xml<resources> <string name="app_name">你的应用名称</string> </resources> -
iOS
编辑ios/项目名称/Info.plist文件,定位到 CFBundleDisplayName<key>CFBundleDisplayName</key> <string>你的应用名称</string> ....


