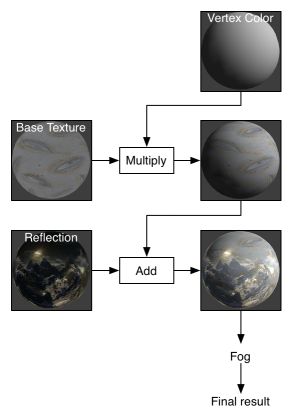
unity 之 shader 语法二
ShaderLab: Legacy Lighting
材质和光照参数用来控制内置的顶点光照,顶点光照是计算每个顶点的标准的Direct3D/OpenGL光照模型. Lighting on 是打开.Lighting受 Material块, ColorMaterial and SeparateSpecular 命令影响
Note:当vertex programs 使用的时候 Material/Lighting 命令不起作用,因为所有的计算都在shader中完成; .建议使用可编程着色器代替传统的顶点照明.对于这些,您不需要使用这里描述的任何命令, 相反你可以定义你自己的 vertex and fragment programs , texturing
顶点着色和光照是任何渲染几何的第一个效果.它在顶点层操作,并计算在应用纹理之前使用的基本颜色。
Syntax
顶层命令控制是否使用固定功能照明,以及一些配置选项。主要的设置在Material块中,下面会详细介绍。
Color
Color color
给物体设置一个颜色,这个颜色是rgba四个值,也可以是属性块中的名字
Material
Material {Material Block}
定义材质属性
Lighting
Lighting On | Off
在材质块中定义的设置有任何效果, 您必须启用照明与照明的命令.如果照明是关闭的,颜色直接从颜色命令中的颜色获取。
SeparateSpecular
SeparateSpecular On | Off
是否开启高光,这个在pass通道的最后开启,所以高光不被材质影响,只会被灯光影响
ColorMaterial
ColorMaterial AmbientAndDiffuse | Emission
使用每个顶点的颜色,而不是在material中设置的颜色,AmbientAndDiffuse 替代Ambient and Diffuse 值l; Emission 替代emission的值
Material Block
它包含了材质对光的处理,这些属性中的任何一个都可以省略,在这种情况下它们默认为黑色(就是没有效果)
Diffuse color: 漫反射颜色,是物体的基本颜色
Ambient color: 环境光颜色. 这个颜色受lighting窗口里的 ambient 的设置影响
Specular color: 高光颜色
Shininess number: 高光的清晰度,值在0-1之间.在0你得到一个巨大的高光,看起来很像漫射照明,1你会看到一个光点,值越大高光越聚合,越亮
Emission color: 自发光颜色
打在物体上的全色光为:
Ambient * Lighting Window’s Ambient Intensity setting + (Light Color * Diffuse + Light Color * Specular) + Emission
环境光*lighting窗口中ambient的强度+(当前灯光颜色*漫反射颜色+当前灯光颜色*高光颜色)+自发光颜色
等式中的灯光部分(在圆括号里面的),是对所有灯光设置的
通常你想要保持漫反射和环境颜色相同(所有内置的Unity着色器都是这样做的)
Examples
以单个红色渲染:
Shader "Solid Red" {
    __SubShader__ {
        Pass { Color (1,0,0,0) }
    }
}
基本着色器,以白色渲染对象和应用顶点照明:
Shader "VertexLit White" {
    SubShader {
        Pass {
            Material {
                Diffuse (1,1,1,1)
                Ambient (1,1,1,1)
            }
            Lighting On
        }
    }
}
在属性面板上显示颜色属性,shaderlab不分大小写An extended version that adds material color as a property visible in Material Inspector
:
Shader "VertexLit Simple" {
    Properties {
        _Color ("Main Color", COLOR) = (1,1,1,1)
    }
    SubShader {
        Pass {
            Material {
                Diffuse [_Color]//用属性是写在中括号下
                Ambient [_Color]
            }
            Lighting On
        }
    }
}
最后,一个完整的vertex-lit着色器(参见SetTexture参考页面):
Shader "VertexLit" {
    Properties {
        _Color ("Main Color", Color) = (1,1,1,0)
        _SpecColor ("Spec Color", Color) = (1,1,1,1)
        _Emission ("Emmisive Color", Color) = (0,0,0,0)
        _Shininess ("Shininess", Range (0.01, 1)) = 0.7
        _MainTex ("Base (RGB)", 2D) = "white" {}
    }
    SubShader {
        Pass {
            Material {
                Diffuse [_Color]
                Ambient [_Color]
                Shininess [_Shininess]
                Specular [_SpecColor]
                Emission [_Emission]
            }
            Lighting On
            SeparateSpecular On
            SetTexture [_MainTex] {
                Combine texture * primary DOUBLE, texture * primary
            }
        }
    }
}
ShaderLab: Legacy Texture Combiners:混合纹理
在基本的顶点光照计算完成之后,开始应用纹理,shaderlab中使用 SetTexture 命令
Note: SetTexture命令在 fragment programs 没用; 因为那个完全在shader中设置
你可以在pass中有多个 SetTexture 命令 - 所有的纹理都是按顺序应用的, 就像绘画程序中的图层, SetTexture 必须写在Pass的最后面
Syntax
SetTexture [TextureName] {Texture Block}
声明一个 texture. TextureName 必须在属性面板中定义过. 在TextureBlock执行对texture的操作.
texture block 控制如何进行应用纹理, controls how the texture is applied.在纹理块内部最多可以有两个命令:combine和constantColor。
Texture block combine command
combine src1 * src2: Multiplies src1 and src2 together.相乘:结果将比两个输入的颜色都深,就像叠加一样
combine src1 + src2: Adds src1 and src2 together. 相加:结果比两个输入都亮,就相当于抬高亮度
combine src1 - src2:从贴图1当中减去贴图2的颜色通道
combine src1 lerp (src2) src3:插值,使用的的是1和3之间的alpha值.当值为1时,使用的就是src1的alpha值,当值为0时,使用的就是3的alpha值
combine src1 * src2 + src3:1和2的alpha相乘,然后和3相加
所有 src 可以是 previous, constant, primary or texture其中的一个:
- Previous:可以是上一个 SetTexture返回的结果
- Primary :可以是lighting光照计算的颜色,或者绑定的顶点颜色 ,primary是diffuse ambient specular颜色的总和
- Texture :可以是属性声明里面贴图的颜色
- Constant :是在ConstantColor中指定的颜色。
Modifiers:
- 上面指定的公式后面可以加上关键字Double或Quad,从而使结果颜色为2x或4x的亮度
- 除了lerp参数外,所有src属性前面都可以加(1-),以使结果颜色为负值。
- 所有src属性后面都可以跟着alpha,以只获取alpha通道。
Texture block constantColor command
ConstantColor color: 定义可在组合命令中使用的常量颜色。
Details
在fragment programs之前,旧的显卡使用分层的方法来创建纹理. 纹理一个接一个地应用,修改即将显示在屏幕的颜色。对于每个纹理,通常与前一个操作的结果相结合。现在建议使用实际的片段程序。
Note 每一个材质可以每个纹理阶段可能被限制在0-1的范围,取决于平台。这可能会影响SetTexture阶段,该阶段可以生成高于1.0的值。
Separate Alpha & Color computation:分离alpha和color颜色
默认,混合的是RGB和Alpha一起的计算,你可以选择指定一个单独的公式来计算alpha值
SetTexture [_MainTex] { combine previous * texture, previous + texture }
这个式子的含义就是:把上次的结果和maintex相乘,颜色加深,这个是RGBA,然后把这个结果和maintex相加,提高亮度,就是增加透明度
Specular highlights
默认情况下,primary是diffuse ambient specular颜色的总和(as defined in the Lighting calculation).如果你在pass中声明了SeparateSpecular On,高光颜色会在组合计算之后再加上去,而不是之前,这是内置 VertexLit 默认的.
Graphics hardware support
支持片段着色器的显卡,pc端支持model2.0,移动端支持OpenGL ES 2.0,它也支持所有的 SetTexture 模型和至少 4个texture状态,很多都支持的8个状态,如果你再就软件上运行他们,有可能只支持2个,你需要分别写几个subshader
Examples
Alpha Blending Two Textures:两个贴图的alpha混合
首先第一个组合器只获取 _MainTex,然后使用_BlendTex的alpha通道来淡入_BlendTex的RGB颜色
Shader "Examples/2 Alpha Blended Textures" {
    Properties {
        _MainTex ("Base (RGB)", 2D) = "white" {}
        _BlendTex ("Alpha Blended (RGBA) ", 2D) = "white" {}
    }
    SubShader {
        Pass {
            // Apply base texture
            SetTexture [_MainTex] {
                combine texture
            }
            // Blend in the alpha texture using the lerp operator
            SetTexture [_BlendTex] {
                combine texture lerp (texture) previous
            }
        }
    }
}
Alpha Controlled Self-illumination:alpha控制自发光
这个着色器使用_MainTex的alpha通道来决定在哪里应用照明. 它通过将纹理应用到两个阶段来做到这一点,在第一阶段,纹理的alpha值用来混合顶点颜色和纯白色 .在第二阶段,和纹理的RGB值相乘
Shader "Examples/Self-Illumination" {
    Properties {
        _MainTex ("Base (RGB) Self-Illumination (A)", 2D) = "white" {}
    }
    SubShader {
        Pass {
            // Set up basic white vertex lighting
            Material {
                Diffuse (1,1,1,1)
                Ambient (1,1,1,1)
            }
            Lighting On

            // Use texture alpha to blend up to white (= full illumination)
            SetTexture [_MainTex] {
                constantColor (1,1,1,1)
                combine constant lerp(texture) previous
            }
            // Multiply in texture
            SetTexture [_MainTex] {
                combine previous * texture
            }
        }
    }
}
我们也可以自定以自发光的颜色.在属性当中声明一个自发光属性 :
Shader "Examples/Self-Illumination 2" {
    Properties {
        _IlluminCol ("Self-Illumination color (RGB)", Color) = (1,1,1,1)
        _MainTex ("Base (RGB) Self-Illumination (A)", 2D) = "white" {}
    }
    SubShader {
        Pass {
            // Set up basic white vertex lighting
            Material {
                Diffuse (1,1,1,1)
                Ambient (1,1,1,1)
            }
            Lighting On

            // Use texture alpha to blend up to white (= full illumination)
            SetTexture [_MainTex] {
                // Pull the color property into this blender
                constantColor [_IlluminCol]
                // And use the texture's alpha to blend between it and
                // vertex color
                combine constant lerp(texture) previous
            }
            // Multiply in texture
            SetTexture [_MainTex] {
                combine previous * texture
            }
        }
    }
}
And finally, we take all the lighting properties of the vertexlit shader and pull that in:
Shader "Examples/Self-Illumination 3" {
    Properties {
        _IlluminCol ("Self-Illumination color (RGB)", Color) = (1,1,1,1)
        _Color ("Main Color", Color) = (1,1,1,0)
        _SpecColor ("Spec Color", Color) = (1,1,1,1)
        _Emission ("Emmisive Color", Color) = (0,0,0,0)
        _Shininess ("Shininess", Range (0.01, 1)) = 0.7
        _MainTex ("Base (RGB)", 2D) = "white" {}
    }

    SubShader {
        Pass {
            // Set up basic vertex lighting
            Material {
                Diffuse [_Color]
                Ambient [_Color]
                Shininess [_Shininess]
                Specular [_SpecColor]
                Emission [_Emission]
            }
            Lighting On

            // Use texture alpha to blend up to white (= full illumination)
            SetTexture [_MainTex] {
                constantColor [_IlluminCol]
                combine constant lerp(texture) previous
            }
            // Multiply in texture
            SetTexture [_MainTex] {
                combine previous * texture
            }
        }
    }
}
ShaderLab: Legacy Alpha Testing
alpha test 是拒绝像素写入到屏幕的最后机会
Note: 当使用fragment programs时,AlphaTest 没有用;大部分平台再shader中使用 HLSL clip()方法.
在计算完最后输出的颜色之后,可以把它的alpha通道和一个固定的值相比较,如果test失败,则这个像素不显示在屏幕上
Syntax
AlphaTest Off
默认渲染所有像素
AlphaTest comparison AlphaValue
设置alphaTest,只渲染alpha值在一定范围内的像素。
Comparison
Comparison is one of the following words:
| Greater | 只渲染alpha值大于AlphaValue的像素 |
| GEqual | 只渲染alpha值大于或等于AlphaValue的像素。 |
| Less | 只渲染alpha值小于AlphaValue的像素 |
| LEqual | 只渲染alpha值小于或等于AlphaValue的像素。 |
| Equal | 只渲染alpha值等于AlphaValue的像素 |
| NotEqual | 只渲染alpha值与AlphaValue不同的像素。 |
| Always | 渲染所有像素. 和 AlphaTest Off.功能一样 |
| Never | 不渲染任何像素. |
AlphaValue
一个在0-1之间的float值, 它也可以在属性面板中定义,在这种情况下,应该使用标准方括号符号([VariableName])来编写。
Details
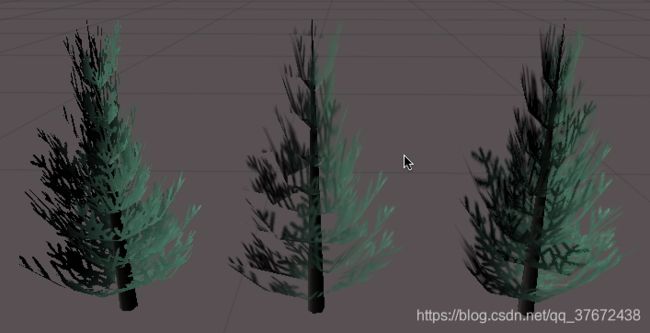
当渲染带有透明部分的凹形物体时,alpha测试是很重要的。显卡上保存着写入屏幕的每个像素的深度记录. 如果新像素比已呈现的像素更远,则不会将新像素显示,这意味着即使使用了混合,对象也不会显示出来。
左边的树使用AlphaTest. 注意其实的像素不是透明的就是不透明的. 中间的树使用 Alpha Blending - 注意树枝附近的透明部分是如何覆盖远处的树叶的,因为有深度缓冲.右边的树是使用最后一个示例着色器呈现的- 它实现了混合和alpha testing的组合来隐藏任何工件。
Examples
最简单的例子,用alpha通道分配一个纹理。对象只有在alpha大于0.5时才可见
Shader "Simple Alpha Test" {
    Properties {
        _MainTex ("Base (RGB) Transparency (A)", 2D) = "" {}
    }
    __SubShader__ {
        Pass {
            // Only render pixels with an alpha larger than 50%
            AlphaTest Greater 0.5
            SetTexture [_MainTex] { combine texture }
        }
    }
}
下面是 把透明度变成一个属性:
Shader "Cutoff Alpha" {
    Properties {
        _MainTex ("Base (RGB) Transparency (A)", 2D) = "" {}
        _Cutoff ("Alpha cutoff", Range (0,1)) = 0.5
    }
    SubShader {
        Pass {
            // Use the Cutoff parameter defined above to determine
            // what to render.
            AlphaTest Greater [_Cutoff]
            Material {
                Diffuse (1,1,1,1)
                Ambient (1,1,1,1)
            }
            Lighting On
            SetTexture [_MainTex] { combine texture * primary }
        }
    }
}
在渲染植物和树木时,许多游戏都带有典型的alphaTest的硬边. 一种方法是渲染对象两次.在第一个pass中,我们只使用alphaTest来渲染超过50%不透明的像素. 在第二个pass中,我们用alpha-blend 混合我们裁剪的那一部分,这个混合没有记录深度,所以是在一个平面上,所有如果远处的竖直挡住了近处的树叶,它们会有一点混肴,这是正常的,因为这个细节很难被看清
Shader "Vegetation" {
    Properties {
        _Color ("Main Color", Color) = (.5, .5, .5, .5)
        _MainTex ("Base (RGB) Alpha (A)", 2D) = "white" {}
        _Cutoff ("Base Alpha cutoff", Range (0,.9)) = .5
    }
    SubShader {
        // Set up basic lighting
        Material {
            Diffuse [_Color]
            Ambient [_Color]
        }
        Lighting On

        // Render both front and back facing polygons.
        Cull Off

        // first pass:
        // render any pixels that are more than [_Cutoff] opaque
        Pass {
            AlphaTest Greater [_Cutoff]
            SetTexture [_MainTex] {
                combine texture * primary, texture
            }
        }

        // Second pass:
        // render in the semitransparent details.
        Pass {
            // Dont write to the depth buffer
            ZWrite off
            // Don't write pixels we have already written.
            ZTest Less
            // Only render pixels less or equal to the value
            AlphaTest LEqual [_Cutoff]

            // Set up alpha blending
            Blend SrcAlpha OneMinusSrcAlpha

            SetTexture [_MainTex] {
                combine texture * primary, texture
            }
        }
    }
}
我们是在两个pass中写的,也就是一个subshader可以有多个pass
ShaderLab: Legacy Fog
Fog 雾参数可以通过雾的命令控制。
Fog将根据和摄像机的距离把像素颜色混合成一个单一的颜色, Fogging 没有更改像素颜色的alpha值,而是更改了rgb值
Syntax
Fog
Fog {Fog Commands}
Mode
Mode Off | Global | Linear | Exp | Exp2
定义雾的mode模式. 默认是global,它根据render settiong里面fog是否启用来传递成Off或者 Exp2
Color
Color ColorValue
设置雾的颜色
Density
Density FloatValue
设置指数雾的强度
Range
Range FloatValue, FloatValue
设置雾的远近平面,就和摄像机的远近平面一样
ShaderLab: Legacy BindChannels:绑定通道
BindChannels 命令可以声明顶点数据是如何映射到显卡上的
Note: 当顶点着色器使用时,_BindChannels没有效果
默认,unity已经给你配置好了,但是有时候你需要创建一个自己的配置
比如,你可以映射基础uv到第一张材质上,第二张uv到第二张贴图上,或者告诉硬件应该考虑顶点的颜色
Syntax
BindChannels { Bind "source", target }
声明源顶点数据映射到目标硬件上Specifies that vertex data source maps to hardware target.
Source can be one of:
- Vertex:顶点位置
- Normal:顶点法线
- Tangent:顶点法线
- Texcoord: 主要UV坐标
- Texcoord1: 二次UV坐标
- Color: 每一个顶点的颜色
Target can be one of:
- Vertex: :顶点位置
- Normal: 顶点法线
- Tangent: 顶点切线
- Texcoord0, Texcoord1, …: 对应纹理阶段的纹理坐标
- Texcoord:所有纹理的纹理坐标 texture coordinates for all texture stages
- Color: 顶点颜色
Details
Unity对哪些源可以映射到哪些目标有一些限制. Source and target必须匹配 Vertex, Normal, Tangent and Color. Texture coordinates from the mesh
(Texcoord and Texcoord1) can be mapped into texture coordinate targets (Texcoord for all texture stages, or TexcoordN for a specific stage).
BindChannels有两个典型的用例:
- Shaders that take vertex colors into account.
- Shaders that use two UV sets.:使用两张uv贴图
Examples
// Maps the first UV set to the first texture stage
// and the second UV set to the second texture stage
BindChannels {
   Bind "Vertex", vertex
   Bind "texcoord", texcoord0
   Bind "texcoord1", texcoord1
}
// Maps the first UV set to all texture stages
// and uses vertex colors
BindChannels {
   Bind "Vertex", vertex
   Bind "texcoord", texcoord
   Bind "Color", color
}
ShaderLab: UsePass
UsePass 命令作用是使用另一个shader里面的pass通道
Syntax
UsePass "Shader/Name"
从给定的着色器中插入具有给定名称的所有pass。着色器/名称包含着色器的名称和pass的名称,用斜线字符分隔。注意,只考虑第一个使用的子着色器。
Details
一些着色器可以使用来自其他着色器的现有pass,从而减少代码重复. 例如,您可能有一个绘制对象轮廓的着色器pass, 你想在其它着色器里面也使用这个pass.举个例子,下面的命令使用了内置的VertexLit着色器中名为“SHADOWCASTER”的通道:
UsePass "VertexLit/SHADOWCASTER"
为了UsePass的工作,必须给要使用的pass起一个名字。pass的名字使用下面的命令命名,要写在pass里面
Name "MyPassName"
Note 内部所有的传递名称都是大写的, :所以UsePass必须引用大写的名字.
ShaderLab: Fallback
在所有子着色器之后,可以定义Fallback。它的意思是“如果没有子着色器可以运行在这个硬件上,尝试使用另一个着色器的子着色器".
Syntax
Fallback "name"
使用另一个着色器的名字
Fallback Off
没有Fallback,即使没有子着色器可以在这个硬件上运行,也不应该有警告
Details
fallback语句的作用和插入一个subshader的功能一样的,就相当于引用另一个subshader
Example
    Shader "example" {
        // properties and subshaders here...
        Fallback "otherexample"
    }
ShaderLab: CustomEditor
可编辑扩展shader,会根据这个名字查找到shader,然后属性面板上会使用ShaderGUI来显示. See Custom Shader GUI for examples.
Syntax
CustomEditor "name"
Example
Shader "example" {
    // properties and __subshaders__ here...
    CustomEditor "MyCustomEditor"
}
ShaderLab: other commands
Category:种类分组
Category 是它里面命令的逻辑分组,这主要用于“继承”渲染状态。比如,你的shader可能会含有很多subshader,每一个子着色器都需要fog打开,blending打开. 就像一个共有的操作:
Shader "example" {
Category {
    Fog { Mode Off }
    Blend One One
    SubShader {
        // ...
    }
    SubShader {
        // ...
    }
    // ...
}
}
Category block 只影响着色器解析,它与“粘贴”它下面的命令到任何子着色器下的作用是完全相同的。它根本不会影响着色器的执行速度。
Shader assets
Shaders 是一种包含显卡可执行的代码和指令的资源. Materials引用 shaders, 设置它需要的参数,比如贴图,unity内置了一些shader,你也可以写你自己的shader
Creating a new shader
在 Assets> Create > Shader创建一个新的shader,通过 Cg/HLSL and ShaderLab三种语言混合编写
Shader import settings
属性部分可以声明属性. 每当用这个着色器创建一个新材质时,这些纹理就会被自动分配。
Shader Inspector
着色器检查器显示关于着色器的基本信息(主要是着色器标记),并允许编译和检查底层编译代码。
Surface Shaders,“Show generated code”按钮显示Unity生成的处理灯光和阴影的所有代码,你可以复制和粘贴所有它回到你原来的着色器文件,并开始调整。
着色器编译弹出菜单
Show generated code按钮的弹出菜单允许在选择的平台上检查最终编译的着色器代码 (e.g. assembly on Direct3D9, or low-level optimized GLSL for OpenGL ES). 这在优化着色器的性能时非常有用;您常常想知道这里到底生成了多少低级指令。
底层生成的代码对于粘贴到GPU着色器性能分析工具非常有用
Shader compilation details
在着色器导入时,Unity不会编译整个着色器. 这是因为大多数着色器内部有很多变量,对所有可能的平台,编译所有这些变量将花费很长时间。相反:
- 在导入的时候,只做最少的着色器处理(表面着色器生成等)
- 实际上,只有在需要时才编译着色器变量。
- 与在导入时编译100-10000个内部着色器的典型工作不同,这种方法通常只编译少量的着色器。
在发布时, 所有未编译的shader变量都已编译, 所以这些数据都会存在于游戏数据里面,不管你有没有使用它
但是这并不意味着shader可以有错误,比如语法错误什么的,尽管这个错误在shader导入的时候可能没有被检查到,比如在 Direct3D 11运行没事,但OpenGL一编译就错了.或者有些变量不适应 shader model 2.0 的限制.这些错误当编辑器使用shader的时候会显示出来;但是,手动编译您需要的平台的着色器也是一个很好的实践,以检查错误,这个可以通过Compile and show code 菜单检查
Shader 编译是通过一个名为UnityShaderCompiler的后台进程来完成的,这个后台进程是在需要编译着色器时由Unity启动的. 可以启动多个编译器进程(通常是一个CPU核心),所以在发布时编译shader是平时编译的.当编辑器不编译着色器时,编译器进程什么也不做,也不消耗计算机资源, 所以没有必要担心他们。当Unity编辑器退出时,它们也会被关闭。
单个着色器变量编译结果缓存在项目中, 在 Library/ShaderCache文件夹下, 这意味着100%相同的着色器或它们的代码片段将重用以前编译的结果. 这也意味着着色器缓存文件夹可以变得非常大,如果你有很多经常改变的着色器删除它,是安全的;这样做仅仅需要着色器变量被重新编译。


