realsenseD435i imu+双目标定
kalibr标定realsenseD435i imu+双目
- 1、标定用途
- 2、环境准备
-
- (1) 系统环境
- (2) 安装ros
- (3) 安装realsense-sdk
- (4) 安装realsense-ros
- (5) 安装ceres
- (6) 下载编译code_utils
- (7) 下载编译imu_utils
- (8) 安装Kalibr
- 3、正式开始
-
- (1) imu标定
- (2) 多相机标定
- (3) imu+双目标定
- (4) 使用realsense-viewer录制并标定rgb相机
- 4、参考资料
1、标定用途
realsense d435i包含了rgb图像、左视图、右视图、深度图、imu等主要的数据。为了使用这些数据要先做的就是对这些数据对应的传感器进行标定。之后可以更好地使用realsense跑算法。本文主要针对双目+imu涉及的传感器进行标定,其他可以同理参考。
2、环境准备
(1) 系统环境
Ubuntu 16之后的都可以,我自己使用的是Ubuntu 18.04,注意不同系统版本相应的软件环境版本可能不同。
(2) 安装ros
参考官方教程链接: http://wiki.ros.org/melodic/Installation/Ubuntu不同Ubuntu版本对应不同ros版本。
(3) 安装realsense-sdk
可以参考官方教程https://github.com/IntelRealSense/librealsense/blob/master/doc/distribution_linux.md,最终已打开realsense-viewer后可以看到深度图、rgb图、imu数据为准。如下图所示:

注意:usb要使用官方原装的3.0的线,否则可能导致数据传输过慢而使得数据无法实时传输,出现画面卡住的现象。
(4) 安装realsense-ros
参考官方教程https://github.com/IntelRealSense/realsense-ros
最终实现结果为终端打开rviz,Fixed Frame选择camera_link(连接realsense数据),通过Add添加topic:/camera/accel/sample、/camera/gyro/sample、/camera/infra1/image_rect_raw、/camera/infra2/image_rect_raw后可以看到如下结果为准(说明可以成功读取到加速计、陀螺仪、双目数据)

注意:陀螺仪的数据在rviz中是无法可视化的,只能可视化的加速计的数据
(5) 安装ceres
参考官方教程http://www.ceres-solver.org/installation.html
(6) 下载编译code_utils
- 创建ros工作空间,用于code_utils以及后面的imu_utils,工作空间名和路径可以自己更改,code_utils和imu_utils都是imu标定需要用到的,用于标定imu噪声密度以及随机游走系数
mkdir -p ~/imu_catkin_ws/src
cd ~/imu_catkin_ws/src
catkin_init_workspace
cd ..
catkin_make
source ~/imu_catkin_ws/devel/setup.bash
- 下载编译code_utils
cd ~/imu_catkin_ws/src
git clone [email protected]:gaowenliang/code_utils.git
cd ..
catkin_make
可能出现以下报错:
sudo apt-get install libdw-dev
- catkin_make时出现backward.hpp没有找到

解决方法:将sumpixel_test.cpp中# include "backward.hpp"改为:#include “code_utils/backward.hpp”
(7) 下载编译imu_utils
cd ~/imu_catkin_ws/src/
git clone [email protected]:gaowenliang/imu_utils.git
cd ..
catkin_make
(8) 安装Kalibr
参考官方教程https://github.com/ethz-asl/kalibr/wiki/installation,建议用源码安装。
3、正式开始
(1) imu标定
- 步骤一:找到realsense-ros包,进入/catkin_ws/src/realsense-ros/realsense2_camera/launch(路径仅供参考),复制其中的rs_camera.launch,并重命名为rs_imu_calibration.launch(命名随意),并对里面的内容做如下更改
将
>
改为
>
这样做的目的是将accel和gyro的数据合并得到imu话题,如何不这样做发布的topic中只要加速计和陀螺仪分开的topic,没有合并的camera/imu topic。
然后运行启动文件
roslaunch realsense2_camera rs_imu_calibration.launch
- 步骤二:编写启动文件,打开/home/n609/install/imu_catkin_ws/src/imu_utils/launch(路径仅供参考),打开终端运行
gedit d435i_imu_calibration.launch
文件名可以自行更改,在其中写入如下内容
>

    >
    	<!--TOPIC名称和上面一致-->


    >

>
- 步骤三:录制imu数据包,realsense静止放置,放置时间要稍大于d435i_imu_calibration.launch中的录制时间,即大于120分钟
rosbag record -O imu_calibration /camera/imu
其中imu_calibration是bag包的名字,可以更改,/camera/imu是发布的IMU topic,可以通过以下命令查看
rostopic list -v
- 步骤四:运行校准程序,首先激活imu_util工作空间的setup.bash,前面路径仅供参考
source ~/install/imu_catkin_ws/devel/setup.bash
接着
roslaunch imu_utils d435i_imu_calibration.launch
- 步骤五:回放数据包,打开新的终端
cd 存放imu_calibration.bag的路径
rosbag play -r 400 imu_calibration.bag
标定结束后在imu_catkin_ws/src/imu_utils/data中生成许多文件,其中d435i_imu_param.yaml就是我们想要的结果,展示如下:
%YAML:1.0
---
type: IMU
name: d435i
Gyr:
   unit: " rad/s"
   avg-axis:
      gyr_n: 2.3539521240749008e-03
      gyr_w: 2.2003805724014335e-05
   x-axis:
      gyr_n: 2.6188870753537648e-03
      gyr_w: 1.9633429257398280e-05
   y-axis:
      gyr_n: 3.2575261188632675e-03
      gyr_w: 3.5268522097346084e-05
   z-axis:
      gyr_n: 1.1854431780076705e-03
      gyr_w: 1.1109465817298644e-05
Acc:
   unit: " m/s^2"
   avg-axis:
      acc_n: 2.8250053766610776e-02
      acc_w: 7.8925155899657628e-04
   x-axis:
      acc_n: 2.2612064059723894e-02
      acc_w: 4.9228531499070764e-04
   y-axis:
      acc_n: 2.4653311434561623e-02
      acc_w: 7.6221527154486917e-04
   z-axis:
      acc_n: 3.7484785805546816e-02
      acc_w: 1.1132540904541519e-03
(2) 多相机标定
- 步骤一:下载打印标定板或购买标定板
到https://github.com/ethz-asl/kalibr/wiki/downloads选择

下载,然后缩放到40%,用A4纸就可以打印出来
原始pdf的格子参数是:
6*6的格子
大格子边长:5.5cm
小格子边长:1.65cm
小格子与大格子边长比例:0.3
调整后的格子参数是:
大格子边长:2.2cm
小格子边长:0.66cm
小格子与大格子边长比例:0.3
但这只是理想情况,实际情况还得实际测量。
新建april_6x6_A4.yaml文件,格式参考上图的yaml,内容展示如下:
target_type: 'aprilgrid' #gridtype
tagCols: 6               #number of apriltags
tagRows: 6               #number of apriltags
tagSize: 0.022           #size of apriltag, edge to edge [m]
tagSpacing: 0.3          #ratio of space between tags to tagSize
千万要自己测量大格子边长,即tagSize,我测出来实际上是0.024,所以我的文件里面tagSize是0.024,请自行更改。
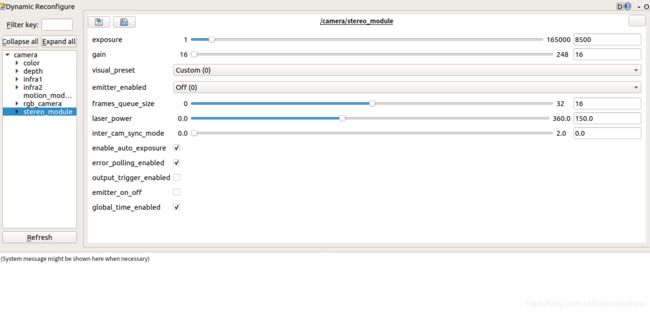
- 步骤二:启动关闭结构光
默认开始结构光时,双目图像会有很多点,这些点可能对标定有影响,所以使用时需要关闭结构光。
先启动
roslaunch realsense2_camera rs_camera.launch
新打开终端,运行
rosrun rqt_reconfigure rqt_reconfigure
打开后将camera->stereo_module中的emitter_enabled设置为off(0) ,展示如下:

- 步骤三:确定realsense合适放置位置
新打开终端,运行rviz
rviz
之后在里面add rgb和双目对应的topic,/camera/color/image_raw、/camera/infra1/image_rect_raw、/camera/infra2/image_rect_raw展示如下:

之后对准标定板,尝试移动realsense,同时要确保标定板一直在三个图像当中。录制过程参考https://www.youtube.com/watch?v=puNXsnrYWTY&app=desktop
- 步骤四:修改相机帧数(官方推荐是4Hz,尽管实际频率不完全准确,但是不影响结果)
kalibr在处理标定数据的时候要求频率不能太高,一般为4Hz,我们可以使用如下命令来更改topic的频率,实际上是将原来的topic以新的频率转成新的topic,实际测试infra1才是对应左目相机
rosrun topic_tools throttle messages /camera/color/image_raw 4.0 /color
rosrun topic_tools throttle messages /camera/infra1/image_rect_raw 4.0 /infra_left
rosrun topic_tools throttle messages /camera/infra2/image_rect_raw 4.0 /infra_right
注意:这种方式可能导致不同摄像头的时间不同步,如果出现这个问题,可以尝试不做这个操作,不这样做意味着需要更多的处理时间,这样的话后面也要相应的更改。
- 步骤五:录制ROS数据包
rosbag record -O multicameras_calibration /infra_left /infra_right /color
后面三个topic就是转换频率后的topic
- 步骤六:使用Kalibr标定
先激活环境变量
source devel/setup.bash
然后
kalibr_calibrate_cameras --target ../yaml/april_6x6_A4.yaml --bag multicameras_calibration.bag --models pinhole-equi pinhole-equi pinhole-equi --topics /infra_left /infra_right /color --bag-from-to 10 100 --show-extraction
其中–target …/yaml/april_6x6_A4.yaml是标定板的配置文件,注意如果选择棋格盘,注意targetCols和targetRows表示的是内侧角点的数量,不是格子数量。–bag multicameras_calibration.bag是录制的数据包,models pinhole-equi pinhole-equi pinhole-equi表示三个摄像头的相机模型和畸变模型(解释参考https://github.com/ethz-asl/kalibr/wiki/supported-models,根据需要选取), --topics /infra_left /infra_right /color表示三个摄像头对应的拍摄的数据话题,–bag-from-to 10 100表示处理bag中10-100秒的数据。–show-extraction表示显示检测特征点的过程,这些参数可以相应的调整。
可能出现以下报错:
1、cannot import name NavigationToolbar2Wx,如下图所示:

解决办法:发现 matplotlib 中没有NavigationToolbar2Wx 而是换成了NavigationToolbar2WxAgg 所以修改源码,将PlotCollection.py中的NavigationToolbar2Wx换成NavigationToolbar2WxAgg
原来的PlotCollection.py:

更改后:

2、报错:Camera are not connected through mutual observations, please check the dataset, Maybe adjust the approx. sync. tolerance.
![]()
解决办法:原因应该是各个摄像头数据不同步,解决办法为在标定命令中添加–approx-sync 0.04,更改后的标定命令为:
kalibr_calibrate_cameras --target ../yaml/april_6x6_A4.yaml --bag multicameras_calibration.bag --models pinhole-equi pinhole-equi pinhole-equi --topics /infra_left /infra_right /color --bag-from-to 10 100 --show-extraction --approx-sync 0.04
其中0.04可以看情况调整到0.1,如果还是不行可能是录制的数据有问题,需要重新录制,确保标定板一直在图像当中,并且运动不要太剧烈。如果还是不行尝试不要调整topic频率
参考https://blog.csdn.net/HUST_lc/article/details/96144499和https://blog.csdn.net/HUST_lc/article/details/96144499评论
3、使用棋格标定板标定时出现如下错误
Did not converge in maxIterations... restarting...
我使用的棋格盘是方的,当我使用官方提供的7*6的棋格盘在电脑上显示并调整到一定尺度时是可以成功的,因此推测是否需要非方的标定板才行
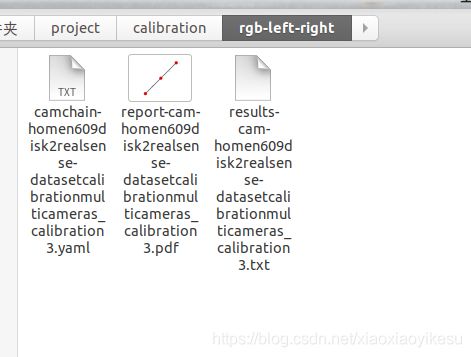
最终得到的结果为三个文件:

(3) imu+双目标定
- 步骤一:编写camchain.yaml,格式参考Kalibr官方教程https://github.com/ethz-asl/kalibr/wiki/yaml-formats中的chain.yaml,具体的参数参考上面得到的yaml文件,没有的参数可以删除,最终结果示例如下:
cam0:
  camera_model: pinhole
  intrinsics: [425.9022457154398, 425.51203910141476, 320.7722078245714, 234.52032563515024]
  distortion_model: equidistant
  distortion_coeffs: [0.28012961504219924, 0.776522889083524, -3.555039585283302, 7.122425751506347]
  rostopic: /infra_left
  resolution: [640, 480]
cam1:
  camera_model: pinhole
  intrinsics: [430.5354779160687, 429.81266841318336, 318.5487581769465, 232.5397023354142]
  distortion_model: equidistant
  distortion_coeffs: [0.2913961623966211, 0.7172454259365787, -3.7209659434658295, 7.615803448415106]
  T_cn_cnm1:
  - [ 0.9999886252230528, 7.228145915638569e-05, -0.004769087951971224,0.054624373296219914]
  - [-6.78405772070143e-05, 0.9999995640055901, 0.0009313357504042449, 0.002552511727883378]
  - [0.004769153190982554,-0.0009310016189884111, 0.9999881941372211,0.004273862007202206]
  - [0.0, 0.0, 0.0, 1.0]
  rostopic: /infra_right
  resolution: [640, 480]
- 步骤二:编写imu.yaml,格式参考https://github.com/ethz-asl/kalibr/wiki/yaml-formats中的imu.yaml,具体参数使用之前imu标定得到的参数,示例如下:
#Accelerometers
accelerometer_noise_density: 2.8250053766610776e-02   #Noise density (continuous-time)
accelerometer_random_walk:   7.8925155899657628e-04   #Bias random walk

#Gyroscopes
gyroscope_noise_density:     2.3539521240749008e-03   #Noise density (continuous-time)
gyroscope_random_walk:       2.2003805724014335e-05   #Bias random walk

rostopic:                    /imu      #the IMU ROS topic
update_rate:                 200.0      #Hz (for discretization of the values above)
- 步骤三:准备好之前的april_6x6_A4.yaml,示例如下:
target_type: 'aprilgrid' #gridtype
tagCols: 6               #number of apriltags
tagRows: 6               #number of apriltags
tagSize: 0.024           #size of apriltag, edge to edge [m]
tagSpacing: 0.3          #ratio of space between tags to tagSize
- 步骤四:复制realsense-ros包中rs_camera.launch,重命名为rs_imu_stereo.launch,更改内容为
将
>
改为:
>
这样来使imu和双目数据时间对齐
将
>
改为
>
这样来保证会有imu话题
- 步骤五:启动realsense
roslaunch realsense2_camera rs_imu_stereo.launch
- 步骤六:关闭IR结构光,参考上面
rosrun rqt_reconfigure rqt_reconfigure
打开后将camera->stereo_module中的emitter_enabled设置为off(0) ,展示如下:

- 步骤七:打开rviz,add imu topic和infra1 topic以及infra2 topic,同时调整realsense位置,要确保双目图像数据一直包含标定板全部内容
- 步骤八:调整imu和双目topic的发布频率以及以新的topic名发布它们,其中双目图像的发布频率改为20Hz,imu发布频率改为200Hz
rosrun topic_tools throttle messages /camera/infra1/image_rect_raw 20.0 /infra_left
rosrun topic_tools throttle messages /camera/infra2/image_rect_raw 20.0 /infra_right
rosrun topic_tools throttle messages /camera/imu 200.0 /imu
注意:,这种调整频率的方式只是理想结果,通过rostopic hz topic名可以查看实际的频率,可以发现实际频率和设置的频率并不一定相同,但可以先这样,知道如何调整的还望告知。
- 步骤九: 开始录制数据包,录制过程参考[https://www.youtube.com/watch?v=puNXsnrYWTY&app=desktop],同样注意双目图像在整个过程要包含整个标定板,同时运动不能太快,这样会造成图像过于模糊,在前后左右上下方向来回移动,录制大概90秒,前后15秒等下可以不使用。录制命令为:
rosbag record -O imu_stereo.bag /infra_left /infra_right /imu
- 步骤十:开始进行标定,标定命令为
kalibr_calibrate_imu_camera --bag [filename.bag] --cam [camchain.yaml] --imu [imu.yaml] --target [target.yaml] --bag-from-to 15 75 --show-extraction
相应参数需要相应更改,target.yaml对应april_6x6_A4.yaml文件
最终得到的结果为是得打yaml,txt,和pdf文件
(4) 使用realsense-viewer录制并标定rgb相机
- 步骤一:打开realsense并设置好bag包record保存路径,设置如下:

设置好rbg相机的分辨率、采样频率后按record记录数据,录制约90秒 - 步骤二:
使用Kalibr标定
先激活环境变量
source devel/setup.bash
然后
kalibr_calibrate_cameras --target ~/project/calibration/rgb/april_6x6_A4.yaml --bag ~/disk/datasets/realsense-dataset/calibration/rgb/20200526_131810.bag --models pinhole-equi --topics /device_0/sensor_1/Color_0/image/data --bag-from-to 20 80 --show-extraction
其中–target …/yaml/april_6x6_A4.yaml是标定板的配置文件,注意如果选择棋格盘,注意targetCols和targetRows表示的是内侧角点的数量,不是格子数量。–bag multicameras_calibration.bag是录制的数据包,models pinhole-equi pinhole-equi pinhole-equi表示三个摄像头的相机模型和畸变模型(解释参考https://github.com/ethz-asl/kalibr/wiki/supported-models,根据需要选取), --topics /device_0/sensor_1/Color_0/image/data表示拍摄的rgb相机数据话题,–bag-from-to 20 80表示处理bag中20-80秒的数据。–show-extraction表示显示检测特征点的过程,这些参数可以相应的调整。
- 步骤三:
- 步骤四:
4、参考资料
感谢这些作者的贡献:
1)关闭IR结构光:https://blog.csdn.net/Hanghang_/article/details/103612300
2)Kalibr标定bug解决方法:https://blog.csdn.net/HUST_lc/article/details/96144499
3)标定整个过程参考:https://blog.csdn.net/kongdaqing1290/article/details/97524087#%C2%A0%C2%A0%C2%A0%C2%A0%201%EF%BC%89IMU%E6%A0%87%E5%AE%9A
4)标定过程参考:
https://blog.csdn.net/Hanghang_/article/details/103546033

