使用MVVM模式的WPF应用(翻译文章)
这个文章园子里已经有了挺不错的翻译作品,我当时不知道, 几个月前又翻译的,权当学英语吧,
原作者是Josh Smith, 原文链接: http://msdn.microsoft.com/en-us/magazine/dd419663.aspx。
这篇文章讨论了以下几个内容:
- 模式和WPF
- MVP模式
- 为什么WPF要使用MVVM
- 用MVVM来搭建应用
这篇文章使用了以下技术:
- WPF
- 数据绑定
代码可以从这里下载 MSDN Code Gallery
内容快速跳转:
开发专业的软件应用的用户界面并不容易,一堆混杂的数据,交互设计,视觉设计,通信,多线程,安全,国际化,验证,单元测试,还需要一点魔法。 考虑到用户界面是系统的门面,必须满足难以众口难调的用户品味,因此是许多系统中最容易发生变化的地方。
有一些流行的设计模式来驯服这个顽兽,但是分离解决众多的关注点却不容易,模式越复杂,就会有越多的走捷径的行为去破坏之前把事情做对的努力。
这并不总是模式的错,有时候,我们使用复杂的模式,需要写一大堆代码,因为找不到简单的模式能够很好支持UI平台。我们需要找到这样一个搭建UI的平台,它使用简单,经过时间考验,和开发者验证的设计模式,幸运的是WPF正好能提供以上几点。
当WPF被越来越广泛的采用时,WPF社区已经发展出自己的模式实践系统。这篇文章,将综述一些设计开发WPF的最佳实践,利用一些WPF的核心功能再加上MVVM设计模式,通过一个例子程序来说明正确搭建一个WPF程序是多么简单(真的么?没骗人吧!)
最本文最后,清楚表明数据模板,命令,数据绑定,资源系统,和MVVM模式配合一起创建一个简单,可测试和可靠的框架,在上面可以发展任何WPF应用。本文附带的应用程序可以作为以MVVM为核心架构的WPF应用的模板。Demo解决方案的单元测试显示测试应用的用户界面是多么简单,当那些功能都存在于ViewModel 类, 在进入细节之前,我们先看看为何要使用MVVM模式。
用设计模式来写简单的“hello, World!”是没有必要和没有效率的,合格的开发者可以一眼扫过几行代码就明白是怎么回事。但是当程序的内容增加, 代码的行数和块数也相应增加,渐渐系统复杂度的增加,和问题的重复出现,鼓励开发者去这样整理他们的代码以便容易使人明白,讨论,和纠错。我们通过给代码的某些给定部分以命名,降低复杂系统的认知混乱。 我们通过一段代码在系统中的功能角色来决定它的命名。
开发者通常有意识的按照设计模式构建他们的代码。而不是让模式有机的出现。两种倾向都没有错。但是这篇文章,我故意通过在WPF应用中使用MVVM架构来显示其优越性。一些特定类的名称包含了一些MVVM模式中的术语。比如:以ViewModel结尾如果那个类是一个View的抽象。这种做法避免之前提到的认知混乱。相反,你可以安处于受控的混乱之中,在很多高级软件开发项目中常有的自然状态。
当人们开始创建软件用户界面,就已经有流行的模式来使这项工作更轻松,Model-View-Presenter(MVP)已经在几个UI平台上流行, MVP是MVC的变种,后者存在也有相当时间,假如你没有使用过MVP模式,这里有一些简单解释,屏幕上你看到的是视图,它显示的数据是Model,Presenter把两者结合到一起。视图依赖Presenter把Model中的数据填充进来,对用户输入做出响应,提供输入验证(可能通过委托给Model去完成), 或其他这类任务。如果你想要了解更多MVP的知识,我建议你读一下Jean-Paul Boodhoo's August 2006 Design Patterns column.
早在2004年,Martin Fowler(又是这个2B)发表了一篇关于模式的文章叫做Presentation Model(PM), PM模式和MVP模式很相似的地方是,他把视图View从行为和状态中分离。有趣的是PM模式它创建了一个View的抽象层,叫做Presentation Model,那么这个视图View就只受Presentation Model的渲染, 在Fowler的解释中,他提出Presentation Model经常去更新它的View,所以两者可以同步,同步的逻辑代码存在于Presentation Model类中, 2005年,John Gossman, 现在是微软WPF和Silverlight的架构师之一,在博客中提出了MVVM模式,MVVM和Fowler的PM相同之处是两个模式都有一个View的抽象层,这个抽象层包含了View的状态和行为。 Fowler的Presentation model是去创建一个UI平台独立的View视图抽象层, Gossman发明的MVVM作为一个利用WPF核心特征来简化用户界面创建的标准方法,从这个意义来讲,我认为MVVM是更一般的PM模式的特殊化,专门为WPF和Silverlight而生。Glenn Block的一篇精彩文章" "Prism:Patterns for Building Composite Applications with WPF" in the September 2008 中, 他解释了微软 WPF复合应用指南, 术语ViewModel从来没有使用,相反,术语Presentation Model被用来描述View的抽象层。 这篇文章里,我将指出 这个模式称为MVVM模式,和View的抽象层是ViewModel。我发现这个名词术语在WPF和Silverlight社区中比较流行。
不同于MVP模式中的Presenter,ViewModel没有到View的引用,View(也就是窗体控件) 绑定到ViewModel的属性, 然后循序,找到(暴露出)Model里和View有关的对象和其他状态变量, View和ViewModel之间的绑定很容易构建, 因为ViewModel对象被设定为View的DataContext属性,如果ViewModel里的属性发生变化,那些新的值就会通过绑定(binding)自动传播到View, 如果用户点击View上的一个按钮,一个命令(command)就会在ViewModel执行,去执行所需的操作。 是ViewModel,而绝不是View去执行对Model Data的所有更改。
View 不知道model的存在,(但是View通过DataContext知道ViewModel的存在--博主加) ViewModel和model也不知道view, 实际上,model完全不察觉ViewModel和View的存在,这个是十分松耦合的设计, 将会在多方面产生好处,你会快就会看到。
一旦开发者习惯于WPF和MVVM,将很难区分两者的区别, MVVM是WPF开发者的通用语,因为他很适合于WPF平台, WPF的设计使它很容易使用MVVM模式来构建应用, 实际上, 微软内部也是用MVVM来开发应用的, 比如Microsoft Expression Blend, 当核心的WPF平台在构建的时候, WPF的很多方面, 像是look-less control model 和 data templates, 都利用了MVVM模式提倡的显示,状态和行为的强化分离的做法。
WPF使MVVM成为一个伟大模式的最重要的一个方面,是数据绑定(Data Binding)框架, 通过绑定View的属性到一个ViewModel, 你得到了两者之间的松耦合,而且不需要在ViewModel里直接写代码去更新View, 数据绑定系统也支持输入验证, 提供了一个标准的途径发送验证错误到View。
WPF另外两个使这个模式如此有用的东西,是Data Templates(模板), 和Resource System(资源), Data Templates 可以把ViewModel的对象指定到UI里显示的View上, 你可以在XAML里声明模板(Template), 然后让资源系统在运行时自动定位和应用那些模板, 你可以在下文学到更多关于模板和绑定的知识,"Data and WPF: Customize Data Display with Data Binding and WPF."
如果不是在WPF里有Commands (命令)的支持, MVVM模式将不会这么强大, 这篇文章里, 我会展示ViewModel怎样把Commands(命令)暴露给View, 以使View可以使用它(ViewModel)里面的功能(方法), 如果你对Commanding命令不熟悉, 我建议读一下Brian Noyes’s的深入文章 "Advanced WPF: Understanding Routed Events and Commands in WPF"
除了WPF和Silverlight2 的特性使应用MVVM模式成为一个很自然的途径去构建应用,ViewModel 类便于单元测试的特性也是MVVM变得流行。 当一个应用的交互逻辑分布在几个ViewModel类里面的时候, 你可以很容易对它写测试代码。 某种意义上, Views 和单元测试 是两种ViewModel的使用者, 对应用的所有ViewModel的一系列测试提供了快速而免费的回归测试, 减少了随着时间增长而产生的维护费用。
除了促成建立回归测试外,ViewModel类的可测试性还有助于用户界面的设计,用户界面更容易剥离, 当你设计应用的时候,你可以通过想象你写的一个调用ViewModel的单元测试,来决定要做的东西应该在View里还是在ViewModel里, 如果你可以不用创建任何UI对象, 你可以把ViewModel整个剥离出来, 因为它没有对视觉元素的任何依赖。
最后,对visual designers的开发人员来说, 使用MVVM可以是设计和开发人员的工作流更顺畅, 因为一个View只是ViewModel的任意一个使用者, 去掉一个View,放入另一个View来渲染ViewModel是件比较容易的事, 可以使原型更快的产生,对设计的UI更快的评价。
开发人员可以集中精力创建稳定的ViewModel类, 界面设计人员可以专注于设计友好的视图. 把两者结合起来的关键仅在于在视图(View)的XAML文件中存在正确的绑定(Binding).
现在,已经回顾了MVVM的历史,操作理论, 我将要检验为啥它会在WPF开发者中流行, 现在请卷起袖子,看看实战中模式是怎么用的。
文章中的示例从不同方面使用MVVM, 他提供丰富的例子来源把概念和实践结合起来, 在visual 2008sp1中创建这个应用, 还需要用到Microsoft .NET Framework 3.5 SP1, 单元测试使用visual studio unit testing 系统。
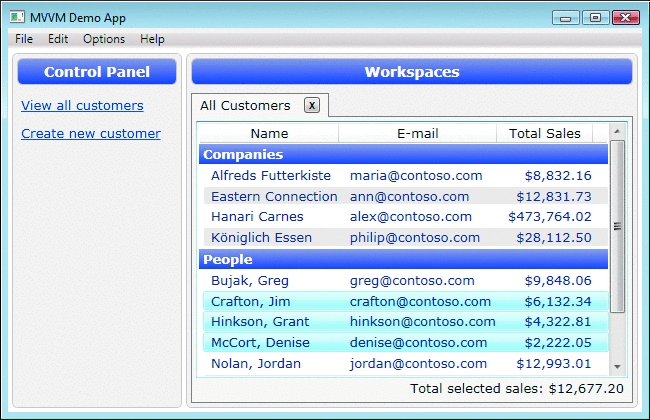
应用可以包含任何数量的WorkSpaces, 用户可以在左边的navigation are点击command link打开, 所有的WorkSpaces 在主内容区的TabControl中展示,应用包含两种WorkSpace, “All Customer“ 和”New Customser”, 在程序运行后打开一些Workspace如下图
Figure 1 Workspaces
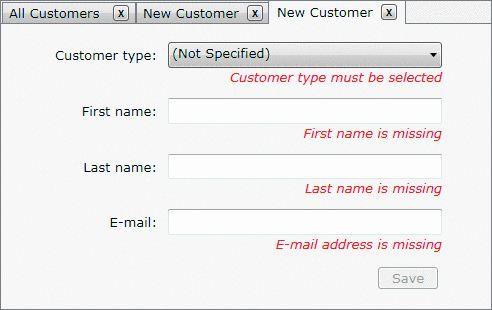
“All Customers” workspace 同时只能打开一个, 但是“New Customer”Workspace可以同时一次打开多个, 当用户决定创建一个新用户New Customer, 她必须填入下图的资料
Figure 2 新用户资料输入表
当用有效值填充数据输入栏,并按下Save按钮,新顾客的名字显示在Tab Item上, 那个新顾客也同时添加到all customers 列表中, 应用并没有实现删除和编辑已有顾客的功能。但是这两个功能和其他类似功能,可以很容易在现有架构上实现, 现在你对示例程序有了大致了解, 那么接下来让我们探讨它是如何设计和实现的吧。
应用中的每个view都是一个空的CodeBehind 文件, 除了在类的构造函数样板式调用InitializeComponent 方法外。 实际上, 你可以清除所有项目中所有View的CodeBehind文件, 应用还是可以正确编译运行。 虽然在View中缺少Event Handling 事件处理方法, 当用户点击按钮,应用的反应还是可以满足用户的需求。 这时因为存在命令属性和显示在用户界面上Hyperlink, button,MenuItem控件之间的绑定, 那些“绑定”确保当用户点击控件时, ViewModel提供的ICommand对象得到执行, 你可以想象命令对象就是一个适配器, 使XAML中声明的View使用ViewModel的功能方法时更加容易。
当ViewModel 提供一个ICommand类型的属性实例, 这个命令对象一般就会使用那个ViewModel对象来完成它的工作, 一个可能的实现模式是创建一个在ViewModel类中的私有嵌套类, 然后这个命令就可以使用包含他的ViewModel的私有成员, 而且不会“污染”命名空间, 那个嵌套类实现ICommand接口, 一个指向包含它的ViewModel对象的引用被注入到他的构造函数。 不管怎样,为每个ViewModel提供的Command创建实现ICommand接口的嵌套类,会使得ViewModel类得体积膨胀, 更多的代码意味着更多潜在性的臭虫。
在示例应用中, RelayCommand类解决了这个问题。 RelayCommand类允许你通过在它的构造器里传递Delegates(委托)来注入命令逻辑, 这种处理允许在ViewModel类中实现简明的Command命令实现, RelayCommand是DelegateCommand的一种简化的变种, RelayCommand类在Figure 3 中说明。
Figure 3 The RelayCommand Class
    public class RelayCommand : ICommand
    {
        #region Fields

        readonly Action<object> _execute;
        readonly Predicate<object> _canExecute;

        #endregion // Fields

        #region Constructors

        /// <summary>
        /// Creates a new command that can always execute.
        /// </summary>
        /// <param name="execute">The execution logic.</param>
        public RelayCommand(Action<object> execute)
            : this(execute, null)
        {
        }

        /// <summary>
        /// Creates a new command.
        /// </summary>
        /// <param name="execute">The execution logic.</param>
        /// <param name="canExecute">The execution status logic.</param>
        public RelayCommand(Action<object> execute, Predicate<object> canExecute)
        {
            if (execute == null)
                throw new ArgumentNullException("execute");

            _execute = execute;
            _canExecute = canExecute;
        }

        #endregion // Constructors

        #region ICommand Members

        [DebuggerStepThrough]
        public bool CanExecute(object parameter)
        {
            return _canExecute == null ? true : _canExecute(parameter);
        }

        public event EventHandler CanExecuteChanged
        {
            add { CommandManager.RequerySuggested += value; }
            remove { CommandManager.RequerySuggested -= value; }
        }

        public void Execute(object parameter)
        {
            _execute(parameter);
        }

        #endregion // ICommand Members
    }
CanExecuteChanged事件, 是ICommand接口的部分实现, 有些有趣的特性, 它将事件订阅委托到 CommandManager.RequerySuggested 事件, 这就保证了WPF commanding架构任何时候询问内部命令的时候,也会询问所有的RelayComand对象,是否它可以执行。 以下CustomerViewModel类中的代码,我会详细说明, 怎样用lambda 表达式来配置一个RelayCommand。
RelayCommand _saveCommand;
public ICommand SaveCommand
{
            get
            {
                if (_saveCommand == null)
                {
                    _saveCommand = new RelayCommand(
                        param => this.Save(),
                        param => this.CanSave
                        );
                }
                return _saveCommand;
            }
}
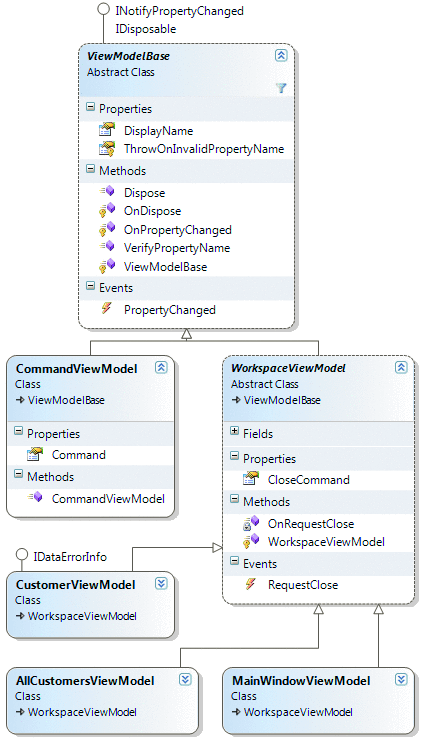
大部分ViewModel类需要同样的特征,它们通常需要实现INotifyPropertyChanged 接口,它们需要有个友好的显示名称, 在Workspaces工作空间的情况下,他们需要关闭的能力, 就是需要从用户界面消除, 这个问题自然导致需要创建ViewModel的基础类, 新的ViewModel类可以从基础类中继承所有的共同功能, ViewModel类得继承层次请看Figure 4
对所有ViewModel指定一个基础类无疑是一个需要, 如果你喜欢在你的类中通过集成更多的类一起来获得更多的特性, 而不是使用继承,那么这就不是一个问题。 就像其他的设计模式, MVVM是一系列指导原则, 而不是硬性规定。
ViewModelBase是继承层次的根类, 也是它为何实现了常用的INotifyPropertyChanged接口,还有一个DisplayName属性。 INotifyPropertyChanged接口包含一个事件PropertyChanged。 任何时间ViewModel对象的属性有新值, 它就会触发PropertyChanged事件去通知WPF绑定系统知悉这个新值。 在接收到通知后,绑定系统查询这个属性, UI元素上的被绑定属性就会接收到这个新值。
为了使WPF知道ViewModel对象的哪个属性已经改变, PropertyChangedEventArgs类提供了一个string类型的PropertyName属性, 你必须小心地传递正确的属性名字给这个事件参数, 否则,WPF会向错误的属性查询新值。
ViewModelBase类一个有意思的地方是他提供了这样一种能力, 可以验证一个给定名字的属性确实存在于ViewModel对象中, 这在重构的时候十分有用, 因为使用vs2008中的重构功能,去改变一个属性的名称并不会更新源代码中的恰巧包含这个属性名称的字符串, (也不应该) 在事件参数中用一个错误的属性名称(其实是字符串)去触发PropertyChanged事件可能导致隐藏的臭虫, 难以追踪, 那么这个特点显然是个巨大的便利。 ViewModelBase中添加的有用的支持代码 在Figure 5 中说明。
        /// <summary>
        /// Raised when a property on this object has a new value.
        /// </summary>
        public event PropertyChangedEventHandler PropertyChanged;

        /// <summary>
        /// Raises this object's PropertyChanged event.
        /// </summary>
        /// <param name="propertyName">The property that has a new value.</param>
        protected virtual void OnPropertyChanged(string propertyName)
        {
            this.VerifyPropertyName(propertyName);

            PropertyChangedEventHandler handler = this.PropertyChanged;
            if (handler != null)
            {
                var e = new PropertyChangedEventArgs(propertyName);
                handler(this, e);
            }
        }


        public void VerifyPropertyName(string propertyName)
        {
            // Verify that the property name matches a real,
            // public, instance property on this object.
            if (TypeDescriptor.GetProperties(this)[propertyName] == null)
            {
                string msg = "Invalid property name: " + propertyName;

                if (this.ThrowOnInvalidPropertyName)
                    throw new Exception(msg);
                else
                    Debug.Fail(msg);
            }
        }
最简单的ViewModelBase 子类是 CommandViewModel, 它有一个叫Command的ICommand类型的属性,MainWindowViewModel通过Commands属性而拥有一堆这样的对象,主窗口左边的导航区(navigation area)为每个被MainWindowViewModel拥有的CommandViewModel显示一个链接, 例如“View all customers”和”Create new customer.” 当用户点击链接,就会执行其中一个命令, 主窗口的TabControl里打开一个workspace, CommandViewModel类的定义如下:
    /// <summary>
    /// Represents an actionable item displayed by a View.
    /// </summary>
    public class CommandViewModel : ViewModelBase
    {
        public CommandViewModel(string displayName, ICommand command)
        {
            if (command == null)
                throw new ArgumentNullException("command");

            base.DisplayName = displayName;
            this.Command = command;
        }

        public ICommand Command { get; private set; }
    }
这里原文没有说清楚,MainWindowViewModel里有个 类型为ReadOnlyCollection<CommandViewModel>的属性Commands,这个属性的Get方法调用了CreateCommands()方法,而这个方法创建了一个包含两个CommandViewModel对象的集合,这两个CommandViewModel的Command属性的委托参数Action<object>,被分别初始化为 ShowAllCustomers()方法和CreateNewCustomer()方法。MainWindow.xaml左边的HeaderContentControl的Content属性被绑定到这个Commands属性,所以Control Panel列表的每个列表项,也就是Hyperlink,的Command属性被绑定到CommandViewModel里的Command属性。
        <HeaderedContentControl
          Content="{Binding Path=Commands}"
          ContentTemplate="{StaticResource CommandsTemplate}"
          Header="Control Panel"
          Style="{StaticResource MainHCCStyle}"
          />
在MainWindowResources.xaml 文件中存在一个 DataTemplate, 其键值为“CommandsTemplate”. MainWindow 使用这个模板去渲染较早提到的CommandViewModels, 这个模板只是将每个CommandViewModel对象渲染成ItemsControl里的一个链接, 每个Hyperlink’s的Command属性绑定到CommandViewModel里的Command属性, 这个XAML如Figure6 所示。
  <!--
  This template explains how to render the list of commands on the left
  side in the main window (the 'Control Panel' area).
  -->
  <DataTemplate x:Key="CommandsTemplate">
    <ItemsControl IsTabStop="False" ItemsSource="{Binding}" Margin="6,2">
      <ItemsControl.ItemTemplate>
        <DataTemplate>
          <TextBlock Margin="2,6">
            <Hyperlink Command="{Binding Path=Command}">
              <TextBlock Text="{Binding Path=DisplayName}" />
            </Hyperlink>
          </TextBlock>
        </DataTemplate>
      </ItemsControl.ItemTemplate>
    </ItemsControl>
  </DataTemplate>
就像之前在类图里所见, WorkspaceViewModel类从ViewModelBase类继承,添加了关闭(close)功能, 我所说的“close”,意味着在运行时一些东西把workspace从用户界面清除掉, 下面这些类从WorkspaceViewModel中继承而来: MainWindowViewModel, AllCustomersViewModel, 和CustomerViewModel. MainWindowViewModel的关闭请求被App处理, App创建了MainWindow以及它的ViewModel, 如Figure7 所示:
//in App.xaml.cs

     protected override void OnStartup(StartupEventArgs e)
        {
            base.OnStartup(e);

            MainWindow window = new MainWindow();

            // Create the ViewModel to which
            // the main window binds.
            string path = "Data/customers.xml";
            var viewModel = new MainWindowViewModel(path);

            // When the ViewModel asks to be closed,
            // close the window.
            EventHandler handler = null;
            handler = delegate
            {
                viewModel.RequestClose -= handler;
                window.Close();
            };
            viewModel.RequestClose += handler;

            // Allow all controls in the window to
            // bind to the ViewModel by setting the
            // DataContext, which propagates down
            // the element tree.
            window.DataContext = viewModel;

            window.Show();
        }
MainWindow含有一个menu item, 它的Command属性绑定到MainWindowViewModel的CloseCommand属性, 当用户点击那个菜单项, App就会用Window的Close方法去响应。 像这样:
      <Menu KeyboardNavigation.TabNavigation="Cycle">
        <MenuItem Header="_File">
          <MenuItem Header="E_xit" Command="{Binding Path=CloseCommand}" />
        </MenuItem>
        <MenuItem Header="_Edit" />
        <MenuItem Header="_Options" />
        <MenuItem Header="_Help" />
      </Menu>
MainWindowViewModel 包含一个元素类型为WorkspaceViewModel的ObservableCollection集合属性, 叫Workspaces, 主窗口包含一个TabControl,其ItemsSource属性绑定到这个集合属性, 每个tab item 都有个Close按钮其Command属性绑定到相应WorkspaceViewModel实例的CloseCommand属性上,下面的代码简略描述了模板怎样设置每个tab item,模板也解释了怎么通过用一个Close button渲染一个tab item
  <DataTemplate x:Key="ClosableTabItemTemplate">
    <DockPanel Width="120">
      <Button
        Command="{Binding Path=CloseCommand}"
        Content="X"
        Cursor="Hand"
        DockPanel.Dock="Right"
        Width="16" Height="16"
        />
      <ContentPresenter
        Content="{Binding Path=DisplayName}"
        VerticalAlignment="Center"
        />
    </DockPanel>
  </DataTemplate>
当用户点击tab item的关闭按钮, 那个WorkspaceViewModel的CloseCommand 执行, 触发RequestClose事件, MainWindowViewModel监视那个WorkspaceViewModel 的 RequestClose 事件, 然后响应请求,从Workspaces collection集合中清除那个Workspace。因为 MainWindow 的 TabControl 有自己的 ItemsSource 属性绑定到 类型为WorkspaceViewModel 的 ObservableCollection 集合 , 从集合中去掉一个项目, 导致相应的workspace从TabControl去除。 这个MainWindowViewModel的逻辑如Figure8 所示:
//in WorkspaceViewModel.cs


     /// <summary>
        /// Returns the command that, when invoked, attempts
        /// to remove this workspace from the user interface.
        /// </summary>
        public ICommand CloseCommand
        {
            get
            {
                if (_closeCommand == null)
                    _closeCommand = new RelayCommand(param => this.OnRequestClose());

                return _closeCommand;
            }
        }

        #endregion // CloseCommand

        #region RequestClose [event]

        /// <summary>
        /// Raised when this workspace should be removed from the UI.
        /// </summary>
        public event EventHandler RequestClose;

        void OnRequestClose()
        {
            EventHandler handler = this.RequestClose;
            if (handler != null)
                handler(this, EventArgs.Empty);
        }
//in MainWindowViewModel.cs


      ObservableCollection<WorkspaceViewModel> _workspaces;

        /// <summary>
        /// Returns the collection of available workspaces to display.
        /// A 'workspace' is a ViewModel that can request to be closed.
        /// </summary>

        public ObservableCollection<WorkspaceViewModel> Workspaces
        {
            get
            {
                if (_workspaces == null)
                {
                    _workspaces = new ObservableCollection<WorkspaceViewModel>();
                    _workspaces.CollectionChanged += this.OnWorkspacesChanged;
                }
                return _workspaces;
            }
        }

        void OnWorkspacesChanged(object sender, NotifyCollectionChangedEventArgs e)
        {
            if (e.NewItems != null && e.NewItems.Count != 0)
                foreach (WorkspaceViewModel workspace in e.NewItems)
                    workspace.RequestClose += this.OnWorkspaceRequestClose;

            if (e.OldItems != null && e.OldItems.Count != 0)
                foreach (WorkspaceViewModel workspace in e.OldItems)
                    workspace.RequestClose -= this.OnWorkspaceRequestClose;
        }

        void OnWorkspaceRequestClose(object sender, EventArgs e)
        {
            WorkspaceViewModel workspace = sender as WorkspaceViewModel;
            workspace.Dispose();
            this.Workspaces.Remove(workspace);
        }
在UnitTests项目中, MainWindowViewModelTest.cs文件包含一个测试方法,验证这个功能正常工作, 容易对ViewModel类添加单元测试是MVVM模式的一大卖点, 因为他允许对应用的功能进行简单测试,而无需在UI写代码, 测试方法如下Figure9
//in MainWindowViewModelTest.cs
     [TestMethod]
        public void TestCloseAllCustomersWorkspace()
        {
            // Create the MainWindowViewModel, but not the MainWindow.
            MainWindowViewModel target =
                new MainWindowViewModel(Constants.CUSTOMER_DATA_FILE);

            Assert.AreEqual(0, target.Workspaces.Count, "Workspaces isn't empty.");

            // Find the command that opens the "All Customers" workspace.
            CommandViewModel commandVM =
                target.Commands.First(cvm => cvm.DisplayName == Strings.MainWindowViewModel_Command_ViewAllCustomers);

            // Open the "All Customers" workspace.
            commandVM.Command.Execute(null);
            Assert.AreEqual(1, target.Workspaces.Count, "Did not create viewmodel.");

            // Ensure the correct type of workspace was created.
            var allCustomersVM = target.Workspaces[0] as AllCustomersViewModel;
            Assert.IsNotNull(allCustomersVM, "Wrong viewmodel type created.");

            // Tell the "All Customers" workspace to close.
            allCustomersVM.CloseCommand.Execute(null);
            Assert.AreEqual(0, target.Workspaces.Count, "Did not close viewmodel.");
        }
MainWindowViewModel间接从主窗体的 TabControl 中添加和移除WorkspaceViewModel 对象,通过数据绑定, TabItem的Content属性得到一个ViewModelBase的子类来显示, ViewModelBase不是一个UI元素,因此他不支持渲染自己, 在WPF中, 一个非可视化对象这样被渲染, 默认在TextBlock里调用toString方法显示一个结果,这显然不是你想要的, 除非你的用户急切想看到ViewModel类的类型名称。
你可以方便地告诉WPF使用typed DataTemplate(强类型数据模板)去渲染一个ViewModel对象, 一个强类型DataTemplate 没有 x:Key, 但是他有DataType属性设置到一个类型的实例。 如果WPF试图渲染其中的一个ViewModel对象, 他会查看在作用域内的资源系统(resource system) 是否存在一个typed DataTemplate, 其DataType属性和你的ViewModel对象或其父类对象匹配。 如果找到, 他就用那个模板去渲染Tab Item的Content属性引用的ViewModel对象。
MainWindowResources.xaml文件有个ResourceDictionary资源字典, 这个字典被加入主窗口的资源层级中。 也就是说其中所包含的资源在窗体的范围内有效, 当一个tab item的content被设置到ViewModel对象时, 字典中的一个强类型 DataTemplate提供一个View(也就是一个用户自定义控件)去渲染TabItem Content。 如Figure10 所示。
<ResourceDictionary
  xmlns="http://schemas.microsoft.com/winfx/2006/xaml/presentation"
  xmlns:x="http://schemas.microsoft.com/winfx/2006/xaml"
  xmlns:vm="clr-namespace:DemoApp.ViewModel"
  xmlns:vw="clr-namespace:DemoApp.View"
  >

  <!--
  This template applies an AllCustomersView to an instance
  of the AllCustomersViewModel class shown in the main window.
  -->
  <DataTemplate DataType="{x:Type vm:AllCustomersViewModel}">
    <vw:AllCustomersView />
  </DataTemplate>

  <!--
  This template applies a CustomerView to an instance
  of the CustomerViewModel class shown in the main window.
  -->
  <DataTemplate DataType="{x:Type vm:CustomerViewModel}">
    <vw:CustomerView />
  </DataTemplate>

 <!-- Other resources omitted for clarity... --> </ResourceDictionary>
你不需要写任何代码去决定哪个View去显示一个ViewModel对象,WPF资源系统为你做这些粗重活, 你可以解放出来集中精力到更重要的事情上,在复杂的场景中,可能需要使用编码来选择一个View, 但是多数情况不必要这么做。
你已经看到应用怎么样加载,显示和关闭ViewModel对象, 现在基本的研究已经到位, 你可以回顾和应用层更加相关的实现细节。 在更深地了解应用的两个workspace之前, “All Customers”和“New Customer”, 让我们先看一下数据模型和数据存取类。这些类的设计和MVVM模式没有半毛钱关系,你可以创建一个ViewModel对象,使之方便使用任何WPF友好的数据对象(这里翻译借鉴了顾兄的说法)。
示例程序中唯一使用的Model类是Customer, 这个类有少量的属性,他们代表一个公司的顾客信息,例如first name, last name, 和 e-mail address,它通过实现IDataErrorInfo接口提供验证信息, 在WPF出现N年前就存在了, Customer类没有半点东西,暗示其被MVVM体系和WPF应用所使用, 这个类可以来自一个古老的库。
数据必须从某处取出来,存回于某处, 这个而应用中,一个CustomerRepository类的实例加载和存储所有的Customer对象, 他正好从一个XML文件中加载这些Customer数据, 这与数据源的类型无关紧要, 数据可以来自数据库,Web服务, 一个命名管道, 一个文件, 甚至信鸽, 这无关紧要, 只要你有个数据.NET 对象, 无论从哪里来,MVVM模式都可以在屏幕上显示那些数据。 (真啰嗦)
CustomerRepository类有些方法是你可以获得Customer对象, 添加一个Customer到存储,和检查一个Customer是否已经存在, 因为应用不许用户删除Customer, 所以Repository不允许你移除一个Customer。 当你用AddCustomer方法添加一个Customer项到CustomerRepository会触发CustomerAddded事件。
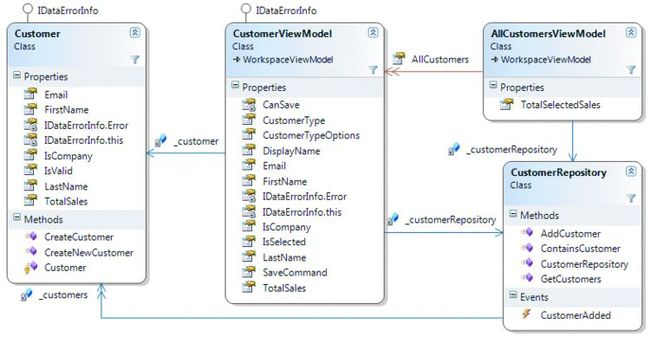
明显, 相对比于商业性的应用需求这个应用的数据模型很轻量, 但是这个并不重要, 重要的是明白ViewModel 类是怎样使用Customer和CustomerRepository。 注意CustomerViewModel是个Customer的一个容器,通过一系列属性, 它暴露Customer的状态,还有其他CustomerView控件使用的一些状态, CustomerViewModel不重复Customer中的状态, 它只通过Association(关联,注意翻译成委托不妥)Customer对象来得到它, 像这样:
//In CustomerViewModel.cs

        public string FirstName
        {
            get { return _customer.FirstName; }
            set
            {
                if (value == _customer.FirstName)
                    return;

                _customer.FirstName = value;

                base.OnPropertyChanged("FirstName");
            }
        }
当用户创建一个新的customer并在CustomerView控件点击Save按钮的时候,相关联的CustomerViewModel就会添加新的Customer对象到CustomerRepository。 这就产生一个repository的CustomerAdded事件, 让AllCustomersViewModel知道他应该添加一个新的CustomerViewModel到他的AllCustomers集合中去。 在某种意义上,CustomerRepository作为一种在不同ViewModel之间处理Customer对象的同步机制, 可能会有人想这是一个Mediator调停者模式, 我会在接下来的部分回顾更多这是怎么样工作的, 但是现在参考Figure 11,对于各部分怎样整合到一起工作先要有个大致了解。
当用户点击创建新的Customer链接时, MainWindowViewModel添加一个新的CustomerViewModel到他的Workspaces, 和一个CustomerView控件来显示它, 当用户输入有效值后, Save按钮状态变有效, 以便用户可以保存新的Customer信息, 这并没有任何不平常, 只是一个带输入验证和Save按钮的数据输入窗体。
Customer类有内建的验证支持, 通过实现IDataErrorInfo接口的提供支持, 这个验证确保Customer有个first name, 一个格式正确的的 e-mail address, 如果Customer是person的话, 有个last name,如果Customer的IsCompany属性返回true, 它的 LastName 属性不能有值(这是因为公司没有Last name), 验证逻辑根据Customer对象的角度来看可能有意义, 但却没有满足用户界面的需求, 用户界面需要用户选择究竟一个新的Customer是一个Person还是一个Company, Customer类型选择初始值是“Not Specified”。 用户界面如何告诉用户customer的类型是unspecified, 如果Customer的IsCompany属性只允许是true和false。
如果你对整个软件系统有完全的控制, 你可以把IsCompany属性的类型变成Nullable<bool>, 这将允许有“unselected”的值, 然而,真实的世界并没有这么简单, 如果你不能改变Customer类,因为他来自你们公司另一支团队的遗留库。又假如没有一个简单的方法去持久化那个“unselected”的值因为已经有个了存在的数据库架构? 又如果其他应用已经使用了那个Customer类,而且依靠那个正常的Boolean值? 结论是,有个ViewModel来拯救世界。
Figure 12中的一个测试方法, 显示了这个功能在CustomerViewModel是怎么起作用的, CustomerViewModel 拥有一个CustomerTypeOptions的属性, Customer类型选择器有三个字符串, 它也拥有一个CustomerType属性, 保存那个被选中的字符串, 当CustomerType被设置的时候, 他将对Customer对象的IsCompany属性映射字符串的值到Boolean值, 两个属性 如Figure13 所示。
//in CustomerViewModelTest.cs

        [TestMethod]
        public void TestCustomerType()
        {
            Customer cust = Customer.CreateNewCustomer();
            CustomerRepository repos = new CustomerRepository(Constants.CUSTOMER_DATA_FILE);
            CustomerViewModel target = new CustomerViewModel(cust, repos);

            target.CustomerType = Strings.CustomerViewModel_CustomerTypeOption_Company;
            Assert.IsTrue(cust.IsCompany, "Should be a company");

            target.CustomerType = Strings.CustomerViewModel_CustomerTypeOption_Person;
            Assert.IsFalse(cust.IsCompany, "Should be a person");

            target.CustomerType = Strings.CustomerViewModel_CustomerTypeOption_NotSpecified;
            string error = (target as IDataErrorInfo)["CustomerType"];
            Assert.IsFalse(String.IsNullOrEmpty(error), "Error message should be returned");
        }
图13 CustomerTypeOptions和CustomerType
        /// <summary>
        /// Returns a list of strings used to populate the Customer Type selector.
        /// </summary>
        public string[] CustomerTypeOptions
        {
            get
            {
                if (_customerTypeOptions == null)
                {
                    _customerTypeOptions = new string[]
                    {
                        Strings.CustomerViewModel_CustomerTypeOption_NotSpecified,
                        Strings.CustomerViewModel_CustomerTypeOption_Person,
                        Strings.CustomerViewModel_CustomerTypeOption_Company
                    };
                }
                return _customerTypeOptions;
            }
        }

        public string CustomerType
        {
            get { return _customerType; }
            set
            {
                if (value == _customerType || String.IsNullOrEmpty(value))
                    return;

                _customerType = value;

                if (_customerType == Strings.CustomerViewModel_CustomerTypeOption_Company)
                {
                    _customer.IsCompany = true;
                }
                else if (_customerType == Strings.CustomerViewModel_CustomerTypeOption_Person)
                {
                    _customer.IsCompany = false;
                }

                base.OnPropertyChanged("CustomerType");

                // Since this ViewModel object has knowledge of how to translate
                // a customer type (i.e. text) to a Customer object's IsCompany property,
                // it also must raise a property change notification when it changes
                // the value of IsCompany.  The LastName property is validated
                // differently based on whether the customer is a company or not,
                // so the validation for the LastName property must execute now.
                base.OnPropertyChanged("LastName");
            }
        }
CustomerView控件有个ComboBox绑定到那些属性,像下面所见到的。
<ComboBox
 ItemsSource="{Binding CustomerTypeOptions}"
 SelectedItem="{Binding CustomerType, ValidatesOnDataErrors=True}"  />
当ComboBox的被选择项改变, 数据源的IDataErrorInfo接口被查询,检查新的值是否有效, 这是因为SelectedIItem属性的绑定中,ValidatesOnDataErrors被设置为true, 因为数据源是CustomerViewModel对象, 绑定系统需要向CustomerViewModel取得CustomerType的验证结果Validation Error, 大多数时候, CustomerViewModel委托所有请求到它所包含的Customer对象来得到validation error。 然而因为Customer不明白对IsCompany属性有个unselected状态, CustomerViewModel类必须处理验证ComboBox控件中这个新的选项, 如Figure14所示。
//in CustomerViewModel.cs

        string IDataErrorInfo.this[string propertyName]
        {
            get
            {
                string error = null;

                if (propertyName == "CustomerType")
                {
                    // The IsCompany property of the Customer class
                    // is Boolean, so it has no concept of being in
                    // an "unselected" state.  The CustomerViewModel
                    // class handles this mapping and validation.
                    error = this.ValidateCustomerType();
                }
                else
                {
                     //其他属性委托给Customer对象验证
                    error = (_customer as IDataErrorInfo)[propertyName];
                }

                // Dirty the commands registered with CommandManager,
                // such as our Save command, so that they are queried
                // to see if they can execute now. 查询Save Command是否可以执行
                CommandManager.InvalidateRequerySuggested();

                return error;
            }
        }

        string ValidateCustomerType()
        {
            if (this.CustomerType == Strings.CustomerViewModel_CustomerTypeOption_Company ||
               this.CustomerType == Strings.CustomerViewModel_CustomerTypeOption_Person)
                return null;

            return Strings.CustomerViewModel_Error_MissingCustomerType;
        }
这段代码的重点是, CustomerViewModel实现了 IDataErrorInfo 接口,可以处理对CustomerViewModel具体属性的验证请求, 并且将其他请求委托到Customer对象。 这允许你利用Model类里的验证逻辑, 然后添加对CustomerViewModel类来说才有意义属性的验证。
对于View来说,可以保存CustomerViewModel的能力通过使用SaveCommand属性得到, 这个Command使用之前的RelayCommand,允许CustomerViewModel在被告知要保存状态时,决定是否可以保存自己, 和怎样做。 在此应用中,保存一个新的customer对象只是将其增加到CustomerRepository。 决定一个新的customer是否预备好被保存,取决于两个因素。 必须检查Customer对象是否有效, CustomerViewModel是否有效, ViewModel相关的属性和之前的验证,这个两步检查是必要的,CustomerViewModel的保存逻辑如Figure15所示。
        /// <summary>
        /// Returns a command that saves the customer.
        /// </summary>
        public ICommand SaveCommand
        {
            get
            {
                if (_saveCommand == null)
                {
                    _saveCommand = new RelayCommand(
                        param => this.Save(),
                        param => this.CanSave
                        );
                }
                return _saveCommand;
            }
        }


        /// <summary>
        /// Saves the customer to the repository.  This method is invoked by the SaveCommand.
        /// </summary>
        public void Save()
        {
            if (!_customer.IsValid)
                throw new InvalidOperationException(Strings.CustomerViewModel_Exception_CannotSave);

            if (this.IsNewCustomer)
                _customerRepository.AddCustomer(_customer);

            base.OnPropertyChanged("DisplayName");
        }


        /// <summary>
        /// Returns true if this customer was created by the user and it has not yet
        /// been saved to the customer repository.
        /// </summary>
        bool IsNewCustomer
        {
            get { return !_customerRepository.ContainsCustomer(_customer); }
        }

        /// <summary>
        /// Returns true if the customer is valid and can be saved.
        /// </summary>
        bool CanSave
        {
            get { return String.IsNullOrEmpty(this.ValidateCustomerType()) && _customer.IsValid; }
        }
ViewModel的使用使得创建一个View去显示一个Customer对象的工作更简单, 也允许Boolean属性可以有没选中这样的状态,它很容易告诉Customer保存其状态, 假如view直接绑定到Customer对象, 那么view就需要一大堆代码使得这些工作正常运行。 在一个良好设计的MVVM架构, 所有View的CodeBehind都应该为空, 或者最多只包含操纵View内的控件以及资源的代码。 有时候,也会需要在CodeBehind里写一些代码和ViewModel对象交互, 例如传递一个事件, 或调用一个在ViewModel不方便调用的方法。
示例程序也包含在一个listView中显示所有的Customer的Workspace, 这些Customer根据company和person来分组, 这些用户可以同时可以选择一个或多个customer, 在右下角查看他们的总销售金额。
该UI(以后用户界面翻译成UI)是AllCustomersView控件,他来渲染AllCustomersViewModel对象, 每个listViewItem代表一个CustomerViewModel对象, 由AllCustomersViewModel对象所拥有的AllCustomers集合包含这些CustomerViewModel对象, 在之前的部分,你看到CustomerViewModel可以渲染成一个数据输入表单, 现在同样的CustomerViewModel对象呗渲染成ListView中的一项。 CustomerViewModel类并不知道哪一个可视化组件去显示它,这使其重用成为可能。
AllCustomersView 创建了在listView中看到的分组, 它通过绑定ListView的ItemsSource到一个 CollectionViewSource 来实现,如Figure16所示。
<!--in AllCustomersView.xaml-->

   <CollectionViewSource
      x:Key="CustomerGroups"
      Source="{Binding Path=AllCustomers}"
      >
      <CollectionViewSource.GroupDescriptions>
        <PropertyGroupDescription PropertyName="IsCompany" />
      </CollectionViewSource.GroupDescriptions>
      <CollectionViewSource.SortDescriptions>
        <!--
        Sort descending by IsCompany so that the 'True' values appear first,
        which means that companies will always be listed before people.
        -->
        <scm:SortDescription PropertyName="IsCompany" Direction="Descending" />
        <scm:SortDescription PropertyName="DisplayName" Direction="Ascending" />
      </CollectionViewSource.SortDescriptions>
    </CollectionViewSource>
ListViewItem 和CustomerViewModel对象间的联系由ListView的ItemContainerStyle属性建立, 赋值给它的Style会应用每个ListViewItem, 使得ListViewITem上的属性可以被绑定到CustomerViewModel的属性上,那个Style中的一个重要的绑定建立了ListViewItem的isSelected属性和CustomerViewModel属性的连接, 如下所示。
 <Style x:Key="CustomerItemStyle" TargetType="{x:Type ListViewItem}">
      <!--
      Stretch the content of each cell so that we can
      right-align text in the Total Sales column.
      -->
      <Setter Property="HorizontalContentAlignment" Value="Stretch" />
      <!--
      Bind the IsSelected property of a ListViewItem to the
      IsSelected property of a CustomerViewModel object.
      -->
      <Setter Property="IsSelected" Value="{Binding Path=IsSelected, Mode=TwoWay}" />
</Style>
当一个CustomerViewModel被选和取消的时候,导致所有被选择的customer的总金额变化。 AllCustomerViewModel类负责维护那个值, 这样LIstView下面的ContentPresenter就可以显示正确的数字。 Figure17 显示AllCustomersViewModel怎样监视每个被选择或取消选择的Customer,然后通知view需要更新显示的值。
图17 监控选中或未选中的客户
// In AllCustomersViewModel.cs
public double TotalSelectedSales
{
    get
    {
        return this.AllCustomers.Sum(
            custVM => custVM.IsSelected ? custVM.TotalSales : 0.0);
    }
}

void OnCustomerViewModelPropertyChanged(object sender,
    PropertyChangedEventArgs e)
{
    string IsSelected = "IsSelected";

    // Make sure that the property name we're
    // referencing is valid.  This is a debugging
    // technique, and does not execute in a Release build.
    (sender as CustomerViewModel).VerifyPropertyName(IsSelected);

    // When a customer is selected or unselected, we must let the
    // world know that the TotalSelectedSales property has changed,
    // so that it will be queried again for a new value.
    if (e.PropertyName == IsSelected)
        this.OnPropertyChanged("TotalSelectedSales");
}
用户界面绑定到TotalSelectedSales属性,要应用货币格式。 ViewModel对象,而不是view可以应用货币格式,从TotalSelectedSales属性从返回一个字符串而不是一个浮点数。 ContentPresenter中ContentStringFormat属性是。NET Framework 3.5SP1添加的属性 , 如果你使用旧版的WPF,你需要在代码中去做货币格式化的工作。
      <StackPanel HorizontalAlignment="Right" Orientation="Horizontal" VerticalAlignment="Center">
        <TextBlock Text="Total selected sales: " />
        <ContentPresenter
          Content="{Binding Path=TotalSelectedSales}"
          ContentStringFormat="c"
          />
      </StackPanel>
WPF带给开发者很多福利,要学会释放其威力需要心态转换, MVVM模式是简单有效的指导方针去设计开发WPF应用, 你可以控制混乱,更好的分离数据,行为和显示。


