交换机的安全:访问安全、端口安全、DHCP欺骗、DAI与IPSG、AAA、dot1x、SPAN、ACL
实验一:交换机的访问安全
(1)拓扑图
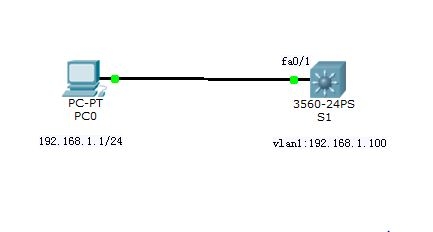
(2)配置IP地址
S1(config)#interface vlan 1
S1(config-if)#no shutdown
S1(config-if)#ip address 192.168.1.100 255.255.255.0
(3)在S1交换机上配置密码、login安全等
S1(config)#enable secret xu(配置enable密码,最好不要使用enablepassword命令,因为它的密码是不加密存放的)
S1(config)#service password-encryption (启用密码加密服务,这样配置的密码将加密存放,和enable secret不一样的是,这种加密是可逆的,思科网站提供破解程序)
S1(config)#line console 0
S1(config-line)#password xu
S1(config-line)#login (配置console口密码)
S1(config-line)#exec-timeout 6 10(配置超时时间,当用户在6分10秒内没有任何输入时,将被自动注销,这样可以减少不安全因素)
S1(config)#access-list 6 permit 192.168.1.0 0.0.0.255
S1(config)#line vty 0 15
S1(config-line)#access-class 6 in(允许192.168.1.0网段的计算机可以Telnet或者ssh该交换机)
S1(config)#line vty 0 15
S1(config-line)#password xu
S1(config-line)#login (配置Telnet)
S1(config-line)#exec-timeout 1 0(配置超时时间,当用户在1分内没有任何输入时,将被自动注销。)
S1(config)#service tcp-keepalives-in(使得交换机没有收到远程系统的响应,会自动关闭连接,减少受到DOS攻击的机会)
S1(config)#login block-for 60 attempts 3 within 30(配置用户30秒内连续登陆失败3次后,要等待60秒后(进入安静期)才能再次登陆)
S1(config)#login delay 10(配置用户登陆成功后,10秒后才能再次登陆)
S1(config)#access-list 7 permit host 192.168.1.1
S1(config)#login quit-mode access-class 10(之前的配置中,当用户多次输错密码后,交换机进入60秒的安静期,禁止登陆,但是ACL7指定的计算机仍然可以登陆)
S1(config)#login on-failure log (配置登陆失败会在日志中记录)
S1(config)#login on-success log (配置登陆成功会在日志中记录)
S1#show login
S1(config)#banner motd (提示信息。motd接@或者其他任意字符,回车换行输入提示信息,再回车换行输如@(和motd后的字符相同)再回车就好了)
S1(config)#banner login(提示信息,再输入用户名和密码前,但是在banner motd后,用法同上)
S1(config)#banner exec(提示信息,再进入exec模式之前提示信息,即通过了认证之后)
(4)配置ssh
S1(config)#clock timezone cst 8 (配置交换机的时区,中国时间简写为CST,为东八区,比标准时间早8个小时)
S1#clock set 13:33:11 22 OCT 2015(配置交换机时间)
S1(config)#ip domain-name xu.com(配置域名,如果单位有自己的域名,就使用单位的域名,如果没有,则可随便配置一个)
S1(config)#crypto key generate rsa (产生加密密钥)
S1(config)#username xu secret xu (创建用户名和密码,ssh需要用户名和密码)
S1(config)#line vty 0 15
S1(config-line)#transport input ssh (之允许用户通过ssh远程登录到交换机,默认是transport inputall,因此默认时可以使用Telnet)
S1(config-line)#login local (从交换机上本地验证用户名和密码)
在pc0上ssh远程到交换机S1上:ssh -l xu 192.168.1.100
当然也可以使用SecureCRT在计算机上ssh到交换机上
(5)关闭不必要的服务
S1(config)#no cdp run (关闭CDP,CDP协议是Cisco的邻居发现协议)
S1(config)#no lldp run(关闭LLDP,LLDP协议可以说是CDP的国际标准版)
S1(config)#no ip source-route(关闭基于源的路由功能,该功能指用户可以在发送出去的IP数据包中知名转发路径)
S1(config)#no ip http server(关闭http服务功能,关闭后就无法用浏览器配置交换机了)
S1(config)#no service tcp-small-servers(关闭TCP端口号小于或者等于19的服务,如datetime、echo、chargen等)
S1(config)#no service udp-small-servers(关闭udp端口号小于或者等于19的服务
S1(config)#no service finger(关闭finger服务,该服务和show user类似,用于显示当前登陆到交换机上的用户)
S1(config)#no service dhcp(关闭DHCP服务)
S1(config)#no ip name-server
S1(config)#no ip domain-lookup (关闭DNS客户端的功能,即交换机不再到DNS服务器上去查询主机的IP地址了)
S1(config)#no service config(关闭交换机在网络上查找配置文件的功能,默认是如果交换机在开机时在NVRAM中找不到配置文件,将广播查找TFTP服务器)
S1(config)#no snmp-server(删除所有和SNMP有关的配置)
(6)配置https
在(5)中关闭了http服务,如果使用浏览器配置交换机,可以配置https服务
S1(config)#ip http secure-server(https需要1024位的证书保护通信,启动https自动产生证书,记得要执行write命令保存配置以及产生的证书)
S1(config)#ip http authentication local(https服务需要用户名和密码,这里采用本地认证,也可以采用AAA)
S1(config)#username xu2 privilege 15 secret xu(创建一个用户,用户要有等级为15的权限才能配置交换机)
实验二:交换机端口安全
(1)拓扑图
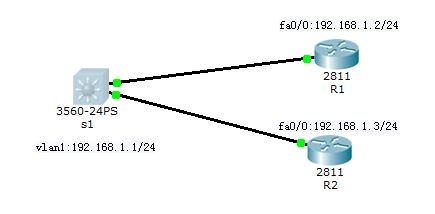
(2)交换机路由器上的基本配置级MAC地址表
S1(config)#int vlan 1
S1(config-if)#ip ad 192.168.1.1 255.255.255.0
S1(config-if)#no shu
R1(config)#interface fa0/0
R1(config-if)#ip add 192.168.1.2 255.255.255.0
R1(config-if)#no shu
R2(config)#int fa 0/0
R2(config-if)#ip add 192.168.1.3 255.255.255.0
R2(config-if)#no shu
S1(config)#mac address-table static 0001.c79a.c802 vlan 1 interface fa0/0(把R1路由器的mac地址静态添加mac表中,记录远不会被删除)
S1#show mac address-table
(3)配置交换机端口安全(配置静态安全MAC地址)
S1(config)#int fa0/1
S1(config-if)#shutdown
S1(config-if)#switchport mode access (把接口改为访问模式,即用来接入交换机)
S1(config-if)#switchport port-security (打开交换机的端口安全功能)
S1(config-if)#switchport port-security maximum 1(只允许该端口下的mac条目最大多为1,即之允许一个设备接入,实际上这也是默认值)
S1(config-if)#switchport port-security violation shutdown (配置攻击发生时端口采用的动作:关闭端口,管理员需要使用shutdown和弄shutdown命令来重新打开端口。实际上这是默认值,其他动作:protect:当新的计算机介入时,如果该接口的mac条目超过最大值,则这个新的计算机将无法接入,而原有的计算机不受影响,交换机也不发出警告信息,restrict:当新的计算机介入时,如果该接口的mac条目超过最大值,则这个新的计算机将无法接入,而原有的计算机不受影响,交换机发出警告信息(在日志中可以看到))
S1(config-if)#switchport port-security mac-address 0001.c79a.c801(允许路由器R1从fa0、1接口接入,)
S1(config-if)#no shutdown
(4)模拟非法接入
R2(config-if)#int fastEthernet 0/0
R2(config-if)#shutdown
R2(config-if)#mac-address 13.13.13(更改R2的MAC地址)
R2(config-if)#no mac-address 13.13.13
R2(config-if)#no shutdown
(5)配置交换机端口安全(配置动态安全MAC地址,)
S1(config)#default int fa0/1(将接口恢复到默认值,即出厂时的配置)
S1(config)#int fa0/1
S1(config-if)#shutdown
S1(config-if)#switchport mode access
S1(config-if)#switchport port-security
S1(config-if)#switchport port-security maximum 1
S1(config-if)#switchport port-security violation shutdown (只能接入一台,mac地址作为static类型被添加到mac中)
S1(config-if)#no shutdown
(5)配置交换机端口安全(粘滞安全MAC地址。)
S1(config)#default int fa0/1(将接口恢复到默认值,即出厂时的配置)
S1(config)#int fa0/1(S1(config)#int range fa0/1-24:多个端口同时配置)
S1(config-if)#shutdown
S1(config-if)#switchport mode access
S1(config-if)#switchport port-security
S1(config-if)#switchport port-security maximum 1
S1(config-if)#switchport port-security violation shutdown
S1(config-if)#switchport port-security mac-address sticky(配置交换机接口自动粘滞MAC地址)
S1(config-if)#no shutdown
(6)配置接口自动恢复
S1(config)#errdisable recovery cause psecure-violation(允许交换机自动恢复因端口安全而关闭的接口)
S1(config)#errdisable recovery interval 60(配置交换机60秒后自动恢复)
(7)调试
S1#show port-security
S1#show port-security interface 0/1
实验三:DHCP欺骗
(1)拓扑图
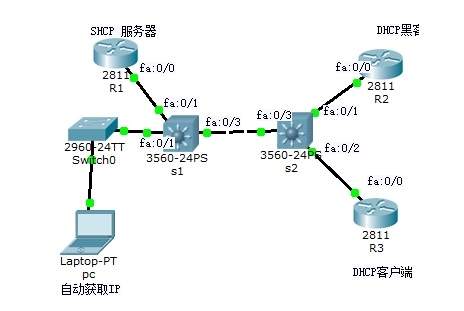
(2)配置R1和R2为dhcp服务器,配置R3为客户端
R1(config)#interface fastEthernet 0/0
R1(config-if)#ip address 192.168.1.1 255.255.255.0
R1(config-if)#no shu
R1(config)#ip dhcp pool xu
R1(dhcp-config)#network 192.168.1.0 255.255.255.0
R1(dhcp-config)#default-router 192.168.1.254
R1(dhcp-config)#dns-server 192.168.1.100
R1(config)#ip dhcp excluded-address 192.168.1.100 192.168.1.254
R2(config)#interface fastEthernet 0/0
R2(config-if)#ip address 192.168.1.2 255.255.255.0
R2(config-if)#no shu
R2(config)#ip dhcp pool xu1
R2(dhcp-config)#network 192.168.1.0 255.255.255.0
R2(dhcp-config)#default-router 192.168.1.254
R2(dhcp-config)#dns-server 192.168.1.100
R2(config)#ip dhcp excluded-address 192.168.1.1 192.168.1.100
R3(config)#int fa 0/0
R3(config-if)#ip address dhcp
(3)配置防dhcp欺骗
在s1上:
S1(config)#ip dhcp snooping(打开s1的dhcp监听功能)
S1(config)#ip dhcp snooping vlan 1 (配置s1监听vlan1 上的dhcp数据包)
S1(config)#no ip dhcp snooping information option(配置交换机s1不在dhcp报文中插入option82,option82是dhcp中继代理)
S1(config)ip dhcp snooping database flash:dhcp_snooping.db(将dhcp监听绑定表保存在flash中,文件名为dhcp_snooping.db,目的是防止断电后记录丢失)
S1(config)#ip dhcp snooping database write-delay 15(指dhcp监听绑定表发生更新后,等待15秒再写入文件,默认值是300秒,可选范围为15-86400秒)
S1(config)#ip dhcp snooping database timeout 15(指dhcp监听绑定表尝试写入操作失败后,重新尝试写入操作,直到15秒后停止尝试,默认值是300秒,可选范围为15-86400秒)
S1(config)#int fa0/1
S1(config-if)#ip dhcp snooping trust(将该接口设为信任接口,默认所有接口为非信任接口)
在s2上:
S2(config)#ip dhcp snooping
S2(config)#ip dhcp snooping vlan 1
S2(config)#no ip dhcp snooping information option
S2(config)#ip dhcp snooping verify mac-address
S2(config)#ip dhcp snooping database flash:dhcp_snooping.db
S2(config)#ip dhcp snooping database write-delay 15
S2(config)#ip dhcp snooping database timeout 15
S2(config)#int range fa0/1-2
S2(config-if)#ip dhcp snooping limit rate 10 (限制接口每秒钟能接受的dhcp数据包数量为10个)
S2(config)#int fa0/3
S2(config-if)#ip dhcp snooping trust(将该接口设为信任接口)
(4)option82问题
当dhcp服务器和dhcp客户端不在同一个子网时,客户端要想从dhcp服务器上获取IP地址,就要用dhcp中继代理来转发dhcp请求包,dhcp中继代理将客户端的dhcp报文转发到dhcp服务器之前,可以插入一些选项信息,以便dhcp服务器能更精确的得知客户端信息,在本实验中,由于dhcp服务器和客户端都在痛一子网中,交换机把option82的值置为0,这将导致基于IOS的R1路由器无法正常分配IP地址,因此在上面的步骤中,交换机都配置了“no ip dhcp snooping information option”.但是如果把R1换成window2003服务器,则无需此命令,因为window2003上dhcp服务器不认为option82的值为0的dhcp报文是错误的。解决办法如下:
方法一:
S2(config)#ip dhcp snooping information option
S1(config)#ip dhcp snooping information option(保留交换机的option82功能)
S1(config)#int fa0/3
S1(config-if)#ip dhcp snooping trust(由于交换机S2会在dhcp报文中添加option选项,当S2把dhcp发往S1时,如果S1的fa0/3为不信任接口,交换机S1将拒绝接收,因此需要把此接口配置为信任接口)
S1(config)#ip dhcp relay information trust-all(配置基于IOS的dhcp服务器能够接受option82为0的dhcp报文)
方法二:
S1(config)#ip dhcp snooping information option allow-untrusted(配置交换机S1,如果从非信任接口接收到的dhcp报文中带有option82选项,也接收该dhcp报文)
(5)测试
R3(config)#int fa0/0
R3(config-if)#no ip address
R3(config-if)#ip address dhcp
S1#show ip dhcp snooping binding
S1#show ip dhcp snooping database
实验四:DAI与IPSG(由于DAI和IP与IP DHCP snooping的紧密关系,本实验是在实验三的基础上配置DAI和IPSG)
(1)拓扑图:
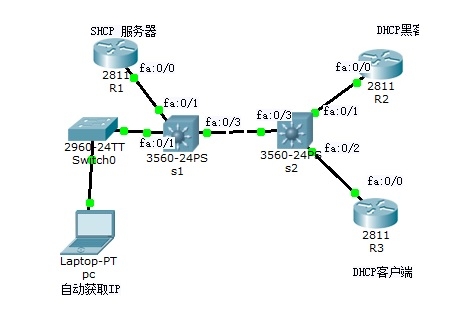
(2)配置DAI
在S1上:
S1(config)#ip arp inspection vlan 1(在vlan1上启用DAI)
S1(config)#ip arp inspection validate src-mac dst-mac ip(配置DAI要检查ARP报文(包括请求和响应)中源MAC地址、目的MAC地址、源IP地址和DHCP snooping绑定中的信息是否一致)
S1(config)#int fa0/1
S1(config-if)#ip arp inspection trust
S1(config)#int fa0/3
S1(config-if)#ip arp inspection limit none(S1的fa0/3是下联到s2的接口,这个口可能会收到大量的ARP包,因此要取消ARP包的限制,默认值是15包/秒)
在S2上:
S2(config)#ip arp inspection vlan 1
S2(config)#ip arp inspection validate src-mac dst-mac ip
S2(config)#int fa0/3
S2(config-if)#ip arp inspection trust(配置信任接口,将不对这些接口收到的ARP包进行检查)
可以把黑客接触不到的接口配置为可信任接口如S1和S2的fa0/3接口,这样可以减少复杂性,否则需要考虑哪些接口需要放行ARP包
(3)计算机使用静态IP地址时配置DAI
假设R3的fa0/1使用固定IP:192.168.1.10.有两种方法配置DAI
方法一:在dhcp服务器上为R3分配固定IP
R1(config)#ip dhcp pool xu
R1(dhcp-config)#host 192.168.1.10 255.255.255.0
R1(dhcp-config)#client-identifier 00e0.8f19.bb01 (将IP:192.168.1.10分配给mac地址为00e0.8f19.bb01的主机)
R3(config-if)#interface fastEthernet 0/1
R3(config-if)#ip dhcp client client-id fa0/1(配置R3的fa0/1接口的mac作为client-id。可以先让客户端先通过dhcp获得一个IP,然后在R1上使用show ip dhcp binding命令查看客户端的client-id)
R3(config-if)#ip address dhcp(此接口依然配置dhcp获取)
因为此种方法还是通过dhcp获得的,因此DAI还是正常工作的
方法二:直接在R3上使用静态IP地址
R3(config)#interface fastEthernet 0/1
R3(config-if)#no ip address(先释放获得的IP地址)
R3(config-if)#ip address 192.168.1.10 255.255.255.0
S2#ip dhcp snooping binding 00e0.8f19.bb01 vlan 1 192.168.1.10 interface fa0/2 expiry 4294967295(4294967295表示永不过期)
S1#ip dhcp snooping binding 00e0.8f19.bb01 vlan 1 192.168.1.10 interface fa0/3 expiry 4294967295
(4)查看
s1#show ip dhcp snooping binding
s1#show ip arp inspection
s1#show ip arp inspection interfaces
(5)配置IPSG
在s1上:
S1(config)#int fa0/2
S1(config-if)#ip verify source port-secrity(在fa0/2口上启用IPSG功能,不加port-secrity参数,表示ip源防护功能只执行“源ip地址过滤”模式,加port-secrity参数,表示ip源防护功能执行“源ip地址和源MAC过滤”模式)
S1(config-if)#switchport mode access
S1(config-if)#switchport port-security
S1(config-if)#switchport port-security mac-address sticky
S1(config-if)#switchport port-security violation shutdown
当以源ip地址和源MAC过滤时,为了能确保DHCP协议能正常的工作,还必须启用dhcp监听选项82,对于没有选项82的数据,交换机不能确定用于转发dhcp服务器响应的客户端主机口,dhcp服务器响应将被丢弃,客户机也不能获得ip地址
在s2上:
S2(config)#int range fa0/1-2
S2(config-if)#switchport mode access
S2(config-if)#switchport port-security
S2(config-if)#switchport port-security max-mac-address 1
S2(config-if)#switchport port-security violation shutdown
S2(config-if)#switchport port-security mac-address sticky
S2(config-if)#ip verify source port-secrity
用户计算机使用静态ip地址时IPSG的配置
方法一:在dhcp服务器上为R3分配固定IP(和上面DAI方法相同)
方法二:直接在R3上使用静态IP地址
R3(config)#interface fastEthernet 0/1
R3(config-if)#no ip address(先释放获得的IP地址)
R3(config-if)#ip address 192.168.1.10 255.255.255.0
S2#ip source binding 00e0.8f19.bb01 vlan 1 192.168.1.10 interface fa0/2 expiry 4294967295(4294967295表示永不过期)
查看
s1#show ip verify source
S2#show ip source binding
实验五:AAA(认证、授权、审计)
(1)拓扑图
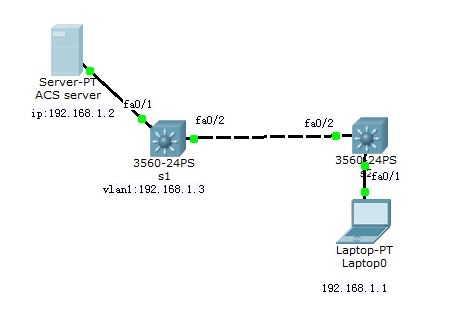
(2)安装cisco acs 4.0并配置如下图
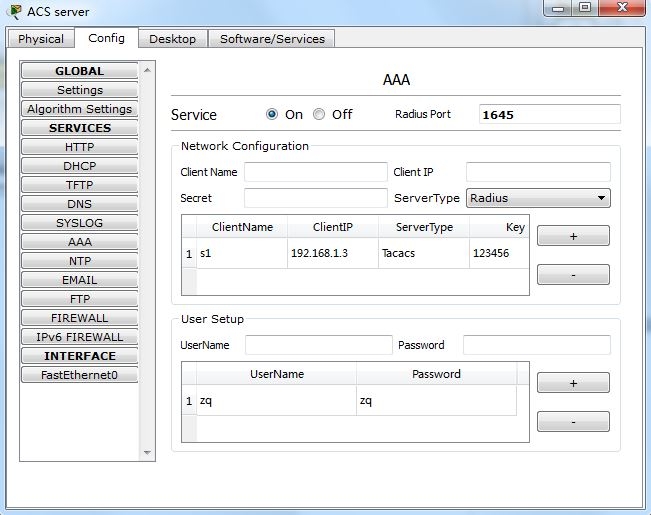
(3)在交换机s1上的配置
s1(config)#int vlan 1
s1(config-if)#ip add 192.168.1.3 255.255.255.0
s1(config-if)#no shu
s1(config)#aaa new-model (启用AAA认证功能)
s1(config)#tacacs-server host 192.168.1.2(指明AAA服务器的IP地址)
s1(config)#tacacs-server key 123456(指明在和AAA服务器进行验证时的密码要和cisco acs 4.0上配置的密码相同)
s1(config)#aaa authentication login test_login group tacacs+ (创建一个认证列表,该列表使用tacacs+进行认证)
s1(config)#line vty 0 15
s1(config-line)#login authentication test_login(配置使用之前创建的认证列表对telnet或者ssh用户进行认证)
s1(config)#aaa authentication enable default enable
s1(config)#enable secret xu(用户telnet到交换机后,还需要执行enable命令才能配置交换机,需要enable密码。)
(4)配置授权
在cisco acs 4.0配置基于用户组的相应权限
在交换机上配置如下
s1(config)#aaa authentication exec TEST group tacacs+(配置exec模式的授权列表)
s1(config)#aaa authentication config-commands(要求配置模式下的命令也需要授权)
s1(config)#aaa authentication configuration TEST group tacacs+(配置config模式的授权列表)
s1(config)#aaa authentication commands 15 TEST group tacacs+(配置命令等级为15的命令授权列表)
s1(config)#line vty 0 15
s1(config-line)#authentication exec TEST
s1(config-line)#authentication commands 15 TEST(要求等级为15的命令要授权)
(5)配置审计
s1(config)#aaa accounting exec ACC start-stop group tacacs+
s1(config)#aaa accounting commands 0 ACC start-stop group tacacs+
s1(config)#aaa accounting commands 1 ACC start-stop group tacacs+
s1(config)#aaa accounting commands 15 ACC start-stop group tacacs+(配置用户进入exec模式,命令等级为0、1、15的审计列表)
s1(config)#line vty 0 15
s1(config-line)#accounting exec ACC
s1(config-line)#accounting commands 0 ACC
s1(config-line)#accounting commands 1 ACC
s1(config-line)#accounting commands 15 ACC(配置telnet用户进入exec模式,执行等级为0、1、15命令都要审计)
测试后可以在cisco acs 4.0上查看用户登录和注销的时间以及用户所执行的命令等
实验六:dot1x(防止接入者把计算机的MAC地址改为合法的MAC地址接入交换机,dot1x利用AAA服务,只有合法的用户才能接入到交换机)
(1)拓扑图
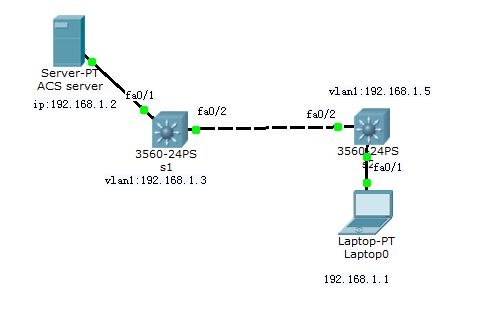
(2)安装cisco acs 4.0并配置如下图(只有RADIUS才支持dot1x)
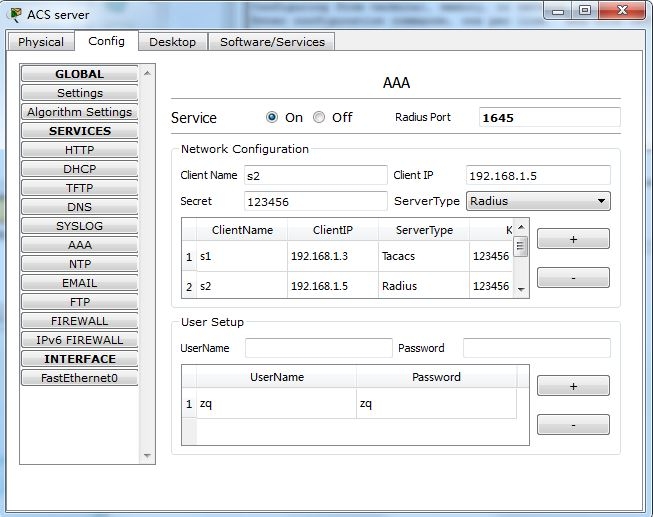
(3)在交换机s2上的配置
s2(config)#int vlan 1
s2(config-if)#ip add 192.168.1.5 255.255.255.0
s2(config-if)#no shu
s2(config)#radius-server host 192.168.1.2(指明AAA服务器的IP地址)
s2(config)#radius-server key 123456(指明在和AAA服务器进行验证时的密码要和cisco acs 4.0上配置的密码相同)
s2(config)#aaa authentication dot1x default group radius(配置dot1x使用RADIUS服务器)
s2(config)#aaa authentication network default group radius(定义dot1x授权策略)
s2(config)#dot1x system-auth-control(全局开启dot1x控制)
s2(config)#radius-server vsa send authentication(配置交换机发送厂商特别属性到AAA服务器,目的是要获得用户的vlan信息)
s2#test aaa group radius zq zq legacy(测试AAA服务是否正常)
s2(config)#interface fa0/1
s2(config-if)#switchport mode access
s2(config-if)#dot1x port-control {auto|force-authorized|force-unauthorized}(auto:认证通过后接口状态就变为force-authorized,不通过就为force-unauthorized。force-authorized:强制接口状态为认证通过,这样用户就不需要认证了。force-unauthorized强制接口状态为不通过,这样用户就不能使用接口了)
s2(config-if)#dot1x reauthentication(认证失败,重新认证)
(4)测试
s2#show dot1x all
实验七:SPAN(交换机端口分析)
(1)拓扑图
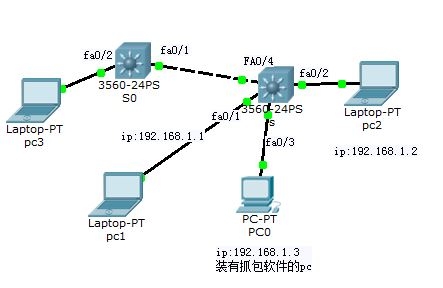
(2)span配置
s(config)#monitor session 1 source interface fa 0/2 both(配置span的源为fa0/2接口的收和发的流量)
s(config)#monitor session 1 destination int fa 0/3(配置span的目标接口为fa0/3。默认时,一旦fa0/3成为目标接口,次接口上所接的pc将不能发送流量)
在pc0上开启抓包软件WireShark,然后从pc1上ping pc2,应该能抓到它们之间的流量。
s(config)#monitor session 1 destination int fa 0/3 encapsulation replicate(配置复制到目的接口的帧将保持源接口的封装)
(3)配置RSPAN
s0(config)#vlan 100
s0(config-vlan)#remote-span
s(config)#vlan 100
s(config-vlan)#remote-span(创建vlan100,作为RSPAN VLAN)
s0(config)#monitor session 1 source vlan 2 rx (配置span的源为vlan1的接受流量)
s0(config)#monitor session 1 destination remote vlan 100(配置span的目的为vlan100)
s(config)#no monitor session 1(删除monitor session 1,因为他使用fa0/3)
s(config)#monitor session 2 source remote vlan 100(配置monitor session 2的源为remote vlan 100)
s(config)#monitor session 2 destination interface fa0/3 ingress vlan 2(配置monitor session 2的目的为fa0/3,ingress是允许fa0/3接口接收pc0发送的帧,并且数据帧以native封装(即没有标签),数据发往vlan2)
(3)测试
在pc上开启抓包软件wireshark,然后pc3pingpc1,应该能抓到它们之间的流量。
s#show monitor session 2
实验八:RACL、VACL和MAC ACL
(1)拓扑图:
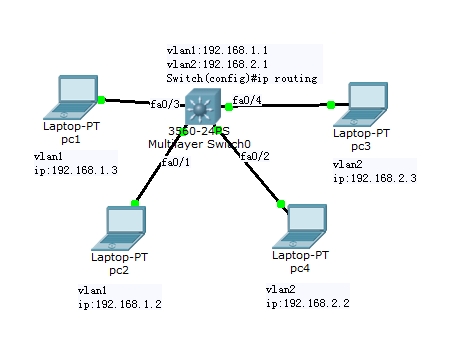
(2)按图配置IP等使其能够想通
(3)配置MAC ACL
Switch(config)#mac addres-list extended MACL
Switch(config-ext-macl)#deny 0025.2212.0000 0000.0000.ffff any (命令格式:{deny|permit}SourceMAC MASK DestMAC MASK Ether TYPE.以上拒绝源MAC地址为 0025.2212.****的帧。pc1的MAC为0025.2212.0561)
Switch(config-ext-macl)#permit any any
Switch(config)#int fa0/3
Switch(config-if)#mac access-group MACL in(pc1ping其它pc很可能是正常的,执行clear arp-cache就行了)
(3)配置RACL
Switch(config)#access-list 100 deny ip host 192.168.2.3 host 192.168.1.2
Switch(config)#access-list 100 permin ip any any
Switch(config)#int fa0/4
Switch(config-if)#switchport(指明此端口为二层端口)
Switch(config-if)#ip access-group 100 in
(4)配置VACL
Switch(config)#int fa0/4
Switch(config-if)#no ip access-group 100 in(清除fa0/3上的acl)
Switch(config)#access-list 101 deny ip host 192.168.2.2 host 192.168.1.2
Switch(config)#vlan access-map VACL 5
Switch(config-access-map)#match ip address 101
Switch(config-access-map)#action drop(从pc4到pc2上的数据将被丢弃)
Switch(config-access-map)#vlan access-map VACL 10
Switch(config-access-map)#action forward(其他的数据被转发)
Switch(config)#vlan filter VACL vlan-list 1
本文出自 “银河系|计算机网络” 博客,谢绝转载!