图片旋转、无限滚动、文字跳动
这一节,继续为大家介绍,使用 HTML5 + CSS3 实现的一些动画特效。由于它们实现起来比较容易,所以我将它们放在一节中讲解。
一、图片旋转
效果图如下:
这个效果实现起来其实并不困难。代码清单如下:
<!DOCTYPE html>
<html lang="en">
<head>
	<meta charset="UTF-8">
	<title>Document</title>
	<style type="text/css">
		#liu{
			width:280px;
			height: 279px;
			background: url(shishi.png) no-repeat;
			border-radius:140px;
			-webkit-animation:run 6s linear 0s infinite;
		}

		#liu:hover{
			-webkit-animation-play-state:paused;
		}


		@-webkit-keyframes run{
			from{
				-webkit-transform:rotate(0deg);
			}
			to{
				-webkit-transform:rotate(360deg);
			}
		}

	</style>
</head>
<body>
	<div id="liu"></div>
</body>
</html>
1. id为liu的div就是用来展示图片的区域,只不过这里的图片是使用的背景图片,并且通过设置圆角来达到圆形的效果。
2. 代码中关键的部分是怎样使得图片无限转动。 我们可以使用 -webkit-animation 和 @-webkit-keyframes 组合使用来完成。
-webkit-animation 是一个复合属性,定义如下:
-webkit-animation: name duration timing-function delay iteration_count direction;
name: 是 @-webkit-keyframes 中需要指定的方法,用来执行动画。
duration: 动画一个周期执行的时长。
timing-function: 动画执行的效果,可以是线性的,也可以是"快速进入慢速出来"等。
delay: 动画延时执行的时长。
iteration_count: 动画循环执行次数,如果是infinite,则无限执行。
direction: 动画执行方向。
3. @-webkit-keyframes 中的from和to 两个属性,就是指定动画执行的初始值和结束值。
4. -webkit-animation-play-state:paused; 暂停动画的执行。
二、无限滚动
其实关于无限滚动的实现,我在JS & JQuery 的 无缝连续滚动 这一章节中用JQuery实现了一篇,如果感兴趣的话,可以点击查看。我们先看看效果图:
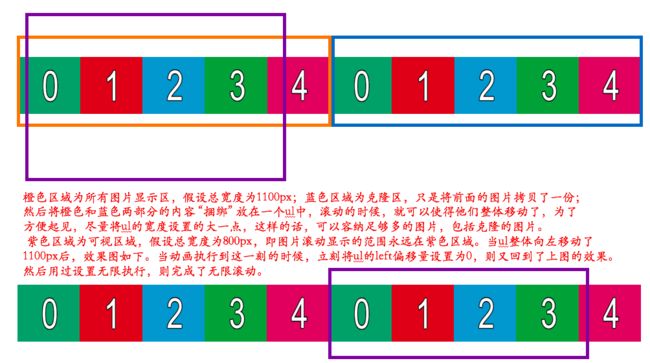
我们这里采用HTML5+CSS3实现,比用JQuery简单的多了,下图为逻辑分析图:
分析完毕后,代码就方便书写了,代码清单如下:
<!DOCTYPE html PUBLIC "-//W3C//DTD XHTML 1.0 Transitional//EN" "http://www.w3.org/TR/xhtml1/DTD/xhtml1-transitional.dtd">
<html xmlns="http://www.w3.org/1999/xhtml" xml:lang="en">
<head>
	<meta http-equiv="Content-Type" content="text/html;charset=UTF-8">
	<title>Document</title>
	<style type="text/css">
		*{
			margin: 0;
			padding: 0;
		}

		#container{
			width:800px;
			height:200px;
			margin:100px auto;
			overflow: hidden;
			position: relative;
		}

		#container ul{
			list-style: none;
			width:4000px;
			left:0;
			top:0;
			position: absolute;
			-webkit-animation:scoll 6s linear 0s infinite;
		}

		#container ul li{
			float:left;
			margin-right:20px;
		}

		@-webkit-keyframes scoll{
			from{
				left:0;
			}
			to{
				left:-1100px;
			}
		}

	</style>
</head>
<body>
	<div id="container">
		<ul>
			<li><a href="#"><img src="images/0.png" /></a></li>
			<li><a href="#"><img src="images/1.png" /></a></li>
			<li><a href="#"><img src="images/2.png" /></a></li>
			<li><a href="#"><img src="images/3.png" /></a></li>
			<li><a href="#"><img src="images/4.png" /></a></li>
			<li><a href="#"><img src="images/0.png" /></a></li>
			<li><a href="#"><img src="images/1.png" /></a></li>
			<li><a href="#"><img src="images/2.png" /></a></li>
			<li><a href="#"><img src="images/3.png" /></a></li>
			<li><a href="#"><img src="images/4.png" /></a></li>
		</ul>
	</div>
</body>
</html>
三、文字跳动
我们经常可以看到用flash完成的一些文字跳动效果,不过,现在我们也可以通过HTML5+CSS3来轻松的实现这样的效果,效果图如下:
思路分析:
1. 由于文字有层次感的跳动,所以我们应该 "各个击破", 每个文字有它自己的 "空间"。
2. 各个文字有先有后的跳动,所以我们应该一次递增每个文字的动画时长。
根据以上两点分析,我们依旧可以使用-webkit-animation 和 @-webkit-keyframes 组合来完成动画效果,代码清单如下:
需要说明一点的是:
span标签默认是行内元素;但是对他们进行float操作之后,他们会变成块级元素。
<!DOCTYPE html>
<html lang="en">
<head>
	<meta charset="UTF-8">
	<title>Document</title>
	<style type="text/css">

		h2 span{
			float:left;
			position: relative;
		}

		h2 span:nth-child(1){
			-webkit-animation:jump 1s linear 0s infinite alternate;
		}

		h2 span:nth-child(2){
			-webkit-animation:jump 1s linear 0.2s infinite alternate;
		}

		h2 span:nth-child(3){
			-webkit-animation:jump 1s linear 0.4s infinite alternate;
		}

		h2 span:nth-child(4){
			-webkit-animation:jump 1s linear 0.6s infinite alternate;
		}

		h2 span:nth-child(5){
			-webkit-animation:jump 1s linear 0.8s infinite alternate;
		}


		@-webkit-keyframes jump
		{
			0%{
				top:0px;
				color:red;
			}
			50%{
				top:-10px;
				color:green;
			}
			100%{
				top:10px;
				color:blue;
			}
		}

	</style>
</head>
<body>
	<h2>
		<span>我</span>
		<span>爱</span>
		<span>你</span>
		<span>中</span>
		<span>国</span>
	</h2>
</body>
</html>


