QProgressBar和QScrollBar的stylesheet
Qt 4.3 Style Sheets, as you most likely know, introduces styling of most widgets. The documentation is a quite silent when it comes to providing “style templates” – templates that you can just copy/paste and get started with styling the widget. Today, I started creating templates for QProgressBar and QScrollBar. All this will become a part of 4.3.1 Style Sheet documentation.
QProgressBar
 QProgressBar:horizontal {
 border: 1px solid gray;
 border-radius: 3px;
 background: white;
 padding: 1px;
 }
 QProgressBar::chunk:horizontal {
 background: qlineargradient(x1: 0, y1: 0.5, x2: 1, y2: 0.5, stop: 0 green, stop: 1 white);
 }
Here’s what you get:
You say “Oh sweet, but I want WindowsXP like progress bars. And the label needs to be outside since its easier to read”. Yeah, sure.
 QProgressBar:horizontal {
 border: 1px solid gray;
 border-radius: 3px;
 background: white;
 padding: 1px;
 text-align: right;
 margin-right: 4ex;
 }
 QProgressBar::chunk:horizontal {
 background: qlineargradient(x1: 0, y1: 0.5, x2: 1, y2: 0.5, stop: 0 green, stop: 1 white);
 margin-right: 2px; /* space */
 width: 10px;
 }
Note that you need set the height for vertical progress bars. You can use “:indeterminate” for indeterminate progress bars. And there’s a small bug which breaks text alignment (fixed in 4.3.1).
QScrollBar
 QScrollBar:horizontal {
 border: 2px solid green;
 background: cyan;
 height: 15px;
 margin: 0px 20px 0 20px;
 }
 QScrollBar::handle:horizontal {
 background: gray;
 min-width: 20px;
 }
 QScrollBar::add-line:horizontal {
 background: blue;
 width: 20px;
 subcontrol-position: right;
 subcontrol-origin: margin;
 }
 QScrollBar::sub-line:horizontal {
 background: white;
 width: 20px;
 subcontrol-position: left;
 subcontrol-origin: margin;
 }
 QScrollBar:left-arrow:horizontal, QScrollBar::right-arrow:horizontal {
 width: 3px;
 height: 3px;
 background: pink;
 }
 QScrollBar::add-page:horizontal, QScrollBar::sub-page:horizontal {
 background: none;
 }
Here’s the awful but didactic screenshot:
Style sheets are so powerful that you can actually place those add-line, remove-line button anywhere!
 QScrollBar:horizontal {
 border: 2px solid green;
 background: cyan;
 height: 15px;
 margin: 0px 40px 0 0px;
 }
 QScrollBar::handle:horizontal {
 background: gray;
 min-width: 20px;
 }
 QScrollBar::add-line:horizontal {
 background: blue;
 width: 16px;
 subcontrol-position: right;
 subcontrol-origin: margin;
 border: 2px solid black;
 }
 QScrollBar::sub-line:horizontal {
 background: magenta;
 width: 16px;
 subcontrol-position: top right;
 subcontrol-origin: margin;
 border: 2px solid black;
 position: absolute;
 right: 20px;
 }
 QScrollBar:left-arrow:horizontal, QScrollBar::right-arrow:horizontal {
 width: 3px;
 height: 3px;
 background: pink;
 }
 QScrollBar::add-page:horizontal, QScrollBar::sub-page:horizontal {
 background: none;
 }
For vertical scroll bars, you will need to replace width with height and use up-arrow and down-arrow. That said, remove those boring borders, slap in a few border-images, gradients and background color and it’s simple to create beautiful custom scroll bars.
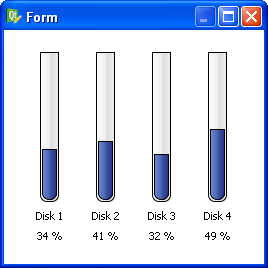
Qt’s powerful stylesheet system can make your boring progress bars look really cool.
Screenshot:
Here’s the code:
QProgressBar {
 border: 1px solid black;
 text-align: top;
 padding: 1px;
 border-bottom-right-radius: 7px;
 border-bottom-left-radius: 7px;
 background: QLinearGradient( x1: 0, y1: 0, x2: 1, y2: 0,
 stop: 0 #fff,
 stop: 0.4999 #eee,
 stop: 0.5 #ddd,
 stop: 1 #eee );
 width: 15px;
 }
QProgressBar::chunk {
 background: QLinearGradient( x1: 0, y1: 0, x2: 1, y2: 0,
 stop: 0 #78d,
 stop: 0.4999 #46a,
 stop: 0.5 #45a,
 stop: 1 #238 );
 border-bottom-right-radius: 7px;
 border-bottom-left-radius: 7px;
 border: 1px solid black;
 }
And here’s the .ui file you can open in Designer (right-click that link and choose “Save as…”).
Happy hacking!
