【Unity灯光与渲染技术】在Unity3D中创建一个自定义的天空盒子setting up a custom skybox
本系列主要参考Unity灯光与渲染技术教程Unity Lighting And Rendering,同时会加上一点个人实践过程和理解。
曾经看到过跟这边文章比较相关的两篇文章“在Unity3D中创建Cubemaps”和“Unity3D中简单的Cubemap反射”,其中第一篇文章主要讲的是通过编写一个脚本来实现unity中创建任意的Cubemap,这种方式可以不用借助HDR贴图来创建Cubemaps,同时可以自己得到任何想要实现的Cubemaps效果。而第二篇文章介绍如何在物体上应用Cubemaps的反射效果。
这篇文章主要讲解如何使用Cubemaps实现一个自定义的天空盒子,结合这篇文章和前两篇文章,可以容易地替换Unity中的天空背景,以及环境对物体的作用。
步骤如下:
1.导入HDR贴图,将Texture Type设置为Cubemap,点击Apply
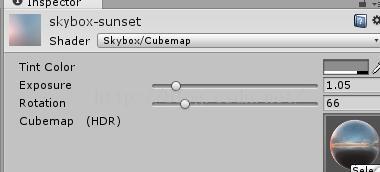
2.创建材质Material将shader类型设置为skybox-cubemap,这里的shader还可通过“Unity3D中简单的Cubemap反射”这篇文章中shader进行自行编写。实现自定义效果。
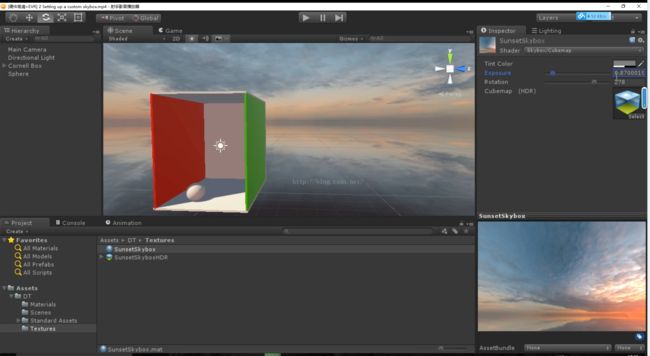
3.打开光照面板替换skybox材质,路径为:window-lighting-environment-skybox
4.下图便可以得到替换过后的天空盒子效果。
实践总结:
在实践过程中遇到了一些小BUG,首先如果安装的是个人免费版本的话,unity预设的skybox-cubed shader是不允许自己调节的,不过你也可以自己编写,以下是专业版的skybox-Cubed shader的内容。
<span style="font-family:Microsoft YaHei;font-size:14px;">Shader "Skybox/Cubemap" {
Properties {
	_Tint ("Tint Color", Color) = (.5, .5, .5, .5)
	[Gamma] _Exposure ("Exposure", Range(0, 8)) = 1.0
	_Rotation ("Rotation", Range(0, 360)) = 0
	[NoScaleOffset] _Tex ("Cubemap   (HDR)", Cube) = "grey" {}
}

SubShader {
	Tags { "Queue"="Background" "RenderType"="Background" "PreviewType"="Skybox" }
	Cull Off ZWrite Off

	Pass {

		CGPROGRAM
		#pragma vertex vert
		#pragma fragment frag

		#include "UnityCG.cginc"

		samplerCUBE _Tex;
		half4 _Tex_HDR;
		half4 _Tint;
		half _Exposure;
		float _Rotation;

		float4 RotateAroundYInDegrees (float4 vertex, float degrees)
		{
			float alpha = degrees * UNITY_PI / 180.0;
			float sina, cosa;
			sincos(alpha, sina, cosa);
			float2x2 m = float2x2(cosa, -sina, sina, cosa);
			return float4(mul(m, vertex.xz), vertex.yw).xzyw;
		}

		struct appdata_t {
			float4 vertex : POSITION;
		};

		struct v2f {
			float4 vertex : SV_POSITION;
			float3 texcoord : TEXCOORD0;
		};

		v2f vert (appdata_t v)
		{
			v2f o;
			o.vertex = mul(UNITY_MATRIX_MVP, RotateAroundYInDegrees(v.vertex, _Rotation));
			o.texcoord = v.vertex.xyz;
			return o;
		}

		fixed4 frag (v2f i) : SV_Target
		{
			half4 tex = texCUBE (_Tex, i.texcoord);
			half3 c = DecodeHDR (tex, _Tex_HDR);
			c = c * _Tint.rgb * unity_ColorSpaceDouble.rgb;
			c *= _Exposure;
			return half4(c, 1);
		}
		ENDCG
	}
}


Fallback Off

}
</span>
代码理解:
初学对很多地方理解不深入,还请多多指教。
1.在Properties块中创建的properties有四项,对应着材质控制的四个通道效果。其中_Tint指Tint Color,_Exposure控制曝光度,_Rotation旋转方向,_Tex添加Cubemap。
<span style="font-family:Microsoft YaHei;font-size:14px;">Properties {
	_Tint ("Tint Color", Color) = (.5, .5, .5, .5)
	[Gamma] _Exposure ("Exposure", Range(0, 8)) = 1.0
	_Rotation ("Rotation", Range(0, 360)) = 0
	[NoScaleOffset] _Tex ("Cubemap   (HDR)", Cube) = "grey" {}
}</span>

2.
在SubShader块中创建和properties中各变量的联系。这将允许从Properties块中访问这些数据。其中定义RotateAroundYInDegrees这个函数目的是返回vertex和degree的值,来进行运算操作。sincos(alpha, sina, cosa);函数我查了一下可以同时计算出sina和cosa的值,同时运算效率很高。
<span style="font-family:Microsoft YaHei;font-size:14px;">CGPROGRAM
		#pragma vertex vert
		#pragma fragment frag

		#include "UnityCG.cginc"

		samplerCUBE _Tex;
		half4 _Tex_HDR;
		half4 _Tint;
		half _Exposure;
		float _Rotation;

		float4 RotateAroundYInDegrees (float4 vertex, float degrees)
		{
			float alpha = degrees * UNITY_PI / 180.0;
			float sina, cosa;
			sincos(alpha, sina, cosa);
			float2x2 m = float2x2(cosa, -sina, sina, cosa);
			return float4(mul(m, vertex.xz), vertex.yw).xzyw;
		}</span>
3.这段结构体定义了点的位置,为了进行运算操作。
<span style="font-family:Microsoft YaHei;font-size:14px;">	struct appdata_t {
			float4 vertex : POSITION;
		};

		struct v2f {
			float4 vertex : SV_POSITION;
			float3 texcoord : TEXCOORD0;
		};

		v2f vert (appdata_t v)
		{
			v2f o;
			o.vertex = mul(UNITY_MATRIX_MVP, RotateAroundYInDegrees(v.vertex, _Rotation));
			o.texcoord = v.vertex.xyz;
			return o;
		}</span>
似乎是做旋转的运算占了大部分篇幅,等有更多的理解再来补充。


